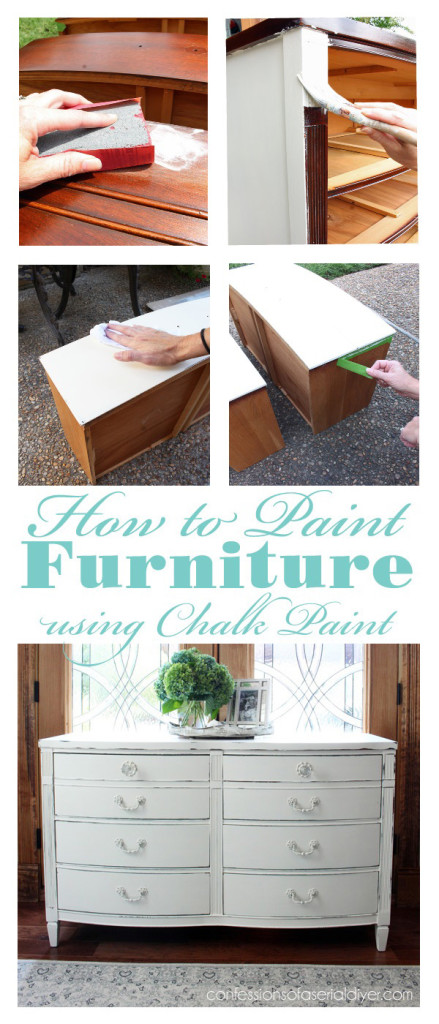
Hello lovely Friends! I get a LOT of questions about painting furniture. I am always more than happy to answer any questions that come my way, but I thought it was time I put together one helpful post sharing the start-to-finish process of what I do when painting a piece of furniture. That way I can refer any questions to the post, and it can easily be pinned for future reference.
I had plans to share that today, but as I was editing photos (I took a ton of pics!), I realized I had way too many photos to share the process and the pretty after photos for one post. So today I am sharing the before and afters, and in my next post, I’ll share the complete step-by-step.
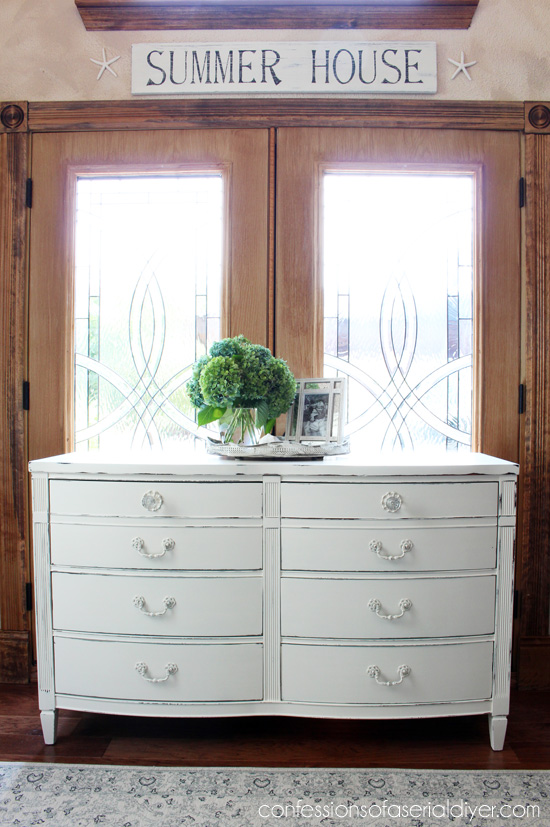
For my model for the big tutorial, I chose this gorgeous dresser I found at a yard sale a couple of weekends ago for get this…$40!!!
Here she is as I found her:
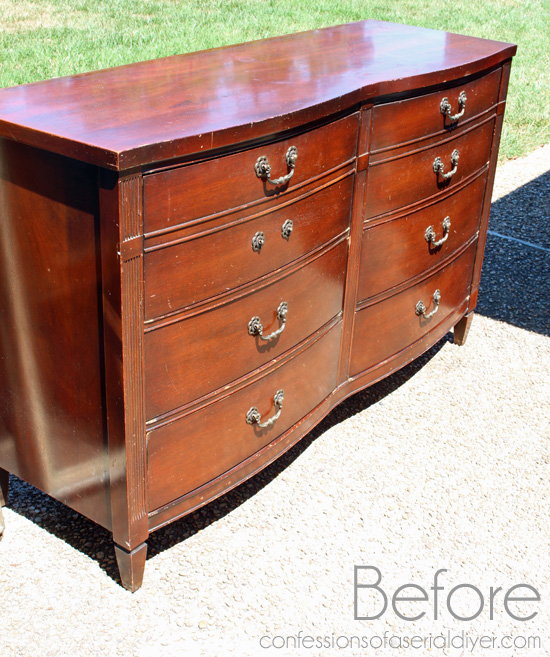
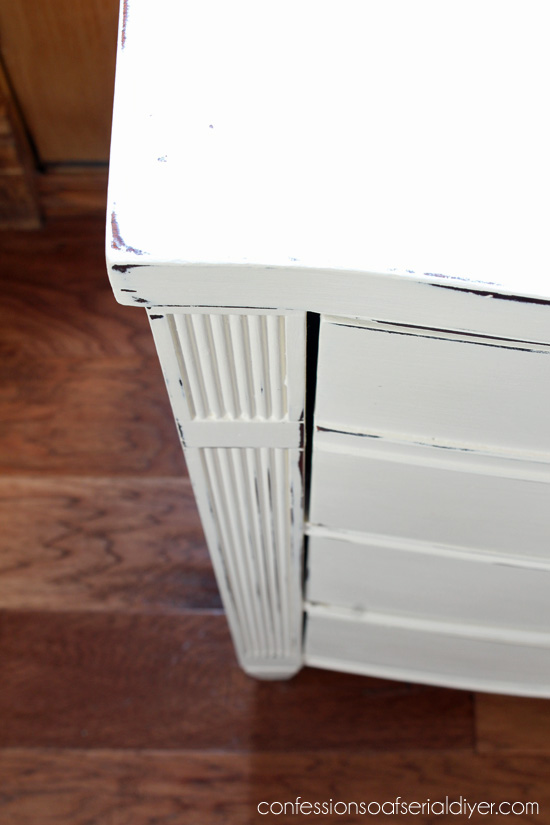
She had a few scratches and dings here and there and was missing a handle, but overall she was in great shape.
*Disclaimer* This post may not be appropriate for anyone opposed to painting perfectly good wood, so turn back now or look away…far far away.
Ok the rest of you…here ya go!

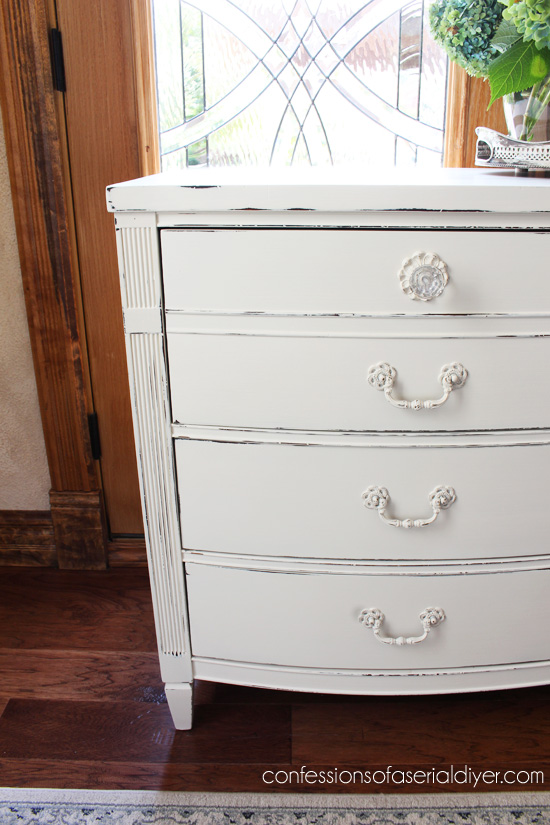
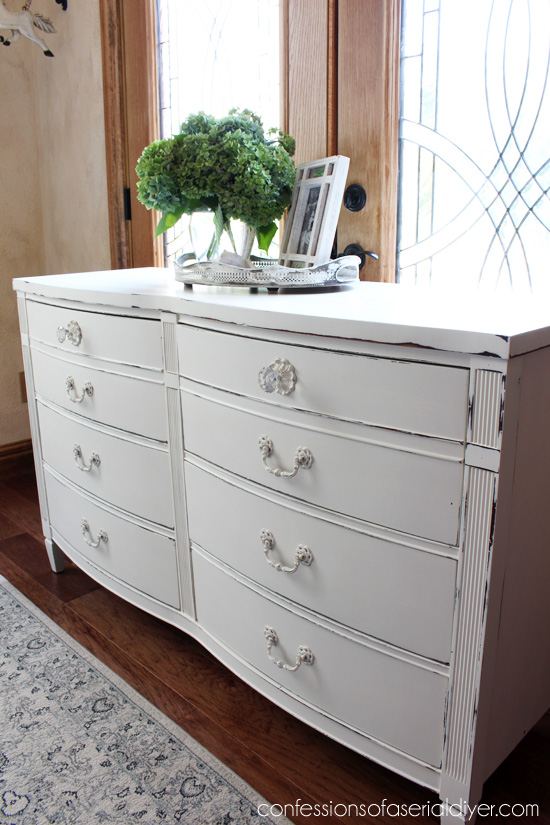
Ain’t she perty? This style was perfect for a simple shabby chic makeover. I also kept it simple for my tutorial.
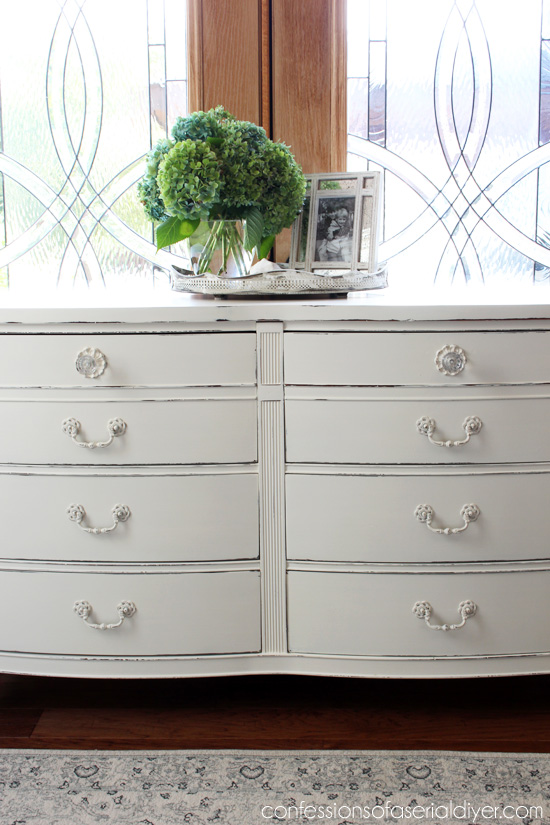
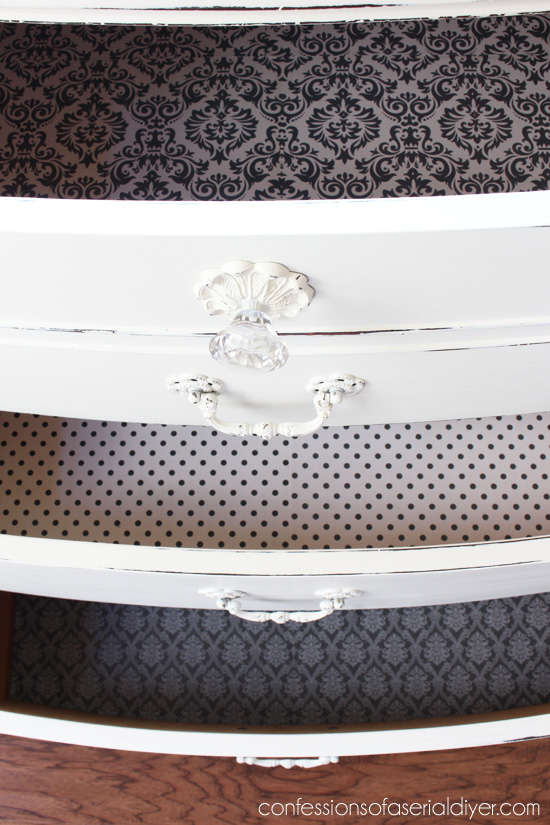
Since there was a handle missing, I decided to fill in the holes at the very top and add these pretty glass knobs I found at TJ Maxx:
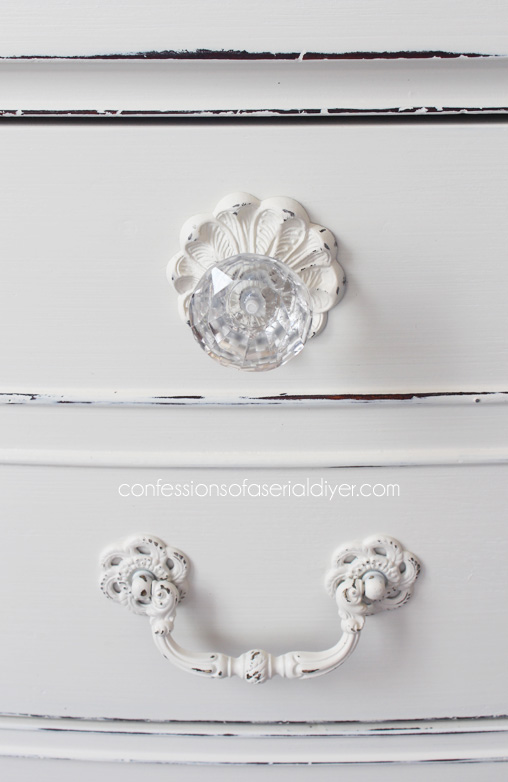
The rest are the pretty originals. They all got a couple of coats of Rustoleum’s heirloom white spray paint and a little sanding.
If I were as artsy as my friend Nancy at Artsy Chick’s Rule, I could have made my own replacement. (See how she worked her magic to make a matching handle from clay here.)
I love how the glass knobs add a bit of sparkle and femininity though.
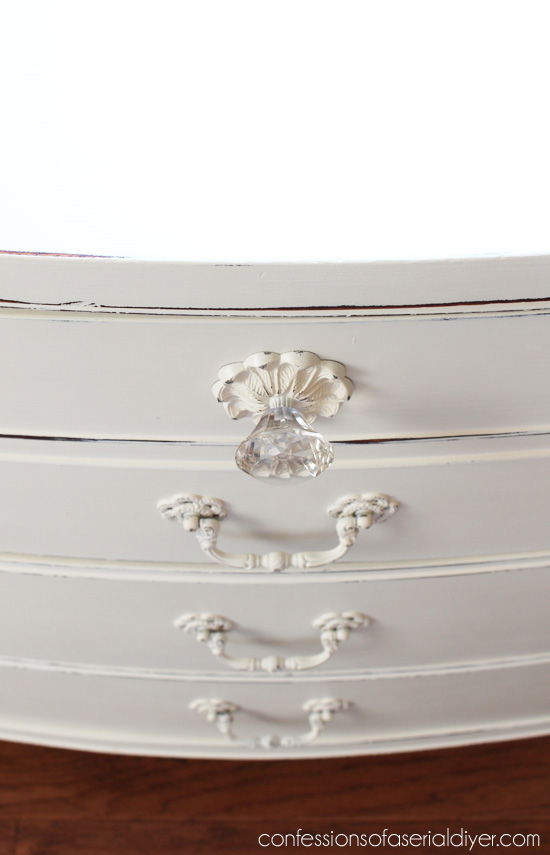
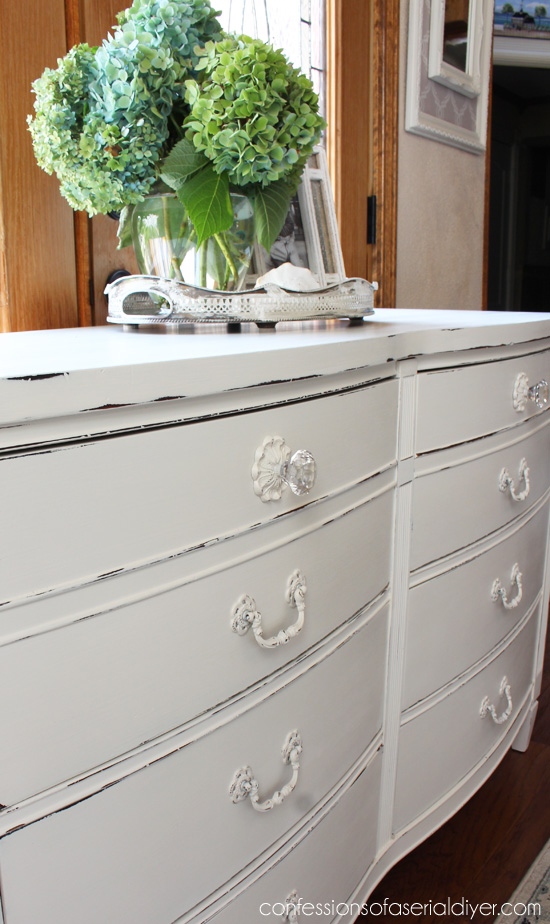
I love the lines on pieces like this, perfect for this style of makeover.
This also came with a mirror, but it was a huge rectangle and definitely didn’t match the pretty curves of this dresser.
My favorite might be the drawers…I couldn’t find enough of any one paper at Michaels to line the drawers, so I chose three!
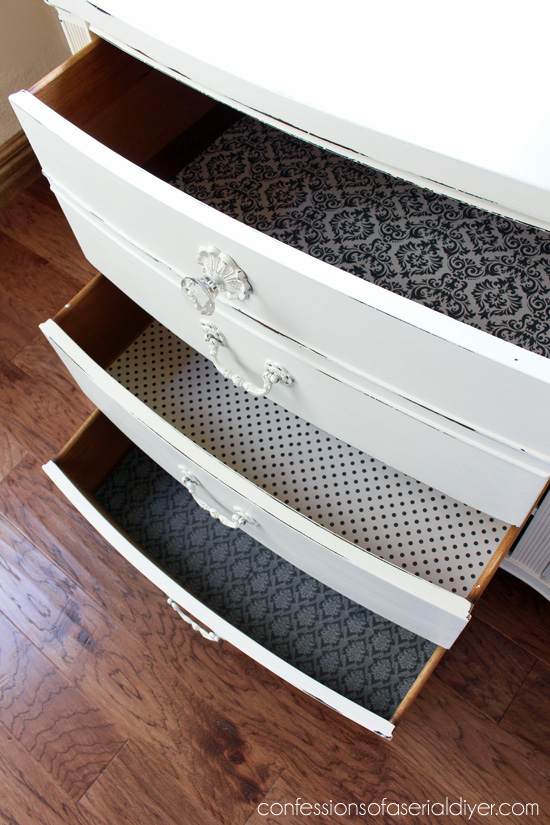
Fun. 🙂
A little close up of my beloved hydrangeas…they have turned this beautiful green and blue mix…
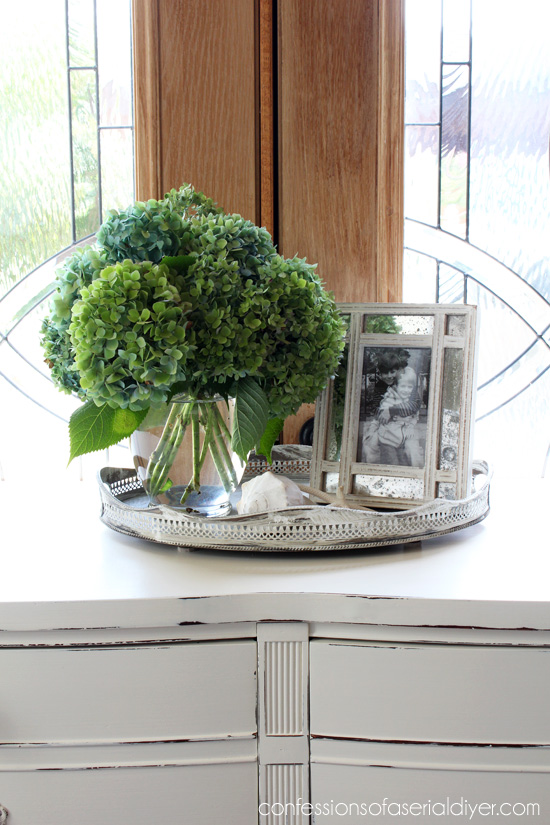
Sometimes my favorite makeovers are the simplest ones.
I’ll be back very soon with a complete step-by-step on how I painted this lovely piece!
UPDATE: Check out how it out now:
XO,
![]()
If you like what you see, there are several ways to follow along!
Email * Bloglovin * Instagram * Facebook * Pinterest * Hometalk * Twitter *
I love to share at these great parties:
The Happy Housie Design Dining and Diapers Liz Marie Blog Funky Junk Interiors Savvy Southern Style Tatertots and Jello DIY Show Off Between Naps on the Porch Just a Girl and Her Blog Sand and Sisal Interior Frugalista Our Southern home


ColleenB. ~ Texas says
Beautiful make-over.
I thought the same as you in using knobs.
When I spotted that one handle missing; I thought, ‘why not move the top handle down and just add knobs to the top 2 drawers.'( noticed how deep the top drawers are) :} Never thought of the glass knobs tho but sure do like it.
Like choice of the drawer liners as well.
Great job
Have a wonderful and enjoyable week end.
Christy K. James says
Thanks Colleen! Yep, replacing the handle with coordinating knobs worked great and I too love how deep that top drawer is! I hope you have a great weekend too! 🙂
Rose L. says
I LOVE IT AND ALSO THE INTERIOR LINING.
Christy K. James says
Thanks so much, Rose! XO
Paula@SweetPea says
Lovely! White brightens up this piece and gives it what I think is a romantic look. I like the new knobs that you chose for the top two drawers. Pretty makeover!
Christy K. James says
Thank you, Paula! XOXO
Anne@DesignDreams says
Looks amazing! Love the drawer liners too!
Christy K. James says
Thanks, Anne! The drawer liners are my favorite. 🙂
Cindy diy beautify says
I just love this gal’s makeover..those curves are really highlighted now! Great job Christy 🙂
Christy K. James says
Thanks, Cindy! I love how the curves really stand out now too. 🙂
Christina says
Christy, this bureau is gorgeous! I love the color and the new drawer pulls. Just the lovely accent of bling to bring out her personality. Thank you for the inspiration!
Christy K. James says
I’m so glad you like it, Christina! Thank you! XO
Amy b says
Completely adorable! Love, love, love the drawer liners and knobs! Can’t wait to see the step by step tutorial!
Christy K. James says
Thanks, Amy! I’ll be sharing that very soon. 🙂
Sue Farmer says
The dresser looks gorgeous!!! As does everything you do Christy. Have a great weekend XOXO
Christy K. James says
Thank you so much, Sue! I hope you have a great weekend as well!! XOXO
andi says
So cute! I’m glad you couldn’t find all matching paper because it looks way better with different ones! As always, I’m jealous of your hydrangeas. 🙂
-andi
Christy K. James says
Thanks, Andi! So true…I’m so glad they didn’t have enough of what I really wanted! Am I gonna have to come up there in the Spring and plant you some dang hydrangeas?! XOXOXO
victoria says
Love your imagination and resolution to solve a “problem” ( I mean with the missing handle), one question, are these knobs joined to that beautiful back or do you buy it separately? …( I remember also the same filigran back in the post reclaimed wood organizer…. ) I dont find here those kind of ornamental….
Good job as always Christy
XO
Victoria
Christy K. James says
Thanks, Victoria! The back piece of the knob came with the knob, but can be removed. We can also find them sold separately at Hobby Lobby here in the U.S. I found this in a set of three on clearance because one was missing. 🙂
Liz says
Ahhhh so beautiful love love the drawer liners Christy.. you’re right, simple and yet so elegant in all the right places! Love the tray as well. Have a great day can’t wait too see your next projects! ..Liz 😉
Christy K. James says
Thanks so much, Liz! The liners might be my favorite. 🙂
Karen says
How do you fill the holes from the old hardware?
The dresser is gorgeous!
Christy K. James says
Thanks, Karen! I use wood filler. I’ll be sharing the process as part of my chalk paint tutorial in my next post. 🙂
Nancy @ Artsy Chicks Rule says
I love the mismatching paper! Perfect! And white is always classic!! Love it. I’m in the middle of painting a perfectly good wood secretary today too!!! I may have to use that disclaimer, lol.
xo
Nancy
Christy K. James says
I saw that gorgeous secretary! That looks like a big project…feel free to use my disclaimer, you might need it ha ha! XOXO
Marie@The Interior Frugalista says
Oh my that gorgeous painted hardware with the glass knobs and floral back plate are the pearls on the little black dress and the gorgeous black & white papers, the fancy lingerie. Very nice Christy!
Christy K. James says
I love your analogy, Marie! XO
MaryJean says
I love the drawer lining paper! What a great idea! Especially when the inside isn’t quite so pretty!
Can’t wait for the demo!
Christy K. James says
Thanks, MaryJean! I’m loving the paper as well…I may never match all the drawer liners ever again! 🙂
Colleen v says
Beautiful work Christy!!!! Well done lady!
Christy K. James says
Thank you, Colleen! XO
Becky says
Lovely work, as usual. I can’t wait to see the how-to! I really like what you did with the knobs – brilliant! Gorgeous hydrangeas…
Christy K. James says
Thanks so much, Becky! I’m hanging onto my hydrangeas as long as I can!
Donna says
I love the three different drawer papers! Can’t wait to read your step-by-step.
Thanks for all your inspiration.
Christy K. James says
Thanks, Donna! I’ll be posting that soon! XO
Addie says
LOVE the dresser….good trick for when a knob is missing!!! Like it better that way!
WOW!!!! to those hydrangeas!!! Beauties!!!! Love them in the green stage of life. I am going to sneak out from California and snip-snip some of those!!!!
Have a good weekend!!!
Addie
Christy K. James says
Thanks, Addie! I think I like it better with the glass knobs added too…lucky that one handle was missing. I am hanging onto my hydrangeas as long as I can. If you were closer, I’d be glad to share! 🙂
Marilyn says
I inherited my mom and dad’s mahogany bedroom furniture, which we have been using for years. It is exactly the same style, but with a little different hardware. I have the same dresser, a highboy, and a nightstand, and have been trying to get up the guts to paint them. I’m also trying to decide whether to leave the top stained and paint the rest or paint it all. Any thoughts? Can’t wait for your how-to post!
Christy K. James says
You are so lucky! I’d love to have this whole set! I considered leaving the top stained for this piece, but since I was selling just the dresser, I thought someone may have a hard time matching the stain to their existing furniture. I do think it would be lovely though. I would have sanded the top and restained it in a dark walnut though. More of a brown than the burgundy tone it has. I would try just painting the body and leave the top and see how you like it. You can always paint the top later if you decide you don’t like the stain. I’m sure it will be gorgeous either way! 🙂
Krista @ the happy housie says
Absolutely gorgeous piece Christy! I’m looking forward to learning all your secrets in the step by step post!!
Christy K. James says
Thanks, Krista! I’m not sure I’ll share anything you don’t already know lol…just wanted a post I could refer readers back to in the future. Hope the new house is coming along well! Can’t wait to see. XO
Terry says
Love Love Love all the special little details you put into this piece! It is so pretty! Well Done!
Smiles!
Terry
Christy K. James says
Thank you so much, Terry!