If you asked me what project I receive the most emails about, I would say hands down, my Sew Easy Outdoor Cushion Covers tutorial. People are so excited that they can cover their worn out cushions for a fraction of the cost of new ones and I love to hear all the positive feedback. I even receive pictures! But the second project I get the most emails about is not even something I created. Know what it is?
This:
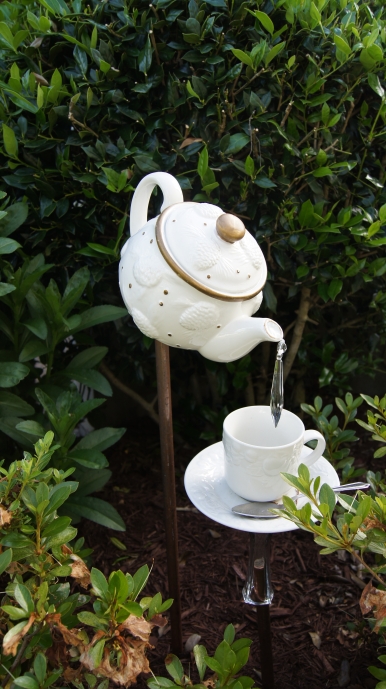
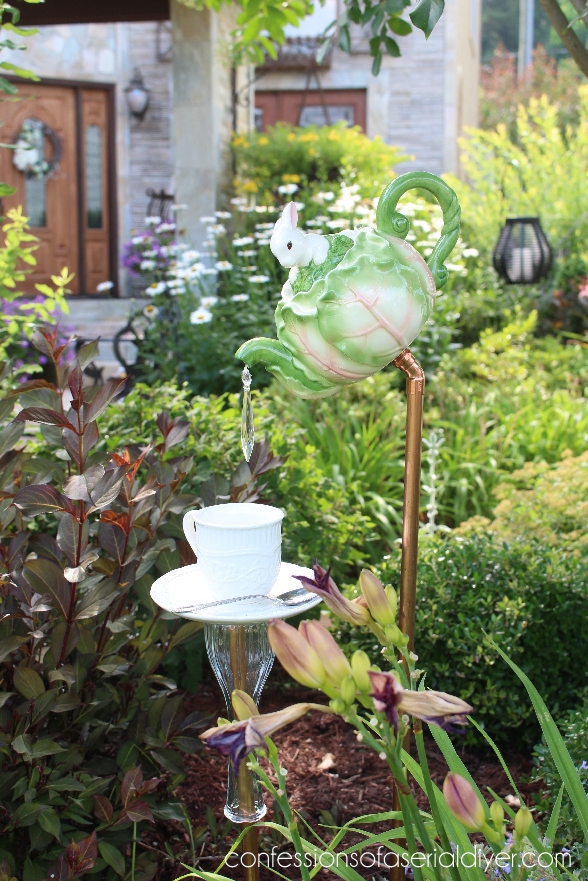
I shared it as part of my Front Yard Garden Tour last Summer, and I have had countless requests for the tutorial! Unfortunately I purchased it from a local craft market last Spring, so sorry, but no tutorial…until now! Here is my version:
Not too shabby!

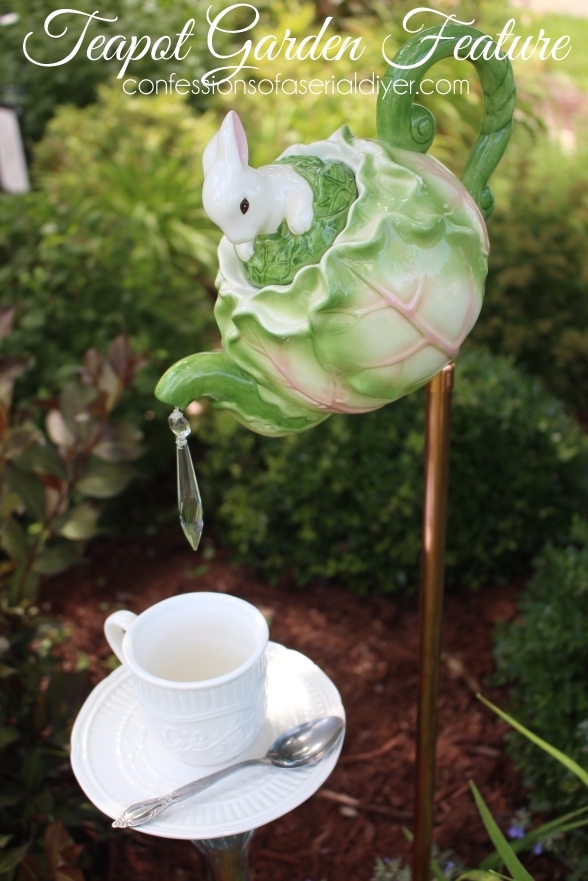
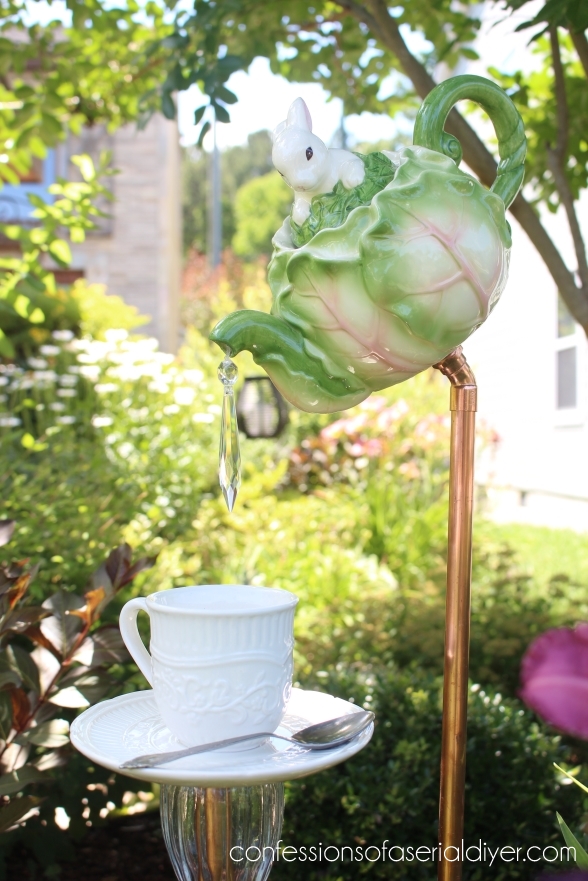
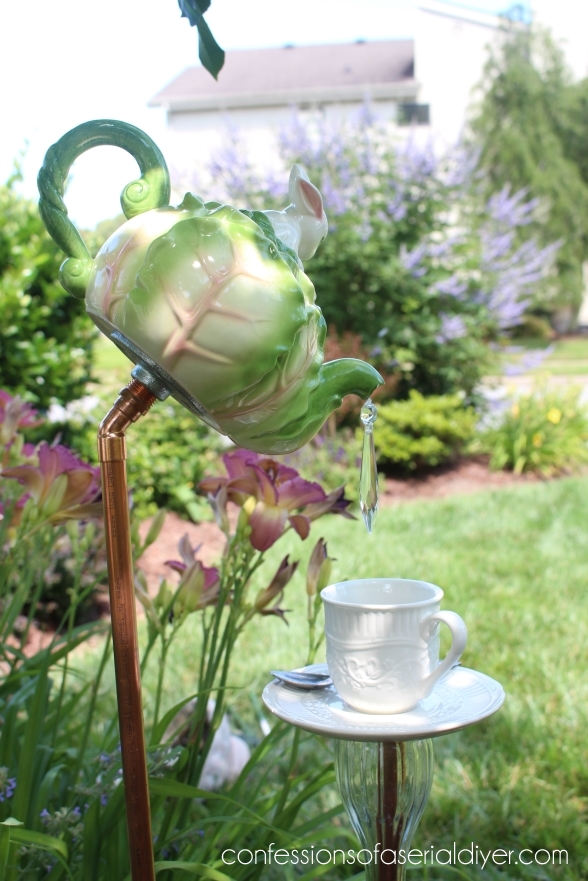
Today I am sharing the how-to on this whimsical teapot garden feature!
Supplies
To get started, you’ll need the following supplies:
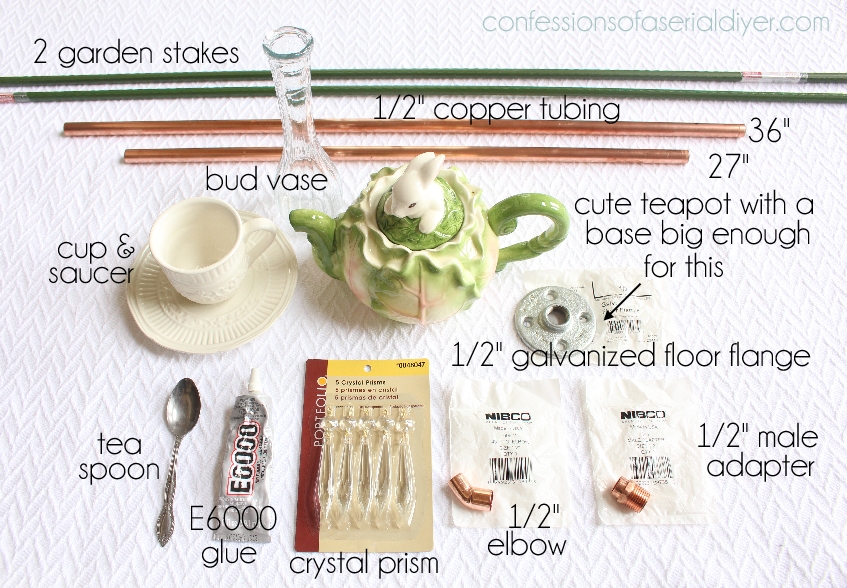
- Two garden stakes
- 1/2″ Copper piping cut to the lengths shown
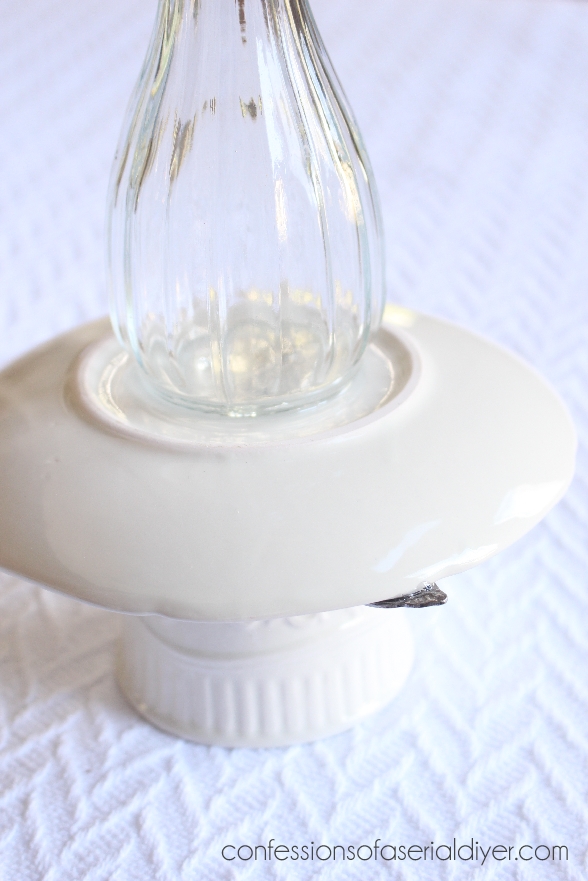
- Clear bud vase
- Cup and saucer
- Tea Spoon
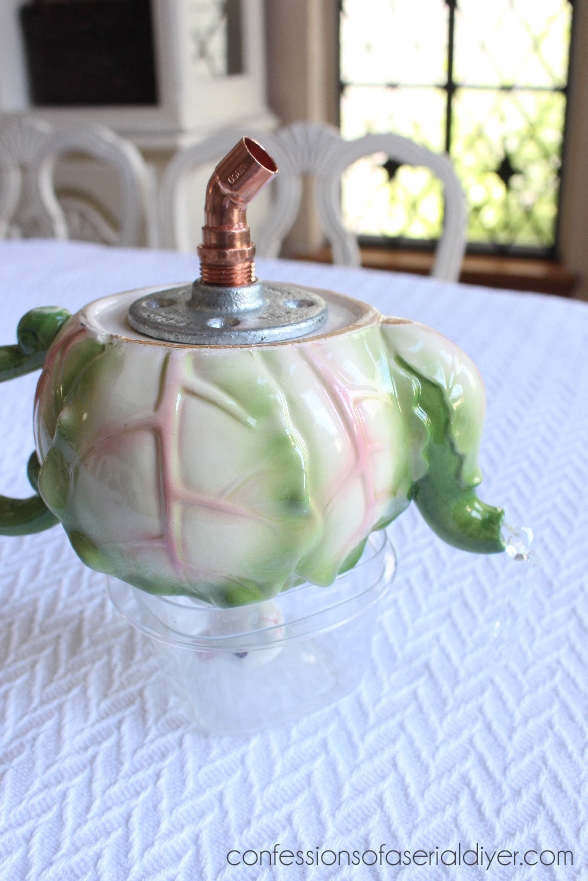
- Teapot with lid and a large enough bottom to fit flange
- 1/2″ Galvanized floor flange (or copper if you can find one)
- 1/2″ 45 degree Copper Elbow ( a sweet reader said it is called a “short sleeve” elbow)
- 1/2″ Copper Male Adapter
- E6000 Glue
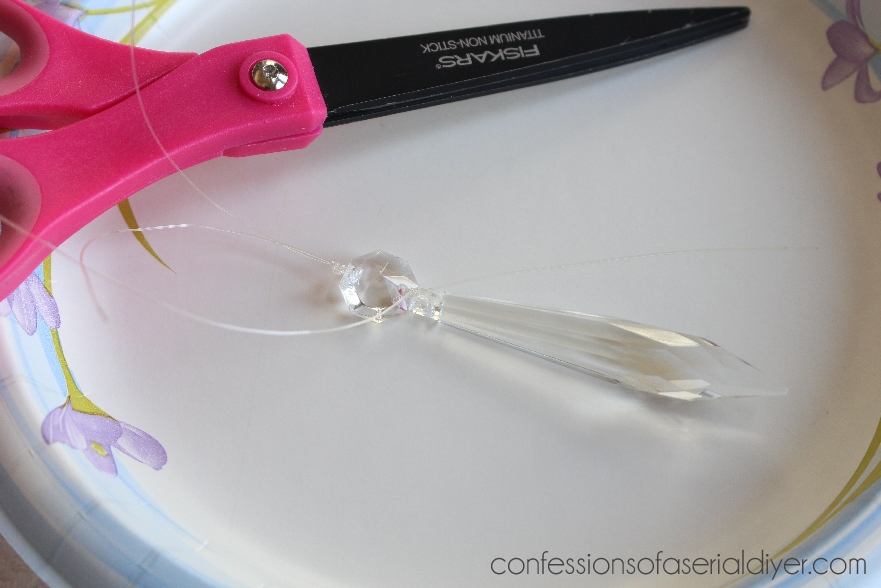
- Crystal Prism (I found this pack of five at Home Depot, but this only requires one.)
- Cotton ball (not pictured)
- Cotton Swab (not pictured)
- Glue gun/ glue (not pictured)
- Fine fishing line
and one of these:

My hubby calls it a tubing cutter. This is what I used to cut the copper piping, super easy!
Let’s Get Started!
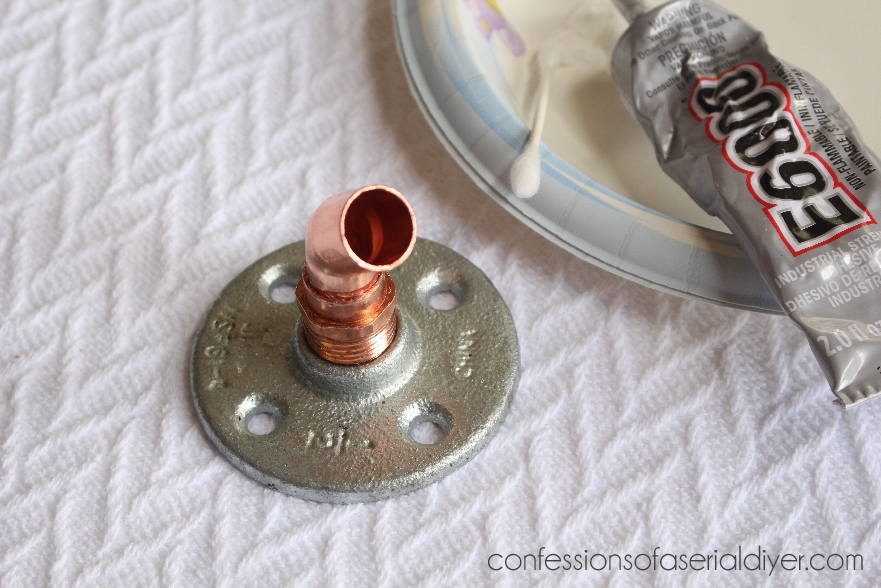
The first step is to add little E6000 glue, using a cotton swab, to the threads of the male adapter, and then screw it into the floor flange. Then also using a cotton swab, add glue to smaller rim of the elbow:

Then insert it into the male adapter. Set them aside to dry.
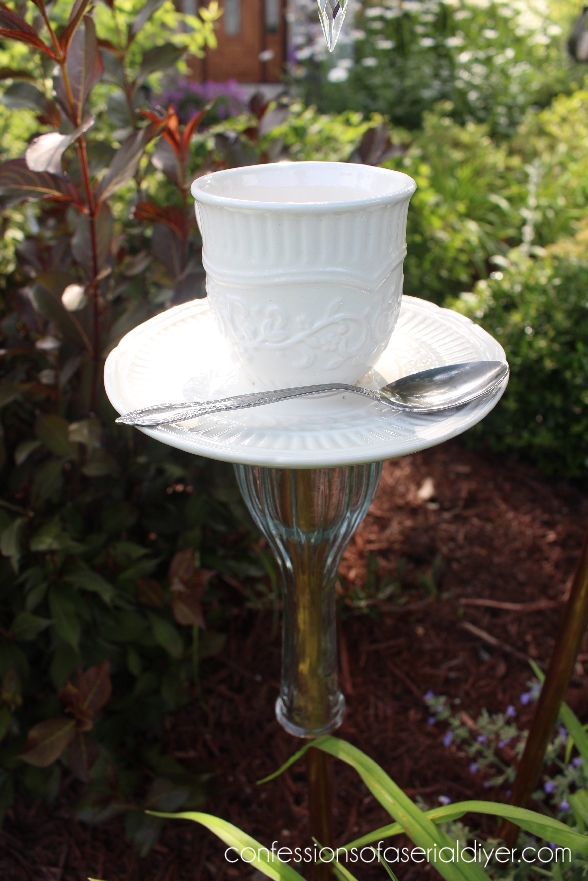
Next grab your cup and saucer. Apply E6000 glue to the bottom of the cup.
Glue to the saucer. Then apply glue to the spoon back and the backside of the top of the spoon handle, and attach it to the saucer.
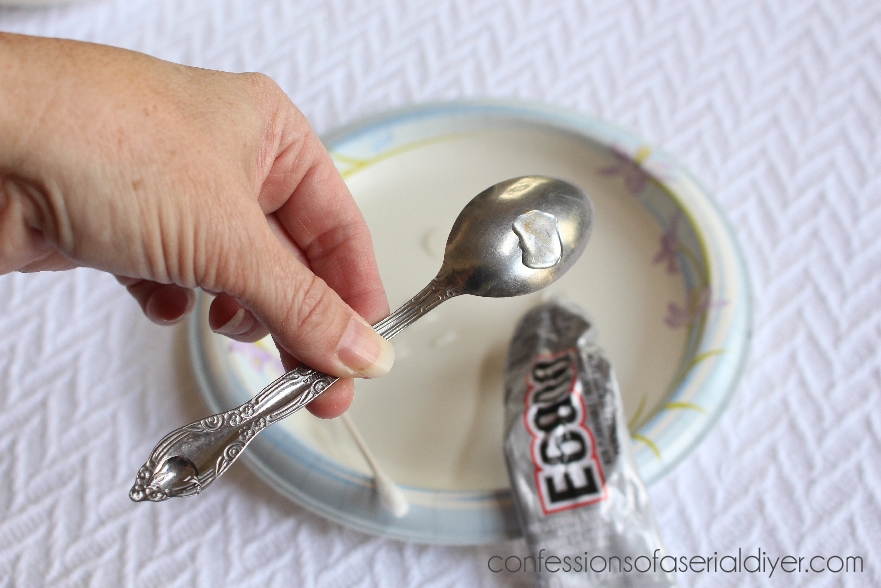
I found this cup and saucer at Homegoods for $3.99. The spoon was a thrift store find.
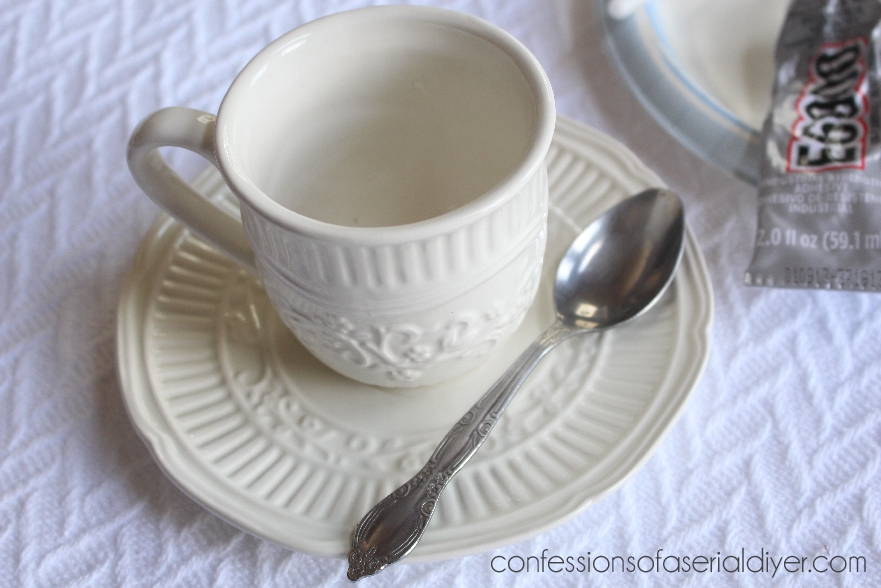
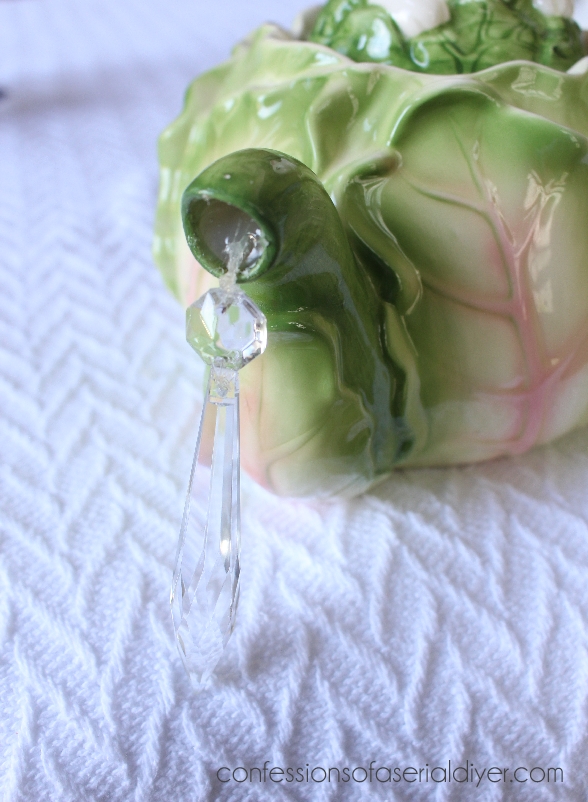
Set aside to dry. Replace the gold wire in one of the prisms with fine fishing line, so it will appear more water-like. Leave about six inches of thread attached at the top.
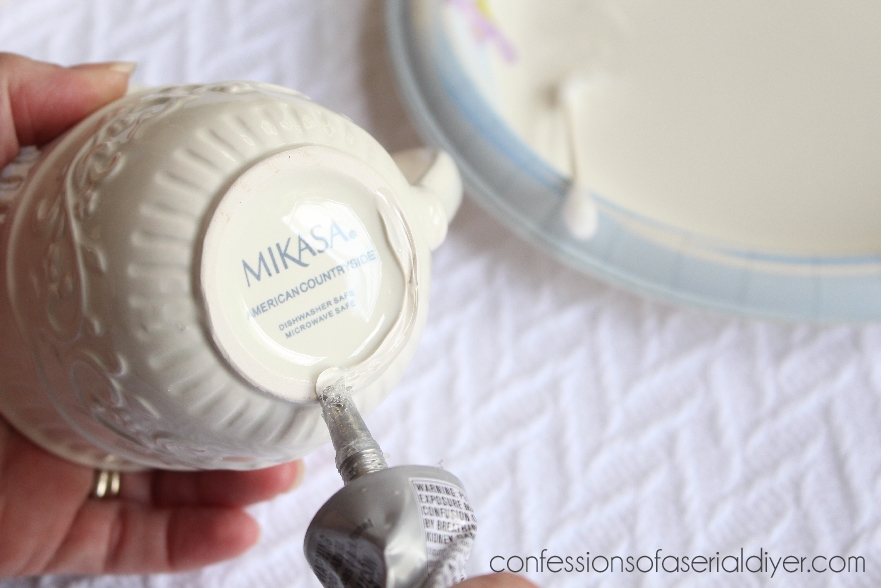
Grab your teapot and the cotton ball. Apply E6000 to the cotton ball.
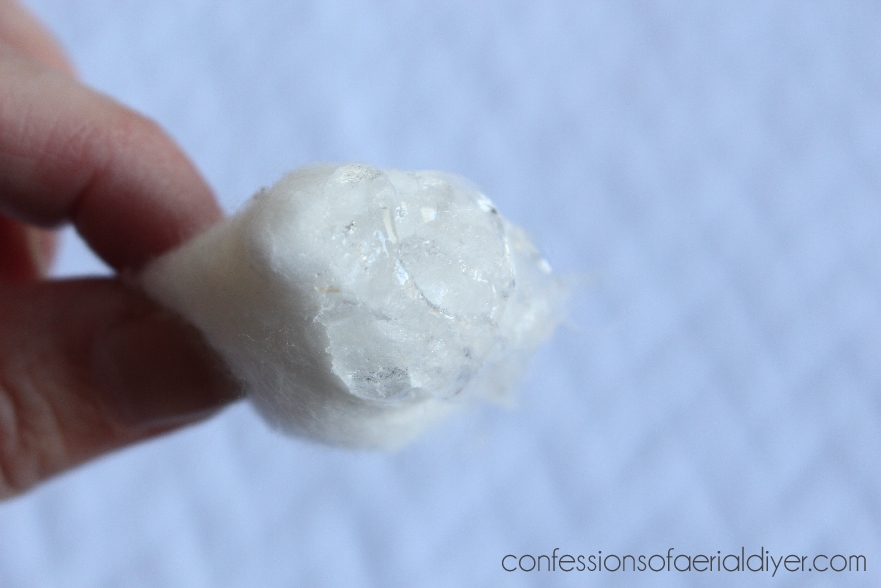
There you have it, a picture of a cotton ball with glue on it. What can I say, I like to be thorough. Insert the extra fishing line through the spout of the teapot, then insert the cotton ball into the spout from the inside:
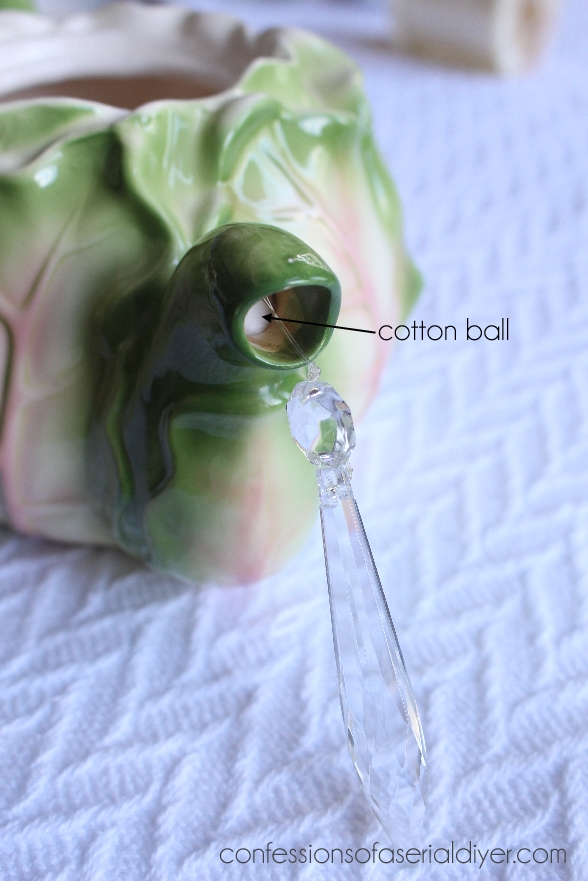
This small cavity will be filled with hot glue once the E6000 dries. Now you can glue the lid of your teapot in place.
Once the glue has dried, fill the spout opening with hot glue. You will need to hold it at an angle so that it will not drip out, until it firms up, about 5-7 minutes.
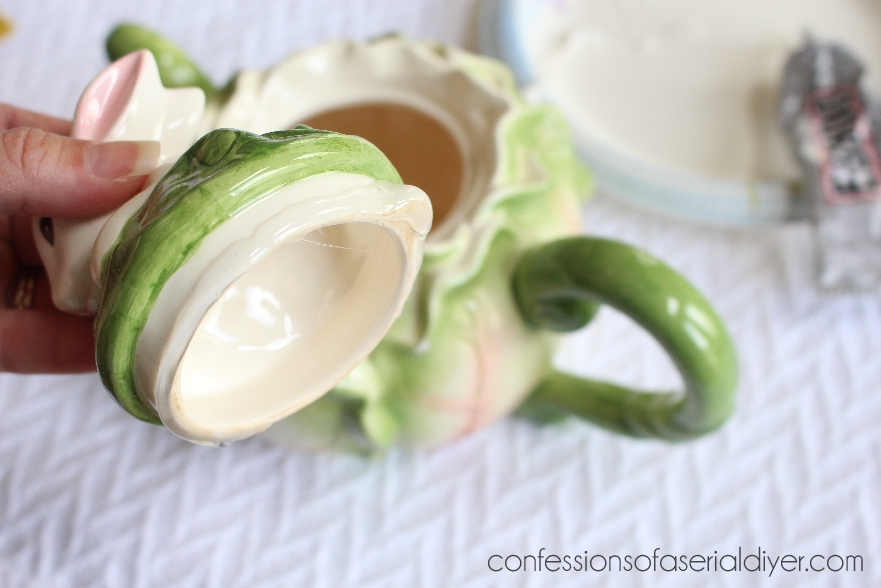
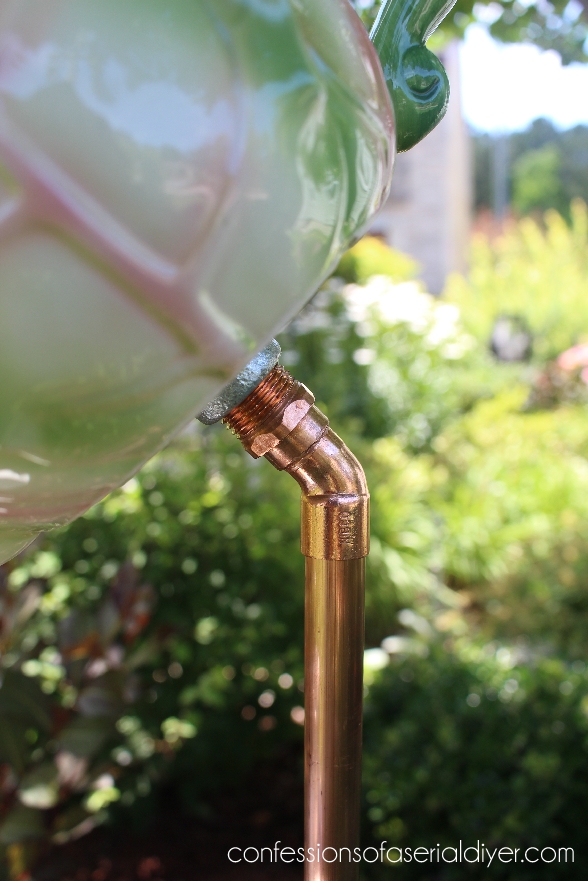
Find a container that will hold your teapot upside down. I used a Rubbermaid container. Apply E6000 glue to the bottom of the flange and attach to the bottom of the teapot, with the elbow angled toward the spout like so:
Next, turn your cup and saucer upside down and glue the bud vase to the bottom.
That’s pretty much it! Allow both pieces to dry overnight.
Install it Properly
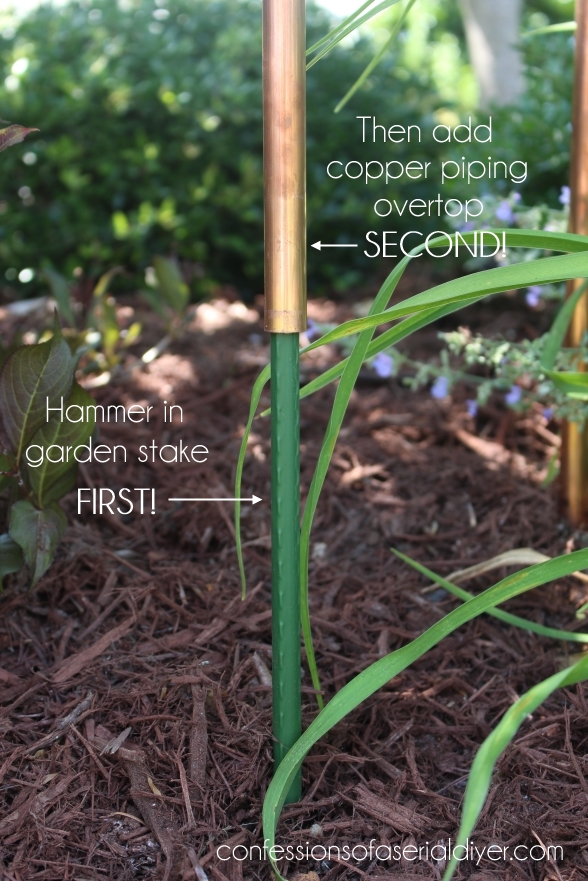
To install your beautiful new creation, first hammer in the garden stake, then apply the copper piping over it. DO NOT HAMMER THE COPPER as it will become distorted and your teapot will not attach to the fitting properly.
Add teapot…
This is not glued in place, for easier storage if you decide to remove it during the Winter months. Position the stake for the cup and saucer centered directly below the dangling crystal. The bud vase should easily slip over the copper piping.
Tada!
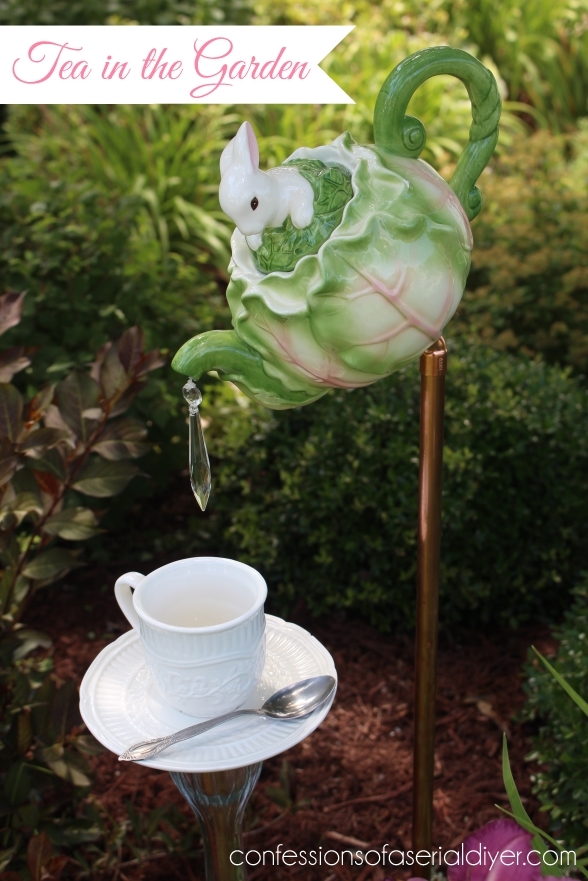
I found this teapot back a couple of months ago at a thrift store for $2.25. I knew exactly what I wanted to do with it.
Here is the view from the back:
This is in my front garden, you can see my front door in the background.
Now I have a tutorial to refer my inquiries to! The gals who made the original don’t ship since it’s not cost productive, but you can find more info about their “Y’art” here. The total cost for this was a bit more than I would usually spend on such a project, even with a thrift store teapot, bud vase, and spoon. Out of pocket I spent around $36 for this, but it’s totally worth it! Wouldn’t this make a fantastic gift for Mother’s Day? (Okay I’m a month late, but maybe next year?)
This is my DIY Summer Fun project for our Get Your DIY on Party that starts this Sunday!
If you’re kinda new here, I along with four other fabulous co-hosts, host a themed link party the first Sunday of every month. We share our own themed creations the week before. Here is what we all came up with for this challenge:

Summer and Sand Wood Sign from Mandy at The Hankful House For the Beach Summer Wreath by Krista at The Happy Housie

My teapot garden feature reminds me of Summer time in my garden!
The fun starts this Sunday, July 6th at 7:00pm EST. Come link up your favorite Summer Fun projects or just come by to get inspired!
(This theme is really open! Anything that reminds you of Summer, the beach, vacation, outdoor fun… come share it with us!)
I can’t wait to see what everyone brings to the party!
XO,
![]()
If you like what you see, there are several ways to follow along! ![]()
Email * Facebook * Pinterest * Hometalk * Twitter * Instagram
I love to share at some of these great parties:
Home Stories A to Z Not Just a Housewife Kammy’s Korner The Happy Housie Design Dining and Diapers Liz Marie Blog Funky Junk Interiors Savvy Southern Style Tatertots and Jello DIY Show Off Redoux Interiors Between Naps on the Porch The DIY Dreamer Oh My Creative Little Miss Celebration Just a Girl and Her Blog Sand and Sisal Interior Frugalista House on the Way Addicted 2 DIY I should be Mopping the Floor Miss Mustard Seed


Krista @ the happy housie says
This is super adorable Christy and it would also make an amazing mother’s day gift too, wouldn’t it?? Love it -so creative!!
Christy K. James says
Thanks so much, Krista! XO
Sherri S. says
How cute is this!?! You did a wonderful job making your own 🙂 LOVE IT!!!
Hope you have a safe & blessed 4th of July…
~Sherri
Christy K. James says
Thanks, Sherri! Hope you and yours have a wonderful Holiday weekend as well! XO
Jenise @ DIYFunIdeas.com says
Love this! So fun and whimsical. Pinned to my garden board. 🙂
Christy K. James says
Thanks, Jenise 🙂
JoAnn @ SweetPepperRose says
Awesome little project! oh I love anything bunny… I’ll be on the hunt – thanks for sharing.
Christy K. James says
SO glad you like it, JoAnn! Hope you enjoy your Holiday weekend! 🙂
Cindy@DIYbeautify says
I adore the whimsy of this! Thanks for the step-by-step instructions! Pinning.
Christy K. James says
Awesome! Thank you, Cindy!! Have a great weekend! 🙂
jen Schreiner says
Simply adorable.
Christy K. James says
Thanks, Jen!
Nancy @ Artsy Chicks Rule says
Wow Christy!! That is an awesome tutorial…that is so adorable!!! I’m gonna have to make one for my yard. Love it!
xo
Nancy
Christy K. James says
I thought they were so cute when I bought mine and I’ve had so many inquiries about it, I decided to make one! See you soon! XO XO
Lory at Designthusiasm says
Omg, this is fabulous!! Love your version even better than the original and your directions are clear and easy to follow. Just wonderful… 🙂
Lory
Designthusiasm.com
Christy K. James says
Thanks, again Miss Lory! 🙂
Marcia says
Do you remember who made the bunny teapot….I lot this particular one!
Christy K. James says
I made the bunny one. I found the tea pot at a thrift store for $2 🙂
Marcia says
On the bottom of the teapot, does it tell who the maker is…Mikasa, Vietri, Fitz and Floyd….I have searched ebay typing in bunny teapot, cabbage teapot, etc….I love this one!
Christy K. James says
Luckily, I took a photo of the bottom (since it ‘s covered now) and it says “Applause Inc” Hope this helps! 🙂
Julie says
Very “Alice in Wonderland-y” to me. I love the drip being the prism, very clever.
Such a fun garden ornament.
Christy K. James says
So glad you like it, Julie!
Andi says
Oh, my goodness, I’m speechless.
-andi
Marie@The Interior Frugalista says
Hi again Christy, just wanted to let you know that I’ll be featuring your adorable teapot garden decor at the DIY Sunday Showcase Party this weekend.
Christy K. James says
Thanks so much, Marie!!! Just got home from Haven and I’m so bummed I didn’t see you there! I would have loved to meet in person! Maybe next year? 🙂
Linda says
this is just adorable. I have everything except the pipe ect. Now I do make the garden tea cup bird feeders. And instead of a vase i just glue with 6000 a copper caps on the bottom of the tea cup saucer and it fits onto the copper pipe without gluing . Then I can take the cup off and store during the winter. The vase is really cute . Thank you Linda
Christy K. James says
Oh smart idea for attaching the saucer to the pipe! 🙂
Linda says
could you take a cork and size it to fit the spout opening and run the line into the pot?
Christy K. James says
You probably could, Linda. What is nice about the hot glue is that it dries almost clear. That helps it to look more like you are pouring water.
Brooke Bock says
Wow!
Thanks so much for the detailed tutorial….It looks like the perfect project for one of my summer workshops….Now I will definitely be on the lookout for teapots…. I guess everyone else may be as well…
Thank you!
Brooke
Christy K. James says
This would be perfect for a group project! In your teapot hunt, keep in mind the bottom of the teapot needs to be big enough in diameter for the floor flange to fit. So glad you stopped by! XO
Linda says
today I am making my garden tea pots. One for myself and the other tea pot for my sister. I am using plumbers putty. I put gloves on got out my 6000 glue took a chunk of putty put it in a ball and then flattened it. I put glue in the middle and then my fish line that is attached to the prism. I put the putty inside the pot spout added more glue and stuffed the putty inside the hole. I adjusted the length of the prism by pulling the line inside the pot and tied a knot and glued the knot to the putty. My husband later felt maybe a person should of tied a toothpick to the line when knotted. it would fit width across the inside spout and glue it to the putty. Sounds complicating but so far it is going smoothly ! The lid is glued and we have the fittings glued to the flange . Now let everything dry over night and then attach the flange to the bottom of the tea pot. Thank you for sharing your garden art with us! It sure adds ” whimsical “to any garden 🙂
Christy K. James says
Oh so glad to hear you are making the teapot feature! Sounds like you figured out a great way to add the crystal. Thanks for sharing, and I’d love to see how it turns out if you are up to sharing 🙂
Linda says
I finished my sister’s and my tea pot garden art today. I put mine in the front side yard , it is so cute. I am not good at downloading pictures to the computer. I find I can take pictures and go to the store and put them on a disk and mail them.
My tea pot is cream with a pink rose in the middle with a rose bud for the top of the lid., Tea pot was $3.60. I chose a white petite tea cup with silver trim and flowers.
Christy K. James says
I bet they turned out beautiful, Linda! You’ll find the teacup makes a great rain gauge too 🙂
MJ says
This looks amazing! I only have a tiny balcony at the moment, but I’m so pinning this to make if I ever do have a garden. Thank you so much for sharing! Visiting via Whimsical Wednesday
Christy K. James says
Thanks, MJ! I actually had it in a tub of flowers at one time, which might just work on your balcony 🙂
savy c. says
That is SO COOL!!!!! But I think it should have been nice if you painted the cup and saucer to look like a tomato or something, you know? But over all, that is super impressive!!
Katherines Corner says
this is soooo wonderful. Love it! xo
Christy K. James says
Thanks, Katherine! 🙂
Sherri White says
Christy- where do you find the floor flanges? I can’t seem to find any around my small town! Thanks!
Christy K. James says
They have them at Lowes and Home Depot, for around $9. Not sure if that’s helpful…but make sure its galvanized. Good luck 🙂
Sherri White says
Hi! I got my 1/2″ floor flange, but my 1/2″ copper male adapter is too small to fit it; am I doing something wrong? Thanks!
Christy K. James says
Sorry to hear you are having trouble, Sherri. The male adapter should screw right into the floor flange if they are both 1/2″. Maybe one was mis-marked? Try measuring them. You may need to take the flange to the store with you and match up the parts while you’re there. Let me know what you find out. Good luck!
Sherri White says
Christy- yup, the male adapter I had was the wrong size-: ( ! I also had gotten the wrong elbow…I got a 90 degree instead of a 45 degree; so, now I should be all ready to make my teapot!!! Thanks for your help!!!
Christy K. James says
Ha ha…it will have been a long journey to this little teapot feature, but hopefully well worth it. 🙂
IrishMimi says
LOVE, LOVE, LOVE your Teapot Garden Feature. Better than the original because your bunny peaking from the cabbage teapot is both adorable & “garden-themed” . And I love the crystal drop.
I’m inspired — I’m going to try to make it actually pouring water by making it into a recirculating fountain. I have an super inexpensive teapot from a garage sale to attempt it — it’s sweet AND at 50 cents I’m not out much if I destroy it trying to drill a hole for the water line (I did it w/ a metal kettle pouring into a basin a few years ago for a friend).
I think I’ll use a crystal drop, too – if it works. I think the cup & saucer will either “float” on a basin of water (looking like a glass table) or sit on a solid surface and/or pebbles (w/ the hidden water basin below)
Christy K. James says
I’m so glad you like it! I love the idea of making it an actual fountain. If you have success, I’d love to see! 🙂
Nicole says
Was wondering if the teapot should be sealed with something to protect it from the elements? If yes, what should I use? Thanks!
Christy K. James says
Hi Nicole! There should be no need to seal them. Ceramic holds up really well outdoors. I did bring them in for the winter though, but there was really no need to. 🙂
Caye says
I just love this project, and the great way you explain things!! I too, am a thorough person and get frustrated with “instructions” that are not thorough. Thank you for a great idea and wonderful pictures. You’re aces!
Christy K. James says
Thanks so much, Caye! So glad you enjoyed this tutorial. This is such a fun project and yes I do try my best to be thorough! 🙂
ARLENE says
Love your teapot and cup project. It rains here often and I would have to empty the cup often. Was wondering if I could put a teabag in the cup and pour acrylic in the cup. What do you think?
Christy K. James says
Thanks, Arlene! I haven’t tried anything like that, but it would be a cute touch if it worked. 🙂
MIRIAM NASSAR says
Hermoso tu espacio. Tus ideas son geniales y de muy buen gusto, LAMENTO QUE NO ESTÉ EN ESPAÑOL, para comprender mejor tus explicaciones.
FELICITACIONES
Mary says
Just adorable !! Great for the tea lover. I hope to make one for myself and one for my daughter as a gift. I was looking to use alot of things I have collected over the years. Time to weed out.
Christy K. James says
Thank you, Mary! This would make a wonderful gift! XO
Mgold says
I love this! I’m currently doing a Alice in wonderland themed backyard. I have a problem finding the garden stakes at my Home Depot, I can order it online do you remember if you used a 4ft bigger, and was it a heavy duty steaks or heavy duty supper steel stakes?
Thank you for sharing this! I love it!
Christy says
Thanks! These are just garden stakes, and I believe they were 36″. Have fun!