Hello sweet friends!! I’m back today with a set of lamps from my brand new haul! I’m also sharing my attempt at DIY fabric lamp shades.
Here are the lamps that I found at the thrift store for $5 a piece:
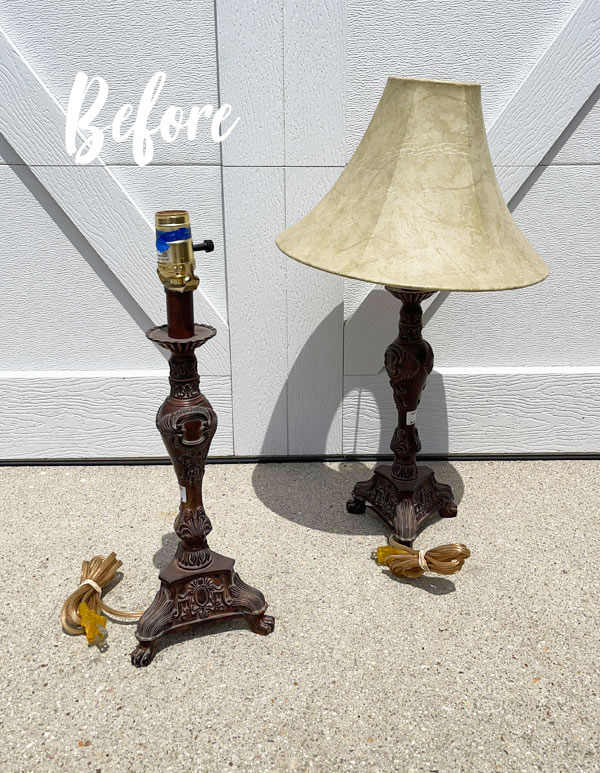
Only one of them had a shade, so finding shades was the first order of business in this makeover!
I’ve included a few affiliate links so you can find the products I love.
I set out to find a set of matching shades since I didn’t have a pair in my rather large stash of shades that would work.
Usually, I start at HomeGoods. They almost always have shades that will work, however, not this time. So, I hit up Target, Home Depot, Walmart, and Tj Maxx. Unless I wanted to spend $22-$28 a shade, there was nothing at any of those places that would work within my budget.
I was about to head out of my immediate area and try a couple more places, but I decided to hit up my favorite Goodwill right by my house first, and look what I found:
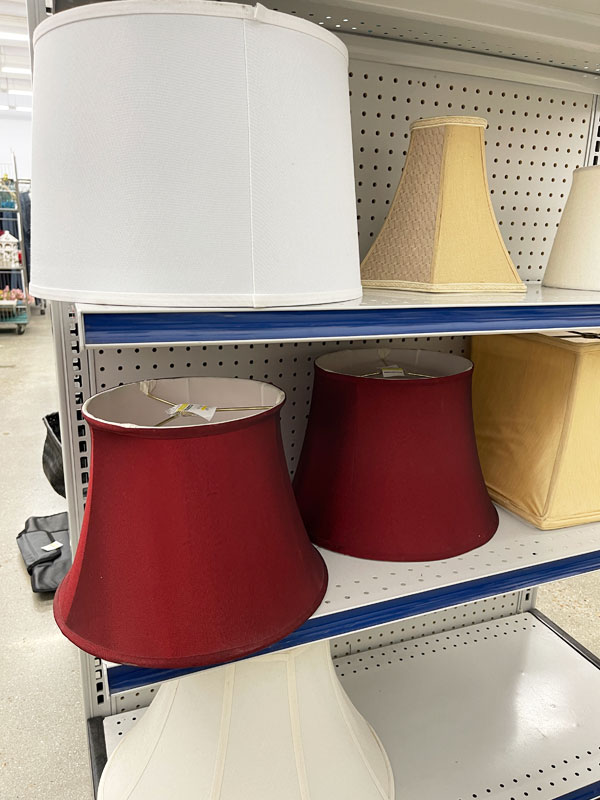
Two bright red lamp shades that were in beautiful condition. Aside from the color, they were perfect. The size was exactly what I wanted and at $6.75 each (yep, more than the lamps!), I went for it.
Now I was ready to get this makeover underway!
Let’s start with the lamps!
I gave the lamps a good wipe down with just a damp washcloth. They were just a bit dusty from being in the garage.
Then I taped off the cord and the top where I didn’t want paint to end up.
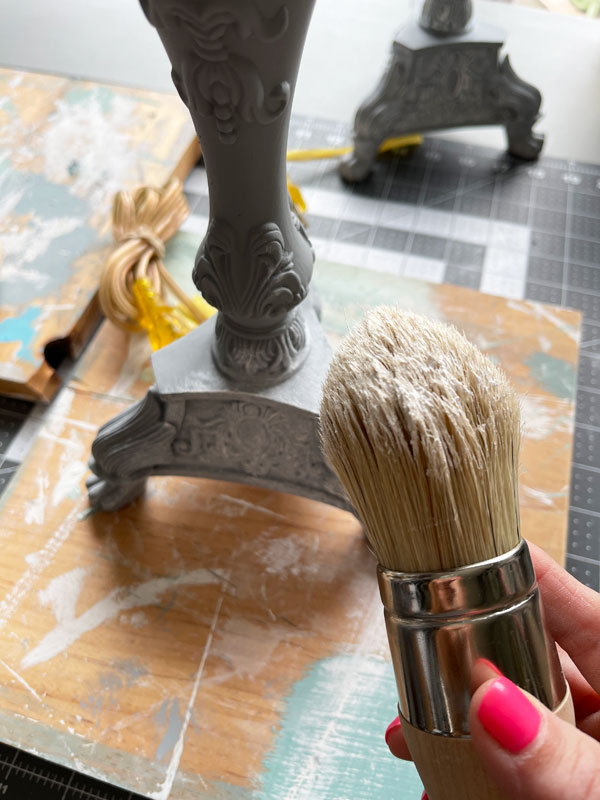
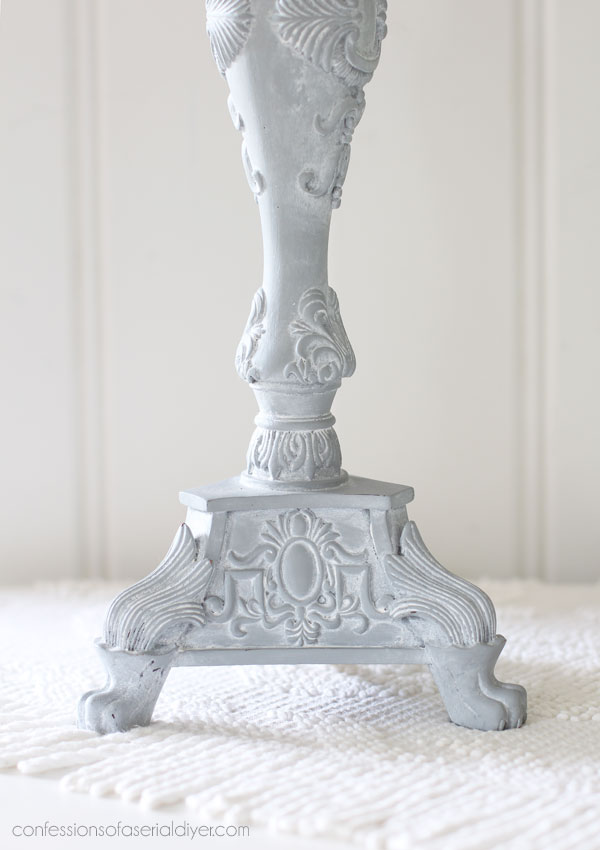
I gave both lamps two coats of Manatee Gray with my Belle Brush:

The Belle Brush has kind of a mop head that is great for getting paint into the details on these smaller pieces.
Once the paint was dry, I added white wax with my La Petite brush. It has a tapered tip that helps to push the wax into the details:
I then used a soft, clean cloth to remove the excess wax:
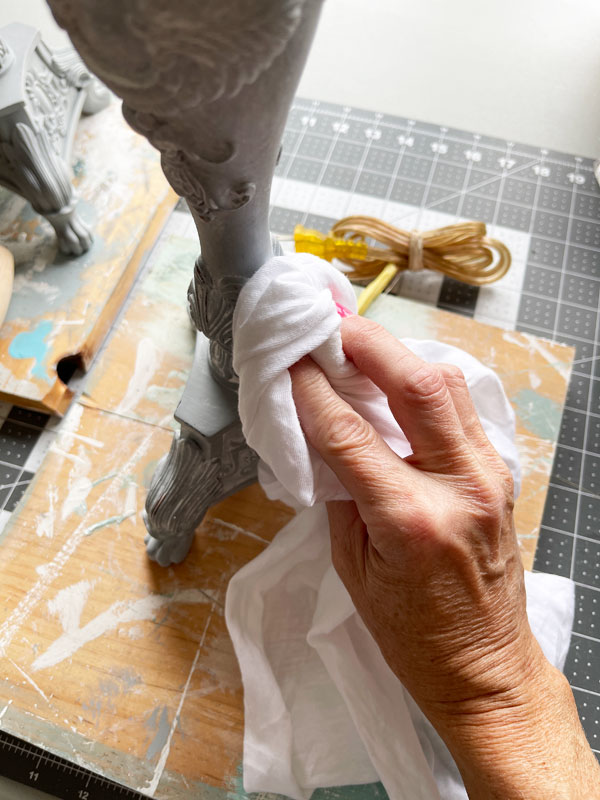
The wax is a sealer, so the lamp part was done!
DIY Fabric Lamp Shades
Now for the shades! I knew this would be a challenge. I’ve covered white lamp shades with fabric before that were more simple in shape.
You can see how I did that HERE.
However, these being red, I knew the red would show through whatever I covered them with when the light was turned on. That meant I needed to remove the existing fabric…
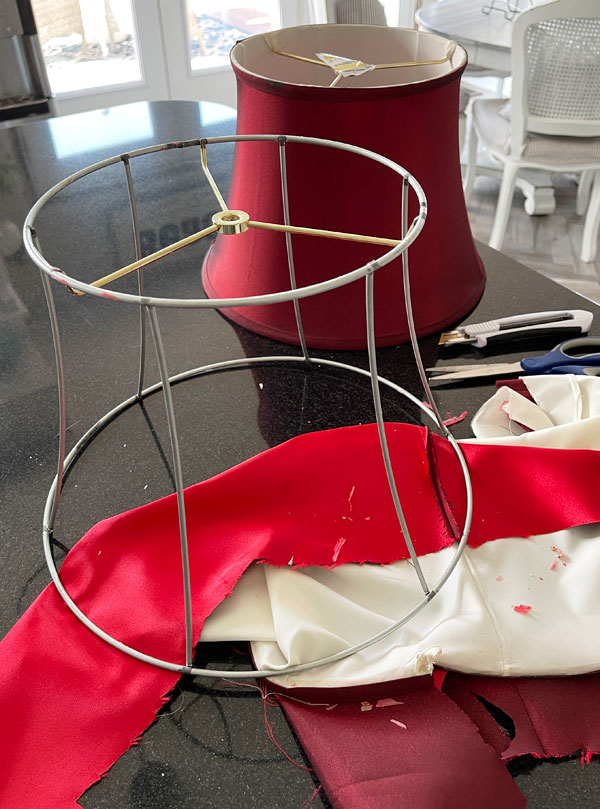
If you’re going to do this, be sure the shade has a complete frame like this and not just the rings around the top and bottom.
The fabric I chose originally started out as curtain panels I picked up a HomeGoods several years ago.
When I turned it on the diagonal, it had a bit of stretch to it which was perfect! For a shade that is tapered, adding it on the diagonal is really the only option.
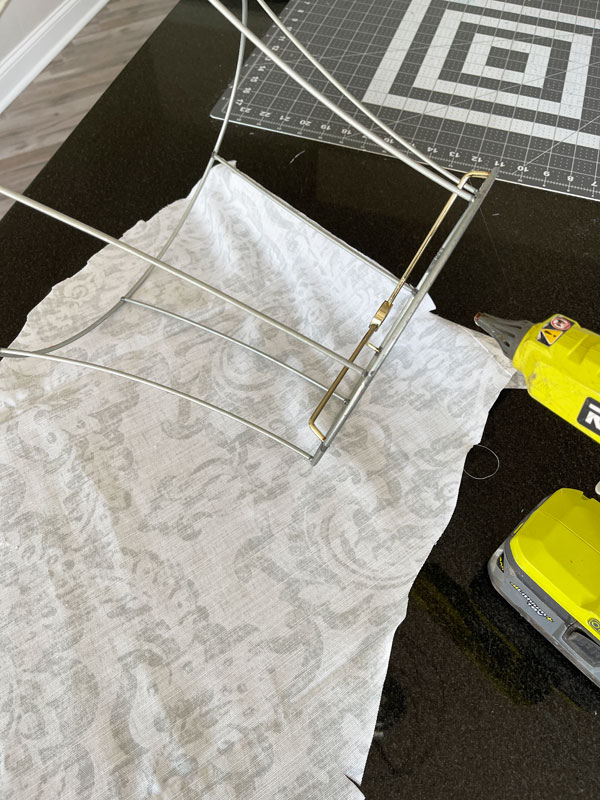
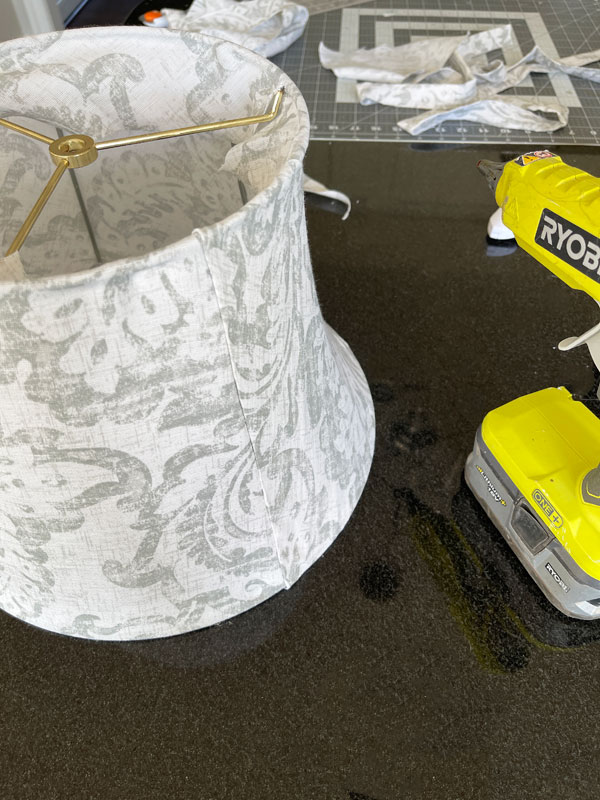
Next, I laid the shade frame on my fabric (on the diagonal), hot glued one end to one of the spokes in the frame, and then haphazardly cut the fabric as I rolled out the shade:
I wasn’t trying to be haphazard about it, but that is definitely how it looks lol!
Just be sure there is enough fabric on the top and bottom.
You can also make a pattern with paper like I did in my more proper tutorial that I shared the link to above.
As I rolled the shade, I glued it to the top and bottom on the inside:
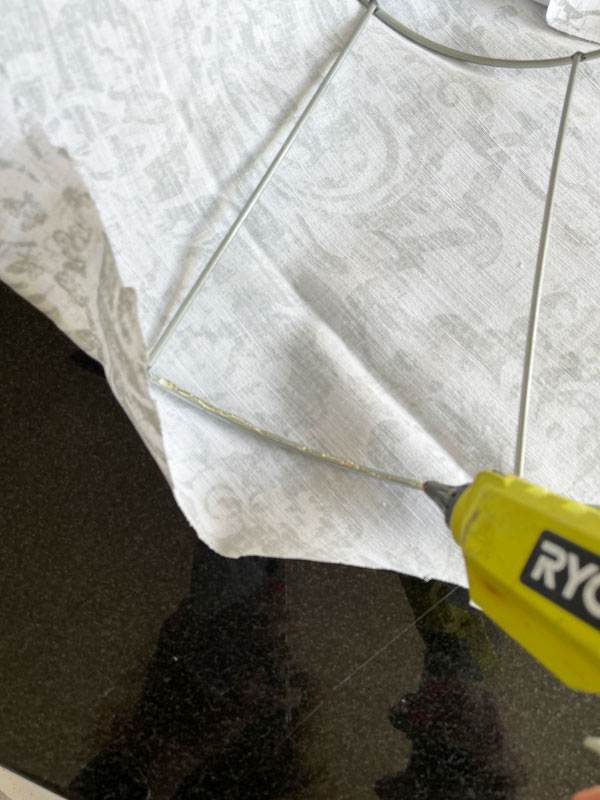
I was pulling the fabric taut as I went folding it over the edge to secure it in place like so:
I continued until I had about six inches left to go. Then I pulled out the iron and ironed the final edge that I would be folded over. I used hot glue to secure it in place:
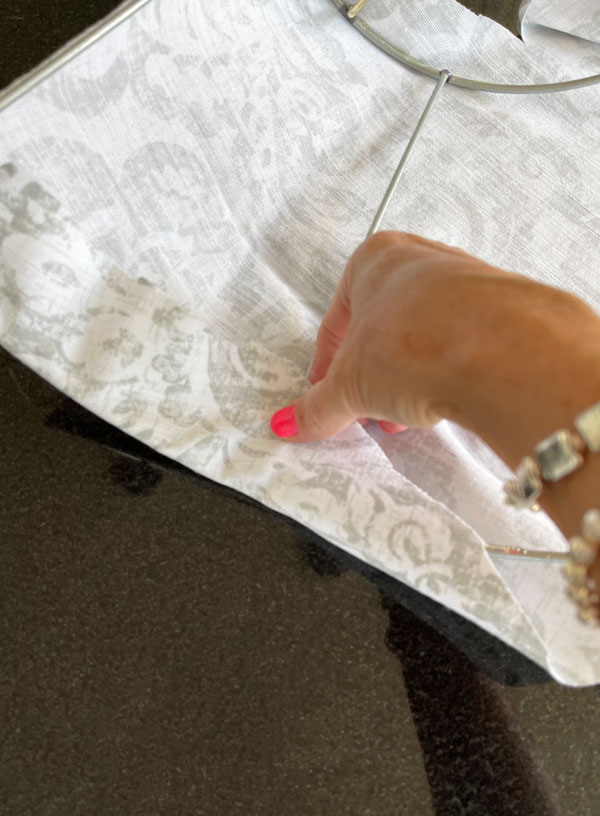
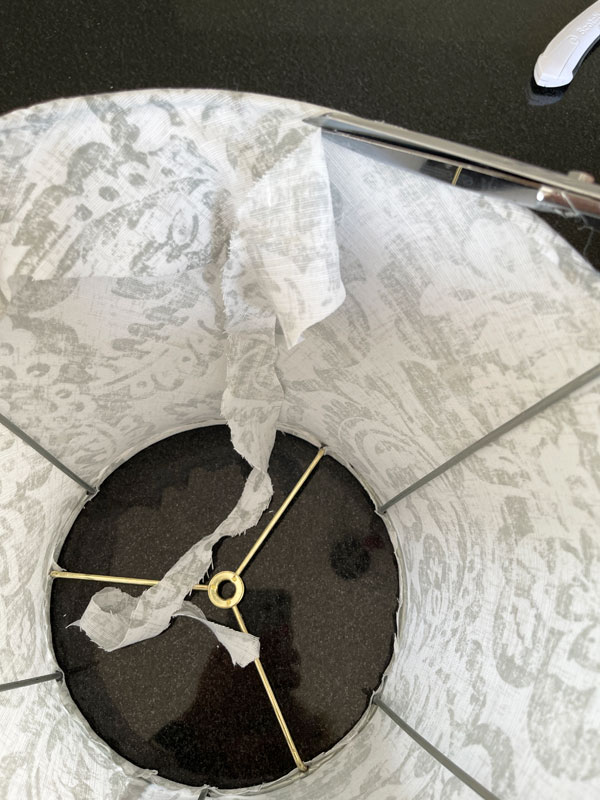
Then I trimmed the all around the top and bottom as close to the frame as possible:
You could stop here, but for a nice, finished edge, I went back to my curtain panels and cut off the finished seams that were along the edge:
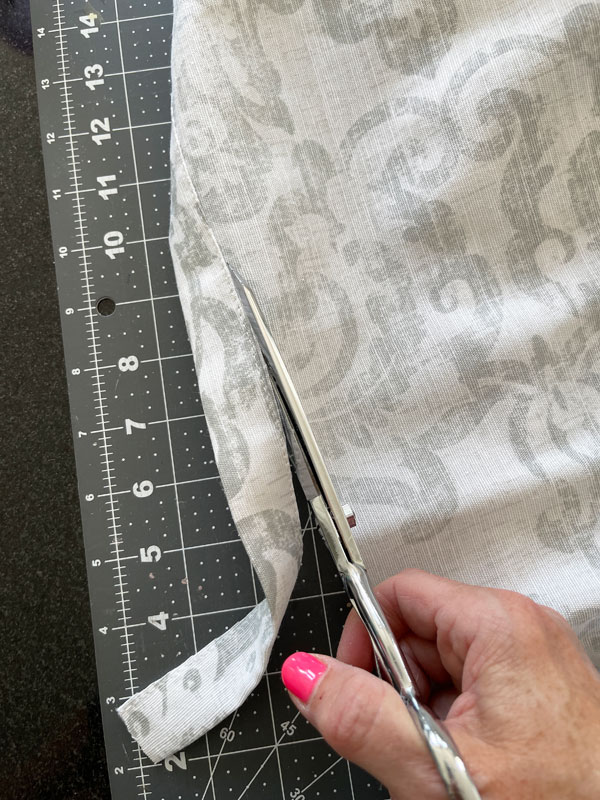
That was the perfect size for piping to trim out both the top and bottom of my shade, and I just hot glued it in place:
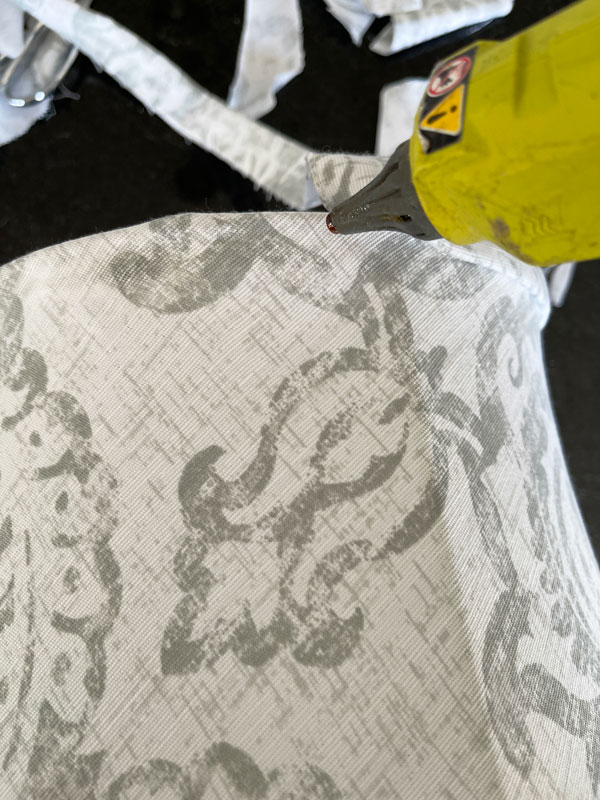
The cut edge went on the inside. I was so lucky that that worked out so nicely!
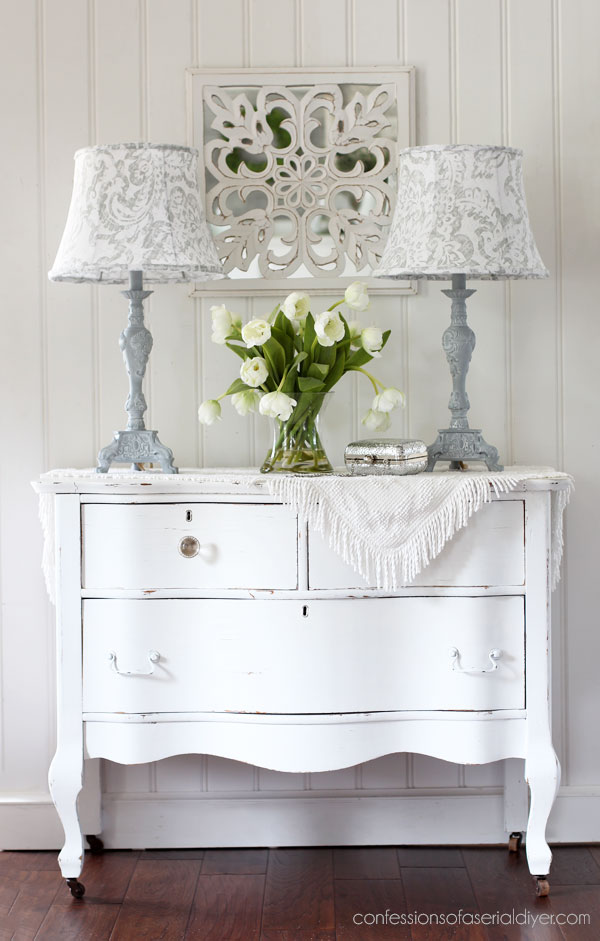
The after
Finally, let’s see how this set of lamps turned out!
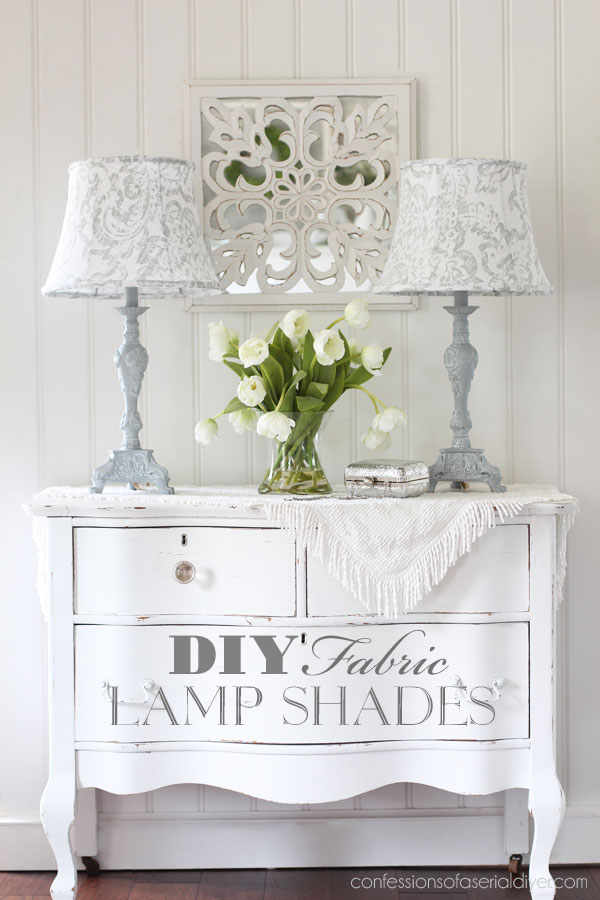
Would you ever guess that these are DIY fabric lamp shades?
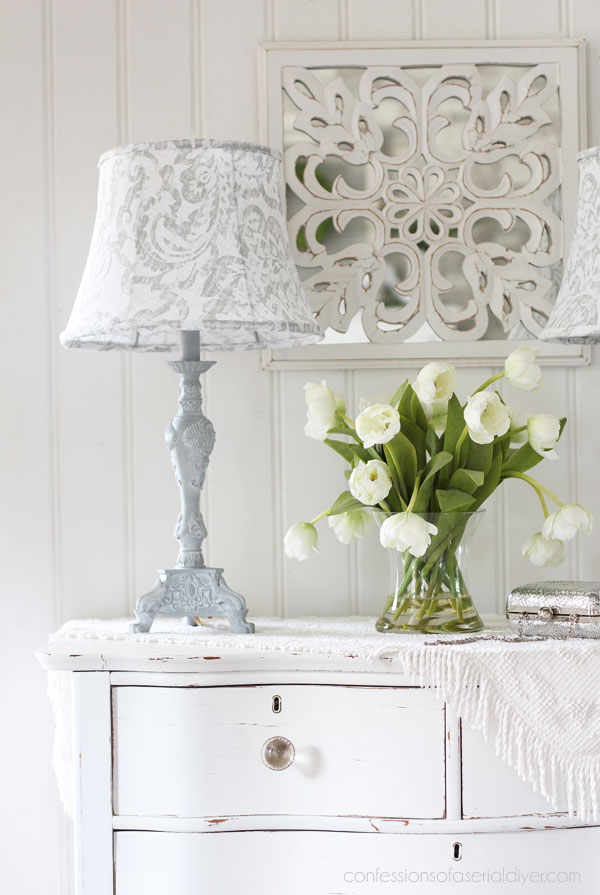
Ok, you might if you really looked hard, but let’s get in a bit closer…

Not too shabby, eh??
The fact that this fabric had some give to it definitely helped!
I already had the lamp harps that attach the shade to the lamps, but I did have to order more of these finials to hold the shades on. They were supposed to be here in time but got delayed, so once I get them in and painted, they will finish this set off nicely!
The details in the lamp really stand out with the white wax…

The cost per lamp ended up being $14.25 if you don’t count the materials I used that I already had on hand. That’s much better than they would have been had I paid $22 or more for new shades.
And I’ll definitely get my money back when I sell them! 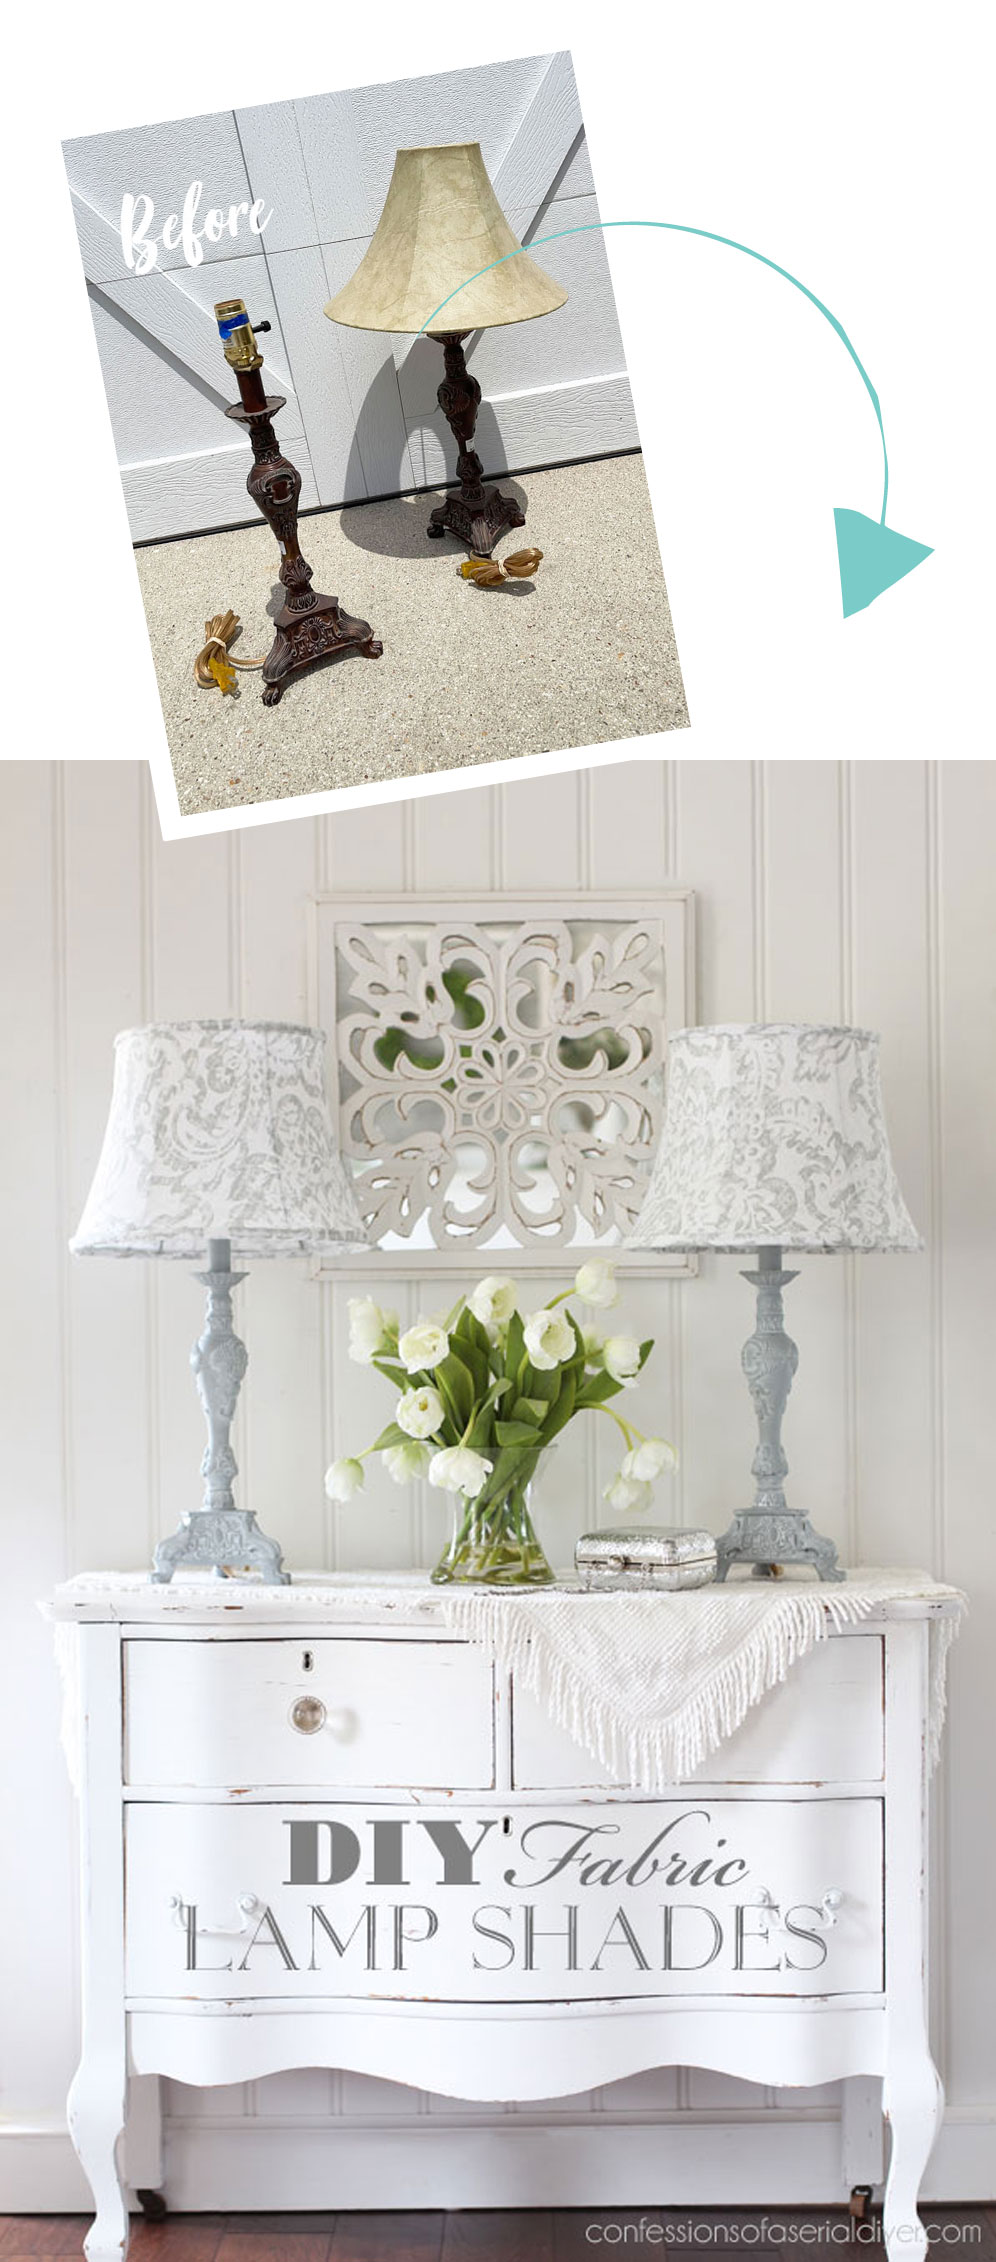
And that is thrifty makeover number two from my brand new haul!!
If you missed the first makeover, it was a pretty one…THIS DRESSER that I shared last week.
I’ll be back on Thursday with this demilune table I picked up for $10:
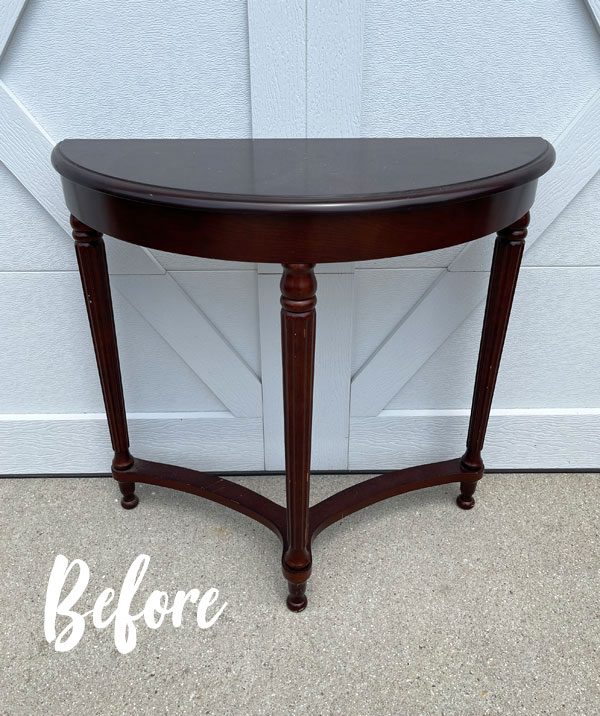
It turned out super cute!
UPDATE: See it HERE now!
See ya then!
XOXO,

P.S. I should have Gator Hide restocked by then too!!
Don’t Miss a Thing!
If you like what you see, there are several ways to follow along!
EMAIL * INSTAGRAM * FACEBOOK * PINTEREST


Get FREE SHIPPING on all orders over $50. No code needed at checkout! Orders under $50 always enjoy $8 flat rate shipping! Most orders ship same or next business day!


Mary Kaiser says
Oh, how beautiful they turned out!! You certainly are a magician! I love the white wax into the details! I am sure impressed with your lamp shade coving skills! They are so beautiful now!!
Christy says
Aww thank you so much, Mary! It was kind of a blessing in disguise that I couldn’t find any good deals on new lampshades lol! XOXO
Jackie C says
I absolutely ❤️ love ❤️ these lamps! I think I’ll hit goodwill today to see what lamps they may have! Plus it’s senior day, 25% off! Whoop! Thanks for the inspiration.
Christy says
I’m so glad you love them, Jackie! Thank you! I hope you found some treasures today! XOXO
Christine says
Ok, those shades are amazing!!! Even at $6.75/each, still way cheaper than retail, right??
Christy says
Thank you so much, Christine! Yes! They were a fantastic savings and totally custom now! XOXO
Janice Holt says
You would never know these were the same lamps. They turned out beautiful. Love the fabric on the shades and the white wax on the bases could not have been any better. Oh and the piping on the shades makes them look perfect.
Christy says
Thank you so much, Janice! They do look like totally different lamps, right? XOXO
Kate says
Love this lamp redo! They’re beautiful:)
Christy says
Thanks so much, Kate! XOXO
Debora says
Those are so beautiful…amazing detail on the lamps and the lamp shades put them over the top! I love them!!! You are so gifted and it’s fun to see what you are going to come up with on each item you transform….you nailed it with these lamps and shades
Christy says
Aww I appreciate that so much, Debora! Thank you! XOXO
Carolyn Price says
You are amazing, Christy!! The lamps look fabulous and those shades are so stylish!!
I had a pair of those lamps at one time. 😂
You are so creative!! ❤️
Christy says
Thank you so much, Carolyn! XOXO
Sheila DelCharco says
Wow those look great!! You inspire me so much!
Christy says
Aww I love that, Sheila! Thank you so much! XOXO
Cyndi says
Those are beautiful! You did a better job on the shades than some I’ve seen in stores!
P.S. Your nails always look so pretty. I’ve given up on mine because I always end up getting paint on them. 🙁
Christy says
Thank you so much, Cyndi! I treat myself to a manicure about every three weeks, but I use gel polish. It literally lasts until they take it off the next time I go lol! XOXO
Denise Cox says
Very pretty!! The wax makes a nice finishing touch!!
Christy says
Thank you, Denise! It sure does add so much, right?! XOXO
Judy says
I just chalk painted a lamp yesterday. It looks like it had an original finish similar to your pair. Other than wax, what sealer do you recommend? Would satin top coat work? I’m afraid paint will come off when I add a topcoat since it’s a non porous surface. Thanks
Christy says
Hi Judy! If it has a lot of details, I would just use a spray sealer like from Rustoleum. XOXO
Cheryl Atkinson says
Hi Christy! They turned out great. I’m not sure that I’m brave enough to try this but you never know. Thank you for the tutorial.
Christy says
Thank you, Cheryl! Well at least you know it’s an option if you’re ever in a pinch! XOXO
Kathy says
Cute!
Christy says
Thank you, my friend! XOXO
Sharon L Austin says
Those turned out great; I love them. However, you should have seen my face when you cut the red off the lampshade. I truly thought you were going to go in a different direction with some rich red lamps when you bought those. LOL
Christy says
Ha ha! Red is just not my color lol. Thank you, my friend! XOXO
Bonnie says
What beauties these turned out to be. Those shades compliment those lamps so well.
Hugs!
Christy says
Thanks so much, Bonnie! XOXO
Amanda says
Love these lamps now! The shades are perfect!! Good work! 🙂
Christy says
Thank you so much, Amanda! XOXO
Ashley says
Hello Christy, you did a beautiful job on those lamps. The lamp shades turned out lovely. 💗
Christy says
Thank you so much, Ashley! It ended up being a good thing that I couldn’t find a deal on new shades lol! XOXO
Vicki Lombardi says
Christy, I absolutely adore what you did with these lamps and your DIY lamp shades! Beautiful! You always inspire me! I am amazed at how many times you have been able to use those curtains from Home Goods but I guess two long panels go a long way! 🙂 I’ve been on the lookout for similar at my Home Goods but no luck so far. So excited to see your magic with your new haul. Vicki
Christy says
Thank you Vicki! I appreciate that so much! I know, right? I know I did the drawers on a dresser and a night table, and I’m sure I used them to line something lol. You do get a lot of fabric with two curtain panels! XOXO
Sheila says
Lamps are soooo pretty Christy! No surprise, you are so talented. Have followed you for some time and you always hit it out of the park. I have always wondered though, does the heat from a lightbulb have any effect on the lampshades? I have wanted to try for some time. Thanks for all your beautiful inspirations!
Christy says
Aww thank you so much, Sheila! I really appreciate your sweet words! While a bulb does get pretty hot, it isn’t close enough to the shade to do any damage. XOXO
Vicki says
Those lamps are beautiful!! You are so smart and inspiring!!!! Thank you for sharing!!
Christy says
I’m so glad you like them, Vicki! Thank you so much! XOXO
Debra Hubbs says
Wow they look beautiful. I thought maybe you would be painting the shades as I’ve seen some do that. That fabric is perfect.
Christy says
Thank you, Debra! I have done that in the past and actually spray paint works fabulous on shades, but I was fearful that the red would still show through lol. XOXO
Lisa says
Love them…wow, nice work..
Christy says
Thank you, Lisa! XOXO
Char says
Wow! Great makeover.
Christy says
Thanks so much, char! XOXO
Denise says
Absolutely gorgeous!! I would never guess they were the same lamps. You did a spectacular job (as always).
Christy says
Aww thank you so much, Denise! XOXO
Addie says
Not too shabby indeed! As I was looking at the red shades and this new fabric…I was thinking….ah oh!!! What if you put your new fabric over the red? Maybe it would have given it a defused light pink glow? It would have made it more specific to a certain buyer but it could have worked? NO????
Well, I have to be nice again….your finishing skills on all your projects are excellent and make a huge difference!!! I don’t subscribe to the “just get it done” thinking. xoxo
Christy says
Thank you so much, Addie! Yes, I was worried that the red would glow through when you turn the lamp on LOL. Could have been great for a sexy boudoir ha ha! XOXO
Michele M. says
Magic, indeed!
WOW! What an incredible transformation!!!!!
Christy says
Thank you so much, Michele! XOXO
Sue Mellette says
Oh my goodness! I absolutely love this makeover! I love the gray with the whitewash finish. But the crowning touch is your handmade lamp shades. They are perfect. Unless someone looks very closely, I dare say these could pass for really expensive lamp shades!! What a stunning pair of lamps. I have several of my late mom’s lamps that are really in need of a makeover. You have given me the inspiration I need to get started!! Enjoy your week.
Christy says
Thanks so much, Sue! I’ll admit, this task was a bit daunting to start, but it went pretty well lol. Good luck with your mom’s lamps, my friend! XOXO
Kay says
Gorgeous and thanks for the info on recovering a lamp shade…I have not been that brave!😄
Christy says
Thank you, Kay! It helped that I was using thrift store lampshades lol! XOXO
Anita says
Love, love, love these! Such a versatile and soft overall look. Great job on the DIY shade covers! A perfect match to the painted base.
Christy says
Thank you, Anita! I’m glad now that I wasn’t able to find new ones that worked lol! XOXO
Joanne H says
Aren’t you clever. Love the way you redid the shades. Thanks for the tip about using the right type of fabric and making great use of the finished edge of the drapes for a really nice edge to the shades. The lamps turned out beautiful.
Christy says
Aww thank you, Joanne! The drapery panels worked perfectly for this purpose! XOXO
Deanna Shanti says
Amazing transformation, as usual! Thank you for sharing!
Christy says
Thank you so much, Deanna! XOXO
Petra says
Thank you so much for the lampshade tutorial 🙂 I have 2 similar lamps and shades that I need to do, so this has helped tremendously xo
Christy says
Oh you are so welcome, Petra! I’m no pro, but at least hopefully seeing it can be done helped lol! XOXO
Cathy says
Wow! They turned out fabulous! I have a pair of lamps that I painted about 4 months ago (white fluff and wax, just like you taught me😉) and I do not like the shades and I haven’t been able to find any that were reasonably priced. What an awesome idea! You always inspire me! Thanks Christy!!
Christy says
Aww yay! Thank you so much, Cathy! Yes, now you can find the perfect fabric and make them your own! XOXO
Karen Moore says
Turned out great. The piping was really the finishing touch for me. Great use of the hemmed fabric. I painted a lamp shade once and added a little painted detail that I decided didn’t work. Painted over it, but when the light is on it shows through. You can’t see it at all when it’s off. It actually is really pretty. You never know.
Christy says
Thank you, Karen! Great idea to paint as well! XOXO
Rose Lefebvre says
I love how the lamps came out. The color is great. You did a great job on the shades. I would never attempt to do those!
Christy says
Thank you, Rose! I was crossing my fingers on the shades lol…glad they worked out! XOXO
Mary King says
Love these two too!! I have been so busy at work that I am trying to catch up on posts. I have missed seeing your talented work although I see some of it daily! 😉
Christy says
Thank you, Mary! I’m so glad you’re able to stop by when you can! XOXO
Kim says
Your stars were aligned on that makeover! Oh my gosh! I like how brave you were to try something new … covering tapered lamp shades and using the drape hem to finish them off?!! AMAZING 🤩
Christy says
Right?? I’m kind of glad I didn’t find new shades that would work lol. Thank you, Kim! XOXO
Maureen says
I have those lamps from my old house. My decor has been changing and I wanted to paint the base white, just like you did!!!! But I’ve been unable to find new shades. I love the shape of mine and they are trimmed with pretty beads, but the shades are covered in a bronze gold colour . I’ve debated painting but don’t want paint on the bead fringe. I thought of recovering them but was lazy. After seeing how yours turned out you have given me the motivation to do it! I love how yours turned out! Thank you so much for the awesome inspiration!!
Christy says
Oh awesome! You are so welcome! I’m thrilled that you found some inspiration for yours. Now they can join the family again lol. Have fun! XOXO
Val says
Dang, Christy, you ARE a magician! These look great!
Christy says
Thank you so much, Val!! XOXO