Amazing friends, welcome to Furniture Fixer Upper Day! On the fourth Thursday of every month, my furniture flippin friends and I come together to share furniture transformations. In December we like to reshare our favorites of the year with you!
Today’s makeover was one of my absolute favorite furniture makeovers of the year, this desk that I found at an estate sale for only $19:
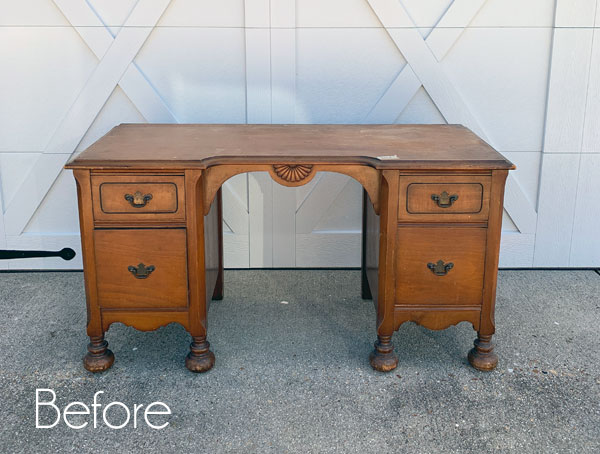
It was originally marked $38, but everything was half off. That was a hard deal to pass up!
Unfortunately, when I got it home I realized it was super short, as in the smallest chair I could find in my stash could barely fit under it. I immediately regretted buying it.
Then I found a solution! I was able to add the height I needed to make it functional.
First, let’s see how it turned out, shall we?
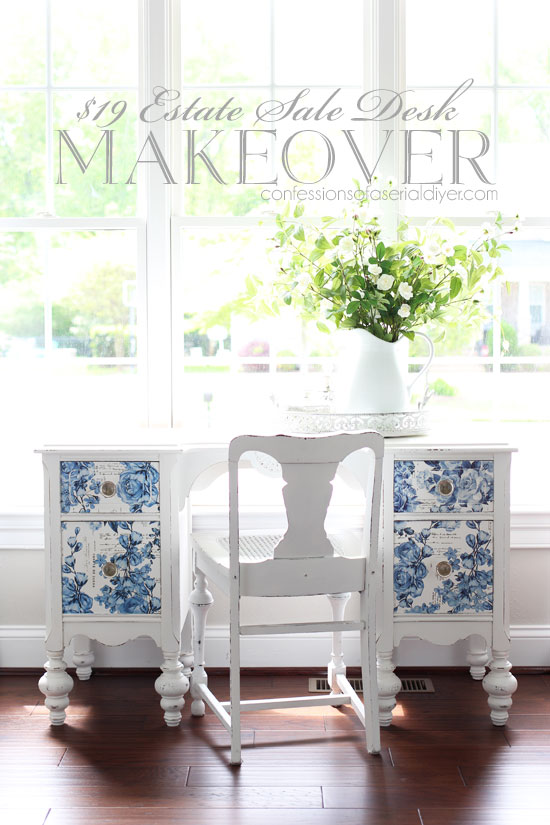
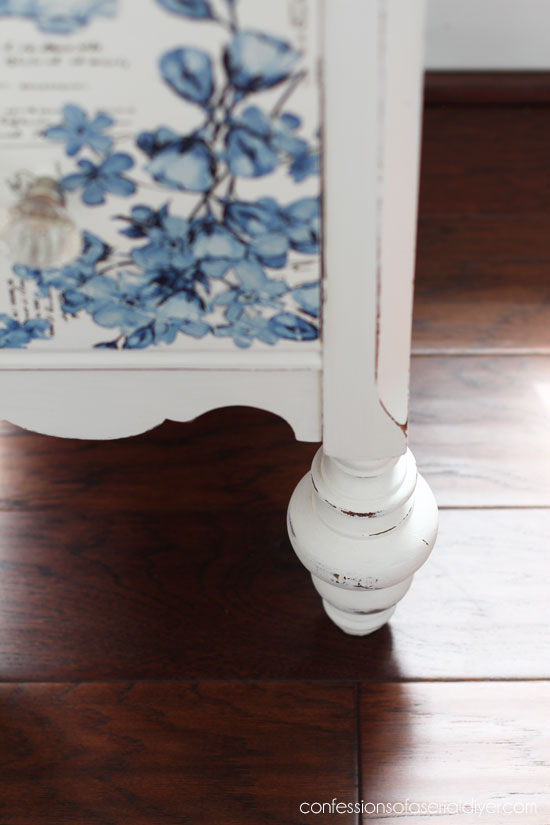
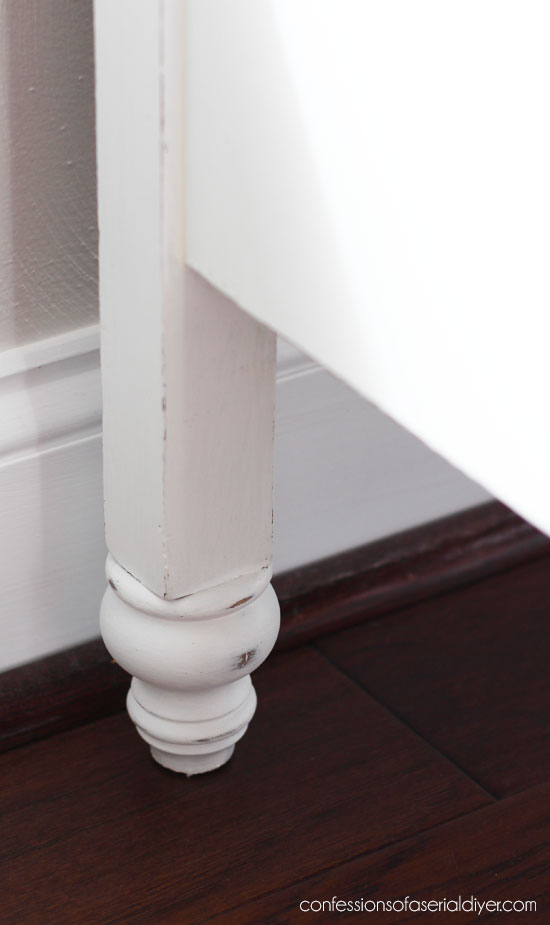
See how I was able to add another 3″ to the height? I added more feet to the existing feet! I think the legs look even better than before! Don’t you? They looked so heavy before.
I’ve included a few affiliate links so you can find the products I love.
I started searching for feet that I could attach to the existing legs. I didn’t have any luck looking locally, so I searched Amazon and found these wooden turned feet that were just perfect!
A set of four was $17.99:
![]()
I ordered two sets since my desk has eight legs.
Then I gathered a few other supplies to attach them.
![]()
I found some dowel screws in my Dad’s woodworking supplies. They probably could have been a bit thicker, but they did the job. I also used a pair of Channellock pliers, a drill, a drill bit for pre-drilling, and wood glue.
Here’s how I did it in case you have a similar issue:
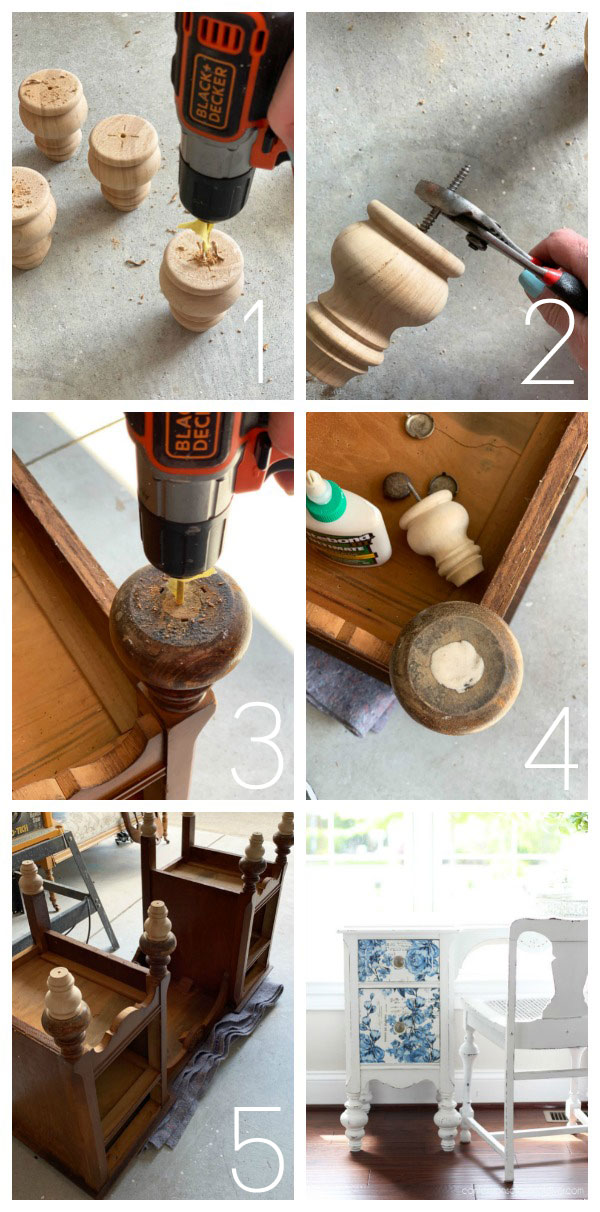
1. You can find feet that already have screws in them, ready to be attached to your furniture, but these did not. I first pre-dilled holes in all the feet with a drill bit that was just slightly smaller than the dowel screws I used.
2. I used my Channellock pliers to help screw one end of the dowel screw into the bottom of the feet.
3. Then I pre-drilled the bottoms of the existing feet as well.
4. I sanded the crud off the bottoms of the existing feet and added a dab of wood glue.
5. Then I screwed the new feet into the existing feet.
They look like they’ve always been like that, right?
You could use this idea for many different types of furniture that you’d like to be a little taller. You just need to find the right combination of legs/feet.
I used my staining cloths in walnut on these after I attached them:
![]()
That way when I sanded later, they would show stained wood through the paint like the original feet:
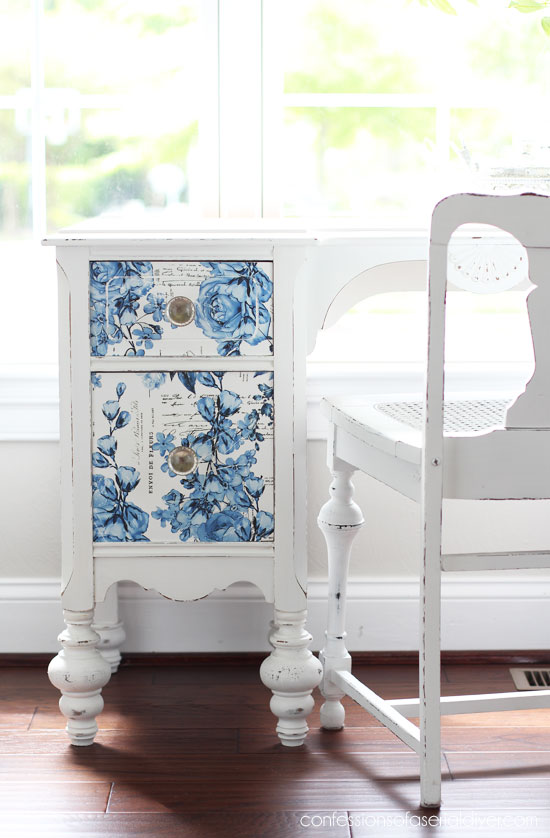
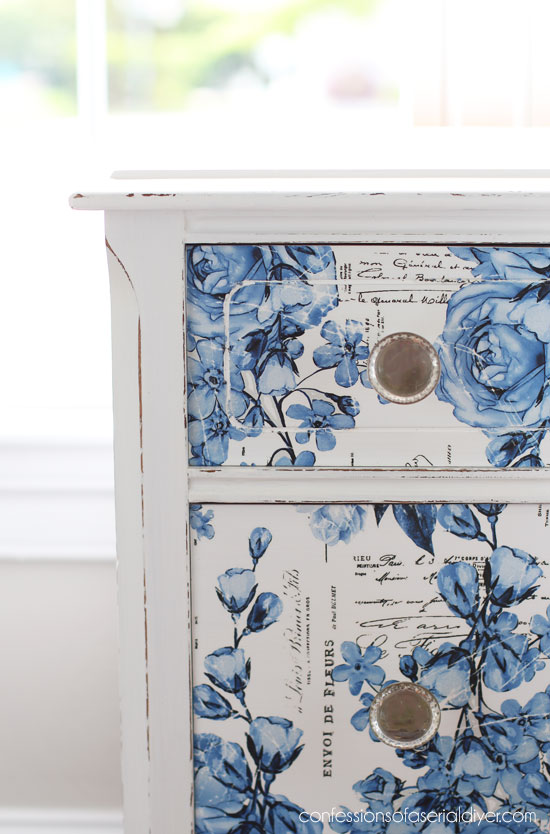
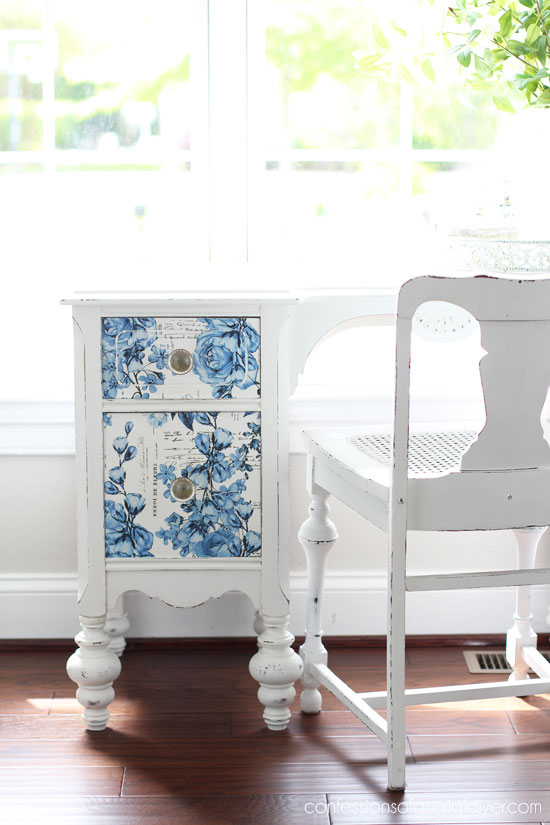
And let’s talk about the star of the show… those beautiful blue drawers!
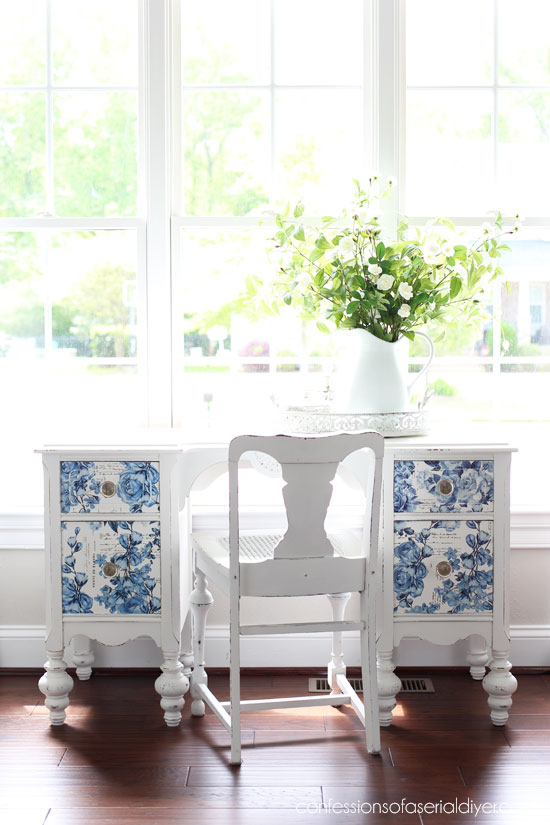
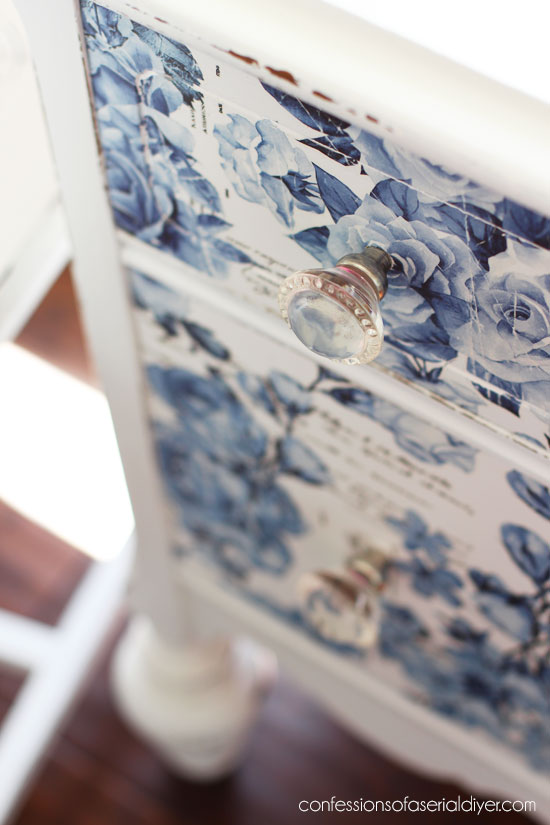
I used a gorgeous transfer from Prima Marketing called French Ceramics that I ordered from Amazon.
![]()
I’m going to show how easy they are to use, but first, this little lady needed some fixing!
After adding the new feet, I removed the old hardware from the drawers and filled the holes with wood filler. I also had a couple of areas on the top that needed help:
![]()
That appeared to be water damage. I removed any loose veneer and filled the area with wood filler also. When the wood filler was dry, I sanded everything smooth with my rotary sander:
![]()
(Find those small dolly wheels HERE…great for moving large pieces! Thanks, Kandice!)
I had unexpected bleed-through issues on the drawers:
![]()
I decided to give the whole piece a coat of Boss in white by Dixie Belle:
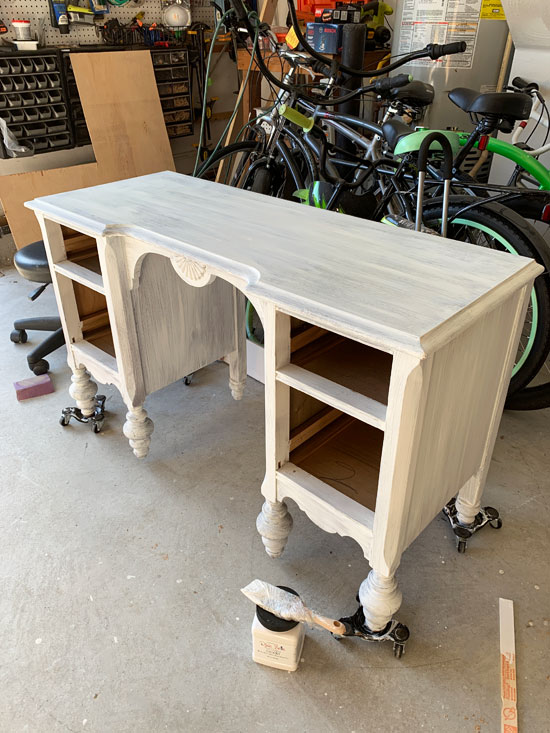
I’m super impatient so I like to get on with it, but I decided to leave it to sit overnight before painting.
The next morning, I gave it two coats of Bit of Sugar by Behr, that I made into DIY chalk paint. Find the recipe HERE along with a video on how to mix it. (This was before I became a Dixie Belle retailer.)
And guess what? NO bleed-through woohoo!
![]()
I sanded lightly all over with 220 grit sandpaper. Because I anticipate that this desk will get some heavier than normal use, I sealed the top with Gator Hide, using a sponge applicator to apply it.
I sealed the body of the desk with Dixie Belle’s Clear Satin Topcoat.
Then it was time to add the transfer to the drawers.
Here’s how easy the transfers are to apply:

1. In this package, there were three sheets of transfers that were 11″ X 22″, instructions, and a burnishing tool.
2. I peeled the backing back on one of the sheets and lined it up with the corner of one of the drawers. It’s a bit sticky. I pressed it lightly across the surface.
3. Next, I took the burnishing tool and rubbed it firmly across the entire surface.
4. Then I used a razor blade to trim the excess all around the edges.
5. The last step is to peel the clear sheet on top away, leaving the transfer behind on the drawer. If any pieces of the transfer are still stuck to the clear top sheet, lay it back down on your surface and burnish it a little more.
And that is it! It couldn’t be more simple. I added another coat of the clear satin topcoat for protection. You can see there are what appear to be scratch marks across the design, but they are part of the transfer…
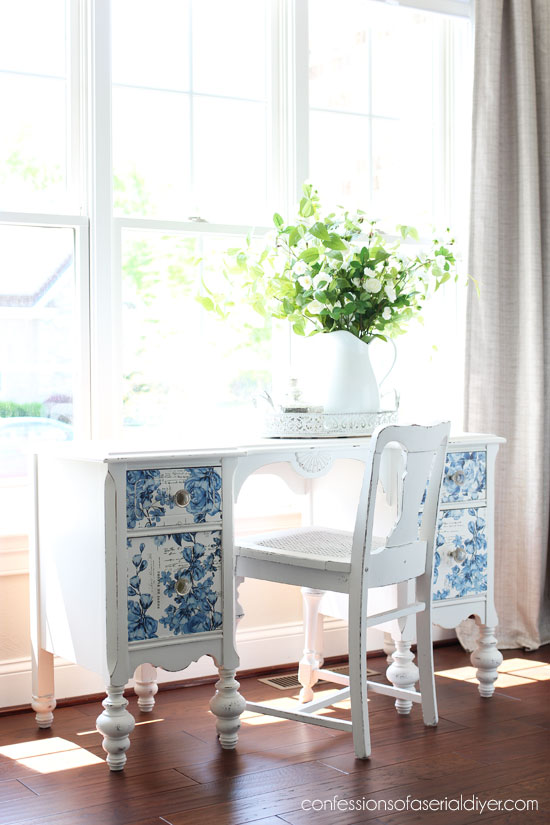
The drawers got a simple navy blue printed fabric:
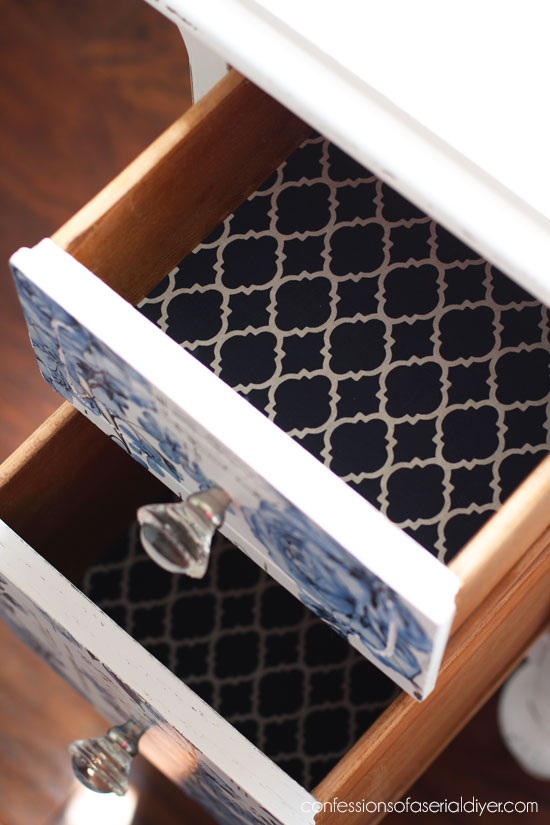
See how I line my drawers with fabric in this video:
If you have trouble viewing, find it on YouTube HERE.
And these glass pulls from Hobby Lobby work great since they are pretty but don’t take away from the pattern on the drawers:
Another peek at those pretty new feet!
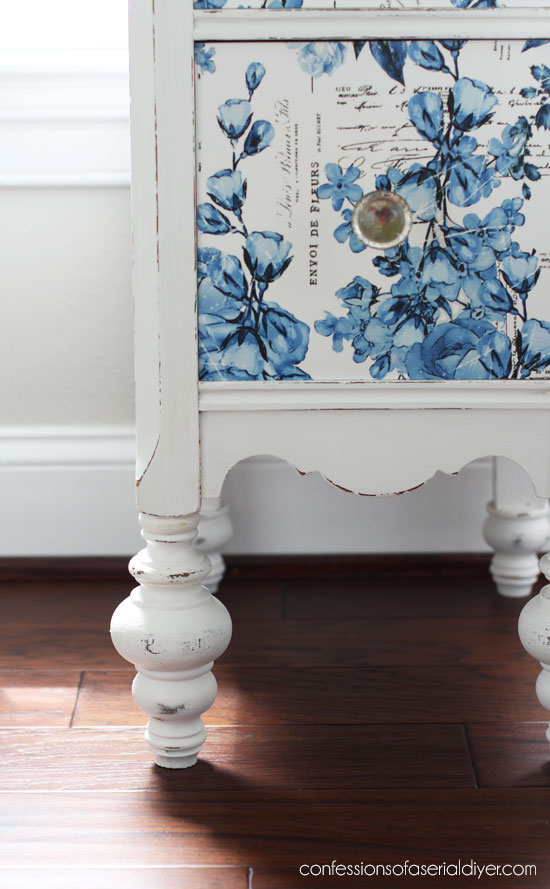
The straight legs at the back got them too and I think they totally work!
I am so tickled at how well this desk that I regretted buying turned out!
And do y’all remember what else I redid to go with this desk?
This mirror was part of that same haul:
![]()
I used what was left over from the transfer on the top to make it match:
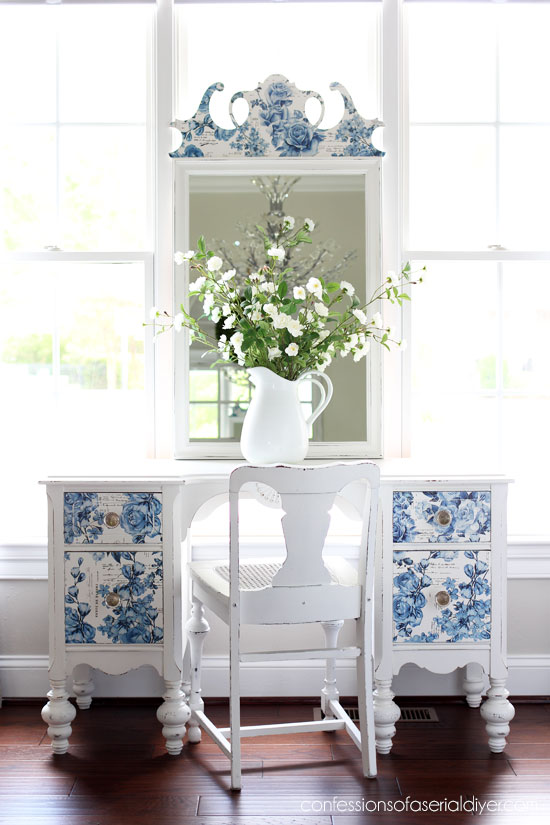

Totally one of my favorite every makeovers!
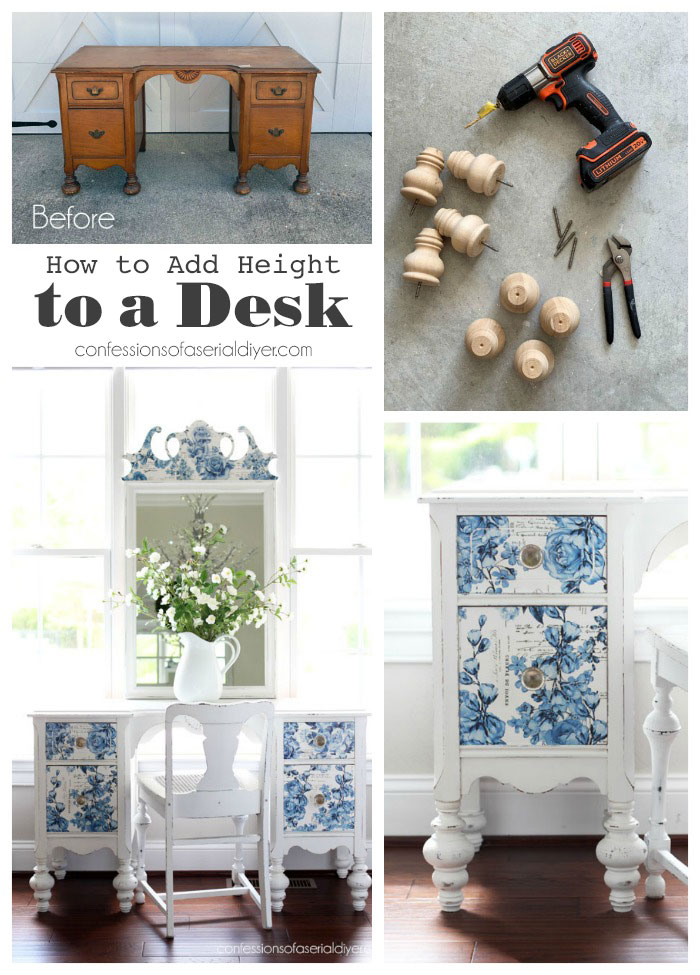
My total out-of-pocket including the desk, the transfers, the hardware, the new feet, and the mirror was $97. Not too bad for a beautiful new desk turned dressing table!
Don’t forget to check out my talented friends’ favorite makeovers of the year as well!

I’ll be back on Tuesday just in time to wish you all a Merry Christmas and to share our outdoor space decorated!
UPDATE: See our outdoor Christmas home tour HERE now!
I hope your weekend is as stress-free as it can possibly be this time of year!!
XOXO,
![]()
Don’t Miss a Thing!
If you like what you see, there are several ways to follow along!
Email * Instagram * Facebook * Pinterest * Twitter


Mary Kaiser says
It is beautiful, I love how creative you are and how you always find a way to make a problem piece into something beautiful and you never give up! You are so cool like that. I can see why this piece turned out to be your favorite for the year. It would be hard for me to pick just one of my favorites of the year because I love them all so much!!
Christy says
Aww thank you, Mary! I was determined on this one haha! XOXO
Christina in SW FL says
Christy, this is a favorite makeover of mine as well. I had forgotten how you magically transformed those club feet!
I admit seeing it now, I can imagine it as two nightstands for your bedroom. 🙂
Christy says
Thank you, Christina!! Oh yep I can see that now too lol! XOXO
Denise - Salvaged Inspirations says
I’ve come across some short desks too. Were people super little back then? ….lol This desk is super gorgeous Christy and love the idea of giving it the extra height. Thanks for sharing! Pinned! 🤗
Christy says
Right?? I guess so haha! Thank you, my dear friend! XOXO
Cathy Klose says
Good morning and Happy Holidays. This was such an informative post! The directions are clear, you provided links to everything! Thank you so much!! Oh yes! And the dresser is stunning!
Christy says
Thank you, Cathy!! I’m so glad you enjoyed this one! XOXO
Candy says
Great idea and beautiful job!
Have a Merry and Blessed Christy,
Candy
Christy says
Thanks, Candy! Merry Christmas to you as well! XOXO
Sue Mellette says
Your makeovers are always so inspiring. I love how you took the time and effort to give height to the desk and the cherry on top was the French ceramic transfer on the drawers and top of the mirror! Stunning – Thanks for sharing your talents.
Christy says
Thank you so much, Sue! I appreciate that!! XOXO
Marie says
This is one of my favorite makeovers of yours, Christy. It’s absolutely stunning and what a sweet steal at $19! Wishing you and your family a beautiful Christmas! xo
Christy says
Thank you, Marie! My favorites are always the ones that needed a little help! A very Merry Christmas to you and your beautiful family as well! XOXO
Jen @ Girl in the Garage says
This makeover is just as fabulous as I remembered! Totally borrowing this idea if I ever run into this problem! ❤️ Have a wonderful Christmas with your boys, Christy!
Christy says
Aww thanks, my beautiful friend! Enjoy your Christmas as well…at the ages your boys are now, it will surely be one to remember! XOXO
Milissa says
Ingenuity! Love the foot extensions and transfers. It turned out so lovely.
Christy says
Thank you, Milissa! XOXO
kandice kullmann says
this is so pretty! love the added and height and the print on the drawers xoxo
Christy says
Thank you, Kandice!! Merry Christmas! XOXO
Mercy says
Hi–I’m a recent subscriber, so this is the first time I’ve seen this post, but I’ve left it up for days because I like it so well! One question though: When you show the mirror, there’s a raised design in the center, but I can’t see anything in the after picture. Did you remove it? And if so, how? That puzzles me!
Thanks, and beautiful (and clever!) work!
Christy says
Thank you, Mercy! I shared the mirror makeover in a separate post and you can see that here: https://www.confessionsofaserialdiyer.com/6-mirror-makeover/ So sorry for any confusion! 🙂 XOXO