Hello amazing friends! Today I am sharing a project that is long overdue. For my last craft market way back in 2013 (it was a sea of cottage white but you can see it HERE), my Mom decided to paint several pieces to sell too. She sold most of what she painted except for a few tables. One of the pieces was a quirky antique table. After it didn’t sell at the market, she put it up in her attic.
About a year later, she was cleaning up there and asked if I wanted to take the table and do something with it. Hmm…antique table + FREE = of course I took it. I immediately decided I wanted to sand the top and stain it, and the legs had a few places where they were starting to separate, so I sanded the top most of the way and filled those areas on the legs in with wood filler.
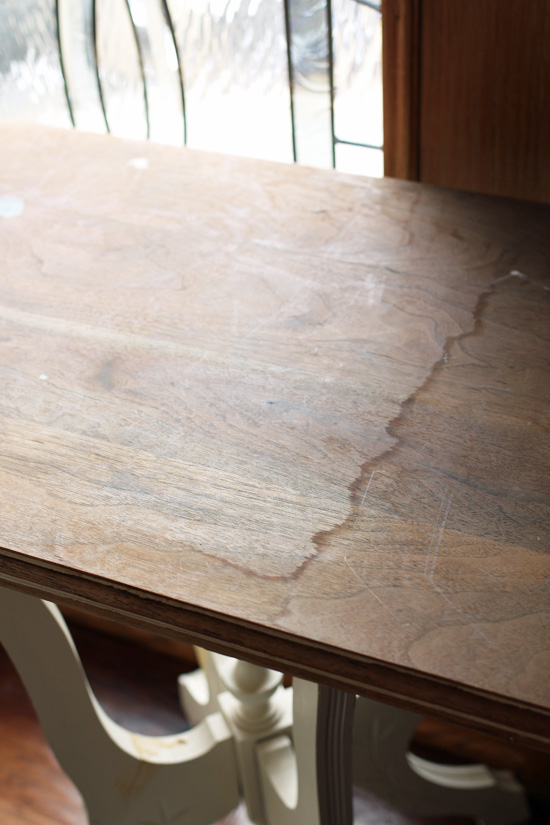
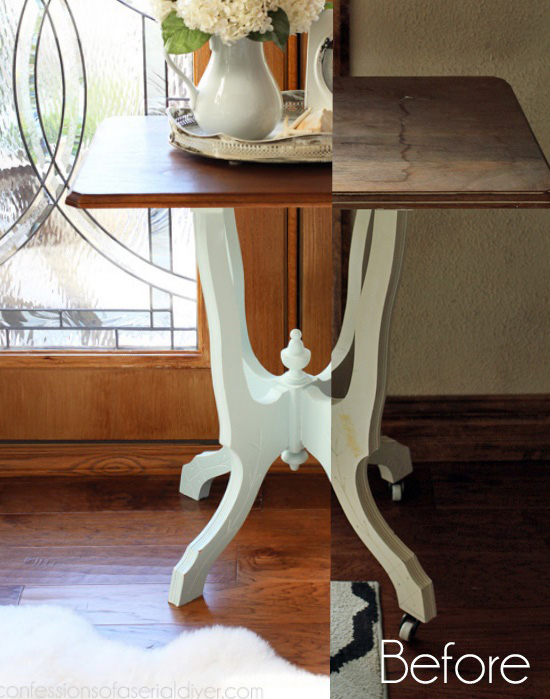
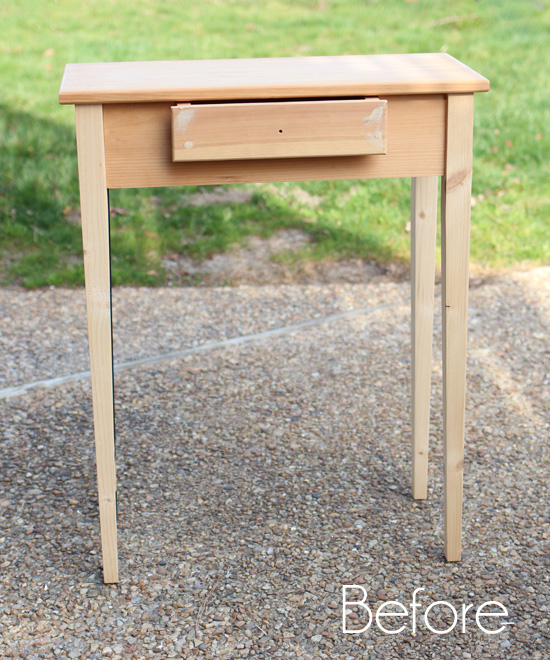
And then there it sat for the next two years looking like this:

I ended up stacking all kinds of crap on top of it. Then a leak added a little more “character” to the top.
I almost wanted to just donate the goofy thing to the thrift store, but I was determined that it was not going to get the better of me.
And so I finished it…

Better, no?
The first thing I did when I pulled it back out was remove the wheels. It was awkwardly tall with them. I have included a few affiliate links so you can find the products I used.
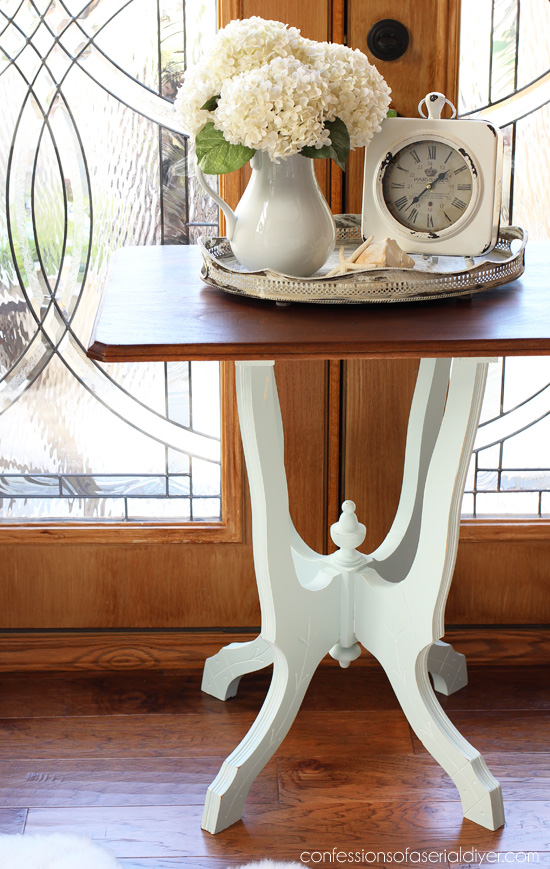
The color I used on the legs is my new found Sunken Pool by Behr. It is so light and breezy! Of course I made it into DIY chalk paint, AND I made a quick two-minute video so you can see how easy it is to make your own!
If the video is wonky, you can view it better HERE. I also added that video to my Chalk Paint Recipe post.
I’m a visual learner so I like to see how something works in action and I thought y’all might be like that too!
The top had paint stuck in the grooves and I didn’t want to risk messing up the detailed edges by sanding, so I used Citristrip Gel to remove the paint.
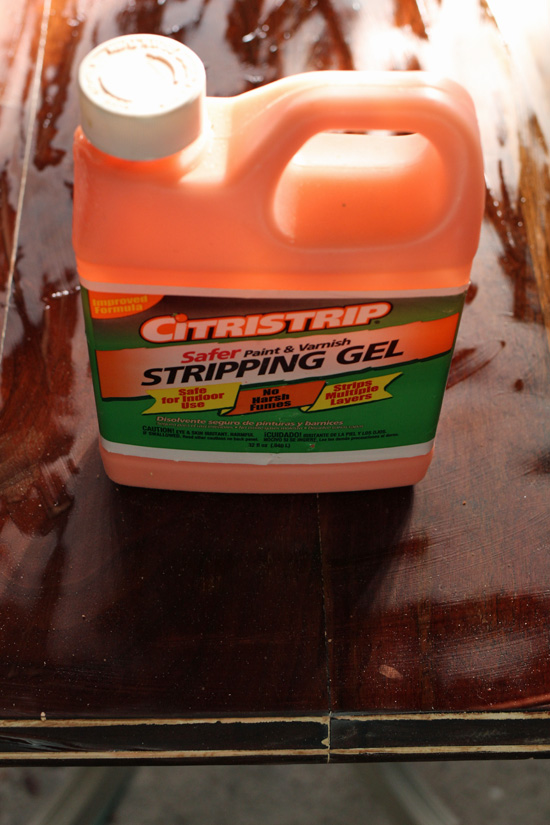
That stuff is awesome and has no harmful fumes. I used a plastic scraper to get the paint out of the grooves, then wiped the entire surface down with mineral spirits.
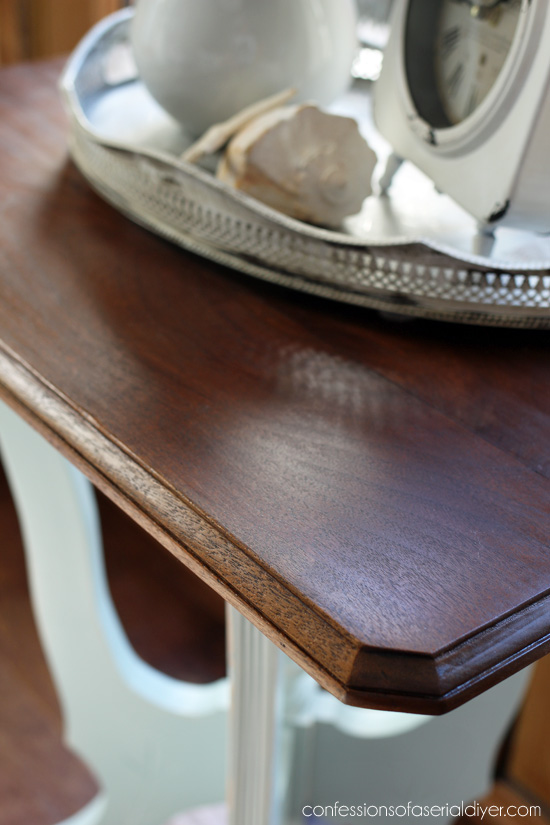
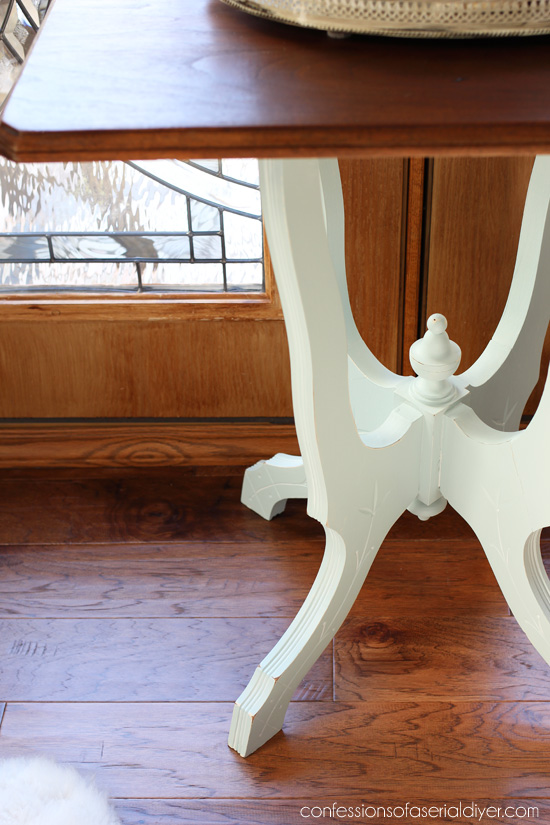
Then I applied a coat of wood conditioner to the top so the wood would take the stain evenly. I followed it up with two coats of Minwax Dark Walnut stain. I apply all my products with a clean soft cotton cloth that I buy in bulk at Lowes. After the stain was completely dry, I sealed it with three coats of Minwax Wipe-on Poly in a satin finish, sanding between each coat with 320 grit sandpaper.
The results are really pretty…
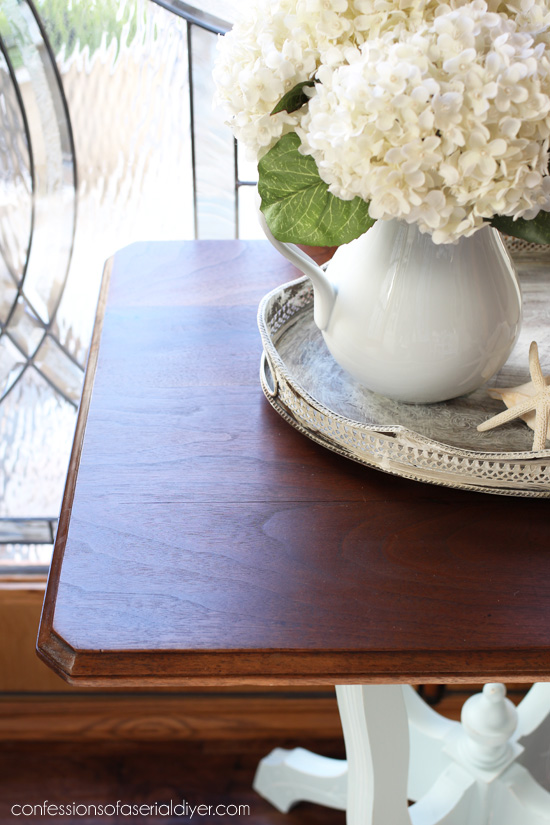
I was able to sand away the ugly water stain as well.
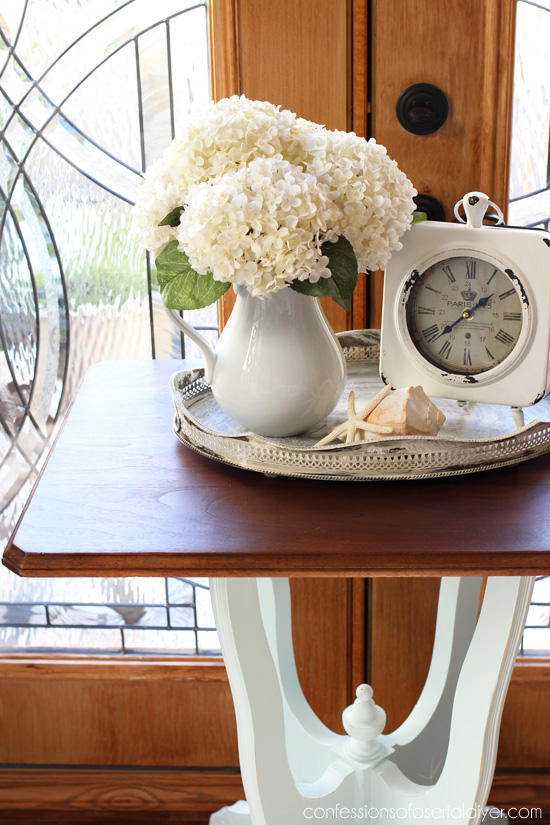
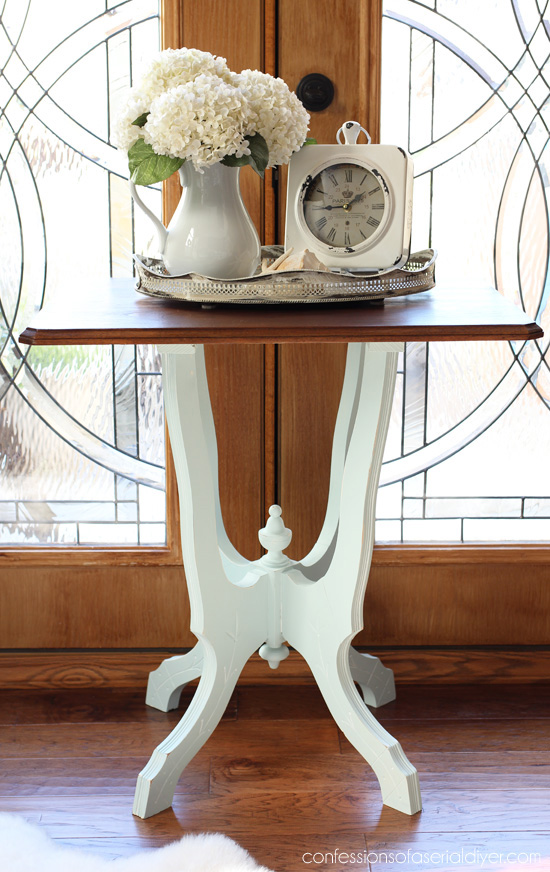
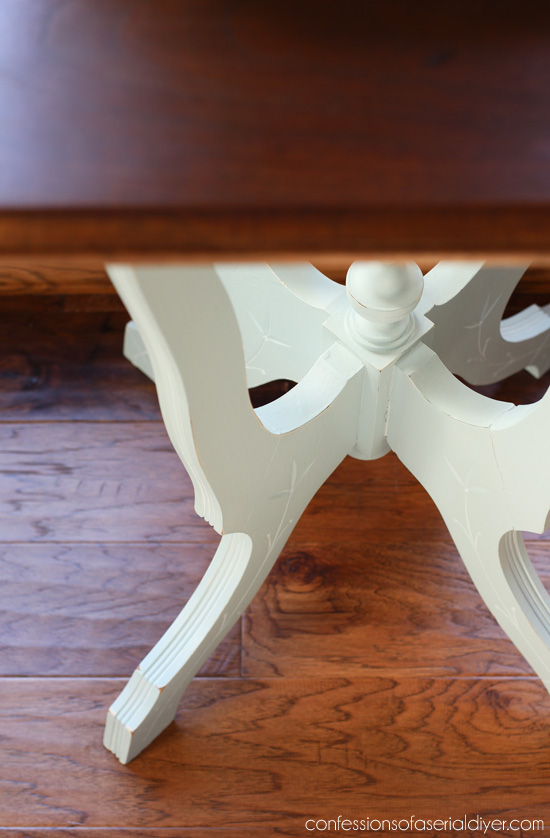
I sealed the legs with Annie Sloan’s white wax. It is great for highlighting details on pieces like the legs on this table:
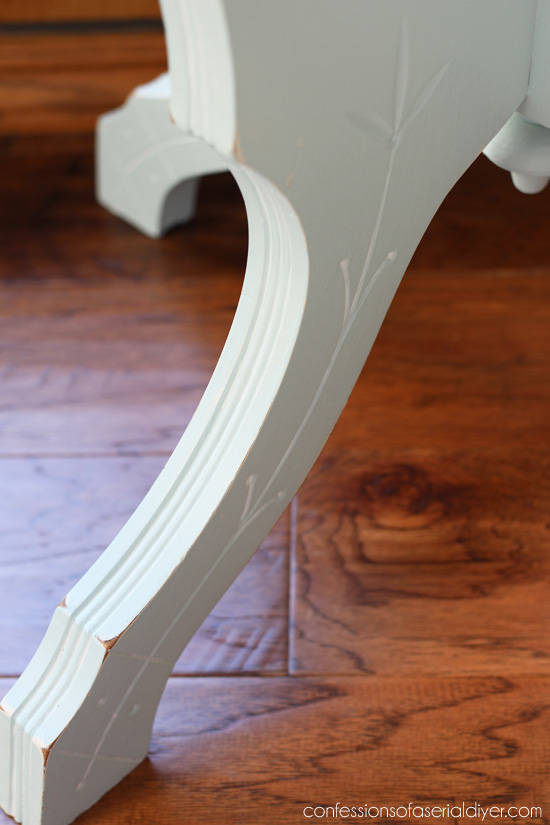
It dries almost clear on the flat areas of lighter painted pieces, at least it did for me since I really buff the wax in.
This is such a cute side table now, and I’m so glad I didn’t donate it!

Do you ever have projects that almost get the better of you? There are probably a couple more projects like that buried in my garage ha ha. But sometimes walking away for a bit does help, just don’t take two years to get back to it!
Hope you enjoyed this makeover as much as I enjoyed getting it out of my garage!
Another table of my Mom’s that didn’t sell was this one:
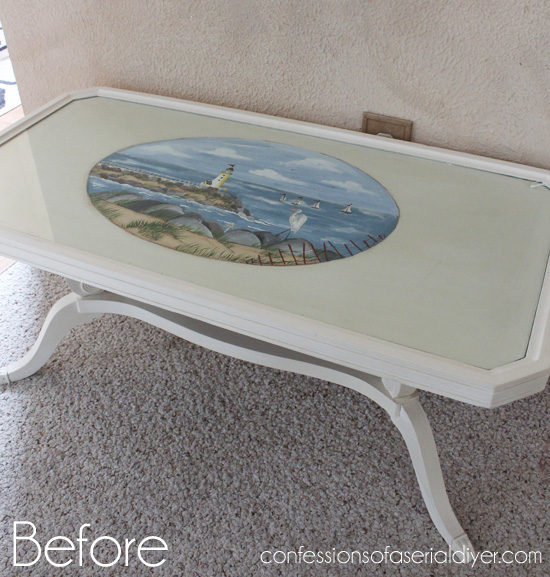
See how I changed it up HERE!
I’ll meet y’all back here on Tuesday bright and early. I’ll be sharing how I finished this unfinished table:
(It also came out of my Mom’s attic…it’s a treasure trove up there!)
UPDATE: See how this unfinished table looks now HERE!
Have a great weekend! 🙂
XO,
![]()
Don’t Miss a Thing!
If you like what you see, there are several ways to follow along!


Christina in FL says
SWEEET! I’m so glad you took off those wheels Christy. The table is so happy with its makeover. Gorgeous result on the top and your treatment of the base is perfect. The white/liming wax was an inspired choice. 🙂 Thank you!!
Christy says
Thank you, Christina!! Yes those wheels had to go…I’m sure they weren’t original anyway. 😀
Susan Renaud says
Beautiful work I love the French inspired table
Christy says
Thank you, Susan! XO
Patty says
Beautiful little table, you did a great job. I just love pieces that are stained and painted they look so rich and go with all types of decor.
Christy says
Thank you, Patty! I agree…love the mix of the paint and stain! XO
Barb says
The makeover on the table is beautiful. Thanks so much for sharing the names of the specific products you used. I need to get some Citristrip and try it. Sounds awesome.
Christy says
Thank you, Barb! Citristrip is a great product and it actually smells nice! 🙂
ColleenB.~Texas says
What a darling little table and the new make over…..Fabulous.
I so enjoy seeing All your make-over projects. You sure inspire.
Both my grown daughters would love that lighthouse coffee table. They are both into the nautical theme for their homes
Christy says
Thank you so much, Colleen!! I did love that painted table…I think if it had been painted with a white background instead of the more cream color, it might have sold. At least we know it is still in tact under the fabric, for someone to discover later. 🙂
Candy J Weiford says
I love this antique table make over. I will be following your directions from this table on an older than 100 year old wagon wheel table and shelves that my husband made for me in the dining room for me, for Valentine’s Day. I have never striped or stained!
Also, cannot wait to make your Chalk Paint.
Trip to Lowes this Saturday………YAY
‘s
Christy says
Thank you, Candy! I must warn you…once you start, it can be addicting! 🙂
Debbie in TX says
Wow, that little table is beautiful. It has so much character and fine little details that make it exceptional. Also, it takes a lot of time and patience to do these projects, and you make everything look so special. Love your magic touch!
Christy says
Wow thank you, Debbie! You are so sweet! I do love the details on this table too! XO
Janice says
Another very pretty table. Think you done the right thing taking the casters off the bottom. You never disappoint me. Can’t wait until Tues.
Christy says
Thank you, Janice! Yes, the casters had to go ha ha! Have a great weekend! 🙂
Marie|The Interior Frugalista says
Look at the legs on that baby! Such a pretty table, Christy and at long last it has a new lease on life. Thanks for the homemade chalk paint video tutorial too.
Christy says
I know aren’t those legs so pretty?? Thank you, Marie! And you’re welcome for the video…I’ve been wanting to make that for a long time! Have a great weekend! XOXO
Kaycee F says
Great makeover Christy, she really looks great! What an adorable little table! Good thing you didn’t donate her!!!
Christy says
Thanks, Kaycee!! I know I’m so glad I didn’t donate her too!! XO
Teresa says
Beautiful! Your DIY chalk paint recipe is the best, I recommend it all the time and, of course, always give you credit.
Christy says
Thank you SO much, Teresa!! I love it too…works just as well as any of those expensive ones! XOXO
Sherry Stuifbergen says
SO GLAD you didn’t paint the beautiful walnut wood! It is a very pretty table. Are you keeping it or selling it? You did a great job with it. I love wood, so I was looking forward to your makeover. I could tell it was an antique.
Christy says
Thank you, Sherry! The top was originally painted when I got it and I am so glad I removed the paint to reveal that beautiful wood beneath! I am selling this one…no room for it! XOXO
DeAnna Moore says
Cute table!! So… I’m assuming if I use that chalk paint recipe I won’t have to sand a wood table?? I have a dining room table that I want to do exactly what you just did but don’t want to have to remove the stain/varnish from the legs. Thank you Christy for all you helpful tutorials!
Christy says
Thanks DeAnna! Yes that is right…no sanding or priming necessary! If you’d like more details, you can check out my chalk painting tutorial here: https://www.confessionsofaserialdiyer.com/how-to-paint-furniture-using-chalk-paint/ 😀
Josie says
I love how you saw the beauty of this piece and made her sparkle with new life. I’m always looking forward to seeing what you do next 😀
Christy says
Aww thanks so much, Josie! XO
Julie B. says
Beautiful, Christy… Did you whiten down the Sunken Pool? This looks like a more blue than aqua…. So hard to tell with out computer monitors! I REALLY like the color!
Christy says
Thanks, Julie! This is right out of the can. The light from that window makes it look lighter too I’m sure. 🙂
Jolinda says
Oh my that is absolutely beautiful and I would love to have it. I am really fond of the beautiful wood on top and paint on the bottom. So classy.
Christy says
Thank you, Jolinda! I’m so glad you like it! XO
Annie (Canada) says
It turned out beautiful! I bet you’re glad you didn’t donate it 🙂
I have two side tables that I painted a year ago that just didn’t turn out the way I imagined so away they went into the dark recesses of my garage…lol They may be out of my sight but not my mind! I know one day soon I’ll be inspired and they will live again 🙂
Christy says
Thank you, Annie, and yes I am so glad I didn’t donate it!! Don’t those projects just drive you crazy? I have a night table that needs a redo also, and I just keep ignoring it. Some day! Have a great weekend! XO
Annie (Canada) says
Oh! I forgot to mention I love your little video <3 🙂
Christy says
Oh thank you! 🙂
Nette says
Beautiful result! I’ve noticed you do a lot of two-tone projects and they all come out fabulous. In general, do you do the painted part first or the stained part first? Or does it matter?
Christy says
Thank you, Nette! I usually start from the bottom and work my way up, so once the whole piece is prepped, I paint first. 🙂
Julie says
I love your blog so much! Finally got over my fear of make your own chalk paint and made a batch. So easy and I love it. I’m assuming you can only do it with flat paint and not satin?
Christy says
Aww thank you so much, Julie!! It really is easy to make your own, and so much cheaper! I have tried using satin, but I find I prefer the flat. 🙂
Becky says
Such a pretty table! The top is gorgeous! Well done!
Christy says
Thanks so much, Becky! XOXO
Rose Lefebvre says
It looks great! Glad the water stain was gone!
Christy says
Thank you, Rose! Me too…I was worried that wouldn’t sand away, but it did thankfully. 🙂
Jeri says
Love your work – look forward to your emails each week! Would love to see a short tutorial on waxing furniture and products you would recommend for different types of projects.
Christy says
Thank you, Jeri! I did touch on waxing a bit in this chalk painting tutorial: https://www.confessionsofaserialdiyer.com/how-to-paint-furniture-using-chalk-paint/ I usually use wax to seal for just about everything I paint, unless I have a piece that needs to withstand serious abuse like children’s furniture, then I like Minwax Polycrylic in satin to seal. That’s a good idea though to add a post that touches on it in more detail! XO