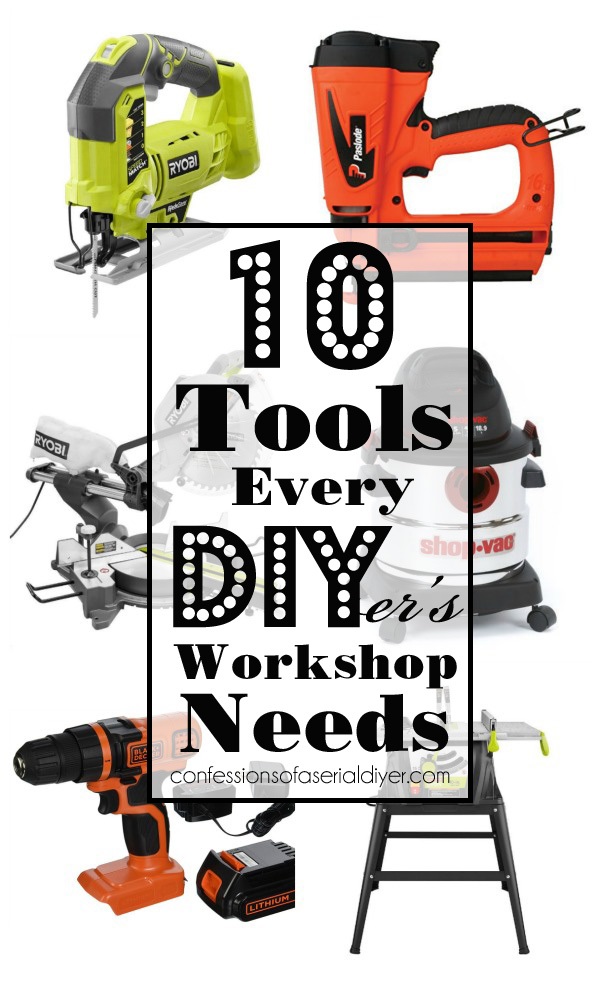
 Hello my DIYer Friends! Today I am sharing 10 essential tools I use most in my workshop!
I often have people ask about different tools I like, would recommend, or feel are essential tools to have in my workshop for all my upcycling projects. This happens even more so around the Holidays when y’all are looking to add to your Christmas lists. Well I finally decided to create one place for all of the above for easy reference!
I am linking these tools to Amazon so you can see more details, ratings, cost etc for yourself. I am an affiliate of Amazon, so if you ever click one of those links to make a purchase, I will earn a teeny tiny commission for referring you, at no extra cost to you of course.
Please be sure to read and follow all safety precautions that accompany your new tools, and wear the proper safety gear when suggested! You DIYers are on your own here…confessionsofaserialdiyer.com is not responsible for lost fingers!
Let’s start with the big guns, the saws! These are the heavies I use on a regular basis that I could not do without.
1
- First up is the miter saw:

This is one of the two types of saws I use on a regular basis. I actually just got this Ryobi Sliding Miter Saw with Laser seen above for Christmas and I love it! I gives me the ability to cut perfect pieces up to 12″ in depth. It also has a laser light that let’s me know my wood is lined up right where I want it to be.
Before that I had a really old Delta that I could not even find anywhere but on eBay, but it did not slide, so it only cut up to 6″. It was still perfect for easily cutting my beloved fence pickets to the lengths I need, for chopping the legs off of headboards when needed, and basically cutting anything that is less than 6″ in perfect cuts. This saw cuts straight and angled cuts. This one is highly recommended on Amazon.
2
- The other saw I use most is a table saw:
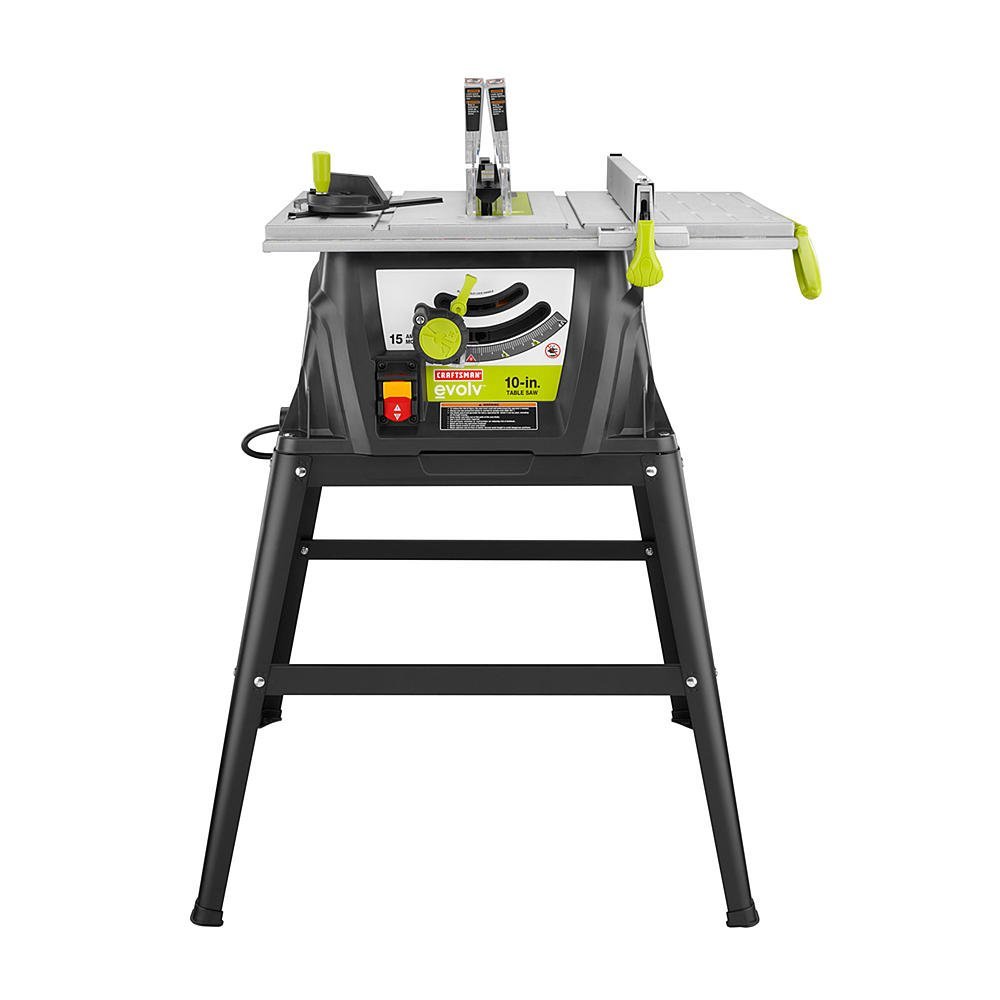 This Craftsman Evolv 15 amp Table Saw is a cost-friendly option with good ratings that is very similar to what I use. My table saw is what I use to cut my hardboard for my chalkboards, my beadboard for various projects and anything larger that I need to cut.
3
- If these two saws are too intimidating, there is one more saw that might be the perfect place to start, and that is a Jig Saw:
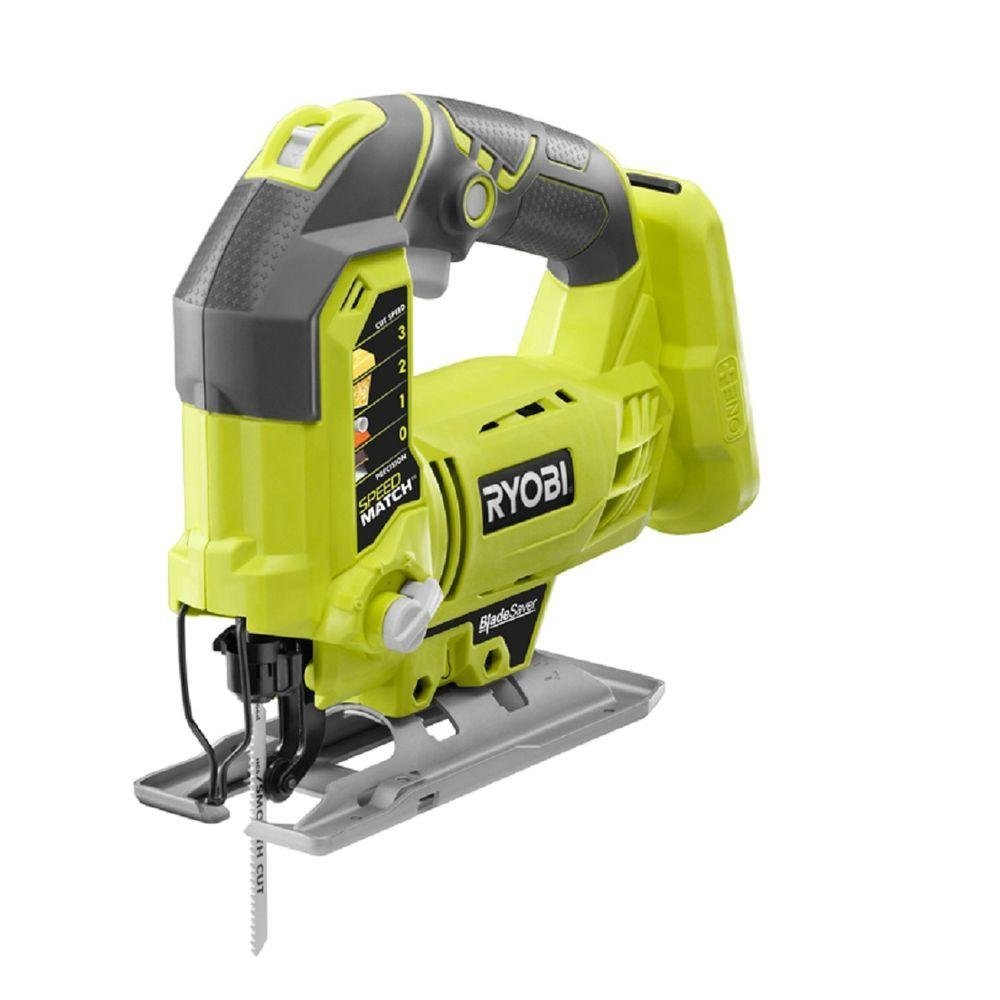 I have this exact one and it’s a Ryobi Cordless 18V One Plus Lithium-Ion Orbital Jig Saw . It is cordless which is awesome, but the battery and charger are sold separately, which can be quite pricey. (They can be used with their whole line of cordless tools though.) I had this Black Decker Jig Saw prior to getting my cordless one and it worked fantastically for the money. I’d definitely recommend it as well. The Jig Saw will cut all of the above I mentioned. I also used this saw to cut the center panels from my kitchen cabinets when I was replacing them with glass, something I wouldn’t be able to use my other saws for. Your cut lines will not be as perfect, but it does the job.
Those are the saws I use and recommend.
4
- No workshop would be complete without a drill! I have three drills in my workshop, but my favorite is my Black and Decker cordless drill:
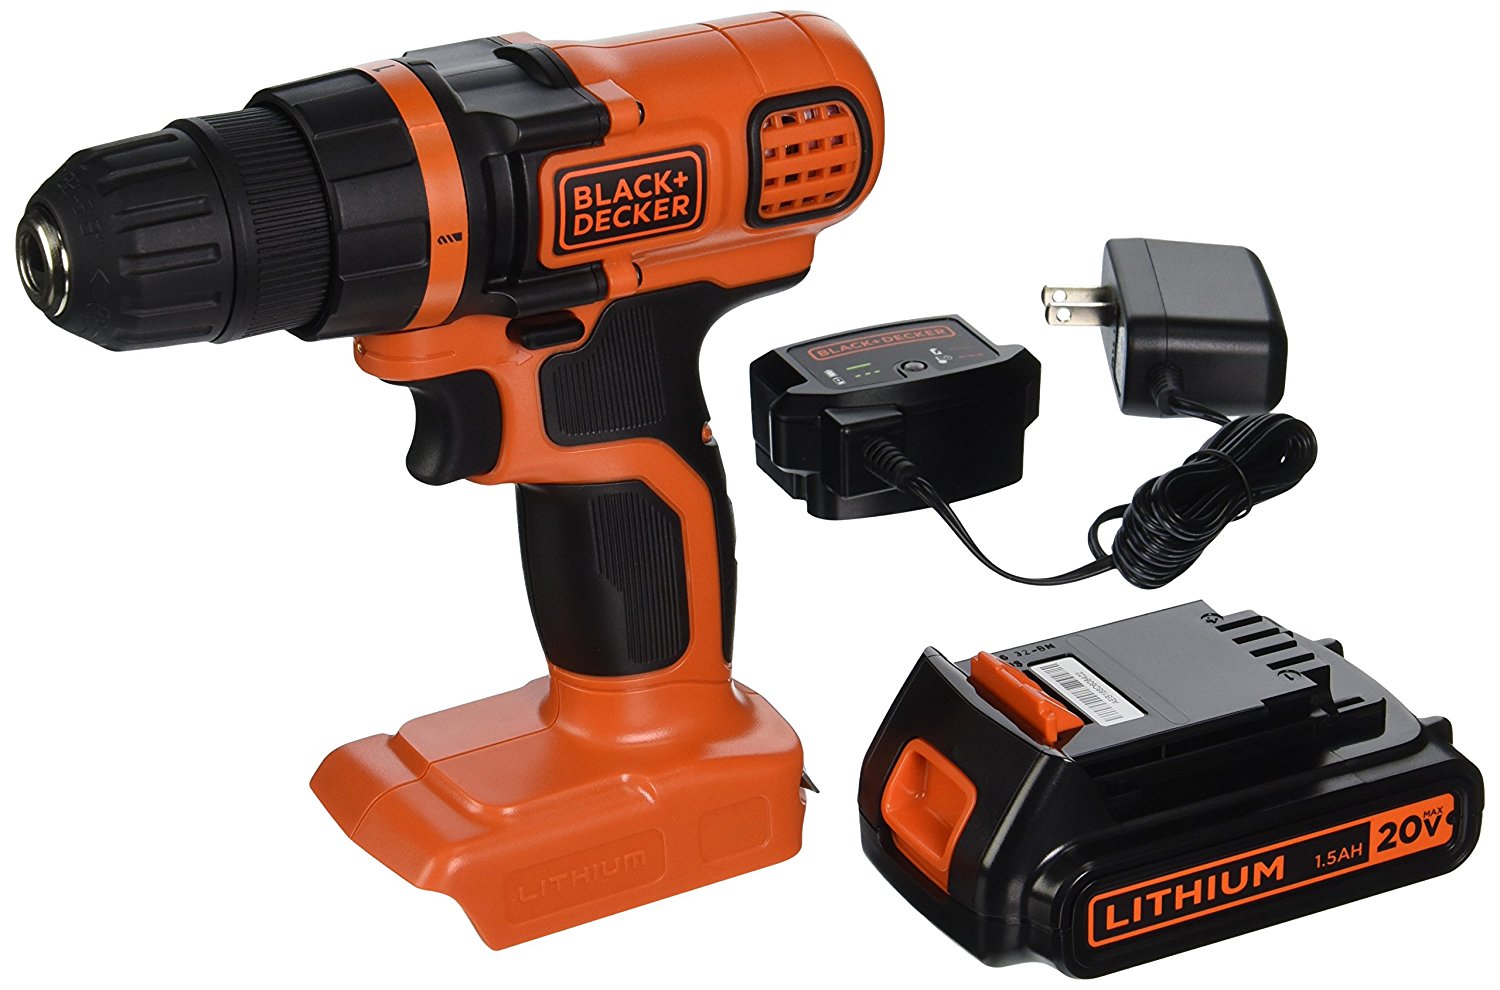
What I love about this drill is that it is smaller than most standard drills, so it is perfect for my small hands, but it functions just as well as the bigger ones I have, definitely a must-have.
5
- Next up is my nailgun:
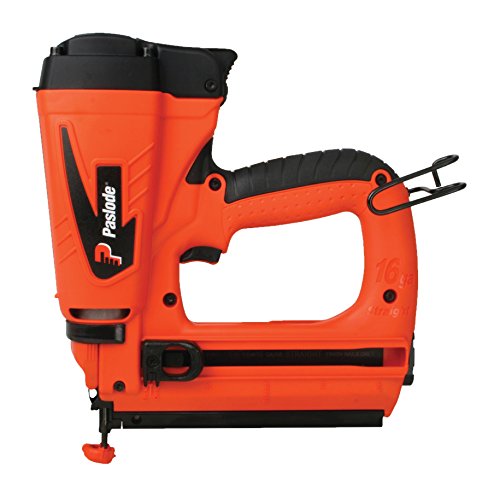
I have this Passlode Cordless Straight Finish Nailer. It rocks! I have had to borrow my Dad’s big ole compressor in the past to install mouldings and it was a pain in the you know what. This little baby gets its power from fuel cells instead. I am still on my original two that we purchased. This tool is perfect not only for attaching mouldings, but also for building shelves, adding new backing to furniture pieces, building DIY wooden crates like these, or for projects like installing a Faux Coffered Ceiling.
6
- I wouldn’t get very far on a lot of my furniture projects without my orbital sander:
 I actually have this Ryobi one now which works great, but before I bought that one I had the Black and Decker Orbital Sander pictured above. It was cheaper, worked just as well, and lasted forever with pretty heavy use.
7
- For vacuuming up all that sanding dust off of my furniture pieces, a shop vac is essential. I have an older version of the Shop-Vac 5 Gallon Wet/Dry Vacuum:
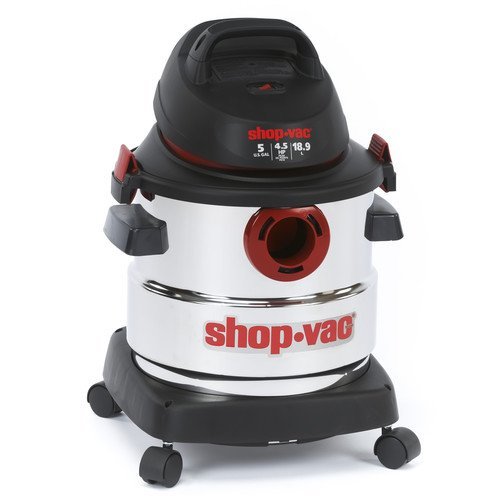 I use the brush attachment as not to scratch my projects’ surfaces.
8
- One of my favorite tools that I use all the time is my Logan Point Driver:
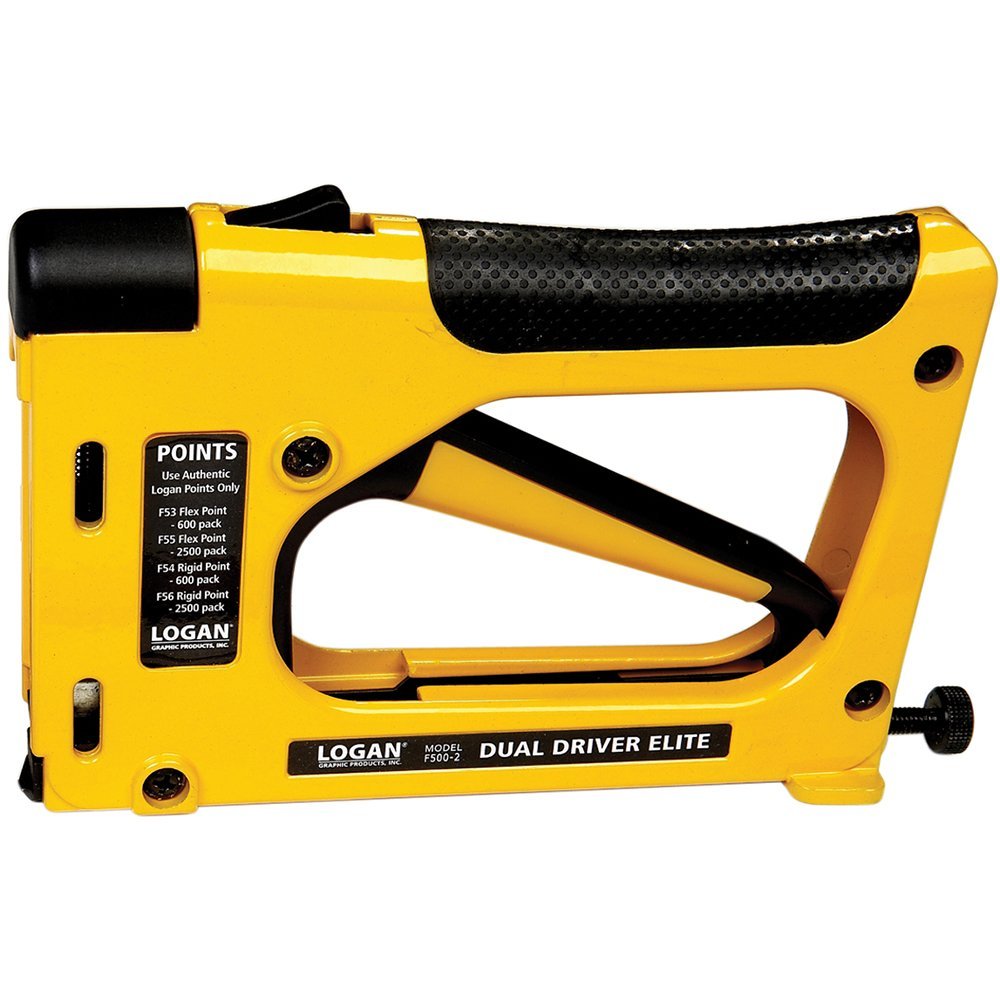
This time-saving tool is how I secure chalkboards into their frames, and it is also a big player when I make trays. It’s so much easier than trying to use a hammer and small nails, although that works too. See this tool in action in this post. You can find the replacement points here.
9
- I couldn’t do most of my upholstery projects without my staple gun, and honestly, my favorite one to use is super cheap, a light duty Stanley:
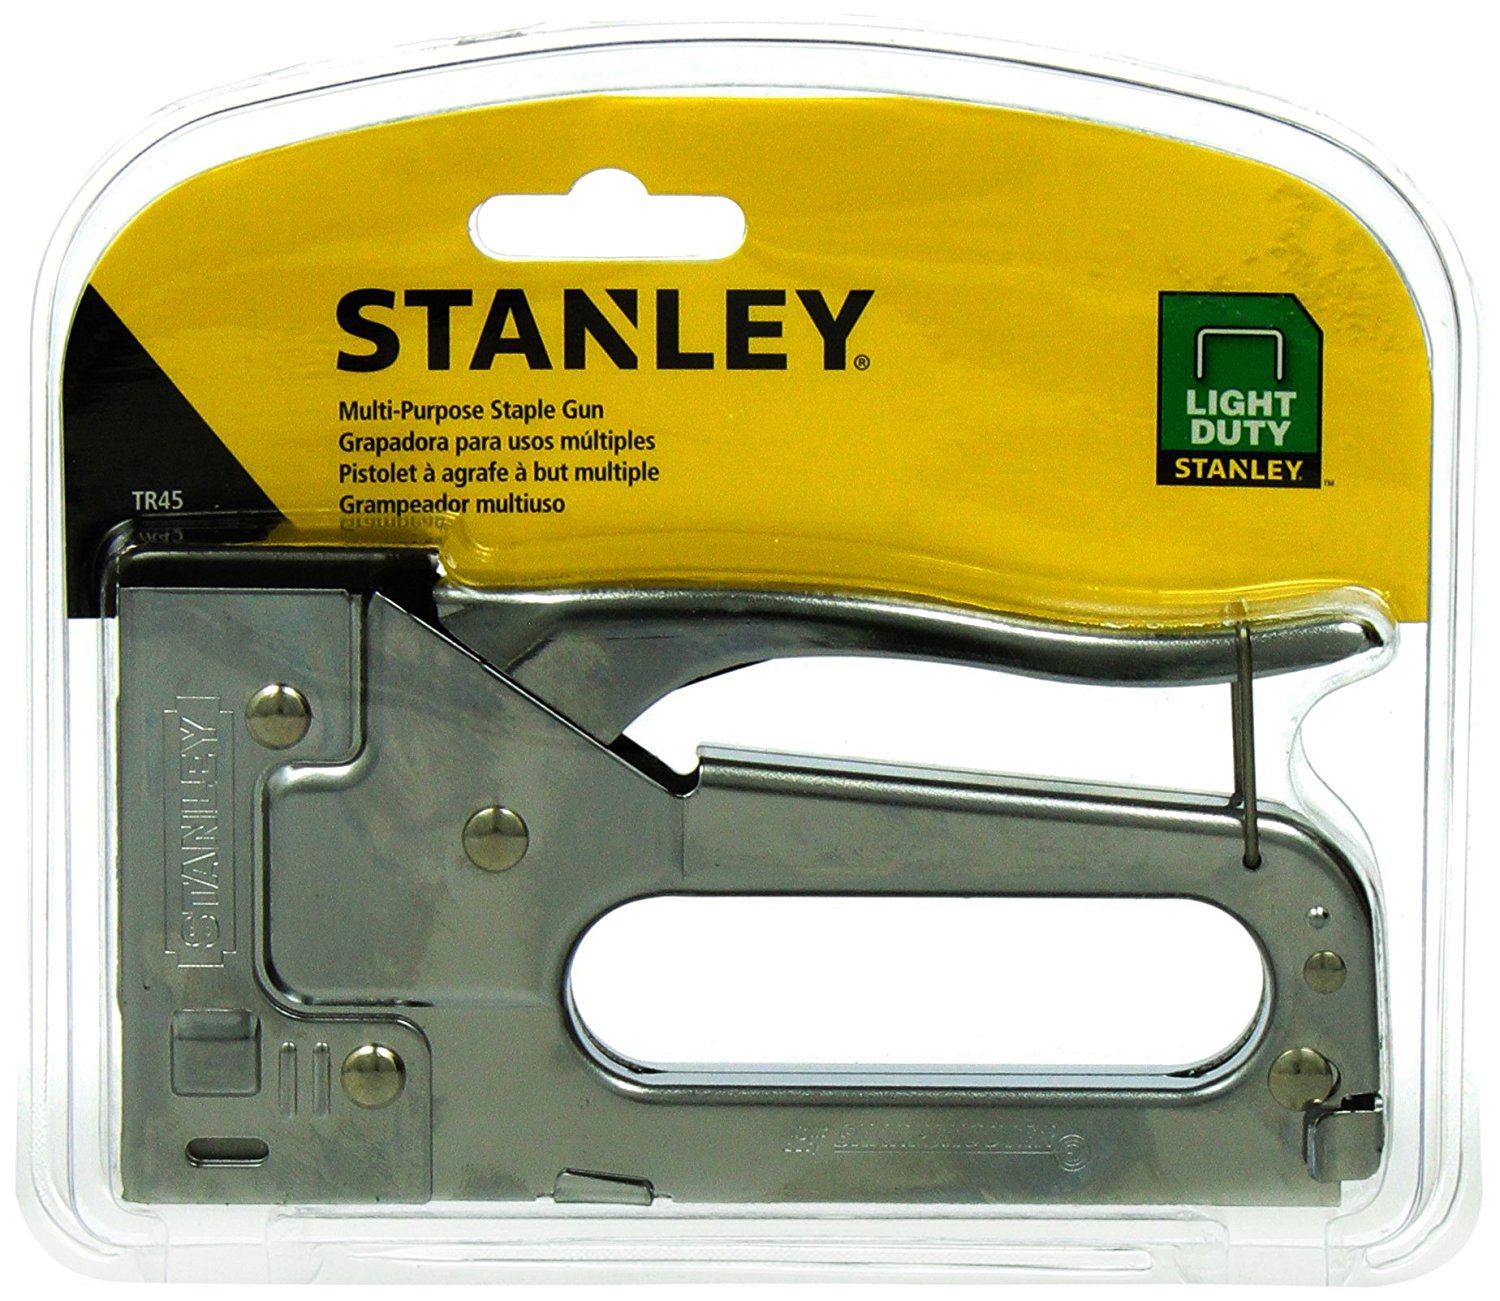
I use the 5/16″ size staples the most. What I love about this staple gun is that it is easy for my small hands to use, and it works perfectly for my small upholstery projects. I have had an electric one and it never would drive the staples all the way in properly. If I ever try a bigger, badder option, then I will update this post, but for now this is perfect for my needs.
- Speaking of upholstery…I’ll just throw this little tool in as an extra:
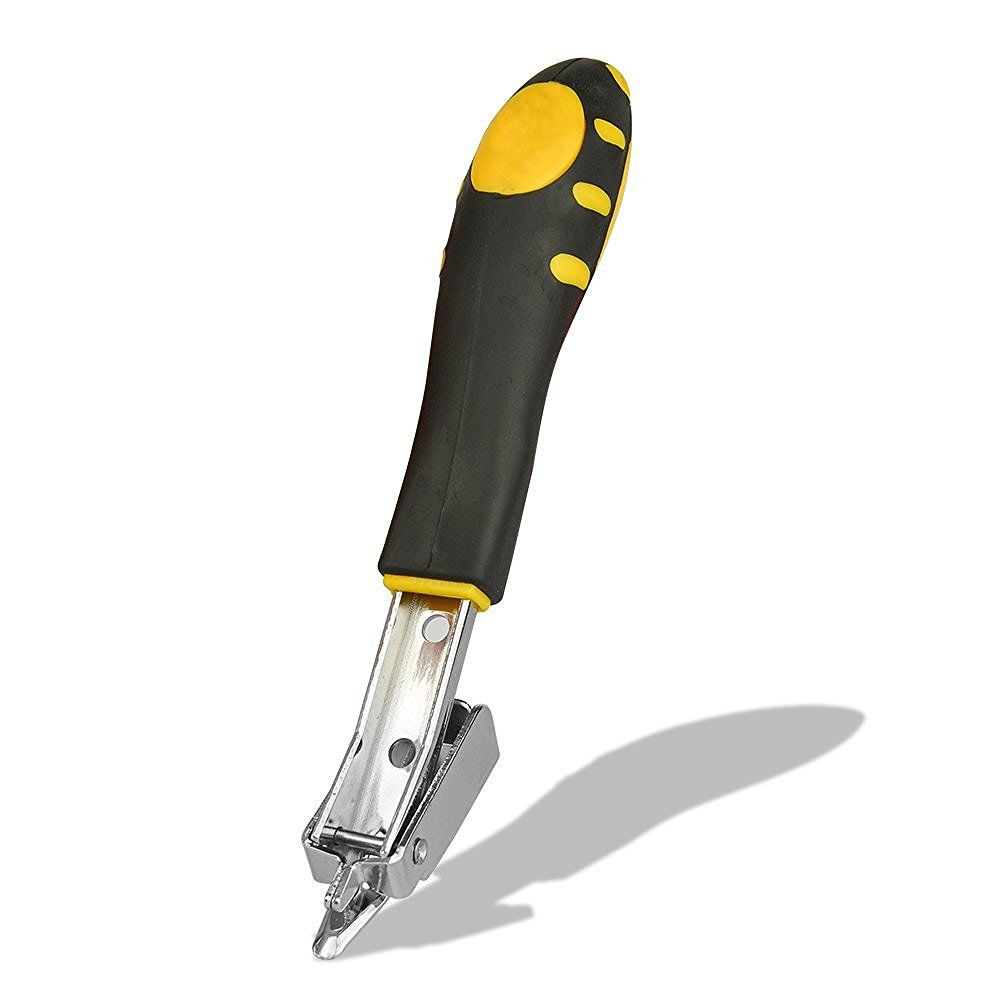
It’s an upholstery and heavy duty staple remover and it makes light work of removing all those staples, as anyone who has tackled removing the bajillion staples from an upholstery project will appreciate.
10
- And finally, what workshop would be complete without a good set of clamps?
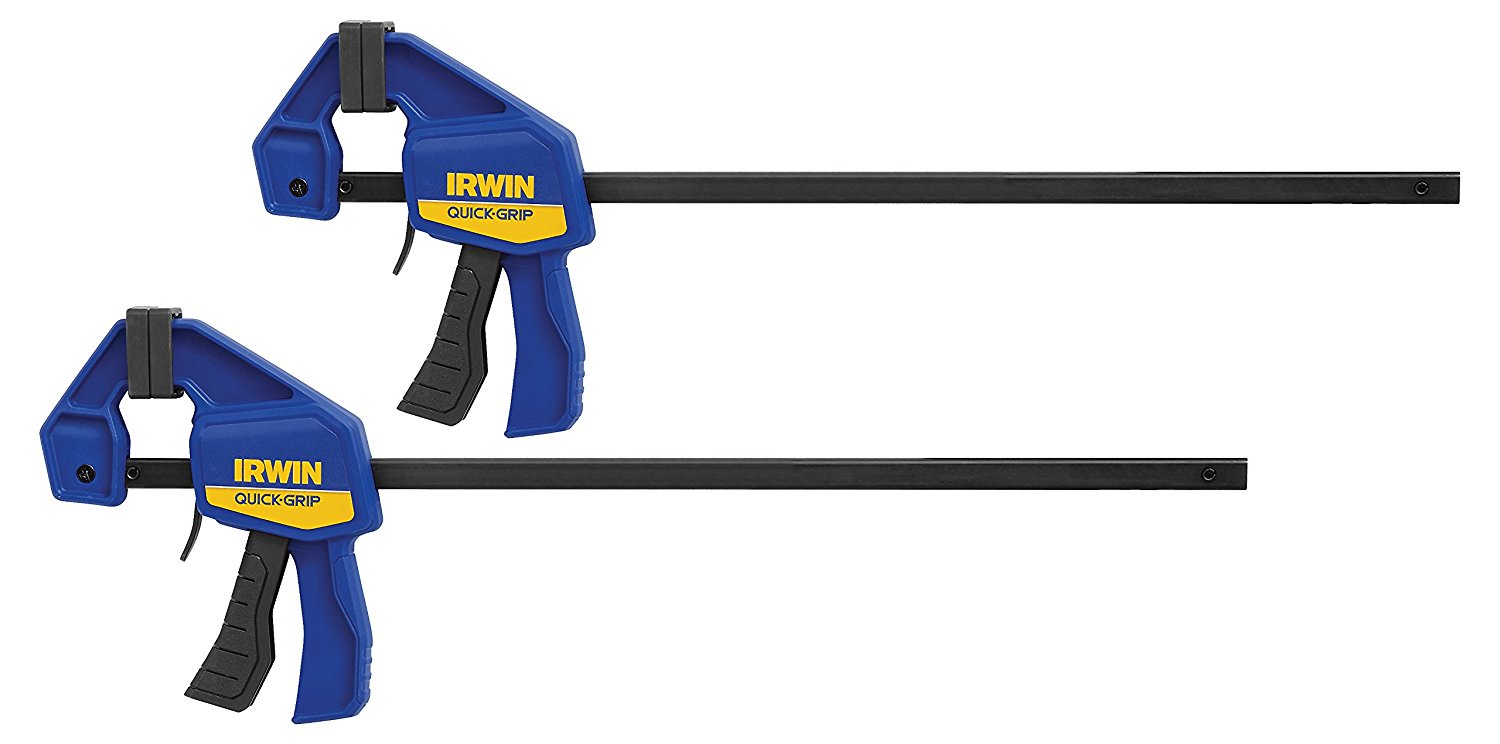
I have an older version of these Quick-Grip Clamps, several of them actually, and I use them all the time to fix furniture pieces.
Those are my top 10 essential tools I have and use on a regular basis in my workshop! There are still many things missing from our DIY arsenal though, so I will be following up with another list soon. I’ll be focusing on the smaller products and tools that are essential to rehabbing furniture and anything else you want to upcycle, so stay tuned!
How about an oldie but goodie before you go to get your thrifty makeover fix?
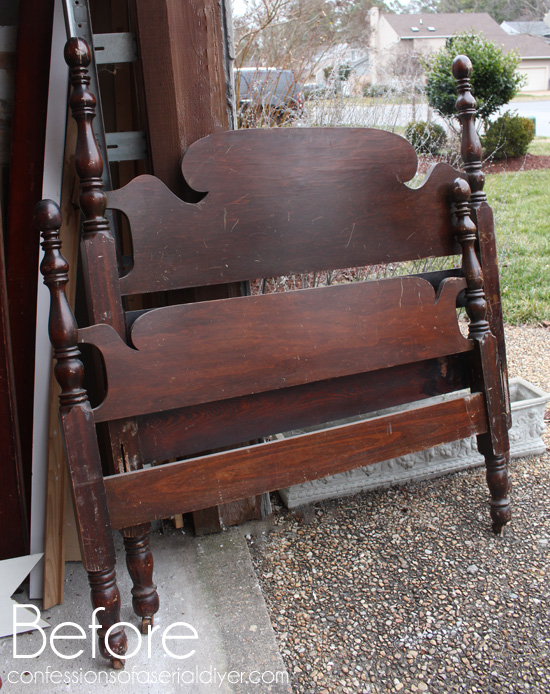
Check out what I did with this $30 thrift store headboard HERE! 🙂
I’ll be back on Thursday sharing what I did with this $40 estate sale book case:
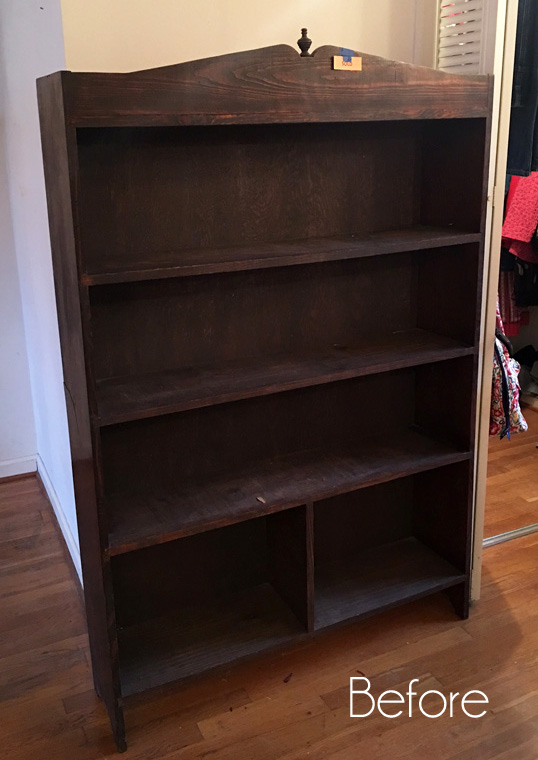
See y’all then! 🙂
UPDATE: Check out the new and improved bookcase HERE now!
XO,
![]()
Don’t Miss a Thing!
If you like what you see, there are several ways to follow along!


sandra powell says
Wow Christy I keep thinking I need to learn to use some power tools rather than wait until my husband can help. I do use my sander and I can use the drill. Great tips, maybe once the weather warms up I will attempt it. Did it take you long to feel comfortable using the saw ?
Christy says
I used to have my husband cut anything that needed a big saw when I first started, but after getting tired of waiting for him, I decided to try them out myself. The jig saw is a great place to start and not really intimidating at all. The miter saw isn’t too bad either, but the table saw took some getting used to. Just be mindful at all times where that blade is! And of course over time you will be more comfortable with those bigger saws. ????
vicki says
I love, love , love your blog! Always such great info and such beautiful furniture rehabs! Wish you were my neighbor so I could work on furniture redo’s with you 🙂
Christy says
Aww thanks, Vicki! It would be awesome to have someone to work alongside! XO
Louise says
I loved this post! Never heard of a “post driver” and may have to invest in one. I have a couple of unfinished projects because I didn’t have the know how or tools. Thank you so much!
Christy says
I’m so glad you found this helpful, Louise! XO
Marcie Lovett says
Great picks, Christy! I use my palm sander a lot and wish mine had a dust bag. They create a lot of dust. Don’t tell anyone, but I use my house vacuum to clean up the mess ????
Christy says
Thanks, Marcie! And ha ha…I won’t tell anyone, especially because I vacuum the big carpet in the garage with my indoor vacuum too lol. XO
Jolinda says
Thank you for sharing. I am making my wish list for my birthday, valentines day, etc.
Love great tools.
Christy says
Oh awesome! I love getting tools as gifts! 😀
Julie B. says
Thank you! This is really helpful. Especially to know that some of the less expensive tools worked well for you before. 🙂 Looking forward to Part II!
Christy says
You’re welcome, Julie! Yes, some of those lesser expensive tools worked perfectly! XO
Zovesta says
I’ve got a corded jigsaw, a nearly broken circular saw, a miter saw, a corded drill, a staple gun, and a corded orbital sander. Your list is all too dreamy! A nail gun seems so useful… it was a PITA to hold up 8 ft ceiling trim and hammer and nail it in at the same time, lol! And can’t forget about clamps. I don’t know why I haven’t gotten any yet!! Ryobi seems to be such a popular brand… What do you think would be good for cutting big pieces of plywood? A table saw like you linked?
Btw, can’t wait to see what happens to the bookcase! I love your bookcase redos. <3
Christy says
Oh goodness, yes…a nail gun would have made your job of hanging ceiling trim much easier! Having the right tools can make things so much easier. I do use my table saw for those bigger pieces. If I have my measurements, I try to get Lowes or Home Depot to cut it for me, just to make it easy. I’ll see ya Thursday with the reveal of that bookcase! 🙂
Mary Kaiser says
Love to know all the tools you use. Do you have a workshop in your home that you work on your projects? How do you keep all your tools organized? Some times it takes me longer to find all the things I need to do a project than it does to actually do the project-ARGG!!! If you have a system you can show me would love to know it and see it!! Just want you to know how amazing I think that you and your blog are!!!
Christy says
Aww thank you SO much, Mary!! I really truly honestly appreciate that so much!! I call it my workshop but it’s really just my garage. All of my tools do have a home, but I am terrible at making sure they all make it back to where they belong. Being creative is messy ha ha. About every two weeks I straighten it up and clear off my workbench. I am more productive when I start with a clean slate though! XOXO
Sonja says
Hi Christy! Thank you so much for this information. Just what I needed!! I adore your blog and love your creations. You are so inspiring! xx
Christy says
You are welcome, Sonja, and thank you!! XO
Patty says
Thanks for your recommendations. I am a real novice at using power tools so your info will be quite helpful. Love your blog!
Christy says
Thank you, Patty, and you are welcome! There’s so much more you can do when you have the right tools! 🙂
Becky says
It’s fun seeing the tools you use! My question for you is: do you have a great way to store them all so your work space stays neat(ish)? We don’t and the tools are scattered EVERYWHERE when we shut down the garage for the day! It’s one of my goals for 1017 to work on that! The solution has to be super easy to use, cuz much as I hate to admit it, none of us will put it away if it requires any going out of our ways, haha!
…I want to look at that point driver too. I wish I had one all the time!
Christy says
Oh girl, I do have a place for everything but I am terrible at putting everything away where it belongs! I have a very large workbench along one wall that has a shelf the length of the bench under it and basically any power tools that fit there, go there. I have a pegboard on the wall for my toolbox tools. Then I have a 3′ X 4′ rolling workbench that has two shelves underneath that hold supplies, and shelving on one side of it to hold paints, etc. My workspace really gets out of control when I have several projects going, but about every two weeks I put everything back where it belongs and clear off my rolling workbench. I do work much better when I have a clean slate! …and get one of those point drivers…they are awesome!! 😀
Becky says
Haha, rats! We’re practically in the same boat! : ) We’re (fianally!) building the “workshop” part of the garage this year, so I’m looking for any ideas! You’ve got me picturing open shelves above and below my workbench, with some pegboard… hmmm. And that rolling bench sounds pretty good too! My sons and I both like to have waaaay too much stuff laid out where we can see it, for creative inspiration. Three (messy) people working = A LOT OF STUFF! If you think YOUR space gets out of control… don’t ever visit me on a busy day, haha! Our garage might be condemned if anybody official showed up! : ) Thanks for your thoughts!
Christy says
Ha ha being creative is SO messy! 😀
Kimberly says
Christy, great post. I love seeing what tools other DIYers are using. Here is one tip on the electric stapler that throws a lot of people off. Using a smaller gauge extension cord reduces the amperage delivered and results in a staple that doesn’t go in all the way. Since the cord on the gun is so short, most people grab an extension cord and are disappointed. If you use a large gauge cord, you will probably find that all the staples are delivered properly (at least that is what I have found and my dad had the same experience ;o) )
Christy says
It’s been so long since I used it that I don’t even remember what kind of cord, if any, I used! I will definitely have to try that thank you! 🙂
Marie from The Interior Frugalista says
Excellent workshop Must Have List. Thanks for the reminder that I NEED one of those Logan Point Drivers and yes please on the staple remover thingy!
Christy says
Thanks, Marie! I got a lot of questions about tools over the Holidays and had hoped to compile this list before Christmas, but of course I didn’t get it done. At least now I have a post to refer people to. I LOVE my point driver!! You need one of those for sure! 🙂
Sonja says
Christy…..have all the tools you do. The only one I just can’t get my fear over is a table saw.
A couple of suggestions. A power stapler seems to do their own thing and I agree with your experiences. Have bought the same manuf. as you and are frustrating. My go to is 20 years old and never a miss. It is an Ace brand. Highly recommend one. Also, bought a Dremel Cut off, it has 4″ blades and options for cutting anything. Love this new tool. Don’t forget to hand around Harbor Freight stores. They carry off brands, but have never had an issue with them. Lots of coupons, much lower prices and interesting things not carried in other places. I also have an electric nailer for different sizes of molding. A good tool to add to the group.
Christy says
Thanks for the suggestions, Sonja! I did include a nail gun, but I think I need one of those Dremel Cut Offs in my arsenal!! 🙂
Laurel Santos says
Your site is so great, it makes me want to move out just so I could decorate my own home. Kudos! Hope you’d continue to share these amazing projects of yours!
Christy says
Thank you, Laurel!