Welcome back, sweet friends! It’s one of my favorite days of the month…Trash-to-Treasure-Tuesday, where I join my favorite treasure-maker friends to share trashy makeovers! Look for their projects at the bottom. My trashy redo involves a mini wall cabinet makeover!
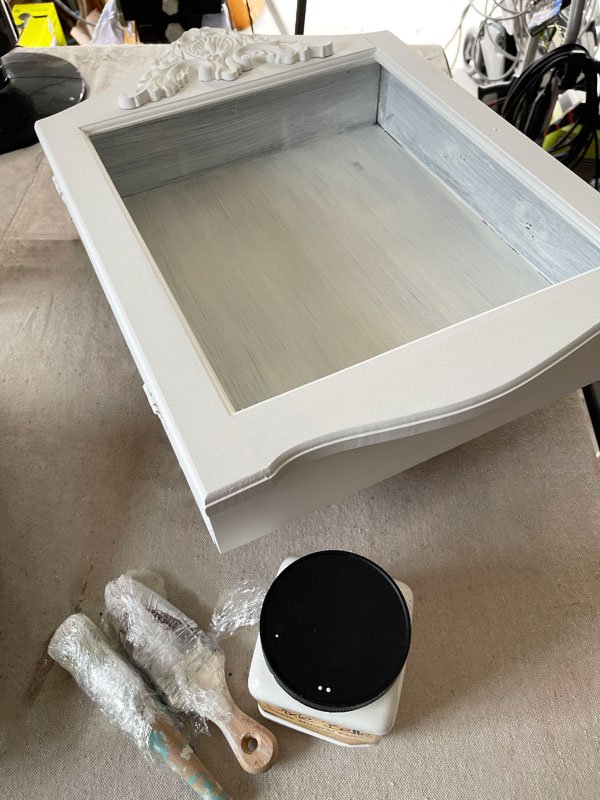
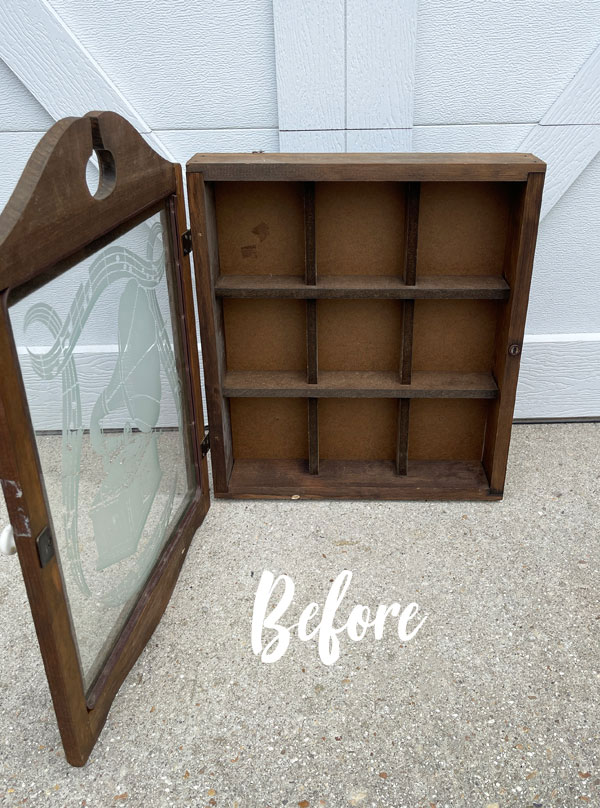
I found this gem for $6 at the thrift store:
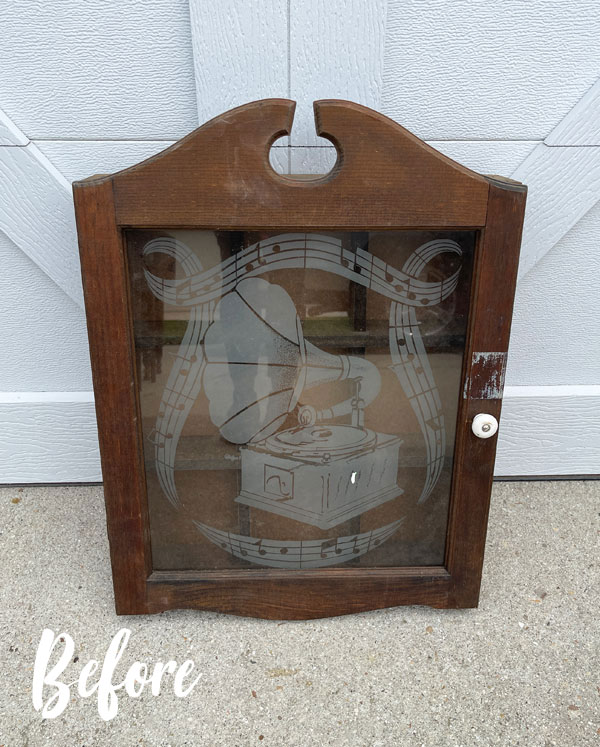
I passed on it the first time I saw it when it was priced at $12, but when I returned, it was half off, so in the cart it went. I’ve actually made over this very same style of cabinet already once HERE waaaaaay back in 2013!
I’ve included a few affiliate links so you can find the products I love.
Demo
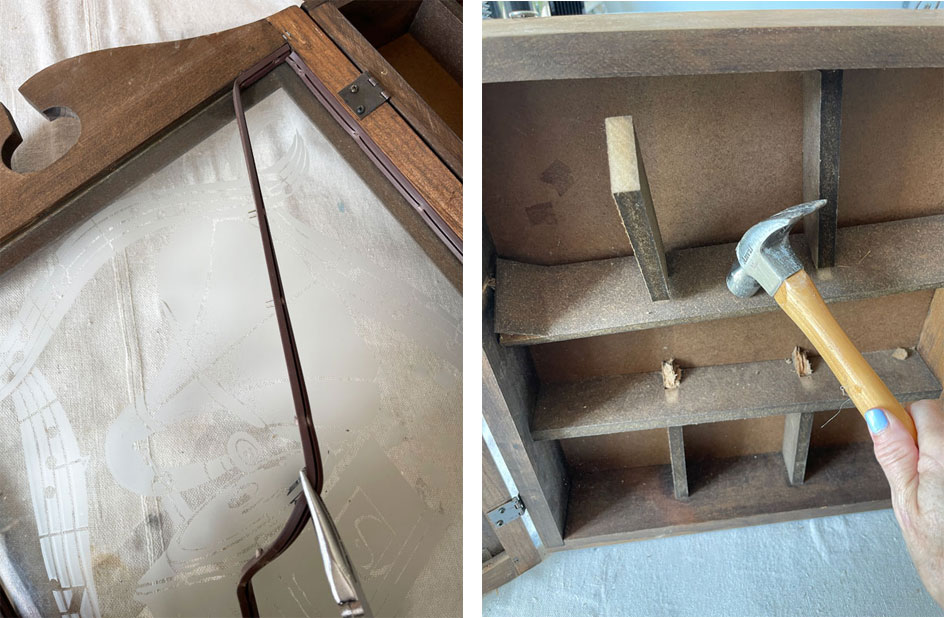
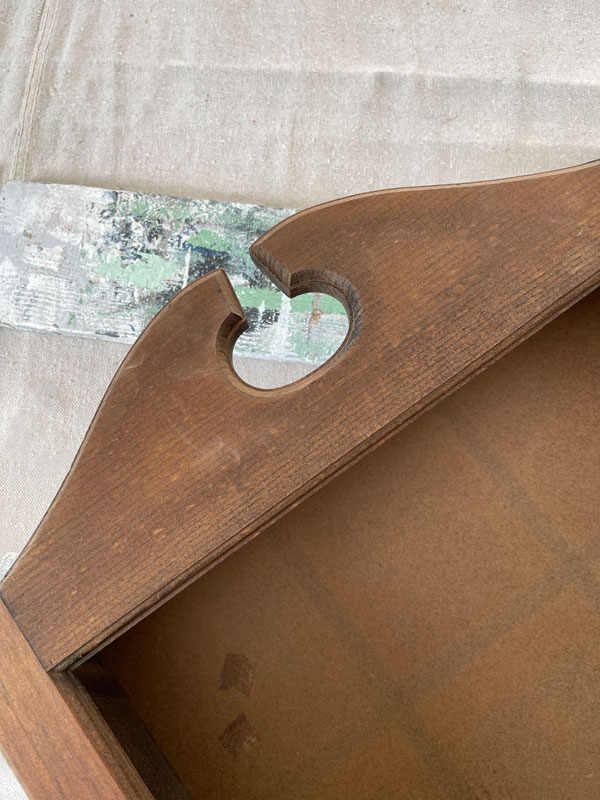
I wanted this cabinet to offer closed storage, so I removed the glass.
Then, I removed the odd shelving as well:
I’m not sure what the original purpose of this cabinet was…perhaps to hold cassette tapes? I’m assuming it had something to do with music. If anyone has had one of these and knows, please share!
Clean
A good cleaning with White Lightning was next. These terry cloth pads are ideal for this step, and they come two to a pack.
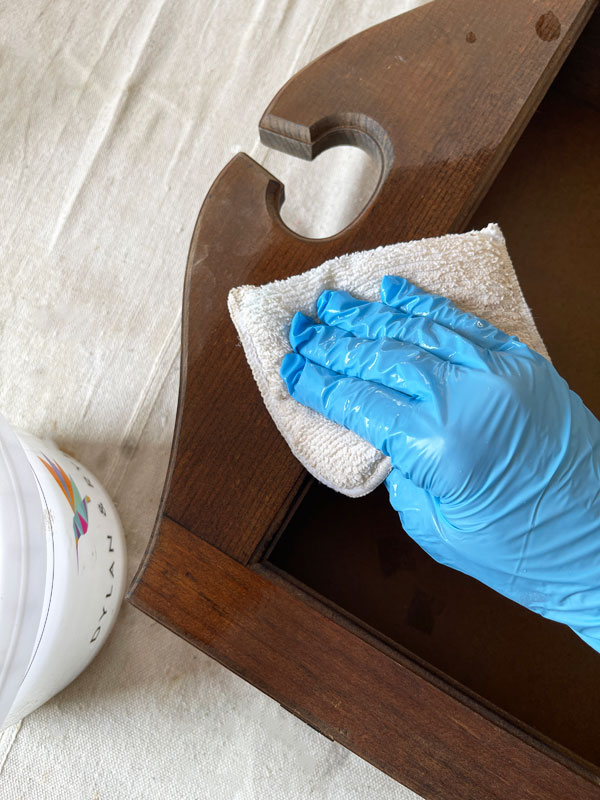
Be sure to wear gloves and swap out your water for clean water to wipe it down once more to remove any residue.
Fill holes
This piece had a bunch of holes that needed to be filled, and I did that with Dixie Mud:
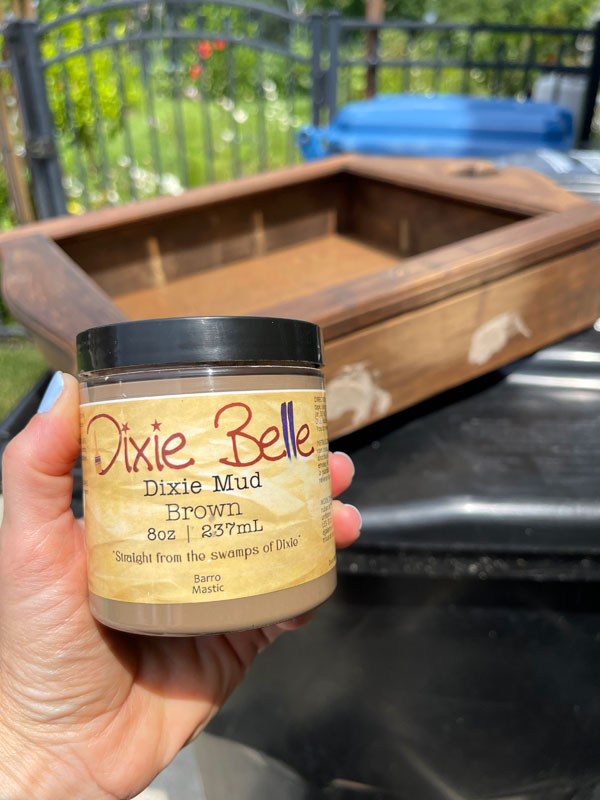
A photo of the mud and our trash cans :D. I left it to dry in the sun for a couple of hours and then sanded the filled areas smooth with 220 grit sandpaper.
Adding a pretty detail
Next, I wanted to address the unattractive area at the top of the cabinet:
I had a beautiful wooden applique that was in a bag of several wooden pieces my MIL gave me a couple of years ago that was exactly what the top needed.
I used wood glue to attach it and clamped it with bar clamps until the glue was dry:
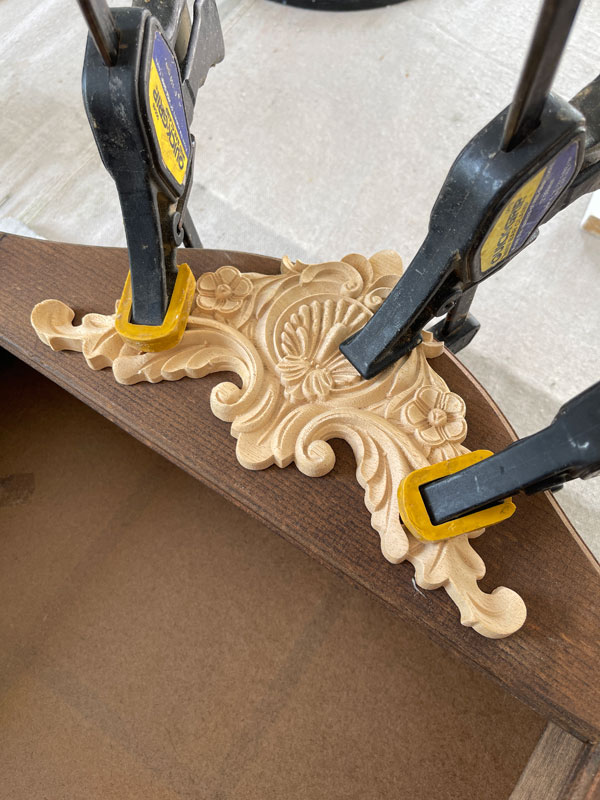
Pretty, right??
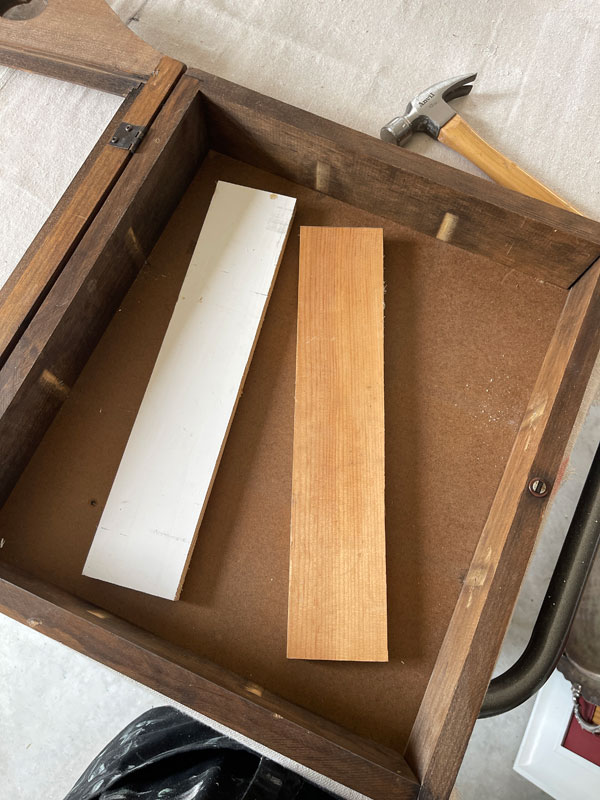
I also cut two new shelves from scraps:
BOSS
I ended up adding a coat of BOSS in white just in case since I had sanded some of the original finish away when sanding:
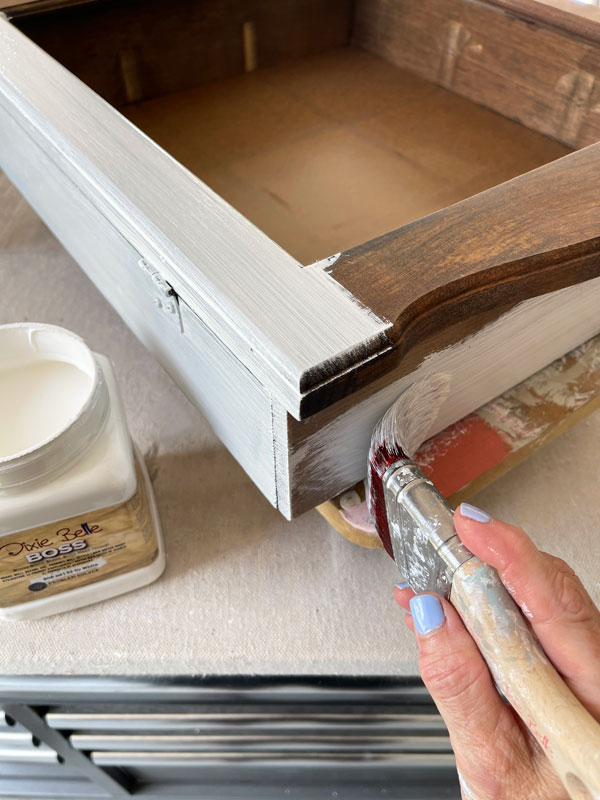
That can cause tannins to come through the paint on some woods, but no tannins came through the BOSS, so I probably could have gone straight to paint. Better to be safe, I guess!
Paint
Then I followed up the next morning with three coats of Cotton white for solid coverage:
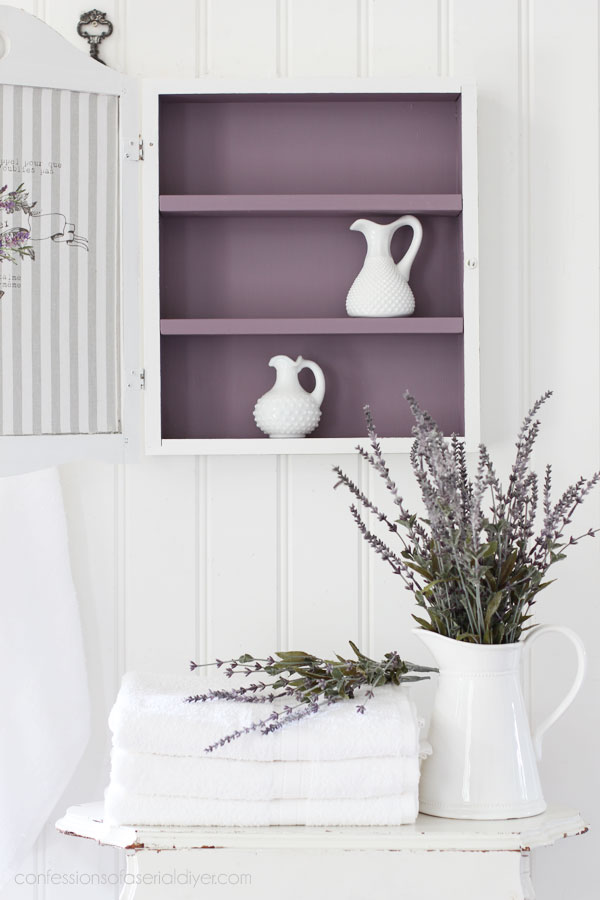
The Inside
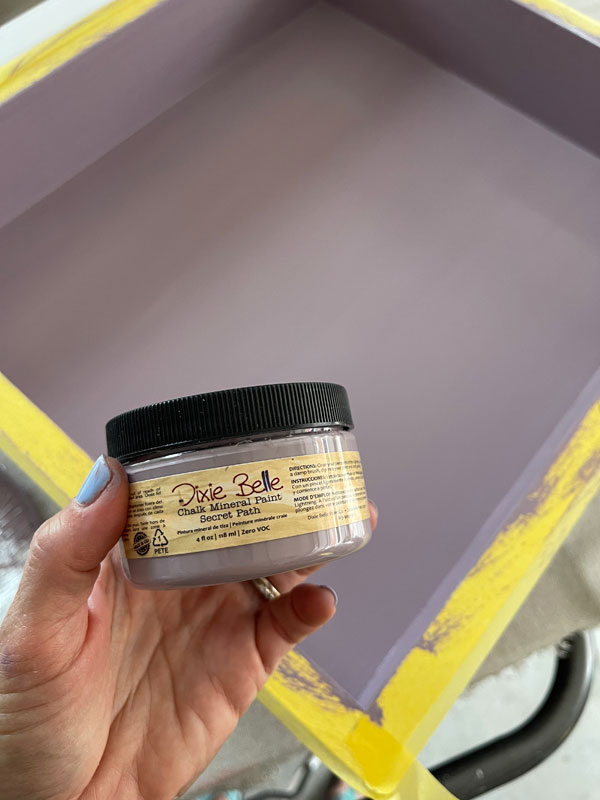
For the inside, I chose another new color from the new Cottage Collection of colors, this rich, dusty purple color called Secret Path:
Sand
Once everything was dry, I sanded with 220 grit sandpaper inside and out:
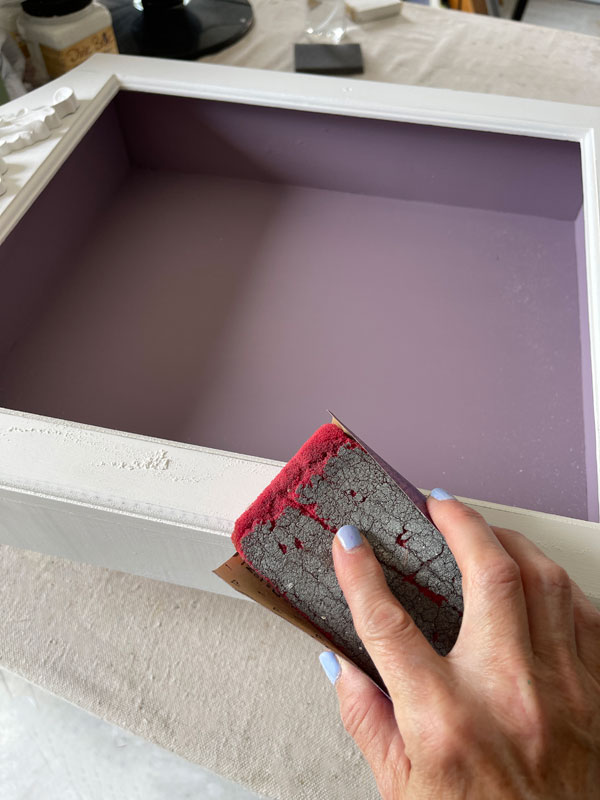
If you don’t like as much of a distressed look, these sanding sponges are perfect for just smoothing out the paint.
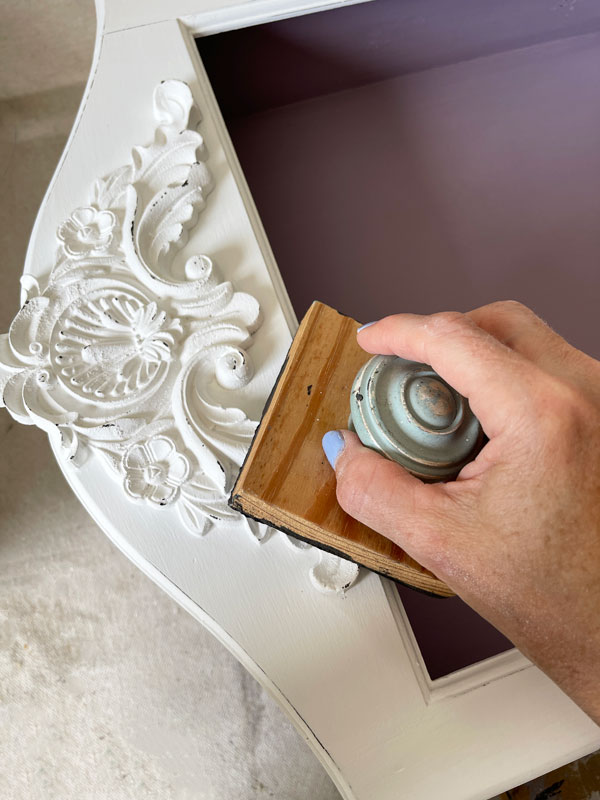
Since sanding the decorative wood piece at the top would have revealed raw wood beneath, I chose to highlight those details with the cheat method of distressing instead:
A new Door panel
To replace the glass that was in the front, I cut a piece of hardboard with my jigsaw:
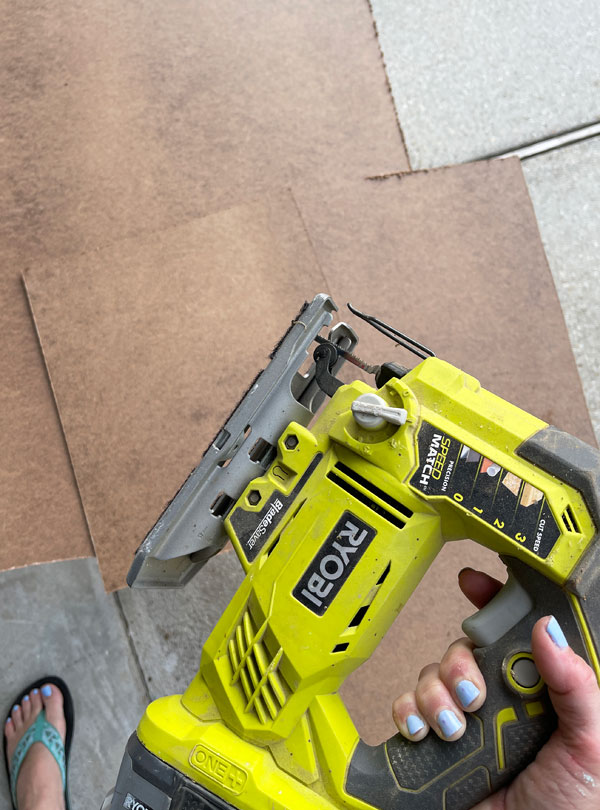
I painted that in three coats of Cotton to match the rest of the outside. I alternated painting in one direction (vertically) with painting the other direction (horizontally) to create sort of a linen look for the front.
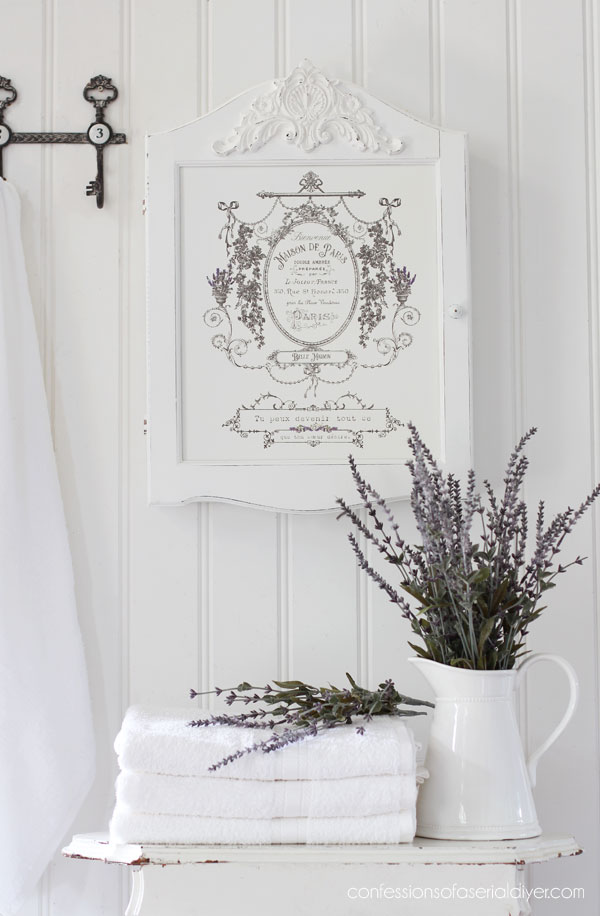
Maison de Paris Transfer
Then, I pulled out the Maison de Paris transfer. It comes with two sheets, so I decided on the pieces I wanted to use and got to burnishing it to the surface:
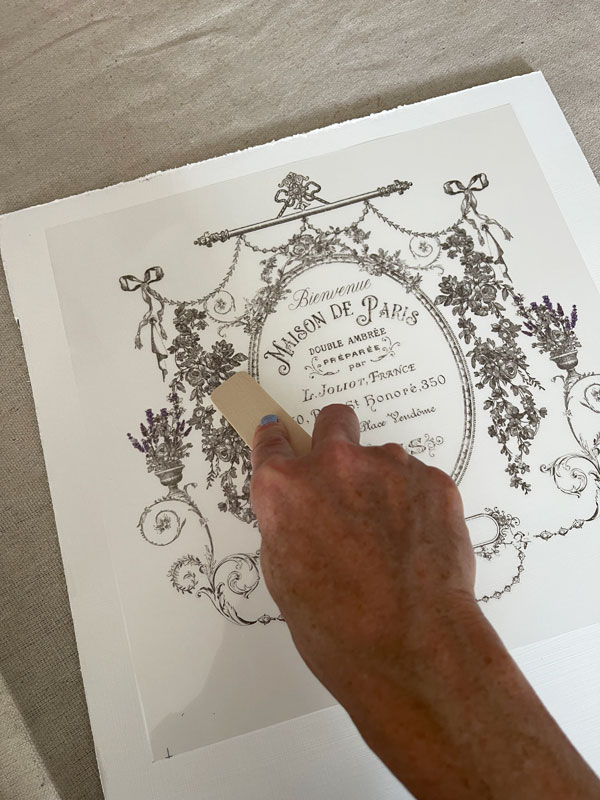
Once I had my image transferred, I attached it to the door frame with my Logan Point Driver.
Seal
I sealed everything with Clear Coat in satin using the mini brush for the inside and the blue sponge for everything else. (It’s tricky to get the sponge into those inside corners easily.)
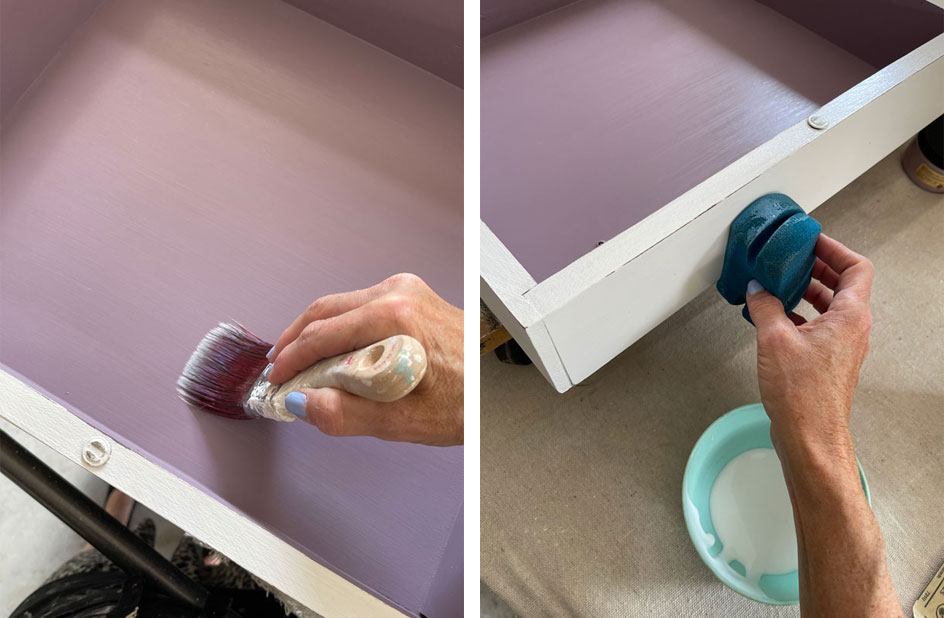
If you use a brush to apply sealer, be sure to apply it as thinly as possible and don’t allow it to pool in the corners.
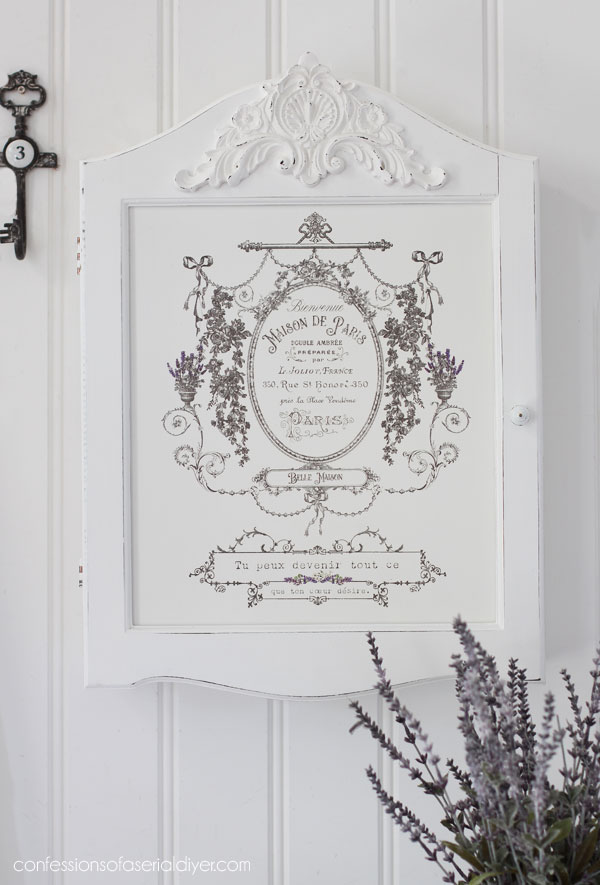
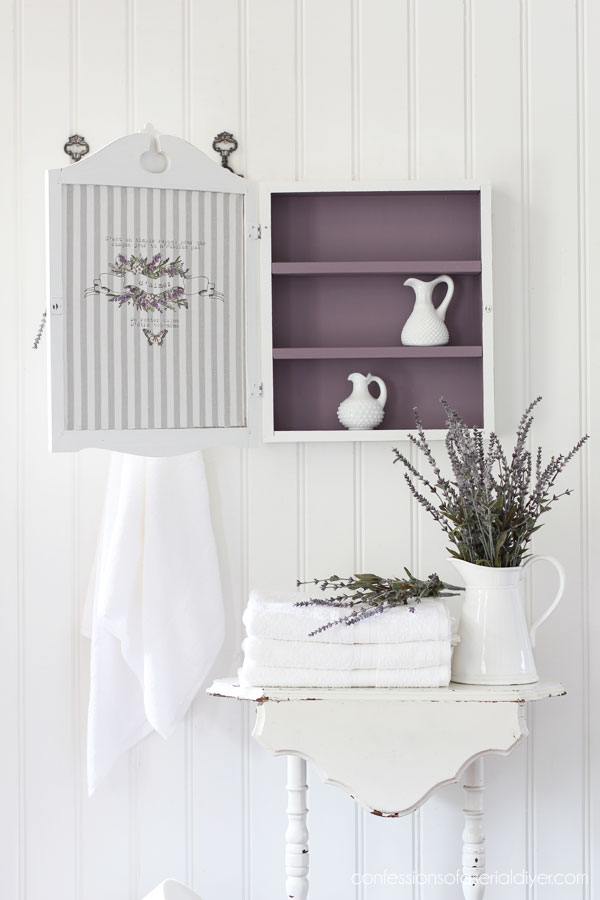
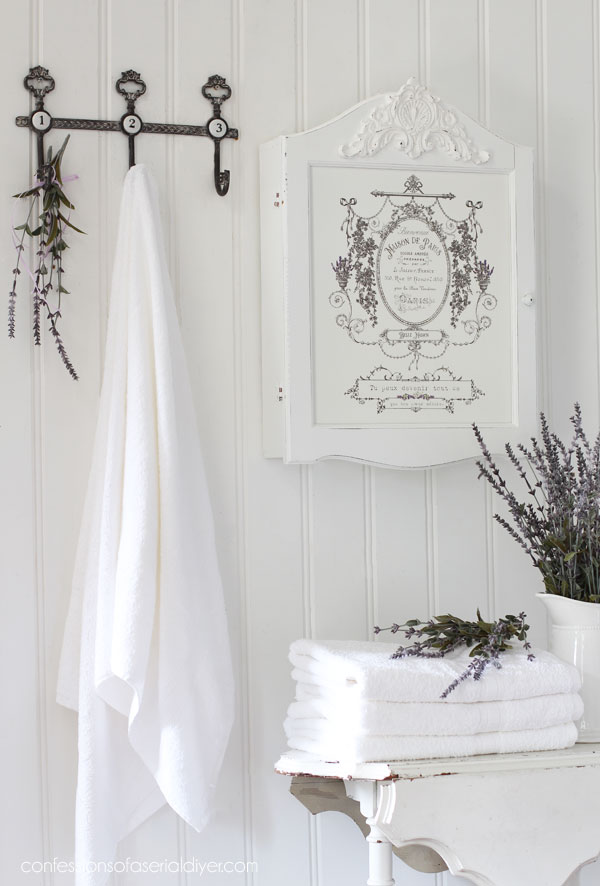
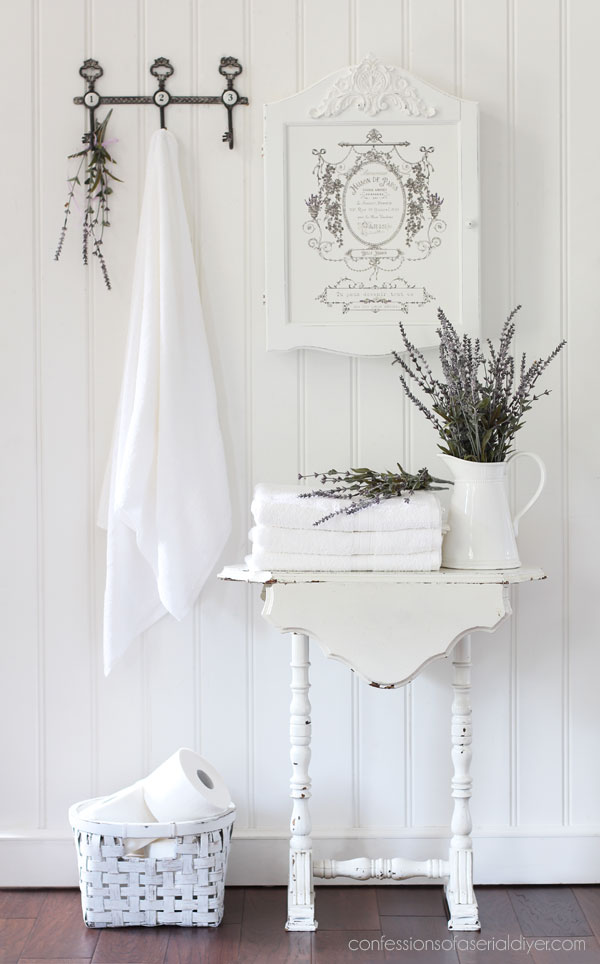
The after
Here is how this mini wall cabinet makeover turned out!

It’s a long way from where it started!


I love the wooden applique on the top, and this gorgeous transfer was a perfect fit for the door!
The inside
Here’s what the inside looked like before:
Cassette tape storage??
And here is how it looks now!
How pretty is this new Secret Path color?
And I used what was left of the transfer on the back side of the door, right over fabric…

I added this fabric that I had left over from our dining room chairs, to the back using matte Mod Podge. I did not apply another coat on the top.
The transfer was applied the next day once the Mod Podge was completely dry.
This little cabinet never knew it could be so cute!

Don’t forget to check out what my friends are bringing back to life today as well!

That’s other piece done!
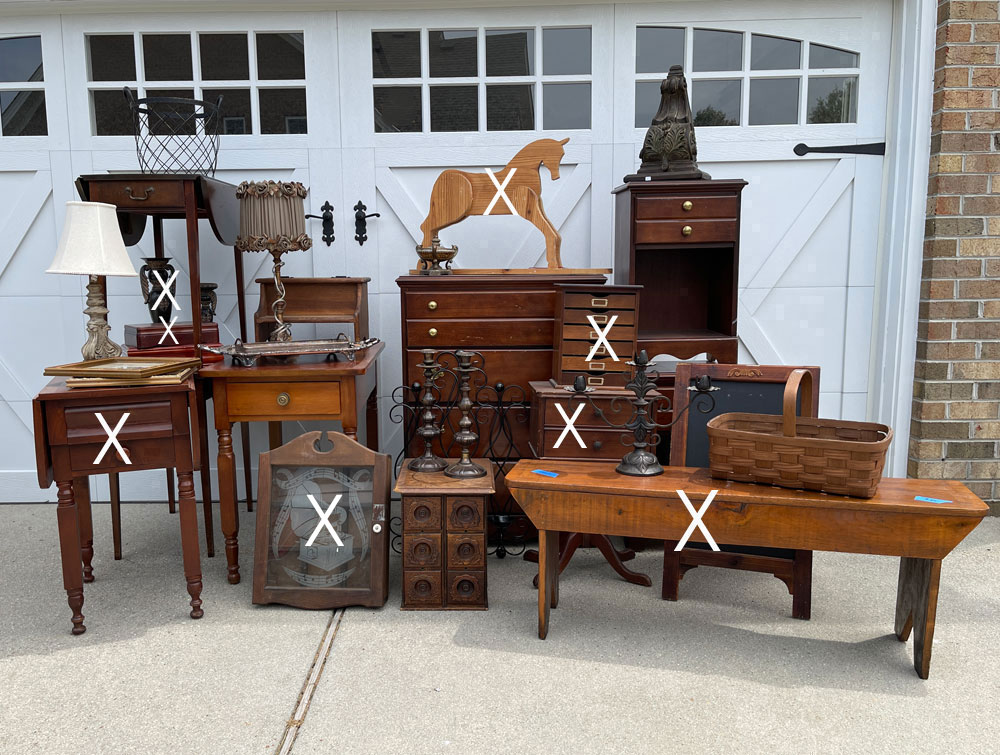
See what I’ve redone so far at the links below:
$4 Jewelry Box Makeover
Vintage Sewing Storage Table
Wooden Horse Redo TAKE TWO!
White Painted Drop Leaf Table
Unfinished Wooden Horse Makeover
Updated Candlesticks
Voodoo Stain and Stencil Bench Makeover
Drawer Organizer Makeover
And if you missed the link at the top, I did another cabinet just like the one I shared today back in 2013 that you can see HERE!
I’ll be back on Thursday with this $5 yard sale stool:
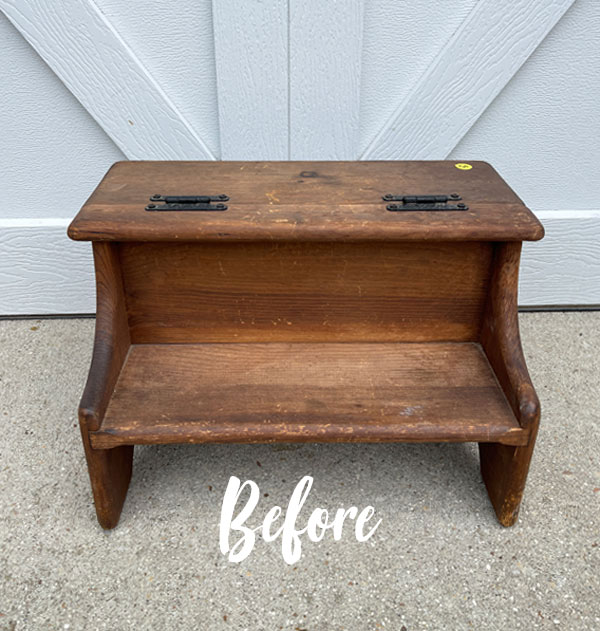
It was pretty beat up but looks much better now!
UPDATE: See what I did with this step stool HERE now!
Enjoy the rest of your week!
XOXO,

Don’t Miss a Thing!
If you like what you see, there are several ways to follow along!
EMAIL * INSTAGRAM * FACEBOOK * PINTEREST


Get FREE SHIPPING on all orders over $50. No code needed at checkout! Orders under $50 always enjoy $8 flat rate shipping! Most orders ship same or next business day!


Mary Kaiser says
Woo Hoo I love the Secret Path color!!! It reminds me of the color you mixed with the gray and Lilac that you used on the big dresser!! I have to get some of that color from your Etsy Shop!! The cabinet turned out so beautiful!! The transfer you used and the color inside sure made it a beauty!!
Christy says
Thank you so much, Mary! I wanted to try this color on something small first, but now I can’t wait to use it on something larger! It is very similar to the color I mixed! XOXO
Cyndi says
This is beautiful! And I love the idea of using fabric on it too. Great idea!
Christy says
Thank you so much, Cyndi! That was a great way to hide the ugly brown backing lol! XOXO
Larissa ~ Prodigal Pieces says
I just adore cabinets like this for so many reasons. You brought this one back to life! Beautiful work, Christy.
Christy says
Thanks so much, my friend! XOXO
ColleenB.`Tx. says
Here is a cabinet similar to what you have.
Like the new make over.
https://www.bing.com/shop?q=+etched+glass+music+cabinet&filters=PageType%3A%229%22&FORM=SHOPIC&overlayId=16759207857#br-priceGraph
Christy says
Thanks, Colleen! I guess it could be just for small collectibles? XOXO
Cecilia says
Ooo, nice. I was hoping you knew what the cabinets purpose was….cassette storage seems to be a good guess. Love the way it turned out. The inside might be my favorite part. Such a pretty color. Reminds me of dried lavender so the back of the door is a perfect match. 😊
Cecilia
Christy says
Thank you, Cecilia! I love that color too and now I want to use it on something bigger! I wish I had a cassette to test it out lol. XOXO
Toby says
love love love this one!!!
Christy says
Thank you so much, Toby! XOXO
Jackie C says
I adore this piece!
Beautiful 😍
Christy says
Thank you so much, Jackie! XOXO
Jan Fowler says
Christy I would buy this one in a hot second if I weren’t all the way over in Germany! Utterly gorgeous❤️
Christy says
Aww thank you, Jan! I wish you were closer! XOXO
Sue says
I love the new color you used in the interior, it is such a nice surprise!
Very charming!
Christy says
Thank you, Sue! I really love it too…hoping to use it on a larger piece next time! XOXO
Shirley says
Christy this is just gorgeous!
Christy says
Aww thank you so much, Sue! XOXO
Patricia Marshall says
This piece is beautiful! I have a similar cabinet, and this idea has got me thinking about all the possibilities. Thank you for your inspiration!
Patricia
Christy says
I’m so glad you like it, Patricia, thank you! XOXO
Niki says
I think your hunch about what the cabinet was used for is probably right. I like the secret path color, it’s a little treat once you open the door. So many uses for this…..very cute!
Christy says
Thanks, Niki! I think so too…someone mentioned they thought it was in the JC Penney catalog back in the 80’s. That makes sense because I’ve seen a few over the years! XOXO
Caye Cooper says
I just love what you achieved with this piece! The lovely lavender is great.
Let me ask you a question, please. IF one had decided to keep the original glass, could the glass have been painted from the reverse side to make the design show up better?
Excellent piece!! I so appreciate what you share with us!
Christy says
Aww thank you so much, Caye! You could have kept the glass and painted the backside. You would need to use a bonding primer like Slick Stick to make sure the paint adheres to the glass. XOXO
Lizzy says
Really cute! I would totally have that in my house.
Christy says
Aww thank you, Lizzy! This is totally my style too!! XOXO
Marcie Lovett says
How funny that you found exactly the same cabinet so many years later, Christy. I cannot imagine what it was for, with those narrow shelves. Not even sure a cassette tape would fit! And what a contrast in styles between the two finished pieces. The wood applique is perfect for covering the outdated shape on this one. I wasn’t prepared for the inside – the outside was already great and then there’s more! I predict this one will be a quick sale 😊
Christy says
Right? I had actually seen another a couple years back but passed on it. Someone mentioned they thought it came from the JC Penney catalog in the 80’s… that would make sense! Thank you, Marcie! XOXO
Denise Zdziennicki says
I LOVE how you transformed this Christy, it’s gorgeous now! And that Secret Path color on the inside is perfection! Pinned! XOXO
Christy says
Thank you so much, my friend!! I LOVE that secret path color! XOXO
Susan says
Christy, you are amazing. You have the most creative “vision” of pieces we all walk by at thrift stores, usually scoffing and laughing along the way. You did a beautiful job on this little piece. Adding the applique was brilliant. The fabric inside door…perfect… inside color… perfect Of course you had the applique in your “bag o’magic things”. Any suggestions as to online shopping for small appliques like that?
Can’t wait to see that foot stool finished this Thursday.
Thank you for sharing beauty, creativity, and your time.
Christy says
Aww I appreciate your kind words so much, Susan, thank you! My MIL had bought several appliques to dress up the plain drawers on her dresser and ended up not using them, so she passed them along to me! I know she bought them online, but I’m not sure from where. Home Depot has a small selection in their store. Thank you so much for shining your light my way today! XOXO
Michele M. says
***GULP***
Holy cow, this is by far one of the best transformations you’d done, Christy.
It is unbelievably cute. WOW WOW WOW. Absolutely love this! You are truly an artiste extraordinaire!
And yes to Secret Path – what a perfect color for this project. Stunning.
Christy says
Aww you are the sweetest, Michele, thank you!! I’m so glad you love this one! I can’t wait to use Secret Path on a larger piece now! XOXO
Petra says
Super pretty 😍 could be a spice cupboard or little medicine cupboard now – so many uses ☺️
Christy says
Thank you, Petra! Ooh yes!! XOXO
Nancy @ Artsy Chicks Rule says
This turned out so sweet, Christy!! Love the little surprise interior! xoxo
Christy says
Thank you so much, my friend! XOXO
Debra Hubbs says
Love these types of cabinets and you really made it beautiful. I would think it was meant as a medicine or spice cabinet? So pretty. You always take that extra step to make it extra special.
Christy says
Aww thank you so much, Debra! It may always be a mystery lol, but it would definitely serve both of those purposes well now! XOXO
Jen @ Girl in the Garage says
That IS super cute, Christy! And it’s actually bigger than I thought it was! Awesome job – and such a great piece for extra storage. xo
Christy says
Thanks so much, my friend! It’s a great size! XOXO
Sharon Austin says
Another masterpiece, I love everything about this!
Christy says
Aww thank you so much, my friend! XOXO