Hello amazing friends! Are you up for a furniture flip? How about six furniture flips?? I’m joining my Furniture Fixer Upper Friends today to bring y’all a dresser that was in need of fixing up, and my friends have flips of their own to share, so don’t forget to check them out at the bottom!
But first, I am happy to report that the winner of my latest craft junk giveaway responded just in time…congratulations to Janice from Alabama! Don’t worry if you didn’t win this go round, I will have another super fun giveaway the first week of November to celebrate my blogiversary, so be on the lookout for that! 🙂
Okay onto today’s project!
A couple of large pieces sold from my booth last week (Hallelujah because September was terrible!), so I went in search of a couple of pieces to fill it back up. I have several small pieces in my stash, but I try to keep the larger pieces moving so I didn’t have any on hand to paint. I had checked out my four favorite thrift stores and came up empty handed when I remembered the Habitat Restore about 25 minutes away.
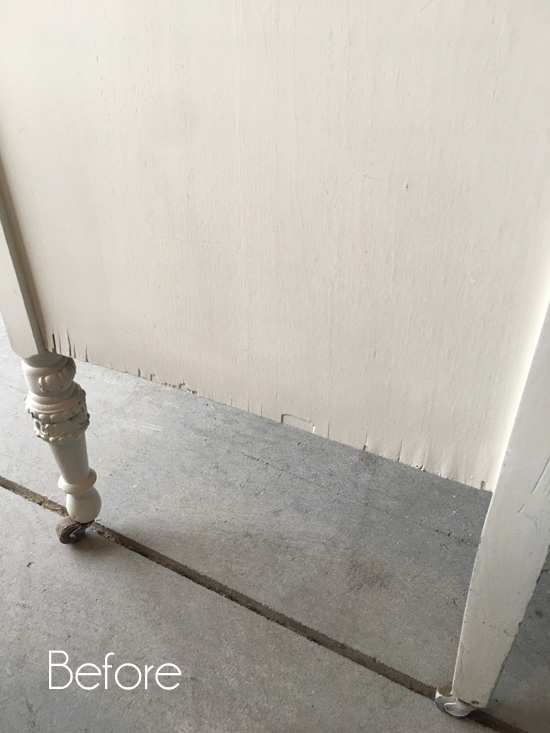
As soon as I walked in, I spied this beauty:
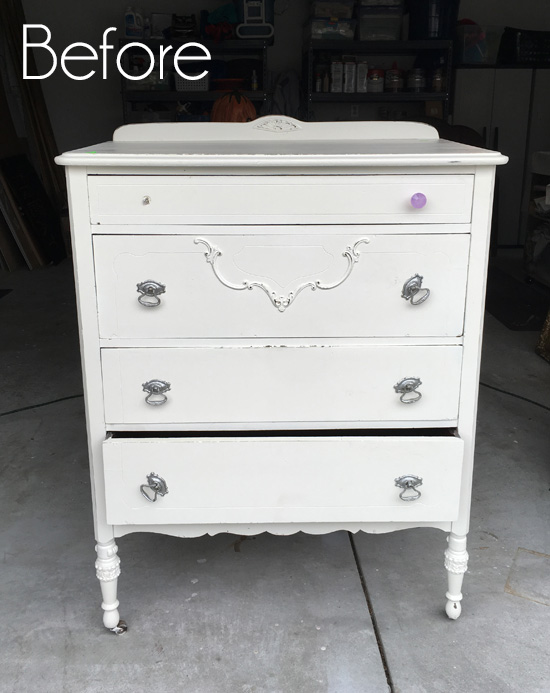
At the discount bargain price of $60, it was hard for me not to grab it. I usually try not to buy already-painted furniture, but I figured if anything white would make a good base coat. It doesn’t look too bad here, but the bottom drawer was stuck open, the original hardware had a really thick terrible spray painted silver finish, and the paint job wasn’t the best. Plus it had a missing knob and a broken wheel. It had zero odor though, so that goes a long way in my book and I brought it home.
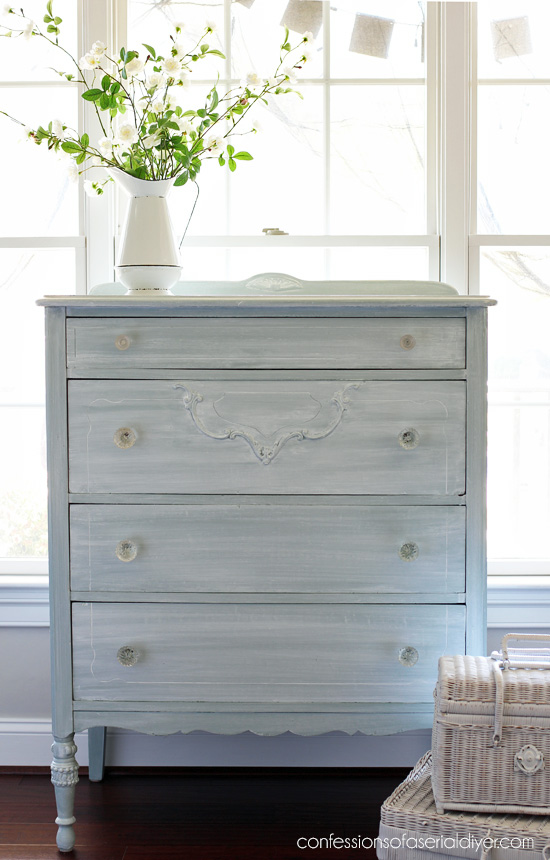
I know you will be shocked to learn that this dresser is no longer white! Gasp…she who paints everything white!
After resharing my 99¢ table makeover last week, I remembered I still had half a quart of that pretty blue in my paint cabinet, so blue it is!
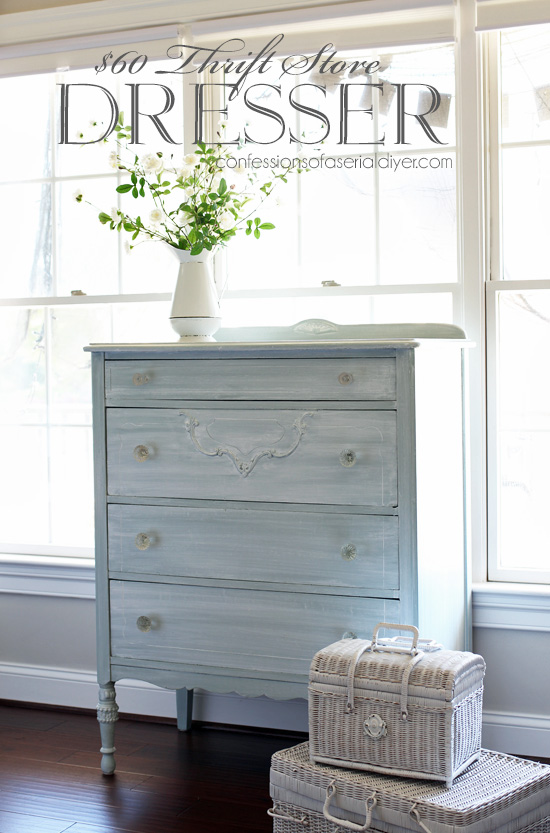
Only this time, I opted for a whitewash finish over this pretty blue! I’ve included a few affiliate links so you can find the products I love.

It has a Summery coastal vibe to it now which I love! (Pay no attention to the Halloween decorations on the outside of the window!)
To get this look, I started by sanding the original white finish super smooth using my orbital sander and 220 grit sandpaper.
Here’s a pictorial of how I got the whitewash-over-paint effect:
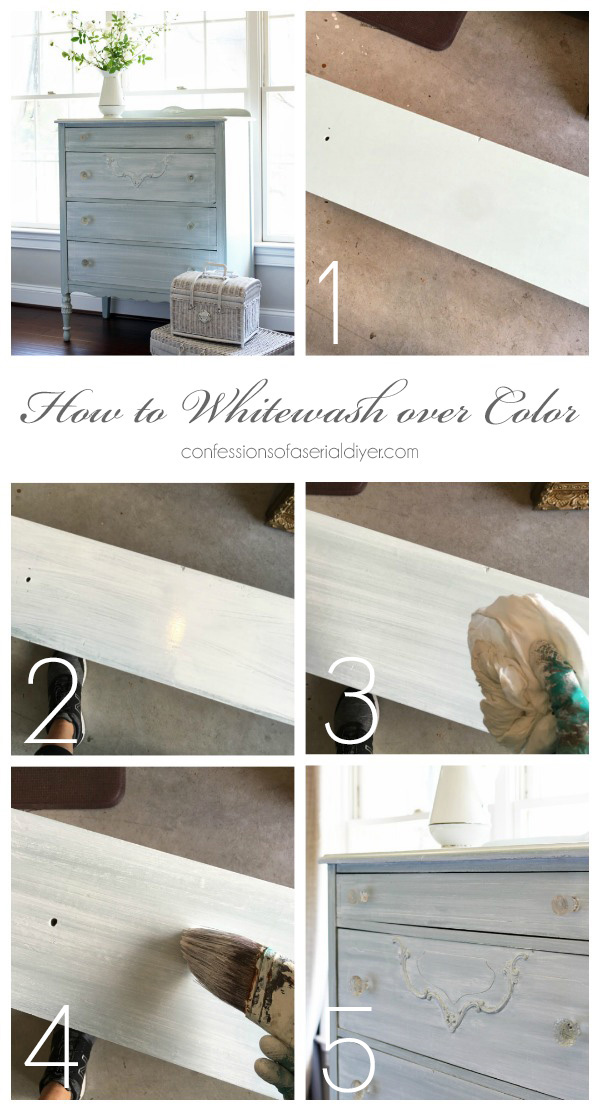
1. First I painted the base color. Over the white I only needed one coat. In this case I used Behr’s Gray Morning made into DIY chalk paint. (Recipe HERE.) This looks really light from the glare in my garage, but it is a medium blue.
2. In small sections, I added one coat of a mix of white latex enamel mixed with just a little water, to thin it. (I put my paint in a small plastic cup and added just a TBSP or so of water to it.)
3. Using a clean soft cloth, I wiped across the surface removing most of the watered-down paint. (I recommend wearing gloves for this step.) I continued to wipe in straight smooth strokes until I got a look I was happy with. You can add a little water if there is too much white, or add a little more paint/water if you want more white.
4. Then I dipped a brush in the paint/water mix and removed most of it onto a cloth. I dry brushed it with a very light hand across the surface, again, working in smooth straight strokes.
5. I sanded very lightly when everything was dry and then sealed with Dixie Belle’s Satin clear coat using this brush made just for applying sealers.
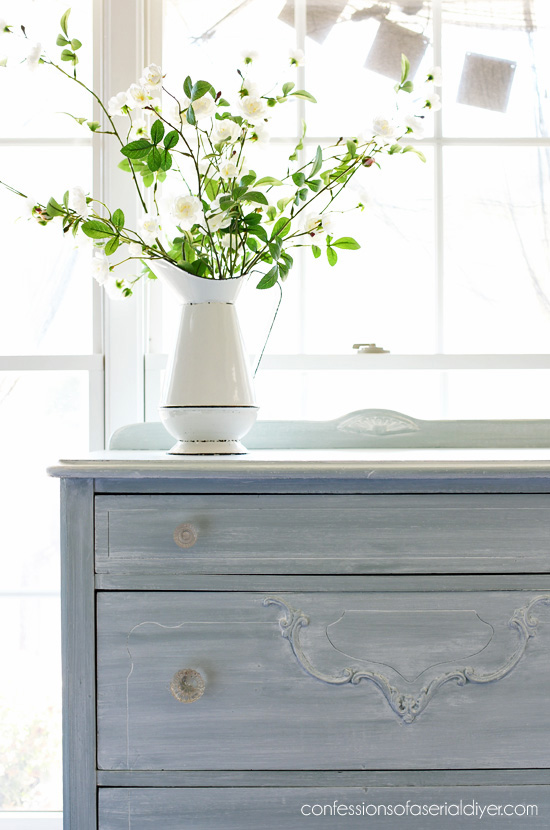
I love the effect of the whitewash over the blue…
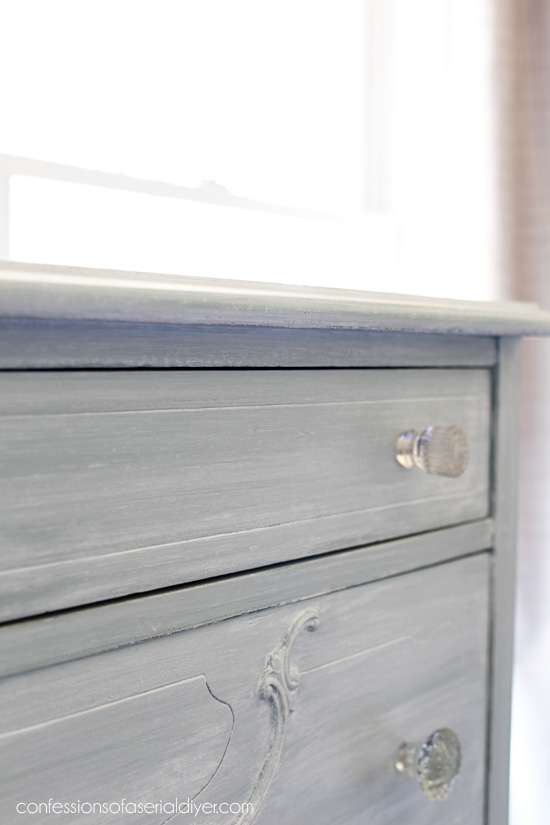
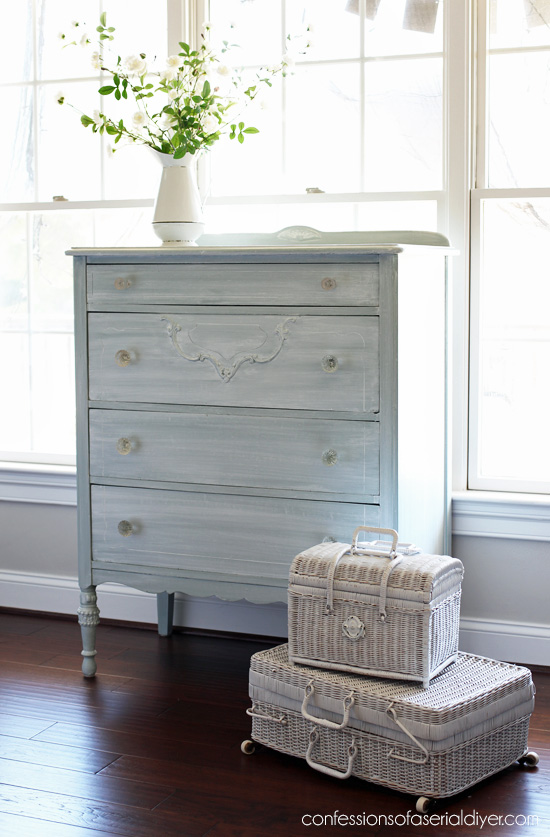
I swapped out the original hardware for a mix of glass knobs…
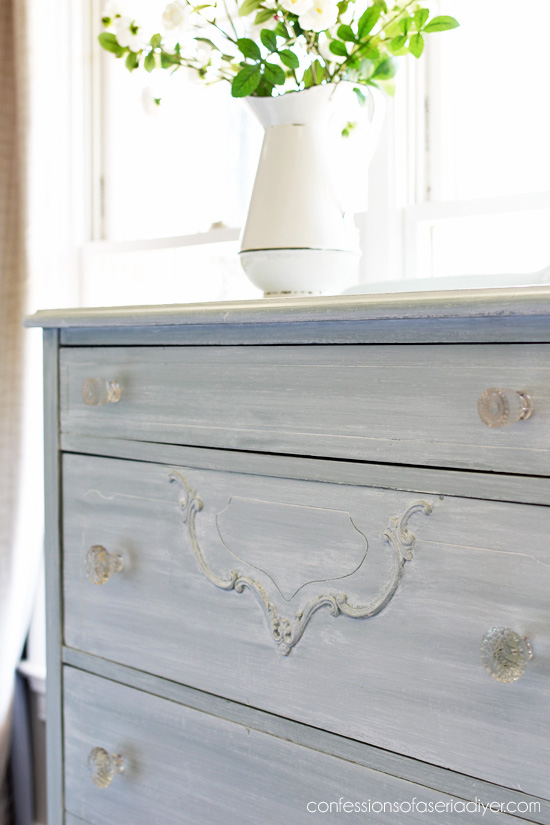
They are picking up some funky yellows and pinks in this photo, but they are all crystal clear in person.
I love this pretty detail on the second drawer too…
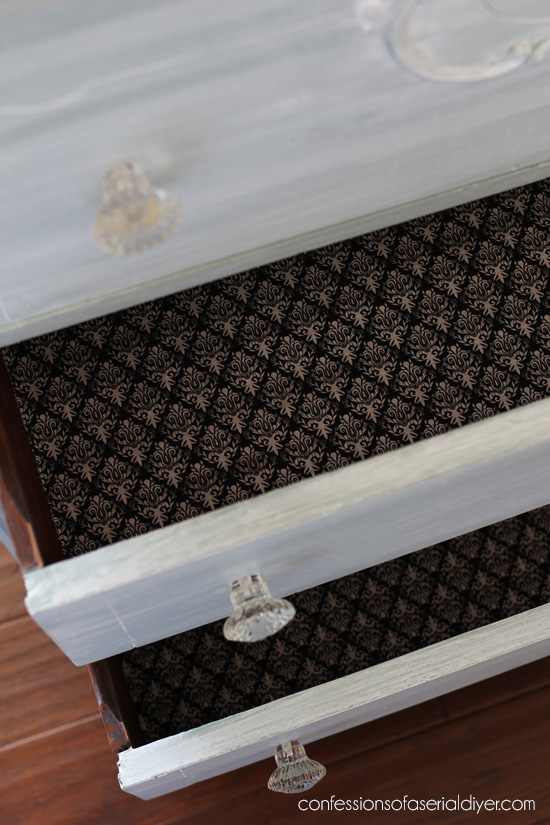
I lined the drawers with this fabric I picked up at JoAnn’s a while back:
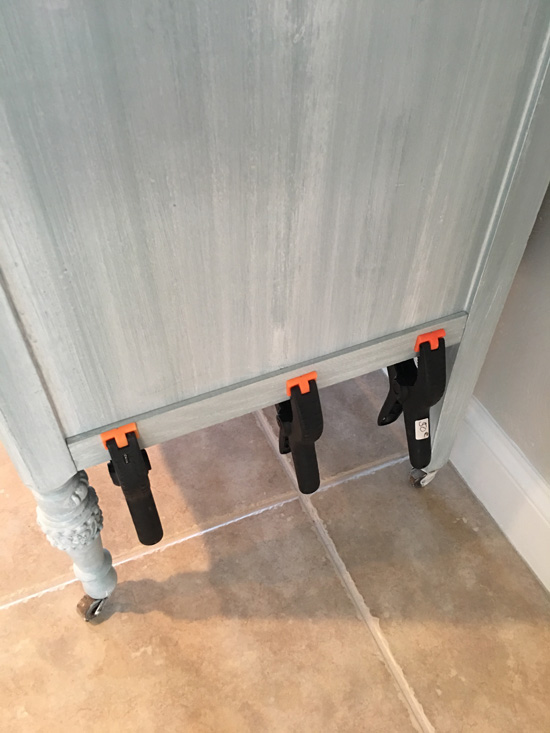
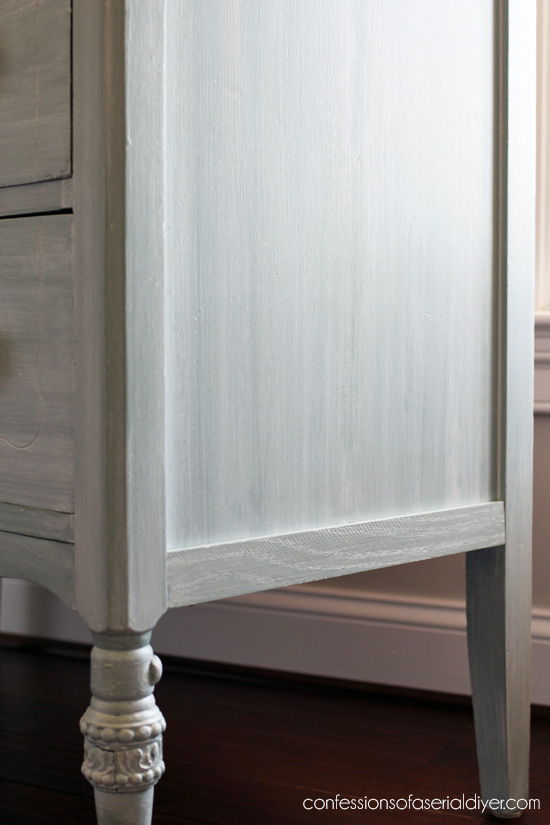
Luckily that bottom drawer was an easy fix, but then I had this damaged veneer on the sides to contend with:
After painting, I cut a piece of oak (would have used cheaper poplar if they had the width I wanted) I picked up at Home Depot to fit either side and painted that also. Then I added it right over the damaged veneer using wood glue and clamps to hold it in place.
It was a simple solution and it looks like it has always been there!
And check out those beautiful details on the legs!
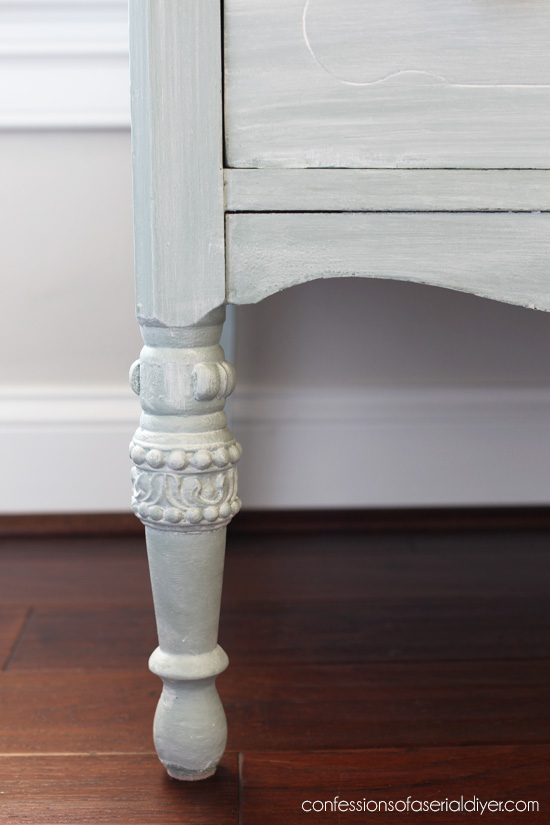
Even though some of them are missing, they are still beautiful!

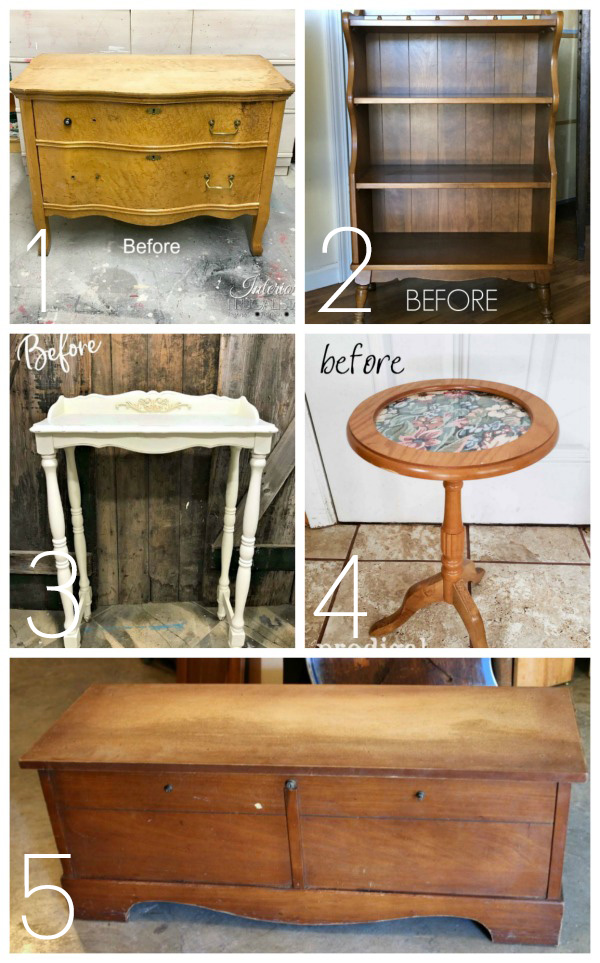
Don’t forget there are five more fun furniture makeovers from my pals for you to check out below!
Want even more furniture makeovers? See all my Furniture Fixer Upper flips in one place HERE!
I’ll see y’all back here on Tuesday with our outdoor Halloween decor!
UPDATE: See our outdoor Halloween tour HERE now! And if Halloween isn’t your thing, check out one of my favorite projects that I wish I had kept HERE!
XO,
![]()
Don’t Miss a Thing!
If you like what you see, there are several ways to follow along!
Email * Facebook * Pinterest * Twitter * Instagram


Mary Kaiser says
How beautiful! I am shocked that it wasn’t white. I turned out beautiful. I like you prefer the white stuff, but love the white wash over the blue to tone it down, so pretty. Thanks for showing how to do it!
Christy says
Thanks, Mary! I know I can’t believe I didn’t leave it white ha ha! I thought it would be fun to try something new! Have a great weekend! XOXO
Petra says
Well I wasn’t expecting that (thought you might do a grey) but I like it 😀 and I actually prefer it with those pieces of timber you put on the sides 🙂
Christy says
Thanks, Petra! I haven’t done gray in a while… maybe it’s time! XOXO
Larissa ~ Prodigal Pieces says
Great find, greats save, and fantastic finish! I just love the soft look, Christy.
Christy says
Thank you, my friend! It was a fun piece to work on! XOXO
Cindy says
Hi Christy. Do you have a # for the Grey Morning paint? I was looking for it at Home Depot, but don’t have it – they even looked it up on the computer. Sometimes they re-name the colors for the Canadian market. So if you have the sample swatch with the # on it that would be great.
Love this dresser – another beauty that will sell quickly.
Christy says
Hi Cindy! Thank you! The number is 490F-4 and they spell it: Gray Morning. It is one of their older colors. Hope that helps. My favorite way to use it is to mix it 50/50 with pure white, but it is beautiful on its own as well! XOXO
Janice says
Love the dresser and the details on the front and legs. The strips of wood you put on the bottom sides do look like they have always been there and bet it will give it a little more stability.
Christy says
Thank you, Janice! I just love those pretty details as well! I sent your box out today and you should receive it on Monday! Enjoy your weekend! XOXO
Christina in SW FL says
Wow, Christy, this one won’t last long in your booth!! Love the soft blue color.
Christy says
Thanks, Christina! I hope you’re right! Have a great weekend! XOXO
Debbie says
Love it!! Another beautiful piece saved! And your furniture fix on the sides with the veneer is something I have run into too, but never thought of fixing it that way. Great idea!!! I have a dresser exactly like that waiting to be restored. Can’t wait to get painting!
Christy says
Thank you, Debbie! Adding that strip of wood was a great solution. I have patched many pieces in the past, but this worked out so much better! Good luck on yours! XOXO
Cecilia from Georgia says
I agree 100%! Excellent fix.
Denise says
Charming makeover Christy! I love these old dressers. It looks amazing with the wash finish!!!
Christy says
Thank you, Denise! I don’t come across pretty pieces like this in our area too often. Glad I found this one! Have a great weekend! XOXO
Sheila DelCharco says
I love the way you fixed the veneer! That’s brilliant! And I *loooooove* tg whitewashed look! I’m thinking I’m gonna have to copy that! One of these days soon I’m going to get to painting my bedroom furniture!
Christy says
Thank you, Sheila! That little strip of wood did wonders. This would be beautiful in a bedroom! XOXO
Nancy says
How clever to add the wood pieces to cover the damaged veneer! Love this piece!
Christy says
Thank you, Nancy! XO
SHARON austin says
Turned out great! And oh my gosh, I have a waterfall dresser also in the garage waiting to be worked on and it has that same damage at the bottom of the veneer-NEVER thought to add a poplar strip, so thanks for that little tidbit of knowledge!!
Christy says
Thank you, Sharon! I’m so glad you found that little tip helpful! XO
Christine says
I admire your creative ideas and have learned so much from following you. Simple things like using a thin piece of trim to cover damaged veneer never even occurred to me. I anticipate that you have saved me hours of stripping veneer in the future. I’m so blessed to have found you. Thanks so much!
Christy says
You made my day with your sweet words, Christine! Thank you! I am so blessed to have sweet readers like you! XOXO
Karen says
What a brilliant idea to just cover damaged veneer on the bottom edges with a strip of wood! Way easier and better looking than some patch jobs!
Christy says
Thank you, Karen! I have tried patching in the past, and it is really hard to get it to look seamless for sure. This worked out great! XO
Cate says
You are about the only person I have seen that does whitewash the way I like it. It’s just perfect. Just like the story, “not too much, not too little, just right”! Love it!
Christy says
Aww thanks, Cate! This is a fun finish to do. It’s really easy to add more or take away if need be! XO
Allison Anselmo says
What a great find! I’m in the market for a small pretty dresser, and i love the white washing too. I think it will find a great home quickly
Christy says
Thank you, Allison! I was so excited to come across this pretty piece. We don’t find pretty detailed dressers like this in our area too often. Hoping it does sell quickly! XO
Kandice says
What a pretty update. I love the soft blue!
Christy says
Thanks, Kandice!! XO
Marie says
Oh my, this dresser looks so pretty with the wash of color. Nice save on the missing veneer too, looks like it’s always been there!
Christy says
Thank you, Marie! I had fun with this one. And yes, that strip of wood worked out perfectly! Have a great weekend! XOXO
Rose Lefebvre says
She has great legs with curves in just the right places! Love how you rejuvenated it!
Christy says
Doesn’t she?? Ha ha! Thank you, Rose! Enjoy your weekend! XOXO
Julie Briones says
Beautiful! Love the detail on those legs, and love that you added the piece of wood to the sides! Looks perfect!
Christy says
Thank you, Julie! Adding those pieces of wood sure was easier than trying to patch it! Have a great weekend, my friend! XOXO
Marcie Lovett says
What a smart solution for the missing veneer, Christy! I think you’re going to have to hurry and find some more pieces to paint, because this one is going to sell quickly.
Christy says
Thanks, Marcie!! I hope so! XOXO
Debra A Wise says
Another beautiful makeover, Christy! How smart to add the strip of wood to cover up the damaged veneer. Love the color with the whitewash!
Christy says
Thank you, Debra! I’m so pleased that the veneer issue was an easy fix! Hope you’re enjoying your weekend so far! XOXO
Mindy says
Great job!! I would like to give this a try~ I have a dresser painted a royal blue with a stained wood top. How do you think this would look with the white wash?
Christy says
Thanks, Mindy! I think that would be beautiful. This finish is very forgiving. I would try it on a drawer and see how you like it. Good luck! XO
Suzanne says
Wow that is beautiful, peaceful, and calm looking. I love it! Up to your usual super high standards, lol
Christy says
Thank you so much, Suzanne! I appreciate that and I’m so glad you like it! XOXO
Jen @ Girl in the Garage says
Soooo pretty, Christy! I love the pale blue with the whitewash. It really does have a coastal beachy vibe now! xo
Christy says
Thanks, Jen!! XOXO