Hello, beautiful friends!! After Thursday’s very involved dresser makeover, I’m back with a quick and easy one today! I have a Home Interiors shelf makeover for you!
Remember the days when we would get a bunch of our friends together and hold parties for candles, kitchen gadgets, home decor…anything to get a bunch of friends together, right??
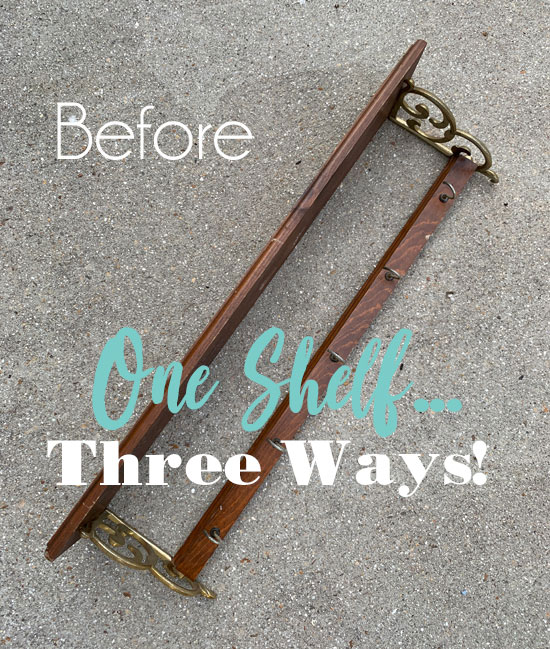
I have actually bought this old Home Interiors shelf four times now, and I couldn’t pass this one up for $5 at a yard sale a couple of weekends ago:

I did a post with the previous THREE variations HERE.
This one started like most projects, with a good cleaning with White Lightning, mixing one TBSP into a half gallon of warm water:

As you can see, I also removed the cup hooks as well.
Prime the Knots
This shelf had a big fat knot in it, and I did not want that to eventually bleed through, so I primed first with clear Bonding BOSS:

I let that dry 24 hours so it could do its thing.
Fill Holes with Mud
Next, I filled the area around the knot as well as a couple other imperfections with Dixie Mud:

Paint
Finally, it was time to paint, and for this shelf, I chose a simple white going with Dixie Belle’s Fluff:

I gave it two coats for solid coverage. I love that Fluff covers completely in two coats!
Sand
I then sanded all over with 220 grit sandpaper to smooth and lightly distress this shelf…

Adding a backing
I like to add a backing to these shelves, and for this one, I chose a piece of wide bead board that I cut to fit:

I also painted that piece in Fluff.
Seal
Before attaching it to the shelf, I sealed both pieces in Clear Coat in the satin finish using the blue sponge applicator to apply it.
Adding New Hooks
I attached the new backing using small finishing nails.
Then, I wanted to add hooks again, but the flimsy cup hooks weren’t very functional for anything more than cups, so I dug this fancy piece out that I had recently found at the thrift store:

The largest white ones would be perfect for my shelf.
I had removed those and then ended up screwing them into scrap wood just to paint them in this coastal Duck Egg Blue that I mixed 50/50 with Cotton:

I lightly sanded those to reveal some white and then sealed with a quick spray of Rustoleum’s Clear Satin Spray.
Once I attached those, this very simple Home Interiors shelf makeover was complete!
Home Interiors Shelf Makeover Reveal

I usually stage items on my bead board wall, but it is the same bead board as I used on the backing here, so it disappeared when I hung it lol!
This was taken on one of our kitchen walls instead…

I love a simple redo, and that is all this piece needed!

The blue hooks add a coastal touch…

Not to mention the addition of the bead board as well!


My babies! ????

I kept the original gold brackets and just painted them…


I have redone this same shelf THREE other times!
See how they all turned out HERE!
I love a quick and easy project!
I’ll be prepping for our neighborhood yard sale this week, so I will have this fun oldie for from the archives for you on Thursday in honor of my yard sale:

UPDATE: Revisit this one from 2022 HERE!
Or, skip to the next new makeover, this set of coastal lamps that were in need of an update!

UPDATE: See how I updated these gems HERE now!
Have a wonderful week!
XOXO,

Don’t Miss a Thing!
If you like what you see, there are several ways to follow along!
EMAIL * INSTAGRAM * FACEBOOK * PINTEREST


Get FREE SHIPPING on all orders over $50. No code needed at checkout! Orders under $50 always enjoy $8 flat rate shipping! Most orders ship same or next business day!


Mary Kaiser says
Oh it simple turned out beautiful! I use to have one of those Home Interior shelves. My 1st mother- in- law use to be a demostrator!! Long time ago! You made it better than the original!
Christy says
Thank you, Mary! There are a ton of these roaming around out there lol! She probably made a small fortune selling Home Interiors! XOXO
Mary C King says
It came out great!
Christy says
Thank you so much, my friend! XOXO
Geri Davis says
I love the new look on the shelf! I remember having a few of those home interior parties back in the day. I went back and looked at your previous ones too! They are all good, love this one the most! Thanks for sharing ❤️
Christy says
Thank you, Geri! Those parties were a great excuse to get a few friends together! This shelf is such a fun and easy one to update, so I’ll always grab them up! XOXO
Janice Redden says
Christy’s garage – where the magic happens! Looks perfect and definitely more up-to-date. Good idea on how to paint the hooks so easily without having to hold them. But, oh, wow…that board you found with all those hooks….that was a lot of hooks on that board!
Christy says
Ha ha yes! I need that sign to hang out there lol. Thank you, Janice! That board had a ton of hooks on it! XOXO
Nana Diana says
Nice update! I can’t tell you how many Home Interior parties I went to over the years. lol. Plus hosted one. It was as much for the fun of the company and get-together as it was for the product. lol.
Christy says
Thank you, Diana! There just weren’t many places you could shop for home decor back then I guess, so they were perfect! And yes, the get togethers were so fun! XOXO
Cheryl W says
Love the beadboard and the bit of color with the hooks! Enjoyed looking back at the previous shelves. I wonder what #5 will bring! Maybe you’ll find it at your neighborhood yard sale! LOL
Christy says
Thank you, Cheryl! These are such fun little shelves to update…and yes, maybe I’ll get lucky this weekend! You never know! XOXO
Kathy W says
Christy, it turned out so much better!!! Adding the piece to the back makes such a big difference!! And, I love that you painted the hooks a different color to add some contrast. It will sell fast!! Everyone needs hooks to hang something and since you added the sturdy hooks, it can hold heavier items. Great job!! I’ll be searching for a shelf like it to redo. As always, thank you for sharing your beautiful makeovers.
Kathy W
Christy says
Thank you, Kathy! I wouldn’t be surprised if you found one since I’ve come across these four as well as one or two that I passed on early on! They are fun to redo…good luck in your search, my friend! XOXO
Sue says
I love the transition to this shelf! Thank you for the inspiration.
Christy says
Thank you, Sue! I’m so glad you like it! XOXO
Cyndi says
Love it! And great idea putting the hooks on the scrap board to paint them. This would be pretty (and useful) in many areas of the house.
Christy says
Thank you, Cyndi! That little trick stops me from getting more paint on my fingers than the hooks ha ha! And yes, this could work in so many places around the house! XOXO
Laura J. says
Love the shelf and all the previous shelves you made over – times 4!!! I have the same outer frame as the one your sons are pictured in except the wood is not painted. I believe I bought mine at Home Goods years back & I have been wanting to paint it. I will head to your shop to buy some chalk paint & other goodies to take advantage of your sale. Thanks for your inspiration Christy!!
Christy says
Thank you, Laura! I painted that frame many many years ago in milk paint. Apparently if you don’t seal it, it will continue to flake off…eventually all the paint will be off ha ha! I should probably seal it! XOXO
Kelly DeVol says
Lovely makeover Christy! I think that most of us that are in our 60’s owned this shelf at one point of our lives – Home Interiors! I know that I did! I painted mine years ago and gave to my MIL. LOVE the beadboard addition – you truly are so creative and clever my dear!
Christy says
Aww thank you, Kelly! There are a ton of them floating around. Everyone had the same decor back then lol! You were smart to paint yours and pass it on! XOXO
Jewels L says
Love the beadbord backing and lightened duck egg blue hooks. Wonderful up cycled creation!
Christy says
Thank you, Jewels! It’s ready for summer now! XOXO
Ruth A says
I absolutely loved/ love Home Interior products. All wood that lasted forever. All 4 of your shelves came out beautifully. You have an eye for creativity and vision.
Stay well.
Christy says
Thank you so much, Ruth! They are very well made for sure! This particular shelf is fun to redo! XOXO
Alex says
This looks amazing! I have a bit of beadboard left over from a project we completed a few months ago and I’ve been racking my mind in how to use it. I love being able to reuse and refinish things like this to help reduce costs on projects. Thanks so much for sharing!
Christy says
Thanks, Alex! All those leftover materials come in handy! XO
Cecilia says
I love beadboard! It looks great with the shelf. Paint to the rescue once again!
Christy says
Me too! Thank you, my friend! XOXO
Michele M. says
Just love that! What a big difference. SO CUTE!!
Christy says
Thank you, Michele! It’s much different for sure…all set for summer! XOXO
Joanne Ireland says
Christy, your site is so practical and your work is always beautifully done and throw in some very economical plans (buying shelves just to reuse the hooks for one, there are so many more though) Thank you so much for this site it’s very helpful for clever repurposing. Would you ever consider a list of must haves for the home diyers or maybe you have? I noticed you have for example a lazy susan for painting and moving wheels for large pieces of furniture, some of your product solutions explained in a list form would be great!
Thank you again! Joanne
Christy says
I appreciate that so much, Joanne! Thank you! I have not written a post on tips for repurposing, but that is a great idea! Thanks following along with me! XOXO