I wasn’t sure what to call this piece, but I’m going with a framed cubby shelf! Amazing friends, do you remember the frame I turned into a shelf this past spring? (This one HERE.)
I’m not gonna lie, that one was a lot of work, but it sold pretty quickly, so when I spied this one at the thrift store already turned into a shelf for 50% off the marked price of $12, I had to grab it:
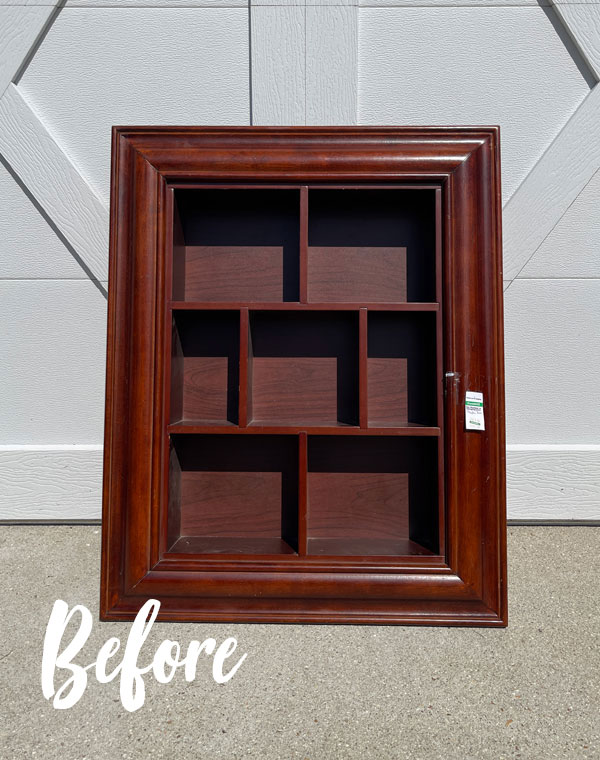
I figured not having to do the actual building of the shelf would make this makeover so much easier!
But can I make it pretty?? Let’s see!
I’ve included a few affiliate links so you can find the products I love.
Clean
Of course, I started with a good cleaning with White Lightning by mixing one TBSP into a half gallon of warm water and giving it a good wipe down.

These applicator pads are actually sponges covered in terry cloth and are perfect for this step. I then swapped out my water for clean water and wiped it down once more to remove any remaining residue.
Prep for Silk Paint
I liked the idea of using the Silk paint which has a built-in top coat, so I wouldn’t have to seal all those cubbies.
Silk paint does require prepping by sanding the surfaces to give the paint something to grip onto.
I did that all over with 220 grit sandpaper wrapped around an old sanding sponge…

Then I vacuumed away any dust with my shop vac and followed up by wiping away any remaining dust with a clean cloth.

An alternative to sanding would be using Slick Stick bonding primer. (Apply one coat, then a second coat after two hours, and then let it sit overnight before painting.)
Paint
I chose Silk in Salt Water for this shelf:

OOPsie
I used the last of one jar on the first and second coats, and just after opening the second jar for the final coat, this happened…

Oopsie! If this happens on a floor like this concrete we have in our garage (can you tell I’ve done this more than once?), I leave it as is to dry.
The next day, I am able to pull it up in one piece:

Pretty awesome. I did paint the entire final coat with that paint from the floor though lol. I tried not to waste it all! I guess I could have scooped it up somehow, but I was thinking of the mess.
This piece needed three coats for complete coverage over that dark stain. Silk dries from the top down, so be sure to let it sit longer than you might for chalk paint. I left it in the sun for about an hour in between coats.
You can read more about the differences between Silk paint and Chalk Mineral Paint HERE.
Sand
Once my final coat was dry, I sanded all the edges to distress a bit.
Yes, you sure can do this with silk paint too when you’re just hitting the raised areas where natural wear would occur.
Transfer
If I was going to make this pretty, I had to add a transfer!
I chose one of my favorites, the French Ceramics transfer:

This one is very forgiving since the pattern is pretty random.
I realized after painting the first coat that I should have removed the backing to make it easier, but it had so many staples that were really embedded in there, so I chose to do it the hard way lol.
I cut pieces to fit the back of each cubby. To do that more easily, I enlisted one of my favorite helpers, my rotary cutting set.
It includes the mat, the rotary cutter, and the straight edge.

I use it for transfers, decoupage paper, and fabric.
Then I used the included burnishing tool to transfer the image…

However, the larger stick made it a bit more difficult to get into those corners and in those tight spaces, so I swapped it for a popsicle stick and it worked much better…

There is no need to seal Silk paint since it has a built in topcoat. I also didn’t feel the need to protect the transfer since it was at the back of the cubbies, so this project was complete!
Framed Cubby Shelf Makeover, The After
Here is how this dark and dreary cubby shelf looks now!

Bright and cheery!

I love the bright white of the Salt Water Silk Paint against this gorgeous blue of the French Ceramics transfer!

And this transfer is the perfect backdrop for these pretty ironstone pieces…

Here’s a bit of a side view. You can see how the frame sits away from the wall:

It is pretty now!

And here’s a peek of the shelf naked:

Still pretty!

I feel like I’m working right through this haul!

See what I’ve completed from this haul so far below if you missed any:
Update a Picnic Basket with Decoupage
Painted Metal Quilt Rack
Vintage Brother Sewing Machine Cabinet Makeover
Child’s Chair Makeover
Painted Console Table
French Provincial Dresser Makeover
SHOP NEWS
I’ve added 19 BRAND NEW Fall and Christmas items from Redesign to my Etsy shop! They should be the first things you see on the homepage when you visit! Get these items while supplies last as Redesign is already sold out of some of these items.
I’ll be back with this vintage bed tray on Tuesday!
UPDATE: This is such a cool piece…see its two functions HERE!
I hope you all have a wonderful weekend! ❤️
XOXO,

Don’t Miss a Thing!
If you like what you see, there are several ways to follow along!
EMAIL * INSTAGRAM * FACEBOOK * PINTEREST


Get FREE SHIPPING on all orders over $50. No code needed at checkout! Orders under $50 always enjoy $8 flat rate shipping! Most orders ship same or next business day!


Mary Kasier says
It is so beautiful now! I love the bright on it with the florals to set off the cubbies! You could make anything beautiful!
Christy says
Thank you so much, Mary! I was so pleasantly surprised this one turned out as nicely as it did lol…it was so dark and heavy looking! Have an lovely weekend! XOXO
Sheila says
Wow that turned out great! With the ironstone you can really tell the scale. I was picturing a shadow box…
Christy says
Thank you, Sheila! It is quite a bit larger than it looked in the before photo. XOXO
Debra Hubbs says
So pretty! At first I couldn’t picture how it would look with a piece of transfer in each space but I love it. These shelf box things can also be recessed into a wall so they look built in which is nice too. I bought an antique smaller one with just little shelves, not boxes, and inserted it behind my stove in our lake house to hold spices. Looks cute. Painted it Haint blue =)
Christy says
My mind it totally blown, Debra! Do you know I never even considered recessing it into a wall? I need to immediately start looking for where I can put this lol! I bet yours is so cute above the stove. Thank you!! XOXO
Debra Hubbs says
So happy I mentioned that then. =)
Christy says
Yes, me too! ????
Janice Holt says
There are so many places you could use the shelf. It turned out beautiful and your ironstone looks so pretty. Have a great week-end.
Christy says
Thank you, Janice! Have a lovely weekend too! XOXO
Lori says
Gorgeous! (Once again) ❤️
Christy says
Thank you so much, Lori!! XOXO
Nana Diana says
I do love the way that cubby shelf turned out but it was a lot of work. lol. Worth it though. Did you notice how the rose seems to be growing right out of the cup? Perfect! Have a wonderful day-xo Diana
Christy says
Thank you so much, Diana! I had to go back and look, and it really does! Enjoy your weekend!! XOXO
Corrine says
Another awesome flip! What a difference!!! Gorgeous
Christy says
Thank you so much, Corrine! I am still amazed at how things can look so different with a little change lol! XOXO
zefi says
Absolutely gorgeous!!! I would love that in my home!
Christy says
Thank you so much, Zefi! XOXO
Sue says
Lovely cubby! I think it is so awesome to present it with white dishware and the transfer sets it off perfectly!
Christy says
Thank you, Sue! I didn’t realize until after that the transfer is called French Ceramics, and all though I used English ironstone…it was kind of funny! XOXO
Charleen says
This is beautiful!!There is nothing better than blue and white,that’s why it’s a classic. Love the transfer. It’s a winner ,no matter what you use it on. Gorgeous. Have a blessed day.
Christy says
Thank you, Charleen! I am a huge sucker for classic blue and white too! Enjoy your weekend!! XOXO
Hannah says
Wonderfully done! The transfer just made it. I’d buy that in a heartbeat ????
Christy says
Aww thank you so much, Hannah!! XOXO
Carroll Xavier says
I love the transformation! French Ceramics is also one of my favorite transfers, and it looks gorgeous in the cubbies. It must be a heavy piece; what did you use to hang it?
Christy says
Thank you, Carroll! It is such a great transfer, and with the varied pattern, there are many more options for its use. It has built in hanging brackets and I just have it hanging on two screws because it was temporary for photos, but I would have definitely used anchors or these hangers that I really like for super heavy items: https://amzn.to/3QdegWt XOXO
Jan Haley says
The wall shelves are beautiful now! My mother had one and we called it a “Whatnot Shelf”. It had mirrors where you put the wallpaper. She put small glass items on the shelves. In my wildest imagination I never thought it could be beautiful. But now it is. You have it styled perfectly, too.
Christy says
Thanks so much, Jan! That is a great name for it. I honestly am surprised it came out as pretty too ha ha! XOXO
Marcie Lovett says
I had no doubt you’d make that shelf pretty, Christy. I didn’t anticipate the transfers, though – it looks like you backed it with fabric! And it’s much bigger than I realized from the before picture. Someone is going to snap that right up.
Good tip on the spilled paint, I didn’t realize it would do that. You better believe I’d try to salvage every bit I could get back in a jar ????
Christy says
Thank you, Marcie! Fabric would have been easier probably and I never even thought of that…great idea! And you know I really debated whether to save my floor or save the paint! XOXO
Michele M. says
Oh that is stunning. I know it will sell so fast.
Beautiful choices on paint and transfers.
Sorry about the spill – what a cool thing it comes up in one piece like that though.
Christy says
Thank you, Michele! Always hoping for a quick sale, and yes…what a bummer to have it spill, but it was the easiest clean up ever lol. XOXO
Cecilia says
Oh it’s much bigger than I thought! Love the blue and white transfer. Just gorgeous. Another successful makeover!
????Cecilia
Christy says
Thank you, Cecilia! It really is a good size! XOXO
Cindy says
I’ve been trying to come up with what to do with my own little out-dated cupboard with heart cut-outs in the doors. Thanks to you Christy this latest transformation has so inspired me. I can’t wait now to remove those doors and begin! Thanks too for all your helpful tips (trust me I need them)!
Christy says
Oh wonderful! I love that you are inspired for your own makeover. Enjoy!! XOXO
Karyn S says
Is it weird that I like the way it looked when it was just sanded, before paint? It made it look like an old farmhouse piece.
Christy says
Not at all…how wonderful that we don’t all love the same things! XOXO
Susan Renaud says
Your cubby is soooo pretty. I have an open shelf with drawers that is very plain and have been looking at it and wondering what to do with it to freshen it up. This cubby result lends some ideas to what my remake may resemble. Thank you very much. I so enjoy your work.
Christy says
Thank you, Susan, I appreciate that so much! I’m glad I could give you an idea for your shelf! XOXO
Rose Lefebvre says
I really love what you did with this piece! I remember my grandmother having one like it that had mirrors in the cubbies (maybe one mirror) and how dark the wood was! You have created beauty!
Christy says
Thank you so much, Rose! Someone else mentioned their mother had one similar to that with the mirrors. It must have been a popular piece to display figurines and such! XOXO
Cheryl Atkinson says
Hi Christy! That shelf is alot bigger than I thought it was. What a great piece and you made it look so pretty. It broke my heart that I ruined one whole sheet of the French Ceramics. Great makeover sis.
Christy says
Good morning, Cheryl, and thank you! It really does appear smaller in the before photo. I’m so sorry you lost some of your transfer. The good thing is that the rest was still usable unlike some transfers that create a whole image by joining the three, but still frustrating. XOXO