
Happy September, dear friends! Today I’m giving Fall a big ole welcome with a DIY Fall Frame Wreath! I’m also touring with the ladies of the Seasonal Simplicity Series, hosted by my beautiful friend, Krista of The Happy Housie, so be sure to look out for even more DIY Fall fun at the bottom!
Okay, let’s get to it!
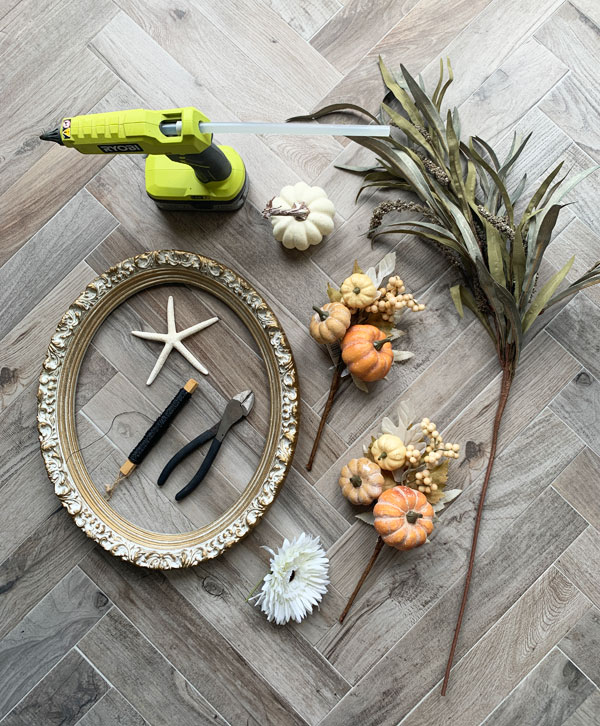
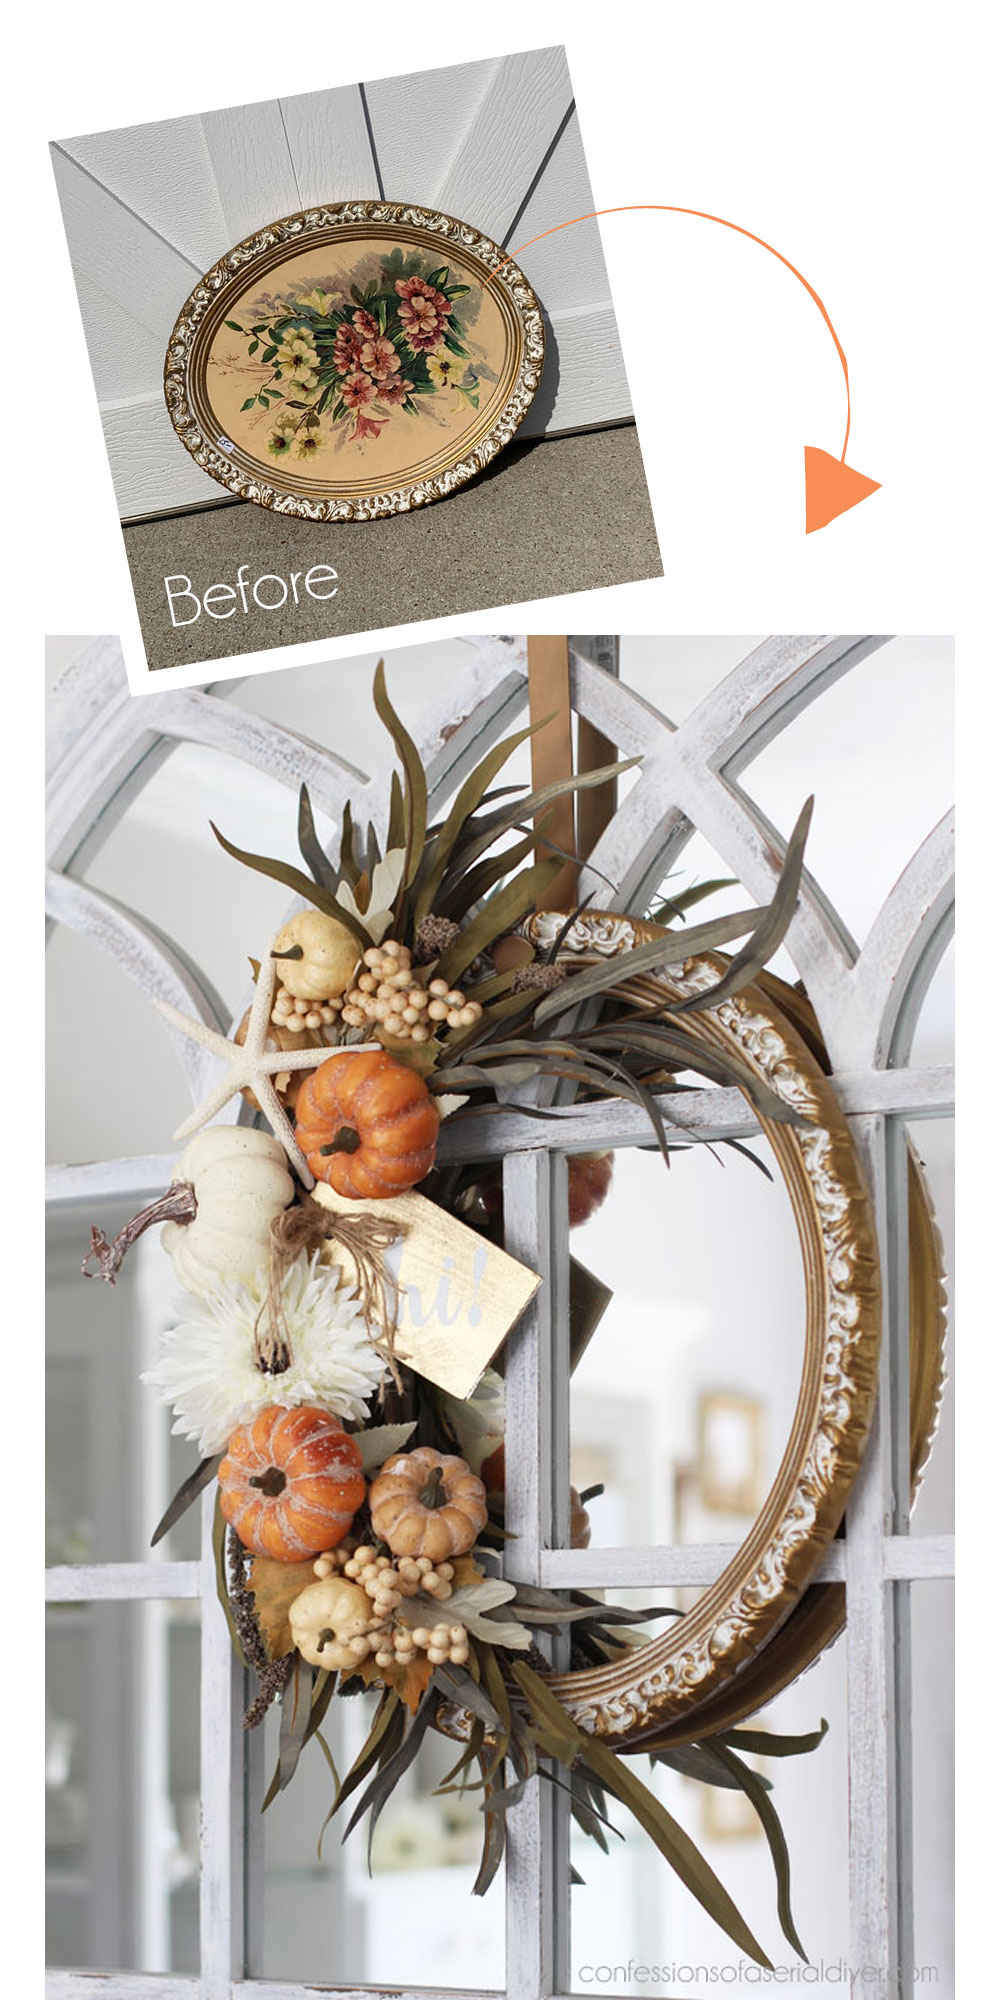
Y’all know that when I join these tours, I still like to stay true to “me” by bringing in some thrifty element, so I dug around in my current haul to find something that I could use for today’s Fall DIY project, and I came up with this picture:

This was leftover from the estate sale of my sister’s grandfather-in-law. This hutch and this secretary were from the same sale.
I loved the frame on this piece, but the estate sale company had priced it at $25, so it was a hard pass for me. When it didn’t sell, my sister nabbed it for me along with a couple others, so it ended up being FREE yay!
The first thing to go was the floral picture that was in the center, it was warped and it was made of cardboard. I’ve included a few affiliate links so you can find the products I love.
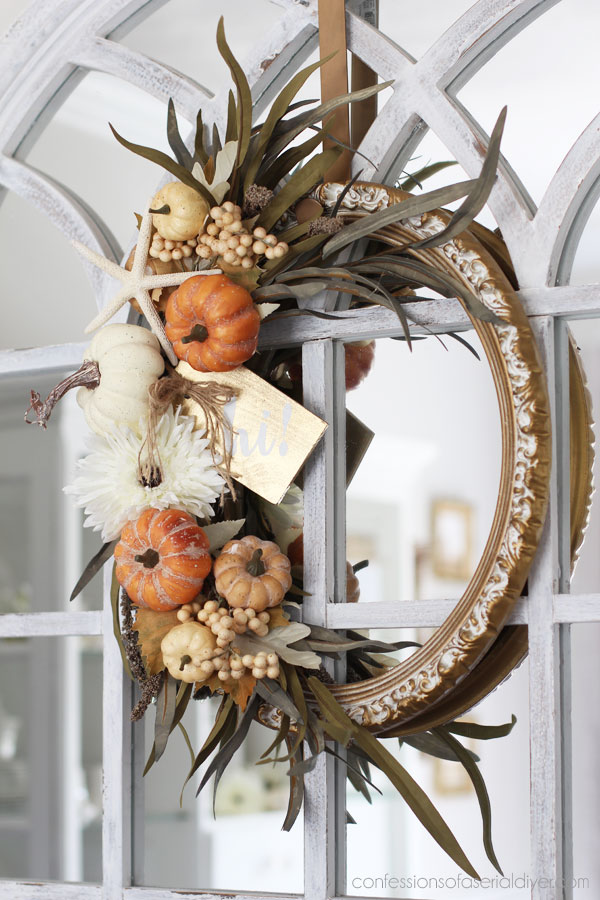
DIY Fall Frame Wreath
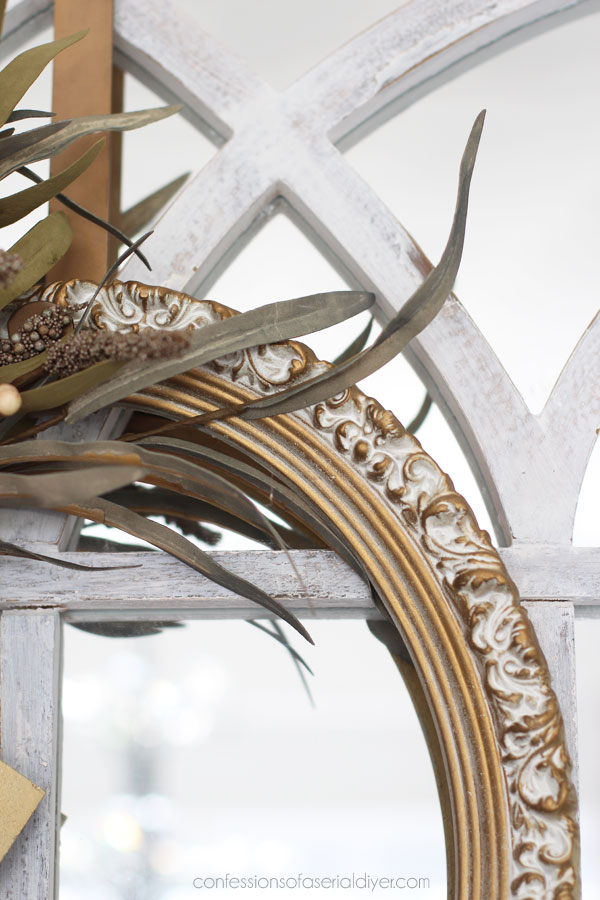
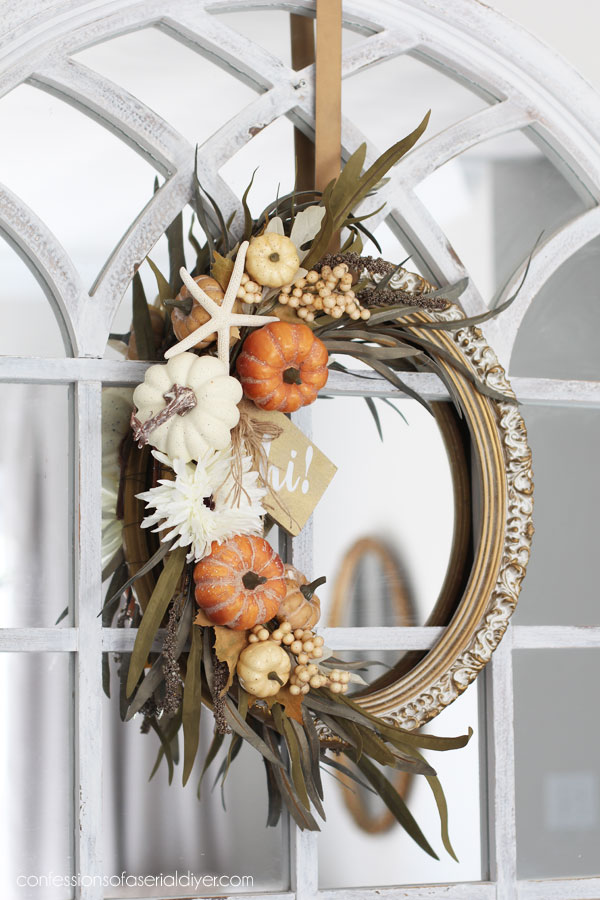
I loved the actual frame as is, so I didn’t even have to paint it, and that was the foundation for my new wreath.
I headed to Michaels to see what I could find to turn it into a Fall wreath and found two pumpkin picks and a white pumpkin. It started as a pick also. Then I stopped by Hobby Lobby and found a nice Fall greenery stem.
Here is everything I used to bring this Fall frame wreath to life:
Not much, right?
Video Tutorial
Here is a quick two-minute video that shows how easily and quickly this unique Fall wreath came together:
If you have trouble viewing, you can see it on YouTube HERE.
And here it is in pictures also:
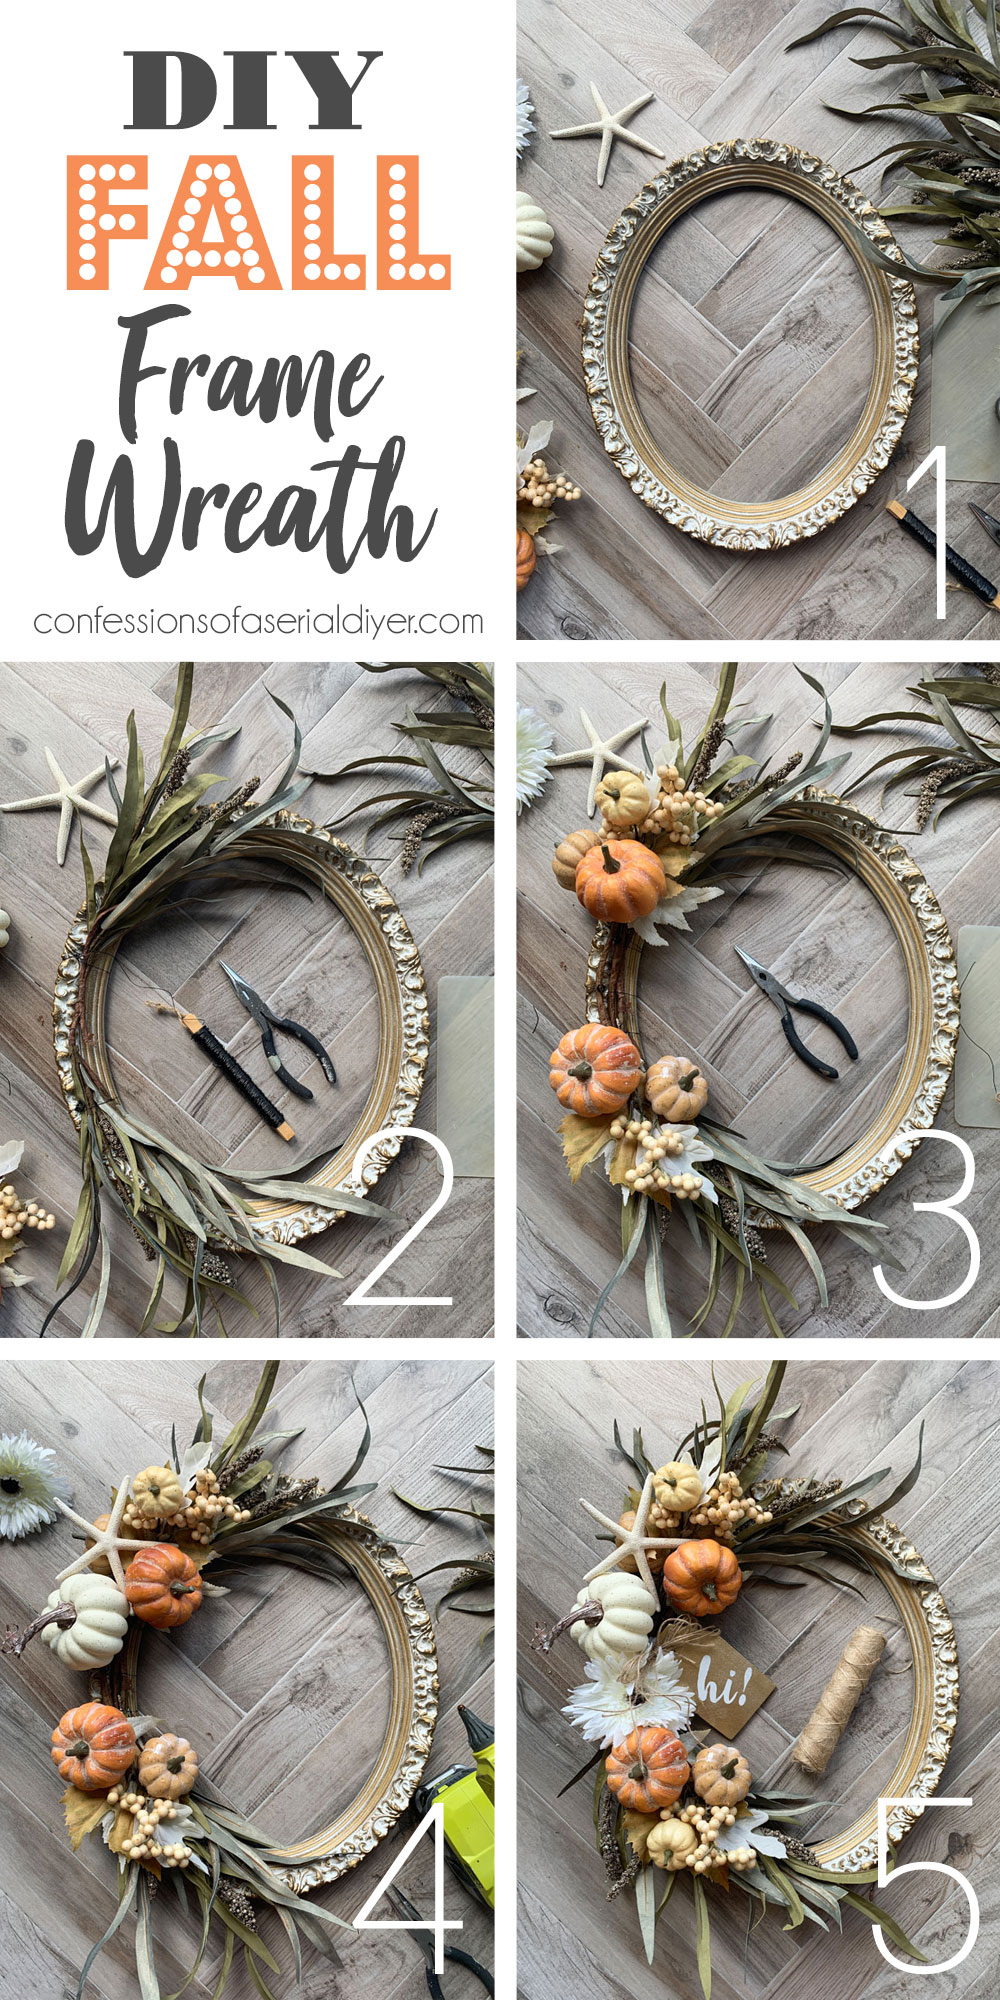
The picks and greenery were held in place with craft wire, and everything else was attached with hot glue using my hot glue gun.
The result
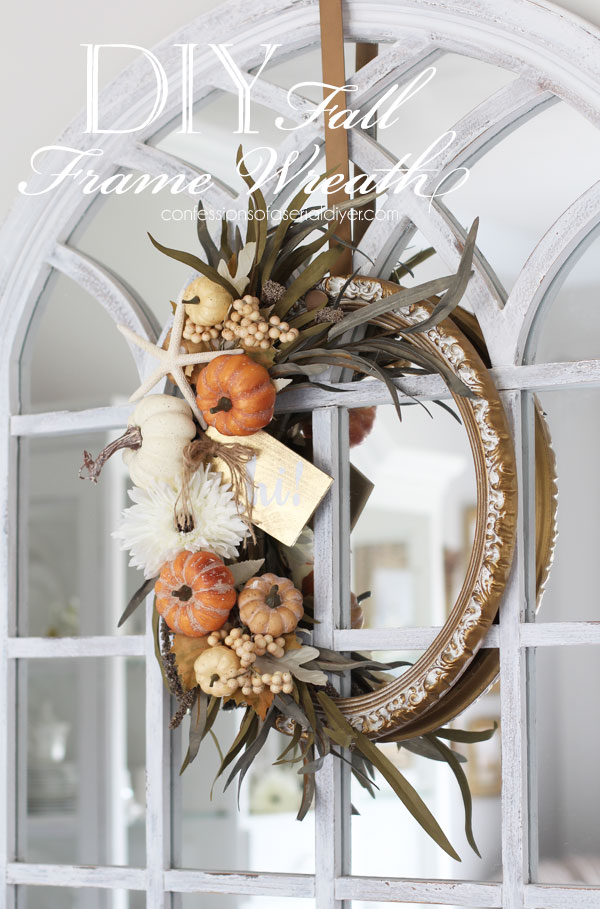
The gold on the frame is just perfect for a Fall-inspired wreath!
It only took a few supplies to create this one of a kind wreath!
If you watched the video, you saw that I originally added a bow, but I just didn’t love it, so I swapped it out for this whimsical tag instead.
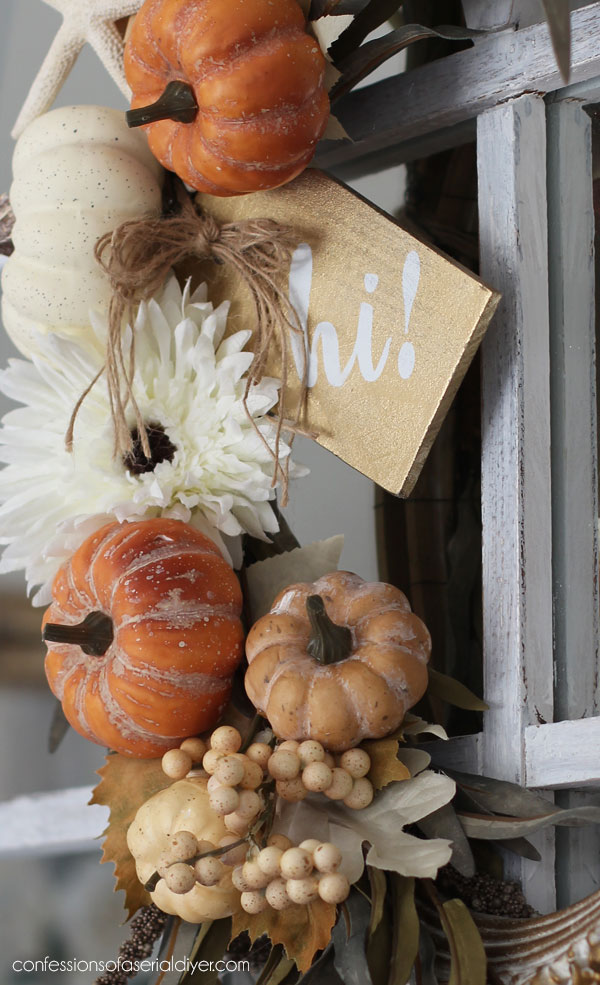
I actually made several small tags out of the original backing from this mirror makeover I shared recently:

You can see what I did with that mirror HERE. I replaced the old backing with fresh luan and y’all know I hate to toss anything, so it became several tags that I could use on other things later:
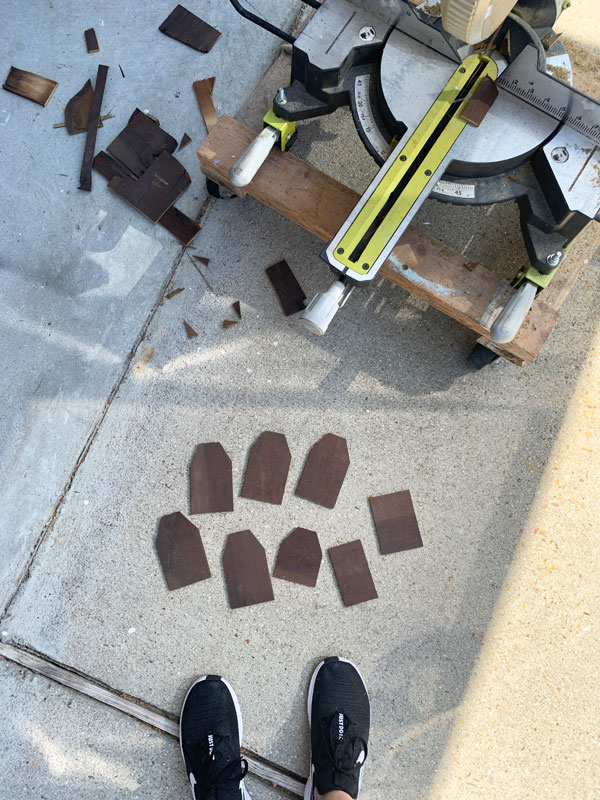
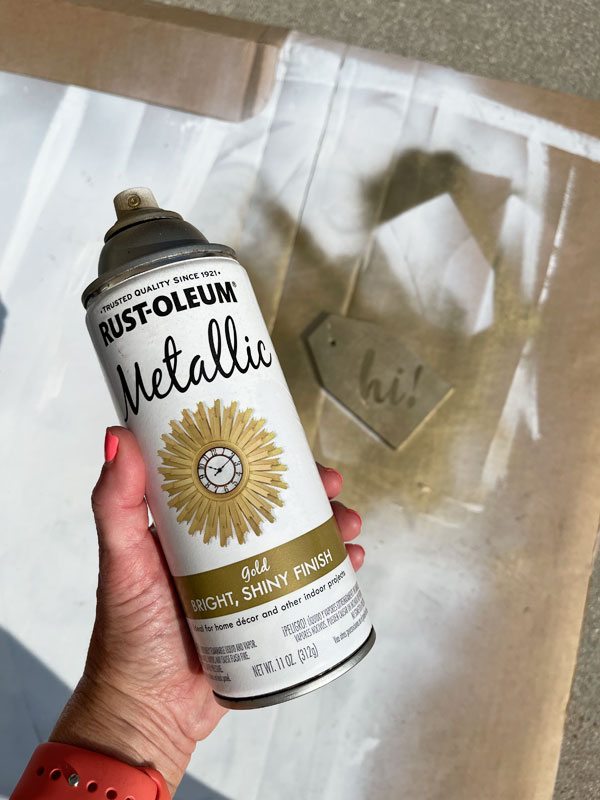
When I wasn’t loving the bow, I grabbed one of these tags and spray primed it in Rustoleum spray primer.
Then I cut a simple “hi” using my Silhouette. I positioned it on the tag and sprayed Rustoleum Metallic Gold over the top:
Then I removed the vinyl and attached the tag to my wreath using a few strands of thin jute twine.

It’s so much cuter than the traditional bow that was overwhelming this wreath..
And a starfish on a Fall wreath? Why not? I live in a beach town, so I had to throw that in!
I have our new Fall wreath hanging in our dining room at the moment…
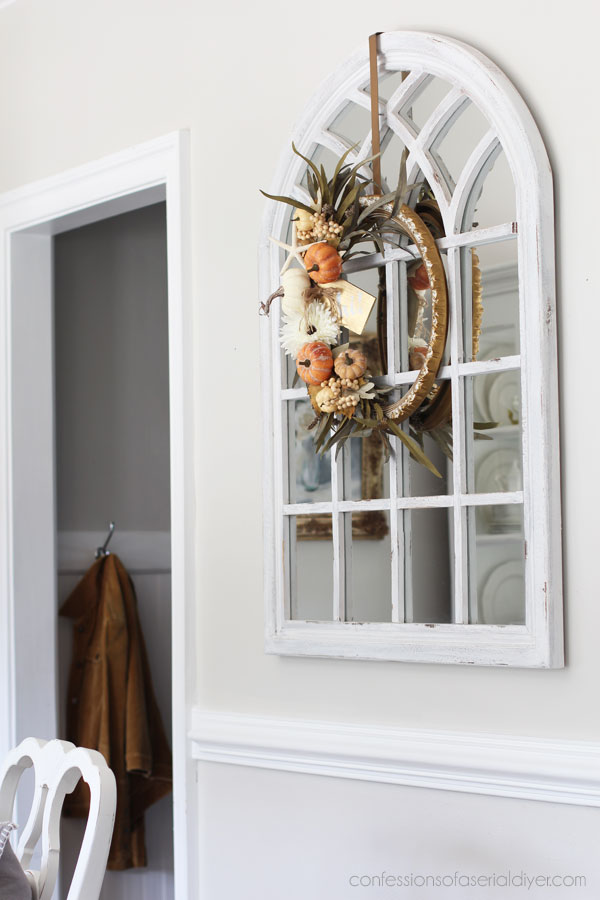
It will go on our front door as soon as I change over to Fall out on the porch. I just refuse to do it during a heat wave.

And y’all know my Fall decor doesn’t last long.
It will soon be replaced with my favorite…H A L L O W E E N !
I hope you enjoyed this quick Fall project!
Don’t go anywhere just yet! My friends have even more DIY Fall inspiration to share with you!


DIY Textured Vase at The Happy Housie
DIY Fall Frame Wreath at Confessions of a Serial DIYer
Dried Floral Cloche at Deeply Southern Home
Fall Wreath How-to at Hallstrom Home

Fall Dried Flower Arrangement at Modern Glam
Elevated Toilet Paper Pumpkins Free Craft at Tatertots and Jello
DIY Inexpensive Fall Wreath at The Happy Happy Nester
How to Make a Fall Wreath at A Pretty Life

Air Dry Clay Leaf Twinkle Lights at Clean & Scentsible
Embroidery Insects at Life is a Party
Dried Florals for Fall at Lemon Thistle
DIY Feather Wreath at Dans le Lakehouse

DIY Fall Wreath Tutorial at She Gave it a Go
How to Make a Succulent Table Runner at My Sweet Savannah
DIY Fall Harvest Nut Wreath at Sincerely, Marie Designs
DIY Fall Cutting Board with a Cricut at The DIY Mommy

If you enjoyed this simple Fall project, you might also enjoy seeing how easy it is turn the sleeves of old sweaters into the cutest mini pumpkins!!
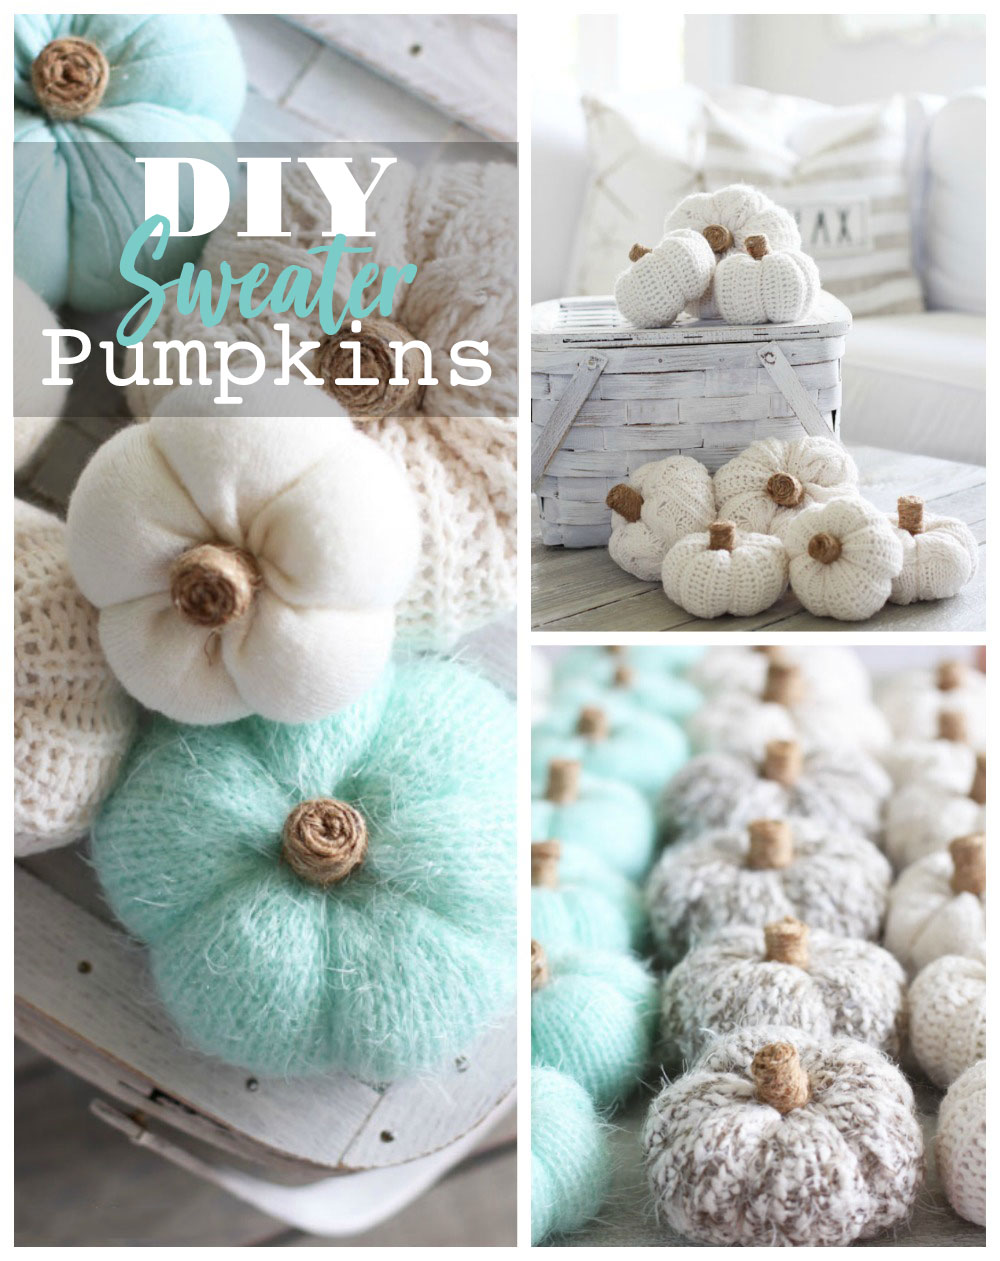
DIY Sweater Pumpkins
I was able to use up another item from my Summer haul, but I can’t cross it off yet since I combined it with two more frames:

I guess I’ll have to do those soon! If you missed any so far, you can catch up below:
How to turn a Sewing Table into a Dressing Table
$5 Barn Sale Mirror Makeover
How to Paint Nicotine Stained Furniture (Trestle Table)
80’s Country Cabinet Makeover
Four Thrifty Basket Makeovers
Farmhouse Hutch Makeover
How to Repurpose small lamps
How to Repurpose an Old Swivel Mirror
Coastal Dresser Makeover
$5 Bulletin Board Makeover
$3 Thrift Store Basket and Lid Repurposed
Summer Basket Wreath from a $3 Thrift Store Find
$7 Thrift Store Mirror Makeover
Vintage Cane Club Chairs Updated
$6 Thrift Store Shelf Makeover with Transfer
Pub Table Makeover
Becky’s Secretary Desk Makeover
Update a Thrift Store Box with Fabric
$5 Buffet Lamps Updated with Decoupage Paper
Mirror Harp Repurposed
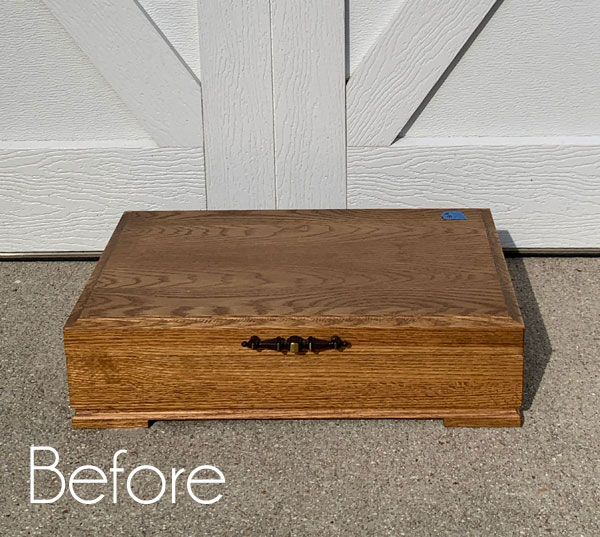
I’ll be back tomorrow sharing how I updated this flatware box I bought from a neighbor’s yard sale:
See ya then!
UPDATE: See the super sweet update of this box HERE now!
XOXO,
![]()
Don’t Miss a Thing!
If you like what you see, there are several ways to follow along!
Email * Instagram * Facebook * Pinterest * Twitter


Robin says
This is such a simple and effective way to make a wreath. Great idea and I love the way it turned out.
Christy says
Thank you so much, Robin! I’m so glad it worked out! XOXO
Denise Cox says
How simple and cute! I love it! AND.. heat wave or no…. I did my Fall decorating yesterday. Yeah! It’s always a “motrin” day, sometimes even the day after, but well worth it. It will be good to see the vibrant fall colors once again… 🍁🍂!! (That WAS a pretty frame… 😉).
Christy says
Thank you, Denise!! I know it must feel amazing to have all your fall decor up! It is supposed to cool down in the coming week, so I won’t be far behind! XOXO
Mary Kaiser says
I LOVE your wreath!! It is so beautiful. Awesome that you didn’t have to paint or do any thing to the frame! Looking forward to seeing what you do to the box tomorrow as I have one that I picked up a long time ago and I haven’t done anything to it yet. I know your the perfect person to give me inspiration!
Christy says
Thanks so much, Mary! I was thrilled when I came across this frame in my stash! I actually had another in mind, but this was just perfect! See ya tomorrow! XOXO
Christina says
I adore this wreath and the video! Love how you got the frame! Sooo glad you had your gorgeous helper there. 🙂 I am amazed it hangs straight with all the beauties on the left. I love the “hi” tag and starfish as well. 🙂
Have a great rest of the week!
Christy says
Thank you, Christina! Lyla just wanted to check everything out lol. Enjoy the rest of your week too! XOXO
Karen says
Just lovely and the frame is an unexpected change from the usual fall wreath forms. I love the addition of the starfish! I love all things coastal! Thanks for the inspiration.
Christy says
Thank you, Karen! I had to pop a starfish in there lol! XOXO
Janice Holt says
Great job using a frame as a wreath. Thanks for the video. Love this wreath. Lots of great idea from your friends also.
Christy says
Thank you, Janice! I’m going to check out everyone else’s projects now! Have a great day! XOXO
Barbara Warner says
Stunning! Gorgeos! Simply beautiful. Your wreath frame makes a wonderful statement on your door. What a beautiful way to welcome guests and even family ass they enter your home. I just love this project! Love the little wooden tags, too. We all need to upcycle and reuse things.
Christy says
Thank you so much, Barbara! I am so happy with how it turned out, and yes, reuse whenever you can! XOXO
Gail says
Wow! Did not expect that! I thought for sure it would be blue and white with a coastal quote in the center! This turned out beautiful.
Christy says
Ha ha! Thank you, Gail! Glad I can still surprise you! 🙂 XOXO
Cecilia says
Haha, I thought it was a tray when I first saw the photo. I was wondering how that would work to become a wreath. I like the idea of using a pretty frame! Very cute and I like the starfish! It looks right at home.
😊Cecilia
Christy says
Thank you, Cecilia! It would have made a gorgeous tray as well! And you know I had to add a tiny touch of coastal! XOXO
Corrine says
Your frame-wreath is flippin’ BRILLIANT!!!! I mean BRILLIANT! I’m so excited, I’m shouting. Lol
Thank you so much for the mega dose of inspiration!!
Christy says
Aww thank you SO much, Corrine!! I am so excited that you’re excited ha ha!! XOXO
Karen Thompson says
so pretty! How is it that you make everything look so easy?! And I love that you added the starfish too 🙂
Christy says
Aww thank you, Karen! What you didn’t see was me getting everything just so before filming lol! XOXO
Sharon L Austin says
Super idea! I have a very similar frame that I just put in the donation box. Sadly, it’s rectangle shaped.
Christy says
Thank you, Sharon! You can definitely use a rectangle shaped frame as well! Instead of having the arrangement on one side, I would have it coming out from one of the corners! XOXO
Ruby says
I love this this project !
Christy says
Thank you, Ruby! XOXO
Mira says
Unique! Quite the unexpected! Love it!
Christy says
Thanks so much, Mira! XOXO
Denise Zdziennicki says
Super cute and Fall’eee my friend! XOXO
Christy says
Thank you, Denise! I am so ready for Fall woohoo!! XOXO
Jo-Anna says
What a fantastic upcycle! So perfectly simple and lovely for fall!
Christy says
Thank you, Jo-Anna! XOXO
Cheryl Atkinson says
Hi Christy! I love your wreath the best and thank you for the tutorial!
Christy says
Aww thanks so much, Cheryl! My pleasure as always! XOXO
Robin says
Love the frame style. Nice that you used restraint to make a minimalistic-style wreath. I’m not ready for summer to end. Maybe sunflowers till Halloween?? LOLOL.
Christy says
Thank you, Robin! I’m not usually ready for summer to end, but it has been so dang hot and humid during August that I think I’m ready this year! I do like sunflowers till Halloween though! XOXO
Toby says
This is darling Christie!!! Love it!!
Christy says
Thank you, Toby! XOXO
Rhonda Hallstrom says
Love it hon! So beautiful
Christy says
Thank you, Rhonda!! XOXO
Paula@SweetPea says
You are so creative! I love your fall wreath so much.
Christy says
Thank you so much, Paula!! XOXO
Cara says
Ohh… I love this! I do love those vintage pieces recreated. Thanks for the inspiration once again! You ROCK Christy!
Christy says
Aww thank you, Cara! XOXO
Connie says
Well you continue to amaze! That oval frame into fall wreath is so beautiful! I up-cycled a picnic basket after I saw your baskets last month and I’d love to show it to you. I also wanted to know if you ever give advice. I have a dark wood sleigh bed that came with this house when I bought it a couple of years ago. Have you done one or do you have any advice? It’s definitely fall here on the island and the days age getting shorter😩. Loving all of your creations. Cheers from Whidbey Island Wa. 😁♥️
Christy says
Aww I appreciate that, Connie, thank you! And I love that you were inspired to get creative! You can email me directly at christykjames@cox.net with photos if you like! I redid our own sleigh bed here: https://www.confessionsofaserialdiyer.com/how-to-paint-a-sleigh-bed/ Maybe it will spark some ideas? Enjoy those beautiful views! XOXO
Jenn says
What a great idea!
Christy says
Thanks so much, Jenn! XOXO
Jo says
Super cute!🤩
Christy says
Thank you, Jo! XOXO
Michele M. says
Oh, that is stunning. You did a remarkable job on that – love love love it.
Christy says
Thank you so much, Michele! XOXO
Sarah @ The DIY Mommy says
Your frame as a wreath is such an excellent idea. It turned out so spectacular!
Christy says
Thank you so much, Sarah! XOXO
Colleen Pastoor says
I love this frame wreath. So beautiful!
Christy says
Thank you, Colleen! XOXO