Welcome back, dear friends!! Today, I’m sharing a favorite thrift store makeover that includes a video on how to paint with chalk paint!
I get questions almost daily about chalk painting furniture, and although I have a very detailed tutorial on my blog for How to Paint Furniture using Chalk Paint, it’s always so nice to see it in action!
Not only am I sharing how to paint furniture with chalk paint in a video, but also how I sand my pieces after!
One of the most asked questions I get is how to minimize brush strokes, so I’ll be sharing all the tips I have for that in the video also.
Let’s get to it!
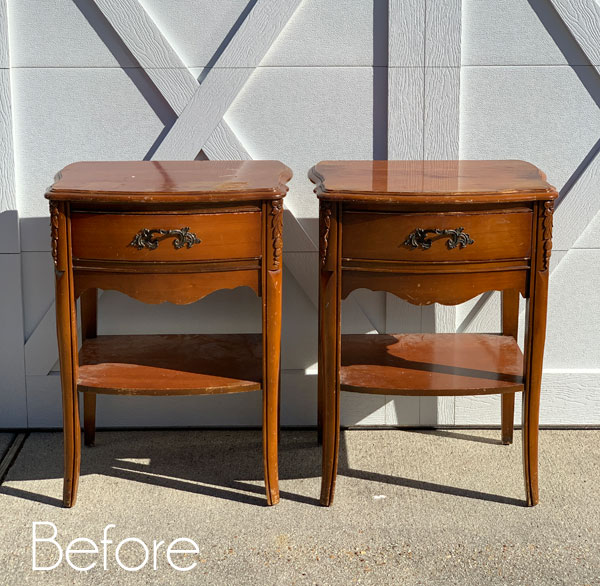
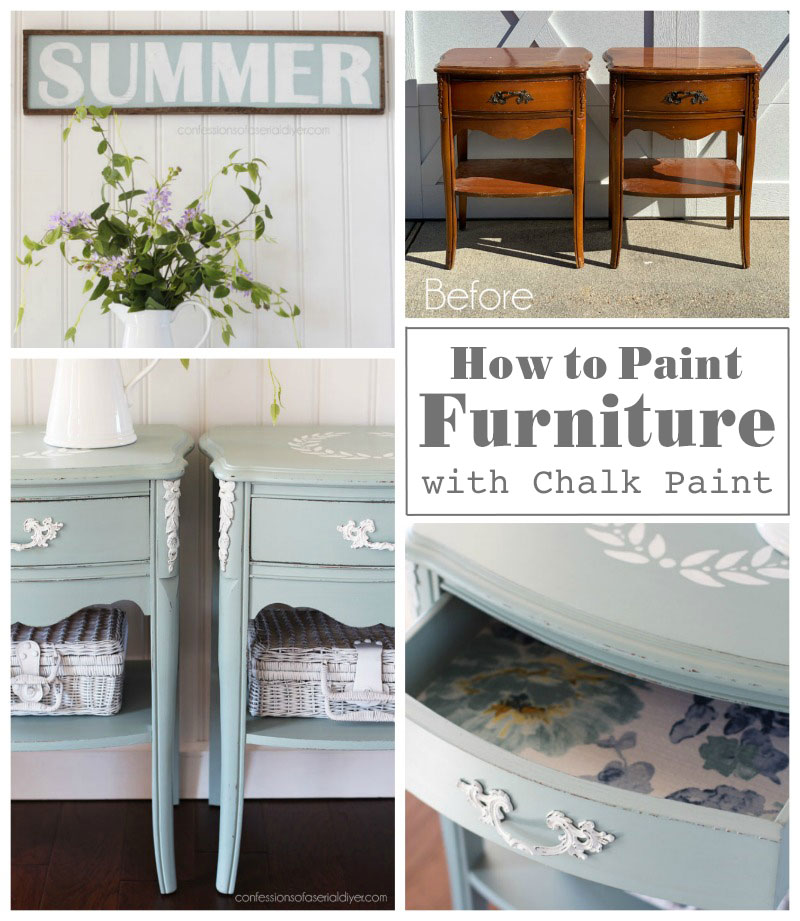
These tables that I scored for only $10 each were the perfect candidates for my chalk painting tutorial:
I had purchased this desk at the thrift store and was driving around to the back to pick it up when I spied these stacked outside. They must have just been dropped off:
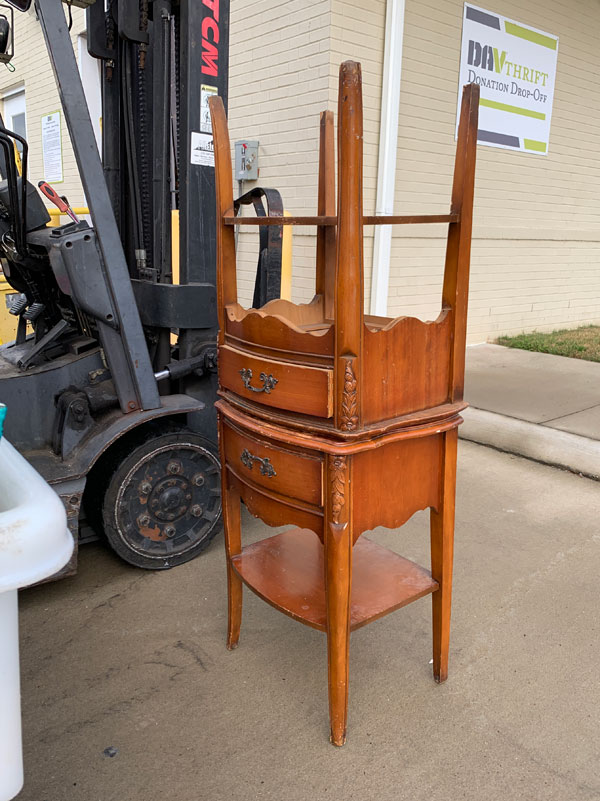
I told the guy I was interested in them and was expecting him to tell me that I needed to wait until they were processed, but instead, he asked me how $10 a piece sounded.
SOLD! I paid the man and shoved them in my car as quickly as I could and drove away!
Here is what these tables looked like up close…
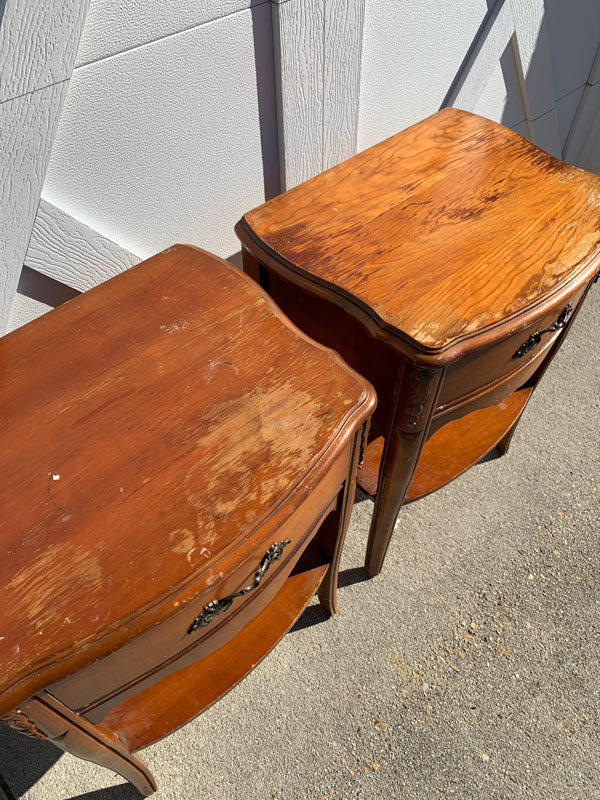
They definitely hadn’t been living their best life. The tops were in terrible condition and the rest of these tables were so dirty. Even the insides of the drawers were a mess.
I’ve included a few affiliate links so you can find the products I love.
Proper prep
If you were to paint over a surface that has areas of stain wearing away like you see on these tables, you would see all those imperfections in your paint finish.
To smooth the tops of these tables out, I sanded them down with my rotary sander using 120 grit sandpaper first, then 220 grit sandpaper.
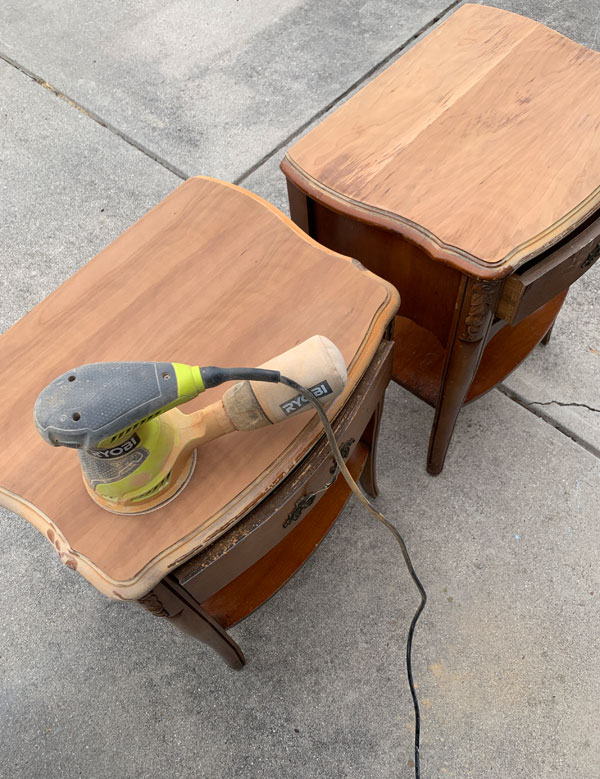
That sander definitely earns its keep around here!
I cleaned up all the dust with my shop vac and gave them a good wipe down. I used Lysol type wipes for this as this makeover was originally done pre-pandemic and those were readily available. I switched to White Lightning when I ran out and now use that for all my pieces. It does a really thorough job of cleaning. That is all the prep that was needed for these pieces.
Paint
I chose to use a 50/50 mix of Vintage Duck Egg Blue and Cotton for these tables. I love Duck Egg Blue, but I love it even more lightened up a bit.
See all the steps to painting and sanding these tables in the video below!
How to Paint with Chalk Paint:
If you have any trouble viewing this video, see it on my YouTube channel HERE.
Here’s Everything you need to chalk paint furniture:
- White Lightning cleaner
- Chalk-style paint (I used a 50/50 mix of Dixie Belle’s Vintage Duck Egg Blue and Cotton. You can find my DIY Chalk Paint recipe HERE.)
- Good quality brush (My favorites are this Purdy brush and this Dixie Belle brush (the 2″ Mini Angle Brush)
- FrogTape for taping off any areas that need to be protected
- BOSS by Dixie Belle* (comes in white, clear, and gray)
*This is only needed if you get the dreaded bleed-through or suspect you will get bleed-through. (usually antique mahogany and cherry pieces)
Adding a Stencil
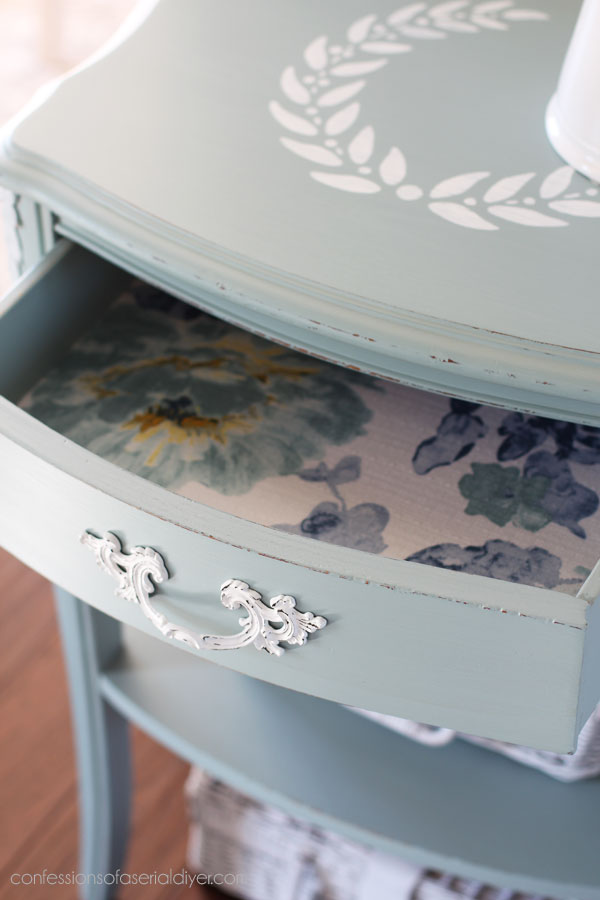
If you watched the video, you saw that I added the wreath part of this stencil to the top:
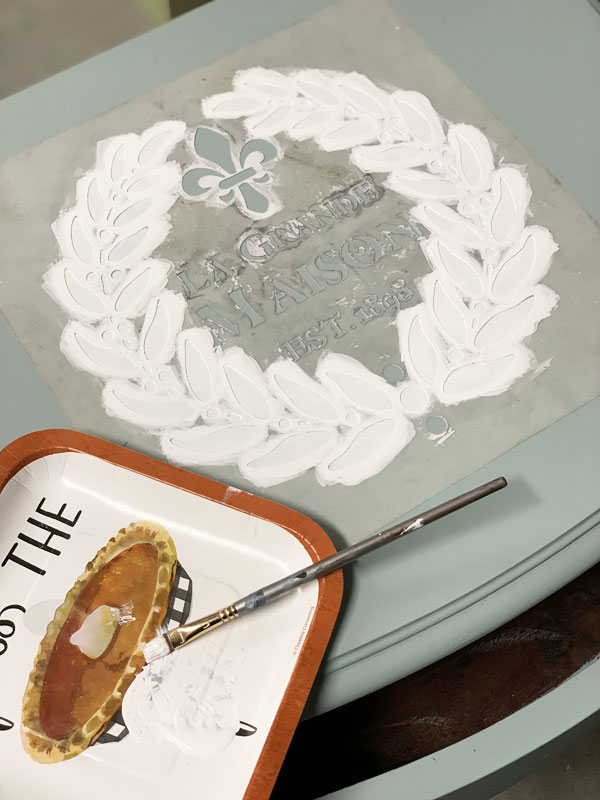
I held the stencil in place by spraying the back of the stencil with spray adhesive first. Then I used white craft paint applied with a small flat brush to fill it in, brushing away from the edges as much as possible. It took three coats for solid coverage, and then I removed the stencil right after the third coat went on. I showed in the video how I sanded right over the top with 220 grit sandpaper to get a super smooth finish.
To sand after painting you will need:
- 220 grit sandpaper
- Foam sanding sponge (an old one is perfect for wrapping the sandpaper around)
- shop vac with brush attachment
- Clean soft cloth
I also shared all the tips I have for getting a smooth finish and how I sand my pieces after in that video.
To seal your paint finish, you will need:
- Clear Coat in satin (Gator Hide for high traffic pieces, or Best Dang Wax if you prefer that route)
- Blue applicator sponge
I shared a video on how to apply sealer with the sponge HERE.
The drawers
I decided to paint the sides and the insides of the drawers also on these pieces this time because they were in pretty sad shape. Normally, I would only paint the drawer fronts.
After sealing the blue, the inside bottom of the drawer got a couple of coats of white paint since the fabric I planned to use had a white background…
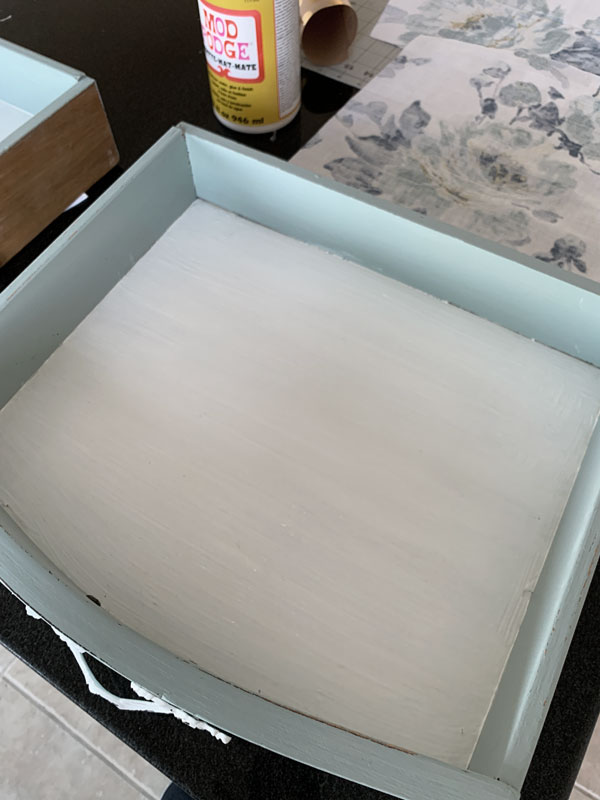
Because the fronts of these drawers were curved, I used some wrapping paper to make a pattern for the fabric to line the bottoms.
Then I used my rotary cutter and cutting mat set to cut the pieces out…

I also created a video on how to apply fabric to drawers which you can check out HERE!
Any guesses where I bought my fabric?? Ya’ll know I love TJ Maxx and HomeGoods drapery aisles for my home decor fabric.

These curtain panels were $19.99, so I got almost five yards of fabric at 50″ wide! I must love y’all if I did math for you!
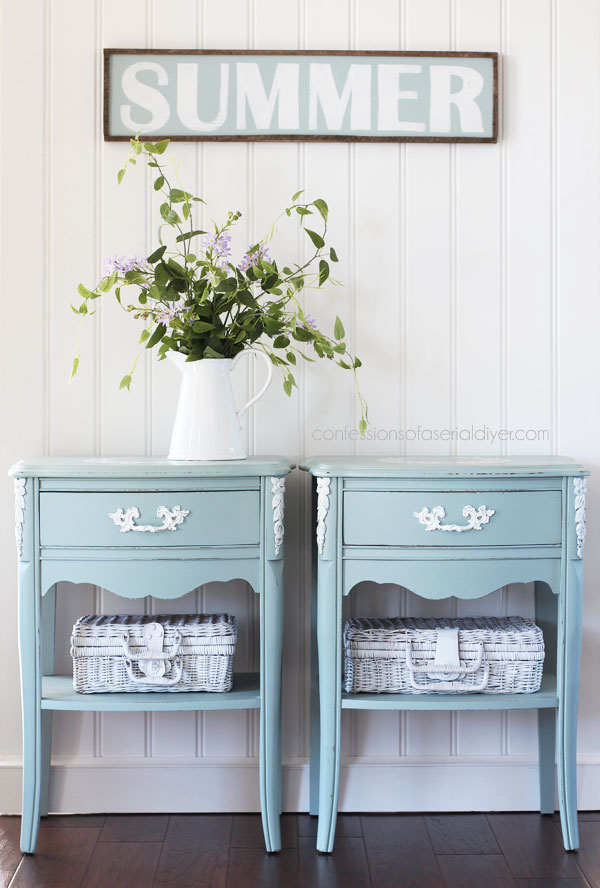
The Reveal
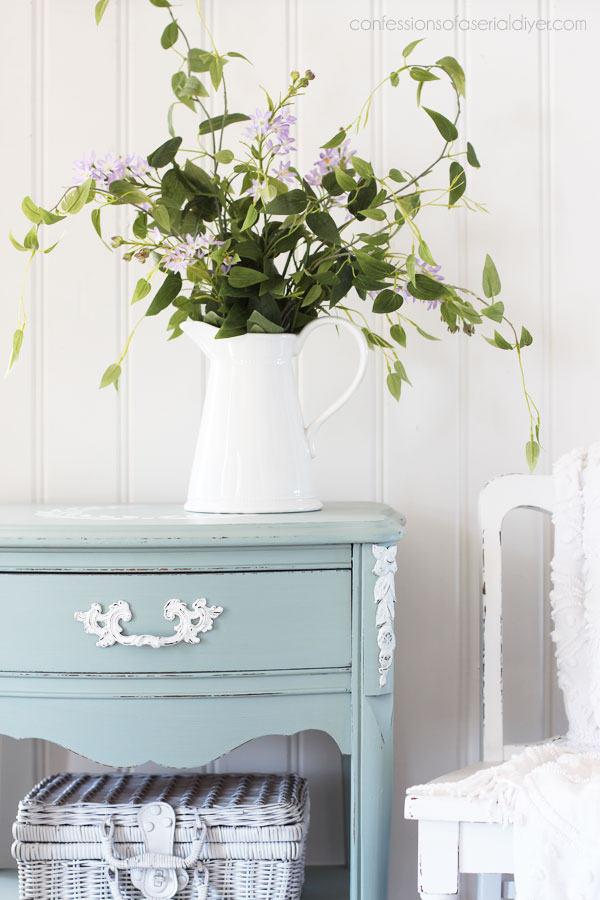
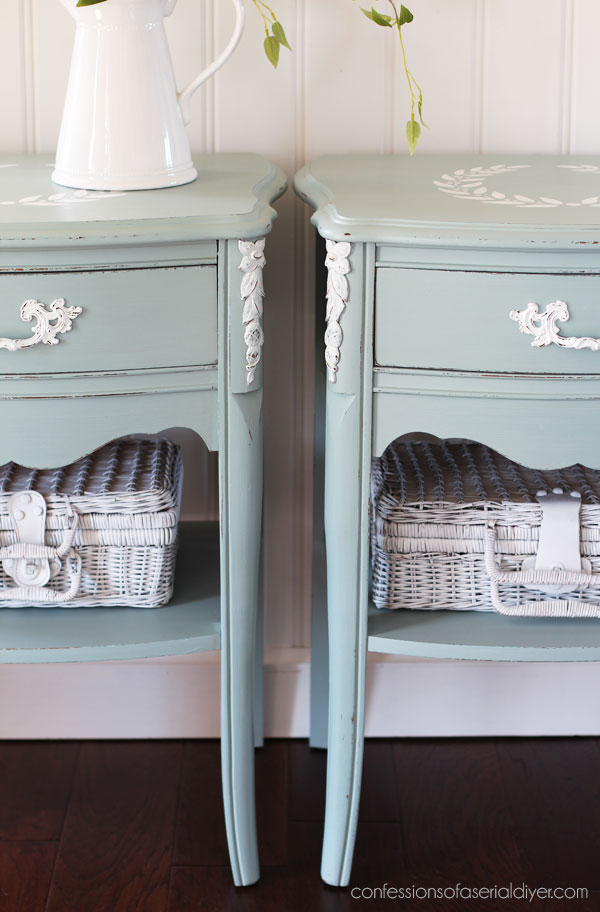
Here is how one of these beauties looks now:
Such a soothing coastal cottage vibe!
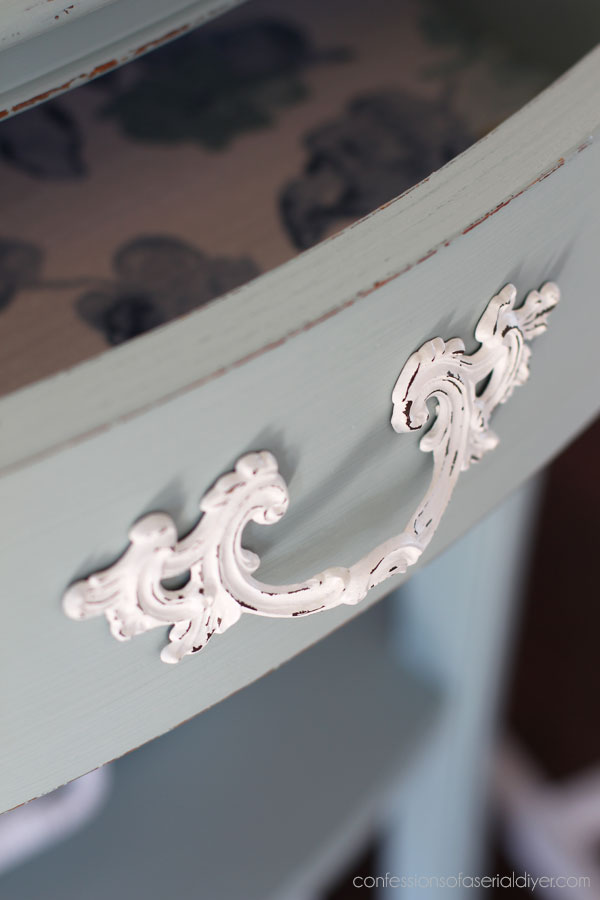
And how about those drawers??
I had plenty of curtain fabric left and I know I’ll use it on future projects as pretty as it is with this color.
I don’t know if anyone noticed, but the original handles were on upside down. I removed them and painted them in two coats of Cotton, distressed them a bit and gave them a quick spray of Rustoleum Clear Spray to seal.
Then I put them back on right side up!
I did do them both…twins!
Remember my Summer sign that I made out of an old dirty Porch sign from my Haul of Shame?
I made it the easy way! No fancy cutting machines required.
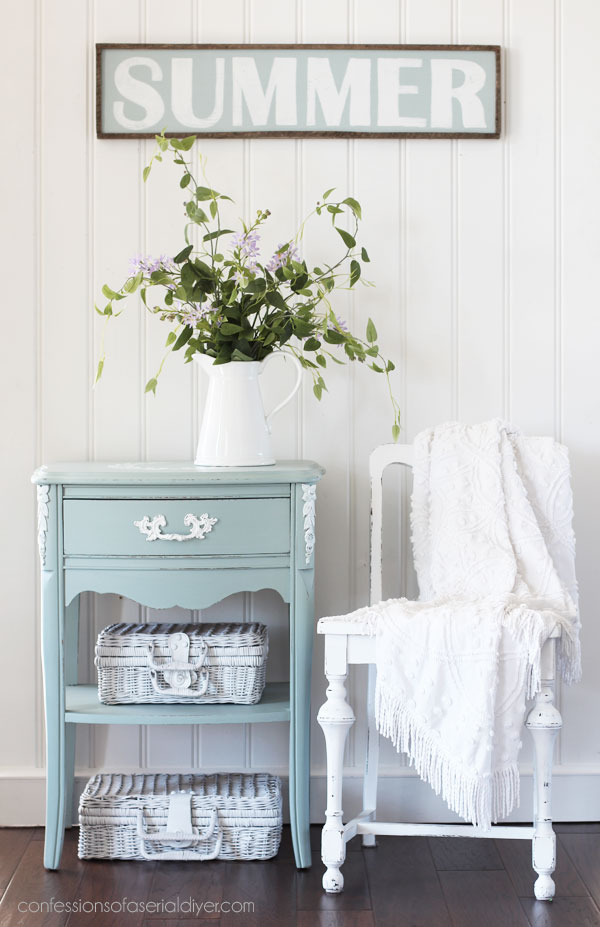
Oh how I love Summer! And, I love how this sweet set turned out!
The makeover of these tables allowed me to cross off two pieces from that haul!
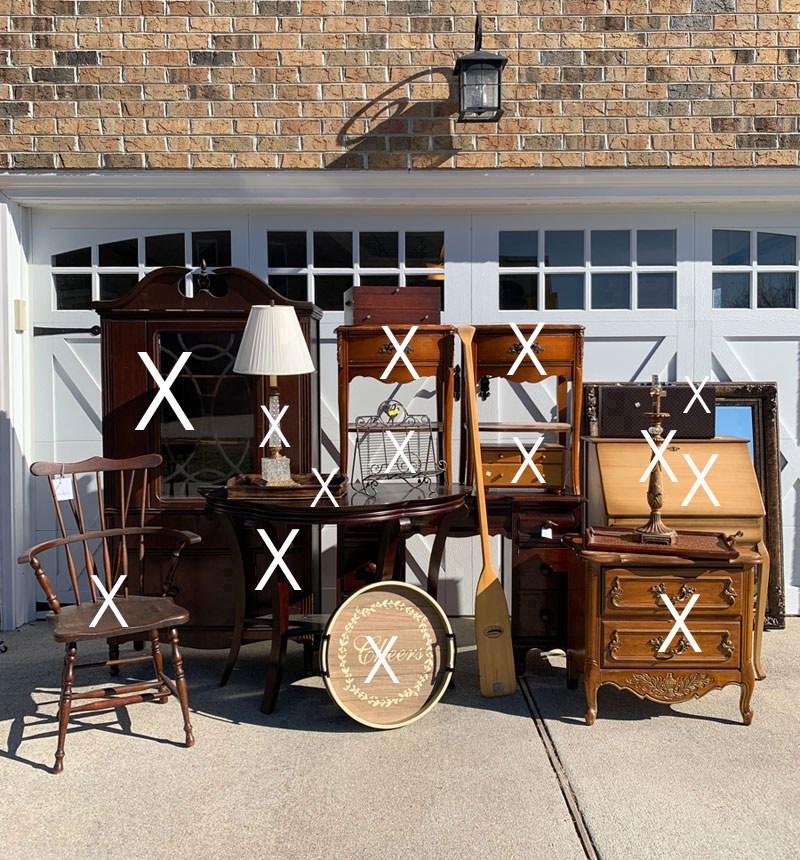
If you missed any of these pieces the first time around you can see them here:
$4 Thrift Store Case Repurposed
$25 Thrift Store China Cabinet Makeover
$3 Lamp Makeover (& How to Rewire a Lamp)
Windsor Chair Makeover (& Drop Leaf Table Take Two)
How to Wet Distress (& a $5 Lamp Makeover)
$5 Thrift Store Chest Makeover
Shop news
Just a quick announcement from my Etsy shop…we have new silkscreen stencils! Four new designs have been added:

Each stencil comes with four sheets of designs. They are very similar to regular stencils except they are sticky on the back so you get really crisp lines! You can use each one up to ten times.
Also, the Best Dang Brush and Scarlet brush are back in stock!
The next piece I tackled from this haul was this flatware box…
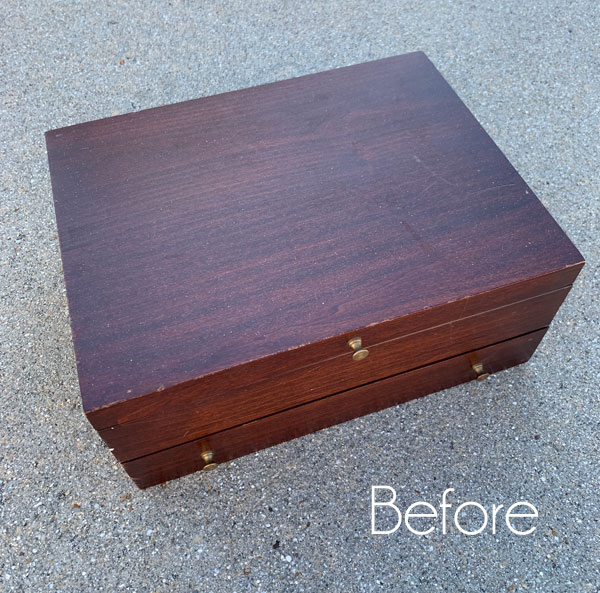
You can check out how it turned out HERE!
I’ve been shopping, so a brand new haul reveal is on its way!! I’m hoping to get it all photographed to share on Thursday woohoo!!!
UPDATE: I’ve got it all photographed and ready to share…see it HERE now!!
XOXO,
![]()
Don’t Miss a Thing!
If you like what you see, there are several ways to follow along!
Email * Instagram * Facebook * Pinterest * Twitter


Petra says
Loving that blue with the cotton 🙂 I’m going to watch your tutorial – thanks for sharing! xo
Christy says
Thank you, Petra!! My pleasure! XOXO
Mary says
You make me tired just listening to the stuff your doing!! I just put out my bark in all my beds in my back yard gardens, 3 yards of bark and probably with only need 1 more yard to finish up the front yard! Looking forward to seeing every thing your working on, how exciting!
Christy says
Oh no ha ha! It sounds like you’ve been busy too! And that is a lot of bark. That’s what we bought too, but we did have some left over. Looking forward to sharing how everything turned out! XOXO
Robin Stephens says
I am always amazed at how much time, effort, creativity and “spare-nothing” you put in to every piece you do. These are lovely and I’d imagine a set will be scooped up super quickly! And, yes, the FIRST thing I noticed was the upside down handles! Again….stunning and bravo!
Christy says
I appreciate that so much, Robin! Thank you! I was so excited to see them just waiting there for me to rescue them ha ha! XOXO
Mandy says
THose look great, look like they would be very expensive. You have wonderful vision & talent.
Christy says
Thank you so much, Mandy! I was so happy to come upon them! XOXO
Janice Holt says
You are definitely a busy girl but I admire you for it. I’m kinda hyper myself. Love everything you show us and anxious to see what you’ve been doing outdoors. Perfect time of year to be outside.
Christy says
Thank you, Janice! My outdoor space is almost ready for its big reveal lol. I’ve really enjoyed getting my hands in the dirt again! And yes, the weather has been lovely! XOXO
Annette Goldberg says
I wish you were my neighbor! I love the product you sell, and the inspiration you give!
Christy says
Thank you so much, Annette!! XOXO
Denise Cox says
L.. O.. V.. E… these adorable twins… 😉!!! I don’t remember this haul so perhaps I wasn’t with you then. I would have remembered these babies!!! Great job and wouldn’t they complement a white, wrought iron bed in a “coastal home… 😋🤗☺️!?
Christy says
Thank you, Denise! I have so much content that only gets shared once never to be seen again, so I’m glad these were new to you! And yes, they would look absolutely charming with a white iron bed!! XOXO
Christina says
Score! on these tables! You really made them sing. Love the color, stencils and fabric! I have no idea how I missed this video, it is beautifully detailed, thank you. Great job!!!
Christy says
Thank you, Christina! Glad you enjoyed the video!! XOXO
Cecilia says
I did notice the handles, lol. Love the fabric. It goes perfectly with the color of those sweet tables. Looking forward to the front yard reveal.
Cecilia
Christy says
Thank you, Cecilia! I’ll be sharing the front yard soon! XOXO
Donna says
Love the makeover!
Christy says
Thank you, Donna! XOXO
Toby Peplow says
Duck Egg Blue! My FAV!!! and man what a STEAL you got on those tables!!! I would have definitely done the same as far as throwing
them in the car and driving away as fast I could!! LOL!!
Christy says
Yay…I love it too!! I was so excited to spy those tables and then the guy gave me such a great deal! I had to speed on out of there lol! XOXO
Marcie Lovett says
Is it sad that I’m excited to see what you’re doing to camouflage the trash bins, Christy? I think outside projects like that actually add to the landscape.
Fun to see these tables again, I’m sure I had the same reaction the first time – so sad they spent their whole lives with their hardware upside down 😉
I never know where to stop painting (underneath, where the drawers meet, back, etc) and I hate to paint over anything that has the date or manufacturer’s mark. I’m sure I’m more interested than most people about a piece’s history!
Christy says
Oh ha ha! I won’t be camouflaging them, unfortunately, but I did do something with the area where they are stored. Glad you enjoyed these tables a second time. If the backs are in good condition, I’ll often leave them be. XOXO
Diana Cosgrove says
Christy… all I can say is BEAUTIFUL… The twin tables are gorgeous!
Diana
Christy says
Thank you so much, Diana! XOXO
Cecilia from Georgia says
I guess this post could be called “throw-back Thursday”! I love these cute tables! Did they sell in your booth? Looking forward to the garbage can reveal!
Christy says
Thank you, Cecilia! Yes…they sold shortly after our antique mall reopened after the shut down last year. See ya tomorrow! XOXO
Sharon L Austin says
Those turned out adorbs!!
Christy says
Thank you, Sharon! XOXO
Sue Mellette says
Love seeing the two end tables again. I really appreciate the time and effort you take to share all the details, thoughts and ideas that go in to creating your masterpieces!! I enjoyed seeing the flatware piece as well. I also love the way you add the extra details, whether it is with molds, wood or fabric, each one turns out perfectly!! Thanks for sharing and have a wonderful week.
Christy says
Thank you so much, Sue! I’m glad you enjoyed seeing these sweet tables again! And I appreciate your kind words…it’s nice to have so many options when redoing these pieces! XOXO
Mary says
Adorable Christy! I don’t know if that is the right word, but felt like giving those newly transformed tables a squeeze now that they look so great! Thank you for generously sharing how you achieve these amazing results with your furniture projects. Makes me wanna get outside and tackle something that needs beautification! 🙂
Christy says
Thank you, Mary, and I love that you wanted to give them a squeeze ha ha! They deserved this makeover after being neglected for so long! It is always a pleasure to share!! XOXO
Carol Flynn says
Christy, my email (Crlschfrc@aol.com) isn’t updating. Please text me if I win! 507-317-9447. Carol Flynn.
Christy says
Hi Carol! The winners have been chosen and all three have responded. Thank you for entering! XOXO
Catherine says
OMGosh….I did notice the handles were upside down…lol!
You did a wonderful job! On the lookout now for end tables!
Christy says
Thank you so much, Catherine! XOXO
Daphne H. says
The tables turned out beautifully! I love them and I love that color. I am brand new to chalk painting and reading all your tips, etc. has really got me excited to do my first big project. Thank you.
Christy says
Thank you, Daphne! I love that you are excited about painting…good luck!! XOXO
Terri says
Do you have video of “How To Chulk Paint Styrofoam ceiling Tiles..They look like Tin..
But I want to distress them.i don’t know how..please help✌
Christy says
Hi Terri! It sounds like they would do very well with my favorite faux distressing technique! You can see that here: https://www.confessionsofaserialdiyer.com/shabby-mirror-makeover-how-to-cheat-a-distressed-look/ Good luck! XOXO
Tracey Baxter says
Well done Christy, they are stunning.
Christy says
Thank you, Tracey! XOXO
Robin says
They look so cute now. The handles were driving me crazy upside down 🤣.
Christy says
Thank you, Robin! Right?? Ha ha! XOXO
Michele M. says
WOW!!!! They are perfect!!!! What an amazing transformation to what essentially was trash. Well done, lady. Such a thrill to see the coastal summer vibe, too – it’s been cold and rainy for a long time here and it makes me hopeful warmer weather will be on its way soon.
Love this set of tables now!!!!! Bravo!
Christy says
Thank you so much, Michele! I am loving that summer is on the way…although it did hit 91 here yesterday yikes! Hopefully, warmer days are ahead for you soon! XOXO
Lizzy says
Beautiful! The color you came up with is like eye candy.
Christy says
Thank you, Lizzy! I love this dreamy blue too! XOXO
Becky says
Those tables are beautiful, and I LOVE the drawer liners! But… a garbage can project?!? I can’t wait! I’ve spent the last two days (or 8 years really) muttering about what to do with our lovely stuck-in-dead-front-of-the-house garbage/recycle carts. UuuUuugly! I’m ready for a good garbage can idea! 😁
Christy says
Thank you, Becky! I wish my project involved hiding the cans, but it does not. I did something that was needed though! XOXO
Jill says
I just started getting into the IDEA of painting furniture and I’m trying to decide what to do with an old piece that’s a chifferobe my family had. I have already used White Lightning to clean it and I’ve removed all the hardware. The only thing I can’t decide is what color to use! The doors have a panel in front that could be done in a second color, so it’s doubly hard to decide. However, I’m already seeing a number of other old family pieces that could use a paint makeover as well! BTW I appreciate your use of RYOBI power tools. I recently retired from the company that makes those tools and I have many of them in use in my home as well!
Christy says
Oh how fun!! Deciding where to go with a piece is definitely the hardest part. I paint a lot of white, so sometimes, I just start painting white and that is like a blank canvas, so more ideas usually come from that point. If it is mahogany or cherry wood, it may bleed. If you see those tannins bleeding through once you start painting. A coat of BOSS will take care of that. And I LOVE my Ryobi tools! Happy creating! XOXO
Peggy says
GREAT 🤍SAVE on those drawer pulls! L🤍VE IT !
Christy says
Thank you, Peggy!! XOXO