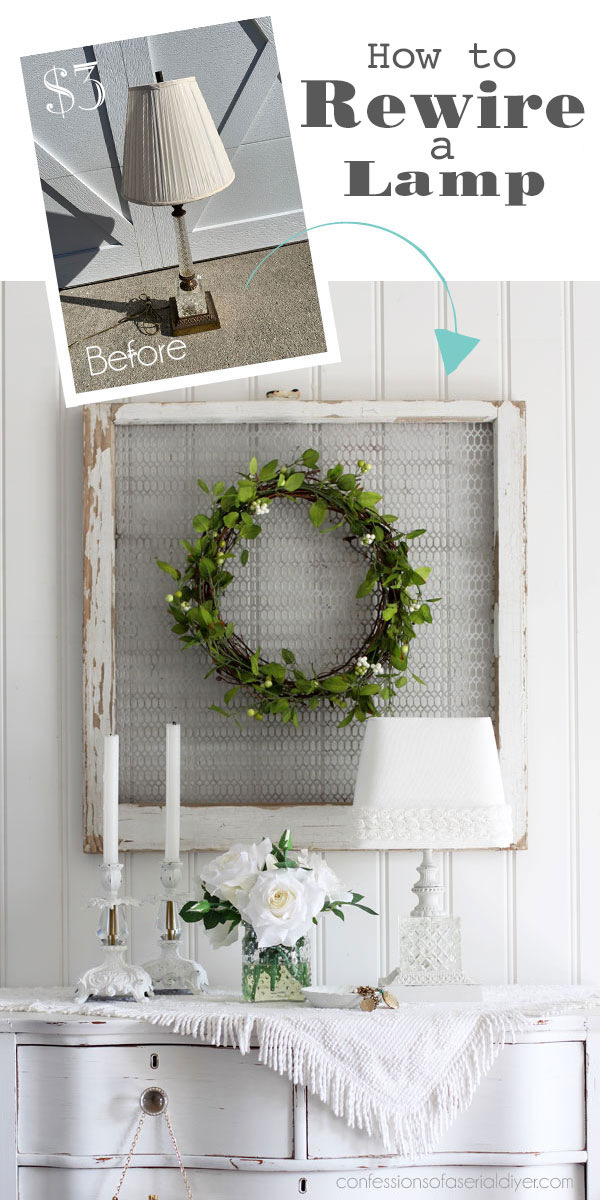
Amazing friends, I’m back today sharing how to rewire a lamp! I always check out the lamp aisle at thrift stores. I love the light they offer my booth and they’re usually good sellers. If you missed the first lamp I redid from this haul, you can see it HERE.
I actually passed on the lamp I’m making over today on the first go because of the outdated plug. I regretted not getting it and luckily, on the next trip in, it was still there and 50% off of $5.25. You just can’t beat less than $3 for a lamp!
Here she is in her original state:
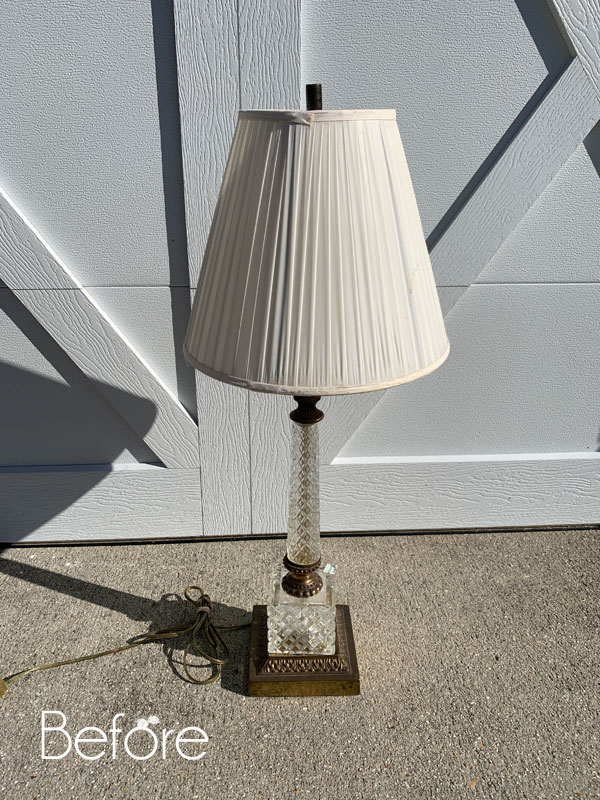
It worked just fine, but in order to resell it, I really needed to rewire it. I’ve included a few affiliate links so you can find the products I love.
My parents and I used to do several craft shows a year for about 15 years. My Dad would build things like tables, shelves, and yep, even lamps! (I’ve made over a few of his leftover unfinished tables he made…you can see one HERE.) My Mom would paint them and they would sell like hotcakes. I used to sew and sell dolls like Raggedy Anne and Andy sets, angels, Santa’s, etc. That’s where I got a ton of practice sewing.
I called on my Dad to show me how to rewire a lamp and he was more than happy to help!
And guess what? It wasn’t hard at all! He gave me two large plastic bins of lamp parts several years ago, so I already had everything I needed, but you will likely only need a new cord and possibly a new socket.
First, let’s see how I reimagined, or should I say, rearranged this lamp!
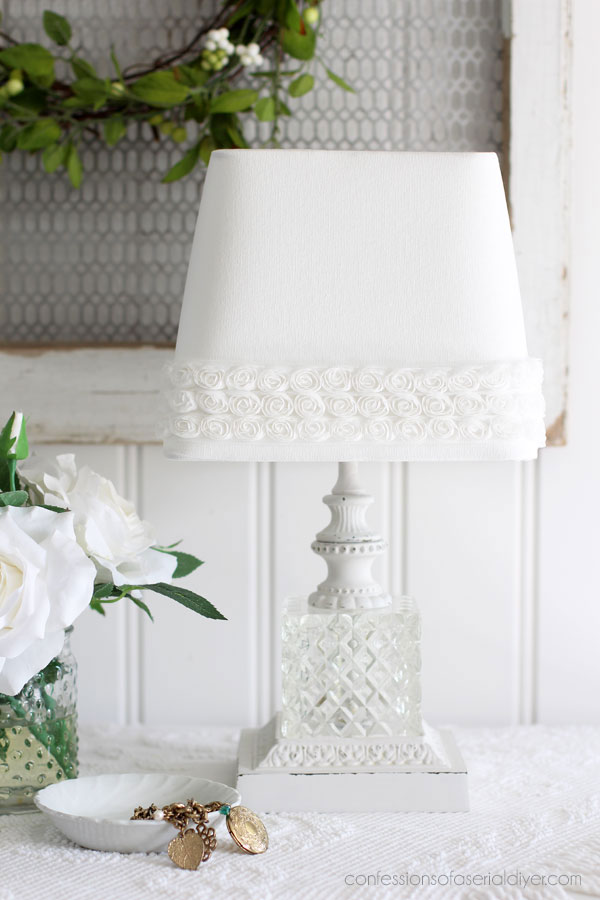
What do you think?? Yep, I totally rearranged the original lamp!
Once I had it apart, I was able to do whatever I wanted with it.
How to Rewire a Lamp
-
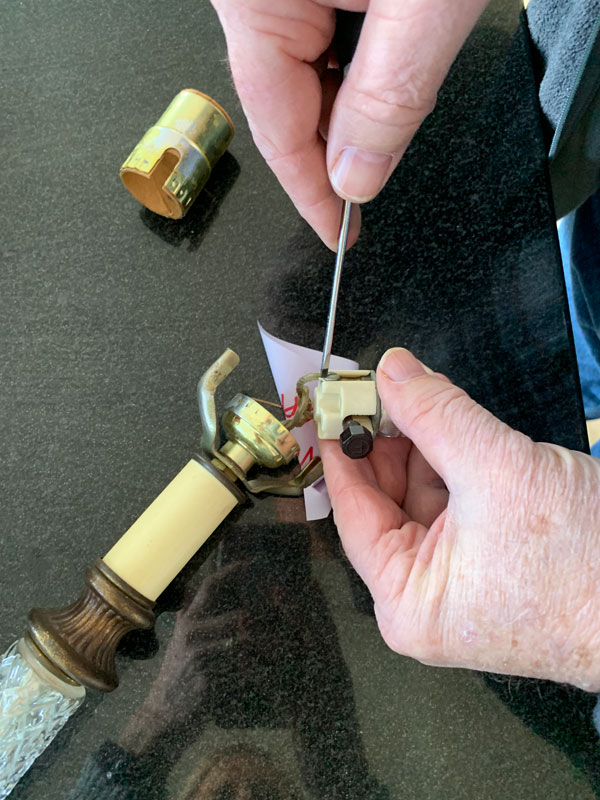
Remove the old Wiring
My Dad wasted no time getting started rewiring this lamp. The first thing he did was remove the socket from the socket cap on the bottom with a small screw driver. Then he slipped the socket shell off to expose the wires:
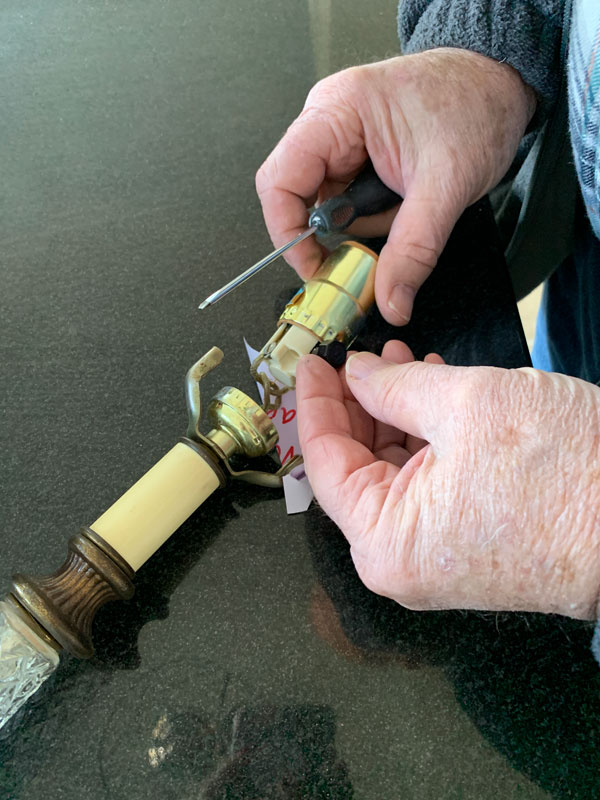
Then he loosened the two screws that were holding the wires in place to remove them:
 Once those were free, he just pulled the old wiring out from the bottom. Pretty simple!
He showed me how to rewire it back that same day, but I knew I wanted to play around and possibly rework it somehow, so I came back to it the next day.
With the wiring removed, I was able to loosen and remove the nut on the very bottom that was holding the lamp together and take it completely apart.

Do you ever feel like you’re being watched?
Reconfigure the Lamp
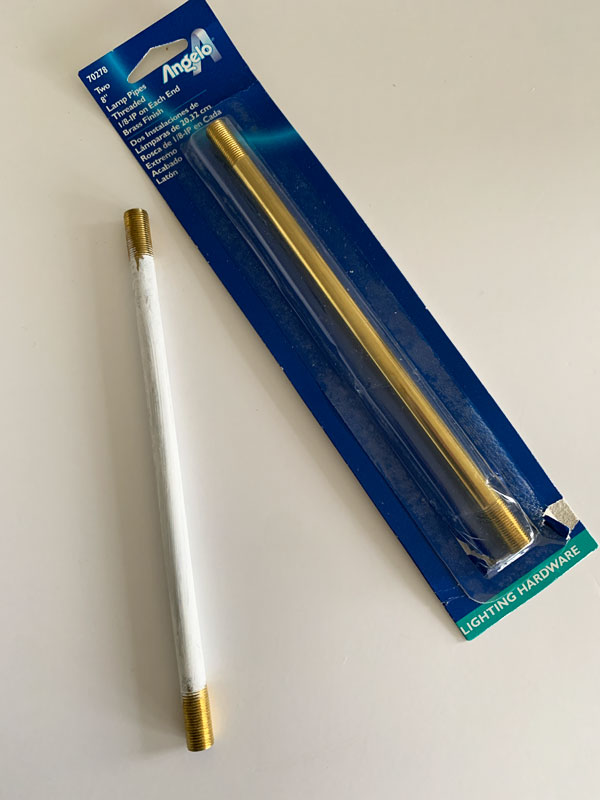
This is the point where I started to play with the pieces, and I loved the idea of creating a shorter, more square lamp, but the threaded rod I already had was too long for what I wanted to do. I found this shorter one in one of my Dad’s lamp part bins:
I painted it in Dixie Belle’s Fluff, along with the other parts I would be reusing:
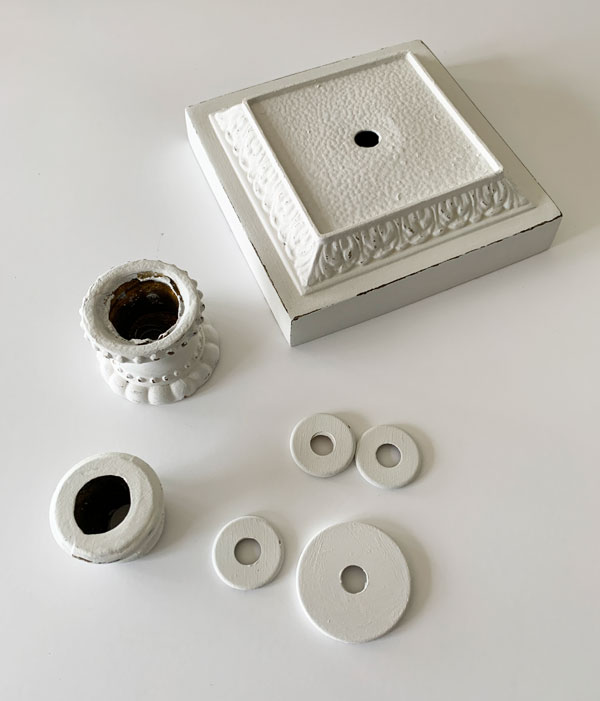
I also used another small brass decorative fitting from my Dad’s lamp parts that is not pictured, but you will see it at the very top of the final lamp.
I sealed the lamp parts with clear wax. (I would have used my favorite satin Clear Coat normally, but I didn’t want to dirty an applicator sponge just for these few pieces.)
Then I assembled my new lamp how I wanted and secured it back with the original nut on the bottom.
Rewire the lamp
Now it was time to put what my Dad taught me to practice! You may need wire strippers to expose the inner wires of your new cord. Mine was already ready to go. I just threaded it up through the bottom of the lamp and out the top. Then I pulled the wires apart a bit so that I could tie a knot. This is to prevent the cord from being accidentally pulled out of the socket:
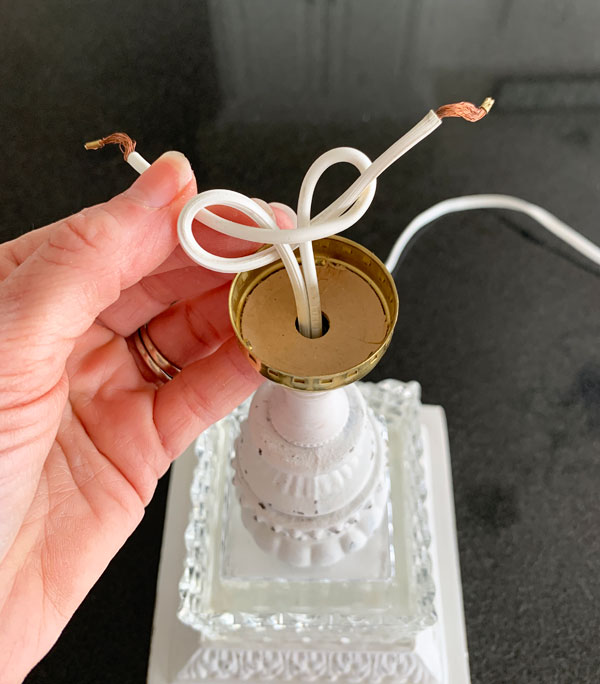
Then I attached the wires, one to each of the two screws on the socket, by bending the ends of each wire into the shape of a “U”:
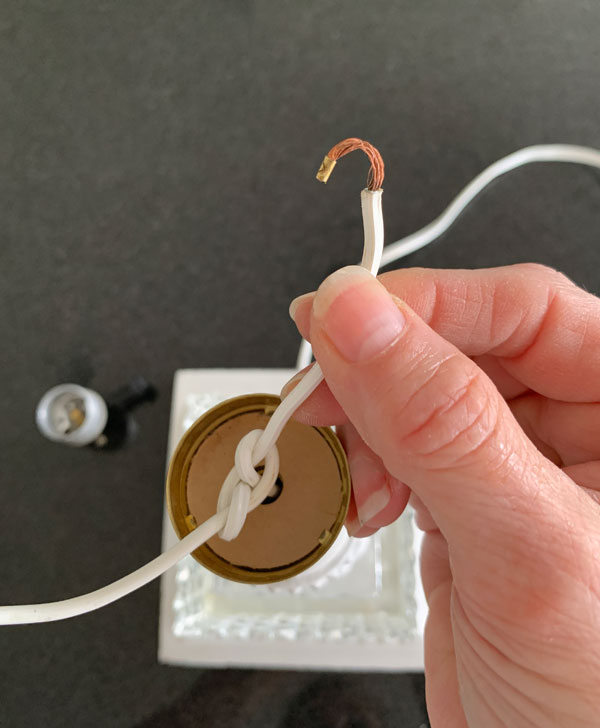
Then I wrapped each wire around each of the screws and tightened them with my screwdriver:

(Wrap the wire around clockwise, so that when you tighten the screws, the wire doesn’t get twisted off.)
Then I secured it with the nut and replaced the socket shell, pushing it firmly back in place.

And that’s it! Not too bad, right? Thanks, Dad!!
In case you’re wondering, here is an idea of how it might have looked had I kept the original design:
Still pretty, and a pair of them with these shades would have made absolutely lovely buffet lamps, but on its own, it just seemed too tall and lanky.
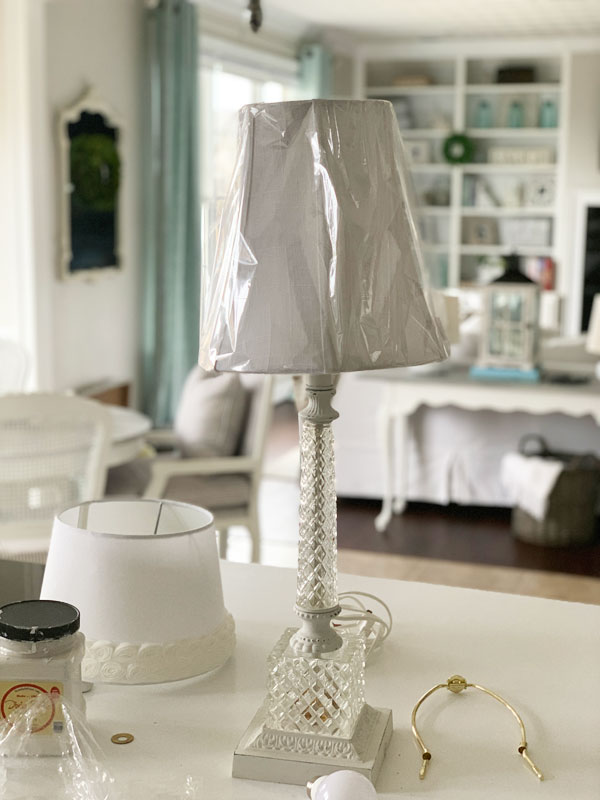
I started with that round shade you saw in the background, but I didn’t love it and it was very white compared to the Fluff, so I went on the hunt for a new shade and found this square one at Target that was perfect!
Except it was bit plain, so I headed to Hobby Lobby to find a decorative trim I could use on it and found this pretty one with the rosette detail:
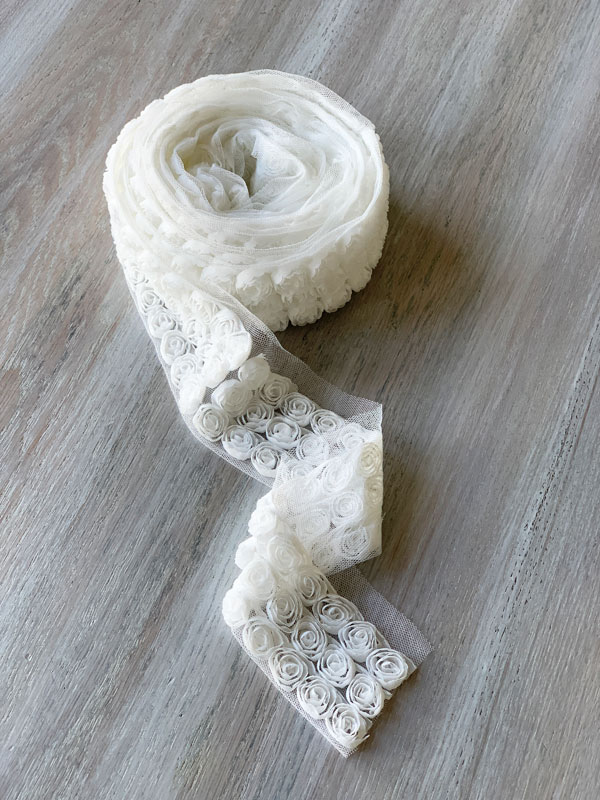
I used my hot glue gun to attach it:
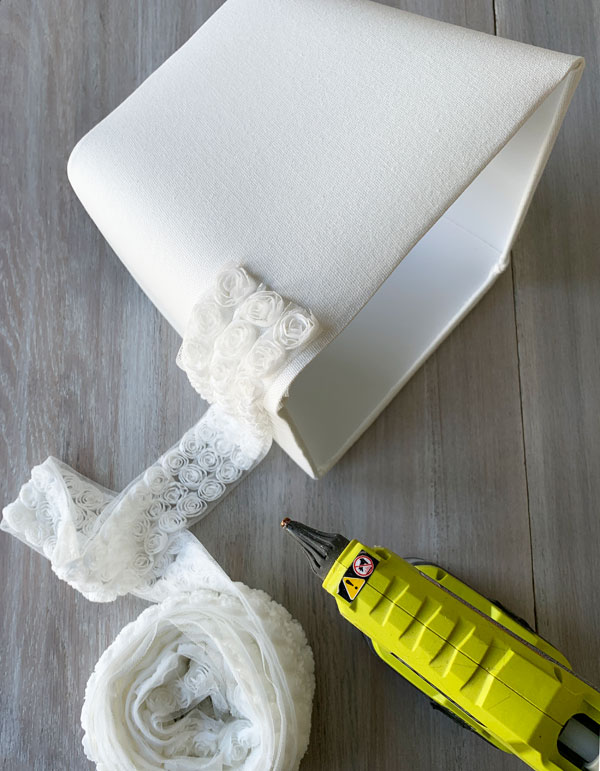
You’ll want to use the hot glue sparingly as it may yellow over time.
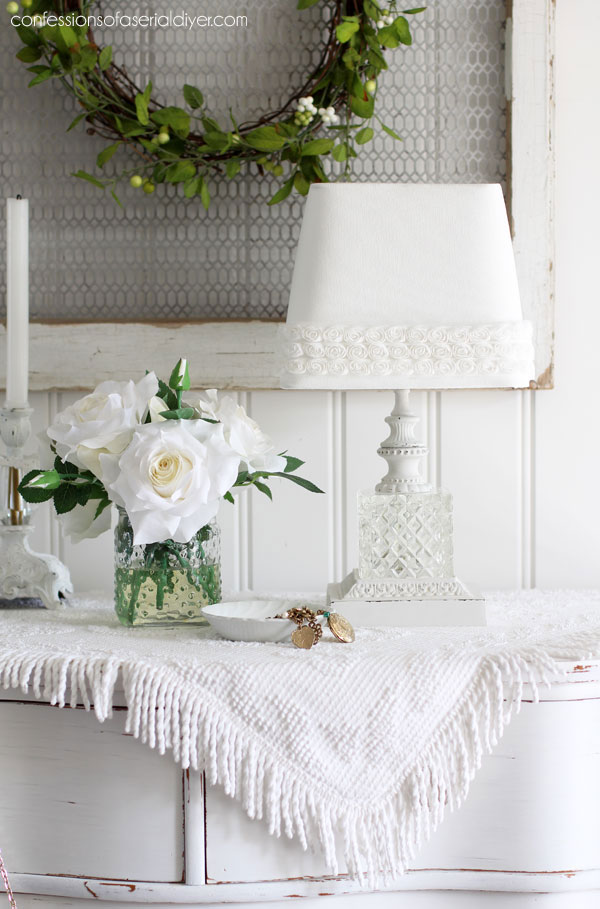
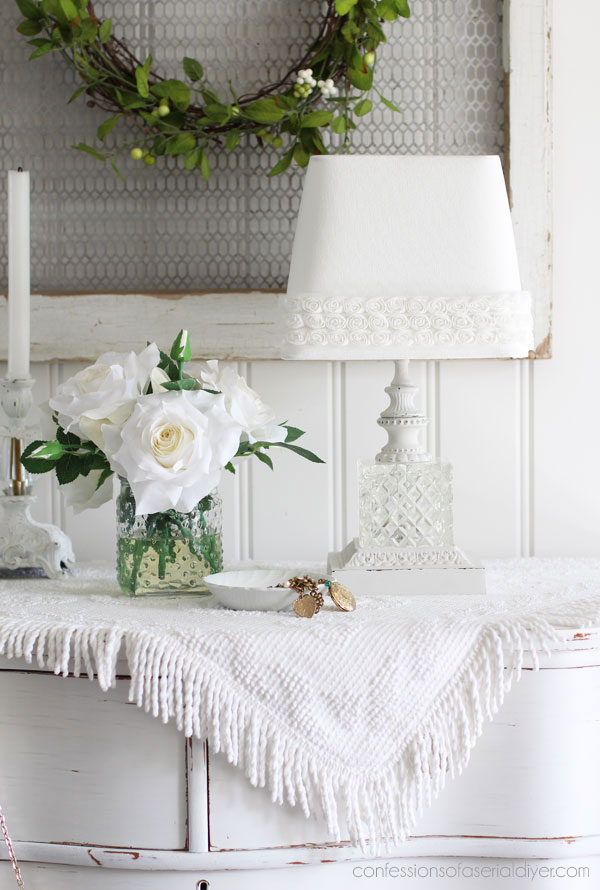
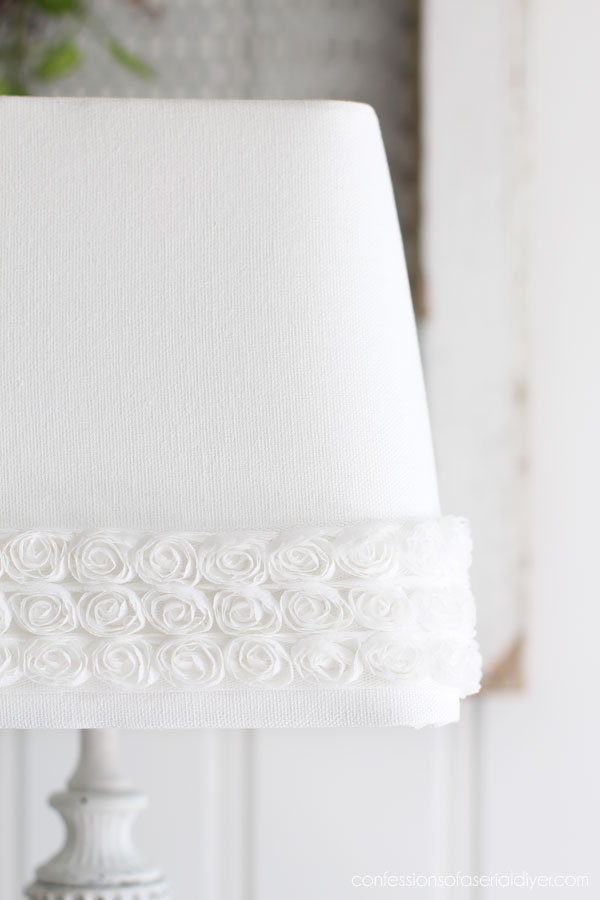
I think this sweet rosette trim was just what this shade needed! This is an uno shade so it sits right on the socket…no harp needed.
How cute would it be if I could find some pretty glass beaded trim to add to the bottom now? Ooh dang…I wish I’d have thought of that sooner!

It’s still cute though!

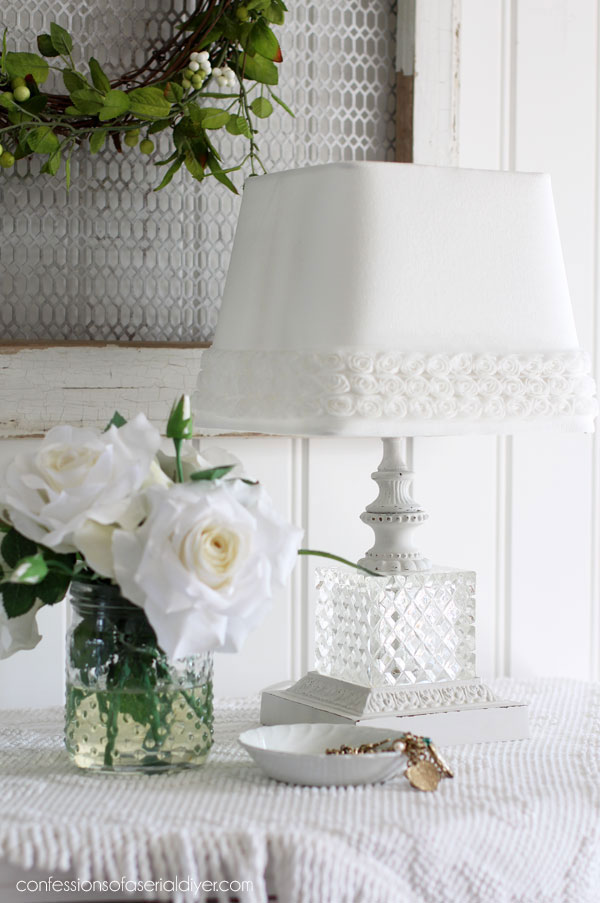
I think I’ll be keeping this one for my office!
I’m no expert on rewiring now by any means, but at least I’ll no longer feel like I have to pass on those lamps with dated wiring! I will save them all ha ha!
I hope y’all enjoyed this makeover! Another piece complete from my Winter Haul!
If there’s anything you missed, you can catch up below:
Windsor Chair Makeover (& Drop Leaf Table Take Two)
How to Wet Distress (& a $5 Lamp Makeover)
$5 Thrift Store Chest Makeover
I’ll have a different kind of makeover to share on Thursday!
At the start of each new year, I like to get my work space in order. It was LONG overdue!! I’ve had a few people mention that they would like to see my workspace and how I store and organize my supplies, but I have never claimed to be super organized and I felt like I had a terrible system that would never be helpful to anyone. Well, I FINALLY got serious and my workspace is more organized than it has ever been! I love it so much that I actually want to share it!! And can I tell you how much more productive I have been?? Seriously!
Here is what I am most excited about sharing:

I built this very primitive work table back in 2013 and it has never functioned better than it does today! This is a great makeover you won’t want to miss!
UPDATE: See how I finally cleaned up my act and got this space organized HERE!
Then I’ll be back next week with a whole batch of smalls to share and I’ll be sharing the china cabinet for Furniture Fixer Upper Day as well! (Told you I’ve been more productive!!)
XOXO,
![]()
Don’t Miss a Thing!
If you like what you see, there are several ways to follow along!
Email * Instagram * Facebook * Pinterest * Twitter


Betty Bilnoski says
Wow! All I can say is WOW! I’ve been patiently (impatiently?) waiting for this lamp makeover….and it’s fabulous, Christy. I love the new shape.
As you know, I’d inherited 2 of these exact lamps (and they desperately need makeovers). Originally, I’d had them on my buffet in dining room, but I moved them to our bedside tables (and they do look kind of spindly there). Now I don’t know what to do with them. Since my Hubby & I aren’t nearly as skilled as you are, I have a feeling they’ll remain tall, get painted and relocated to the buffet. But I love the new, shorter version.
Christy says
I’m so glad you like them, Betty! Thank you! They were beautiful tall as well. I bet a fresh paint job and maybe a set of new updated shades would do wonders. They are the perfect size for a buffet! XOXO
Betty Bilnoski says
Do I dare ask if this lamp is for sale? And do you ship?
Christy says
I do occasionally ship if something is small, but I love this one so much that I will be keeping it. It is the perfect size for a table in my office. 🙂
Betty Bilnoski says
I don’t blame you for keeping it!
Gloria Pflager says
you are very clever! and the lamp turned out beautifully — love the added trim on the shade. I seem to always get the wrong size shade or harp for my lamps and they look so out of proportion — is there a trick?
Christy says
Thank you, Gloria! I try to find a lamp at the store that is similar in size to the one I have, so I can get an idea of how the shade will fit my own lamp. It does help! XOXO
Micah R says
I’ve heard that you want the shade to be approximately as wide as the lamp is tall. It seems to be a fairly good rule of thumb most of the time. (but not always!) Hope that helps!
Christy says
Thank you for responding, Micah! Sounds like good advice! XO
Susan says
I googled it when I needed a shade and this really nice chart came up that shows how to choose. It really helped, So you might try that.
Christy says
Great advice…thank you! XO
Cynthia says
How brilliant and beautiful it is!!! I love it!
Christy says
Thank you so much, Cynthia!! XOXO
Maryellen Webber says
I love the way this lamp turned out! The shade is beautiful with the rose trim! Great job!
Christy says
Thank you, Maryellen! XOXO
Joan says
So pretty, love the trim on the shade!
Christy says
Thank you, Joan! XOXO
gwen says
Oh Christy, I love this makeover! I’ve done lamps from vintage ceiling lights (flipped) and they are always well-received, but before this makeover, i wouldn’t have thought to cut down a tall lamp! Oh goodie! Something new to keep my eyes open for!
Christy says
Thank you, Gwen! Ooh great idea to use vintage ceiling lights for lamps!! You gave me something to look out for too! XOXO
Stacey says
Beautifully adorable!!! Love this makeover, and so appreciate your teaching us how to rewire a lamp. Great post! Thanks so very much for all you share.
Christy says
Thank you, Stacey! I can’t believe it was so simple to rewire a lamp! I won’t be passing on those vintage beauties I see now! XOXO
Catherine says
OK, the lamp is super cute and this gives me some good ideas for a haul of old lamps I have stashed away and want to update. But your little kitty stole all the attention for me. Love that cute face!
Christy says
Thank you, Catherine! Isn’t she the cutest? I didn’t even realize she was in the shot until I was editing photos ha ha! XOXO
sharon austin says
Love the new look; that rosette trim on the lamp is perfect and I seriously thought that shade came that way! And I love this post because it shows us you have to go through trial and error sometimes, just like we do. Thanks for sharing.
Christy says
Thank you, Sharon! Yep, I don’t always get it right the first time either! XOXO
Cecilia from Georgia says
Love it! I see this style lamp a lot in Goodwill but think they’re so outdated! You really brought this into the 21st century and the shade is perfect. Love your creativity! XOXO
Christy says
Aww thank you, Cecilia! I agree it feels much more updated now! XOXO
Candy says
Oh Christy this is beautiful! I would be keeping this too. Love it this size and those roses gave the shade just the right touch really good idea.
Blessings, Candy
Christy says
Thank you, Candy! I’m so pleased the shade worked out! XOXO
Susan Pearson says
I never cease to be amazed at your creativity!!! I love the newly configured lamp!
Christy says
I appreciate that so much, Susan! Thank you! XOXO
kira sayler says
Thank you again for helping me get out of my “box”. I rewire lamps often, but forget that I could play around with the parts and even NOT use some of them to make a better lamp! Yay for your creativity!! God is so good to gift us all different !!!
Kira
Christy says
Oh I love that so much; “God is so good to gift us all different!!” Yes, so true!! Thank you, Kira! You can have a lot of fun with those lamp parts! XOXO
Linda C Johnston says
I am amazed. Just stinkin’ AMAZED!!!! That is the cutest dang lamp I have ever seen. What a fabulous job you did! Seriously, I’m on my way to Target to try and buy that shade. I am in love! GREAT job!
Christy says
Aww thank you so much, Linda!! I was SO thrilled to actually find a square shade!! XOXO
Cheryl Atkinson says
Hi Christy. I would definitely keep the lamp. I love it! I was just looking at my bedside lamp last night and i don’t know why i haven’t already painted it so that is on my list of things to paint. Cant wait to see your work space.
Christy says
Thank you, Cheryl! It’s funny how we have some things for so long that we stop actually seeing them, if you know what I mean. A fresh paint job can do such wonders! I’m looking forward to sharing my workspace. XOXO
Patty says
Christy – you continue to surprise and inspire me! I love the new size of this lamp and such a cute shade (I just never think of adding trim – now I will!) – it is obvious that you inherited that creative brain of yours from your parents! I’m glad you’re keeping this beauty!! And there’s that sweet little Layla – your helper – or maybe she just wanted to play with some of those lamp parts 🙂 lol
Christy says
Thank you so much, Patty! Yes…my parents definitely paved the way for me in my creative journey! Lyla made me chuckle when I saw her in that photo as I was editing! She always close by! XOXO
Cynthia Murphy says
I love this lamp! It’s a beautiful makeover.
Christy says
Thank you, Cynthia! XOXO
Micah R says
I love it! Turned out stunning as always. I never would have thought of leaving out part of the base but I love the way it changed up the look!
Christy says
Thanks so much, Micah and thank you for the tip on choosing a shade! XOXO
p says
I’m impressed with your lamp shape re-do !!
It looks completely different. Who knew !
Good idea to keep that one. 😉
p
Christy says
Thank you so much! I just don’t want to part with it now! XOXO
Elise Howell says
Love this Christy! It’s like the original lamp’s pretty little baby sister. That rosette trim “knocks it out of the park!” You just ooze with creativity and we all get to enjoy your process. Kudos to your dad too! Can’t wait to see what you do with your work space.
Christy says
I appreciate that so much, Elise, thank you!! My Dad was thrilled to come help! I’m so excited that my workspace is finally working to its full potential….can’t wait to share! XOXO
Mary says
Wow!! I love the new shape and shade. I always look forward to your blog on Tuesdays.
Christy says
Thank you so much, Mary! XOXO
Rosie says
Just lovely!!
Job well done Christy👍🏻😊
Christy says
Thank you, Rosie!! XOXO
Julie Timmerman says
You always impress me with your can do
Philosophy! You did wonders with this lamp
The rest of us were thinking yes the lamp was pretty but what could you do with it? Just paint it and new shade? Nope, you totally
Made a new lamp that none of us saw, but you did!!😊 You have a great eye. So I keep watching and learning all the time! Thank you for sharing and inspiring❤️
Christy says
Aww thank you so much, Julie!! I didn’t see what it could be until I took it apart and was putting it back together…sometimes these projects just evolve as I go! XOXO
Ashley says
I think the prior owners want their lamp back. #adorable
Christy says
Ha ha! #noway 🙂 XOXO
Ange Mills says
I love the new and improved lamp especially the shade. BTW- Those white roses are so sweet. They look so real.
Christy says
Thank you, Ange!! I found those roses at Michaels…they really do look so real, right?? XOXO
Joni Gonzales says
1) Only you could have come up with rearranging the lamp and adding the rosettes to the shade. Blown away! 2) LOL on Lyla. 3) I was hoping you’d include pics of your dad helping you and I wasn’t disappointed. 🙂 4) OMG! You’re going to show us your workspace! Yay! 5) Apparently today’s post evoked many reactions from me lol. I love that lamp so much. If you add glass trim later, please share!
Christy says
Thank you, Joni!! I love all the reactions lol! See ya Thursday!! XOXO
Janet says
Very pretty!!! Love the makeover, looks more up to date!!
Question? What is your go to color for neutral walls in the house? Thanks so much!!
Christy says
Thank you, Janet! My favorite neutral wall color is Campfire Ash by Behr. I love love love it!! Not too gray, not too beige…just perfectly in between! XOXO
Shirley says
Christy, you are a wonder and an inspiration. Both versions of the lamp are very pretty but I do favor the shorter one just a little. I definitely want to learn to rewire. I look forward to Tuesdays.
Christy says
Aww you are so sweet, Shirley! Thank you!! XOXO
Addie says
Ms. Lobster….get some lotion ASAP!!!!…I am only saying that cuz mine are the same!!!…worst!!!! It’s winter folks!!!!
Cute lamp. The shorter style can easily go into a girls “girlie” room. I am sure it will sell fast….and with the money you can buy the lotion!!!
The Add…XX00 (felt it was time for some humor)
Christy says
I know, right?? I actually left out a step so I had to go back and reshoot and update the post, so yay I was able to replace cracked hands Christy lol! Thank you, Addie and as always, I appreciate the chuckle!! XOXO
Julie Briones says
I love that you ‘shortened’ the lamp… it’s perfect, and of course… WHITE! 😉 (we have something in common… my parents owned a ceramic nursery accessory business when I was a young adult. I have wired MANY lamps!)
Christy says
Thank you so much, Julie!! Oh wow…that is probably why you’re so creative too! XOXO
jill says
LOVE IT!!!!! i love to buy old lamps and upcycle them and now you totally have me inspired to look beyond what i normally look for.
did you replace the screen on the window hanging from the wall? what did you use? grate screen? its lovely 🙂
Christy says
Thank you, Jill! I did add the screen to that old window frame several years ago. It was metal sheeting that my husband had left over from another project that he bought it online. It is one of my favorite upcycles! XOXO
Leslie says
Simply beautiful! Great job!
Christy says
Thank you, Leslie! XOXO
Char Fisher says
Absolutely stunning and the lampshade was perfect with the added rosette trim! Love how you make a $3 lamp look like a $50 lamp!
Christy says
Thanks so much, Char!! XOXO
Donna says
I would love that lamp either way. Just beautiful!
Christy says
Thank you, Donna! XOXO
Debbie in TX says
What an awesome makeover! I love the lamp shade, and I’m not surprised you’re keeping that beautiful piece. Glad to see Miss Lyla is keeping an eye on you!!
Christy says
Thank you, Debbie! Yes, I just didn’t want to part with it and Miss Lyla is always nearby lol! XOXO
Tricia says
Love this, such a beautiful lamp! I do have to ask the window frame behind it what did you use for the wire?
Christy says
Thank you, Tricia! That is a piece I redid several years ago with some metal sheeting my husband had left over from another project. He found it online somewhere. It is one of my favorites! XOXO
Susan says
Way, way better. The old was pretty ugly, and you’re right: it looked too tall and spindly. And I never would have thought of painting a metal lamp until I the ones you’ve been doing and I have to say, the transformation is spectacular!
And painting the rod was a good idea because on the old version the crystal part looked yellowy and dingy, but now it just sparkles! Really really good job!
Christy says
Thank you so much, Susan! I have to admit, I wasn’t so sure I could really change this one up much, but once it was apart, it was easier to see the possibilities! XOXO
Susan says
Hey Christy,
I have an idea you might want to experiment with. I love the aqua/turquoise glass and as I was trying to imagine how your new lamp would look in my bedroom, where I have two lamps that I mad out of a large vase and a canning jar, I got to remembering when researching those that there were people on Pinterest who were tinting jars and stuff in colors like turquoise. I didn’t like the idea for a vase Because I thought the color might come off. But if you tinted the INSIDE of a piece for a LAMP, it wouldn’t be exposed so it wouldn’t wear off. So maybe you might like to try that on one of these bargain lamps you find. You wouldn’t be out much and I bet it would sell quick! What do you think? My imagination is running wild, lol!
Christy says
Oh I like that idea!! I’ll have to keep that in mind! XO
Mary Kaiser says
I LOVE how the lamp turned out , it is beautiful now. I didn’t get a chance this morning to read your post, but I couldn’t wait to get home from work to see what you did with the lamp. Absolutely stunning now!
Christy says
Thank you so much, Mary! My post didn’t get sent out on time for some reason this morning…my apologies as I’m sure it was my error somehow! Glad you finally got to stop by and check it out! XOXO
Naomi S says
That project was really inspired, Christy! The shade is so perfect because it echoes the shape of the bottom glass piece and the trim you found is perfect. I was wondering what you used for a finial, though. I couldn’t see one in the before pictures. Did you have to buy one?
Christy says
Thank you, Naomi! I was so excited to come across that square shade that fit just right! The shade was a UNI shade that just sits on top of the socket, so there was no harp and no need for a finial! XOXO
Petra says
I was looking at your reveal on my phone and I’m getting very confused haha 🙂 because the pictures are small and I’m thinking the before is so different from the after but now that I’m home and re-looking at it I can see all the great changes you’ve made. Well done on another FANTASTIC job <3 xo
Christy says
Oh ha ha! Yep, the after looks quite different! Thanks so much, my friend! XOXO
Ivory says
WOW, what an amazing transformation. You nailed this project. I love everything you did here. Smart rewiring your lamp. Thanks for sharing.
Christy says
Thank you, Ivory!! It’s always a pleasure to share!! XOXO
Ginny says
I’m afraid you can’t keep the lamp because I want it for my bedroom that I’ve just repainted. It will look great on my dresser, so please send it to me. LOL I haven’t been to a thrift store in ages (trying to save money), but next time I do, I’ll be looking at the lamps in a different light, no pun intended.
Christy says
Oh ha ha! Thank you, Ginny! It would probably look fantastic on your dresser! I know it’s hard to stay away from the thrift stores…you have more willpower than me for sure, but good for you! When you get to go again, definitely check out the lamp aisle! XOXO
Olivia says
I like what you did to your lamp. I have a similar tall lamp. The bottom glass on mine is round and it has a light also. I use it as a nightlight in the living room. I bought it on ebay and they called it Hollywood Regency. Not sure what that means, but I do love the lamp. Thank you for the lesson on rewiring.
Christy says
Thank you, Olivia! I love that yours has a light in the bottom also. These lamps are a bit glam so the style name is very fitting! XOXO
Katzpawz says
Normally, I’m not a big fan of that chippy, white, distressed paint look; but I MUST make an exception here. You turned a long, lanky frog into a beautiful, short necked swan! I love it. Your choice of shade and its’ decoration is spot on perfect!!!
Christy says
Thank you so much! XOXO
Maria Howard says
Love this!!
Christy says
Thank you, Maria! XOXO
Becky says
Lovely! Great reformatting job! I love it when you make a keeper. 😊
Christy says
Thank you, Becky!! Me too!! XOXO
Marie says
It looks so much better shortened. I would have never thought of doing that. Such a pretty lamp makeover and I want me some of that pretty rosette trim!
Christy says
Thanks, Marie! I’m so glad shortening it worked out! And I love that trim too…as you can see in the post, I bought extra! XOXO
Laura says
You knocked this one OUT OF THE PARK!!! Love following you. Don’t forget instagram. I spend most of my time there.
Christy says
Aww thanks so much, Laura!! I usually share my new posts on IG the same night they go live, but I totally forgot to share this one this time! XOXO
Laura says
👍🏻💕
Phyllis says
Love the lamp. You have a great eye for design. I wouldn’t have thought to make it shorter. Any ideas what you will do with the other glass piece?
Christy says
Thank you so much, Phyllis! I stared at that other piece for a long time and finally just let it go…it wasn’t easy lol! XOXO
Sharon Davison says
I love square lamp shades. The rosette trim is gorgeous! I was wondering if the hot glue would hold up in the heat of the lamp. Have you used hot glue on lamp shades before? I love this lamp!
Christy says
Thanks, Sharon! Oh yes… the hot glue holds up just fine! XOXO