Hello amazing friends! I have another makeover to share with y’all from this pile of goodies I picked up last Saturday:
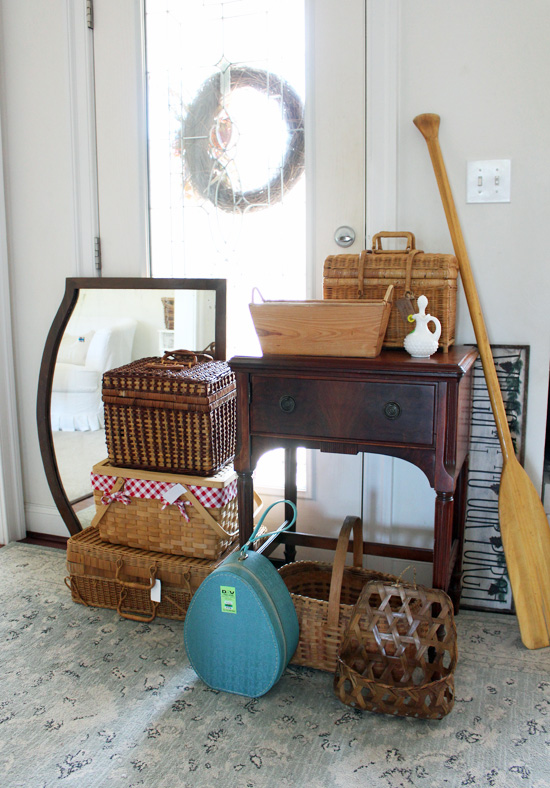
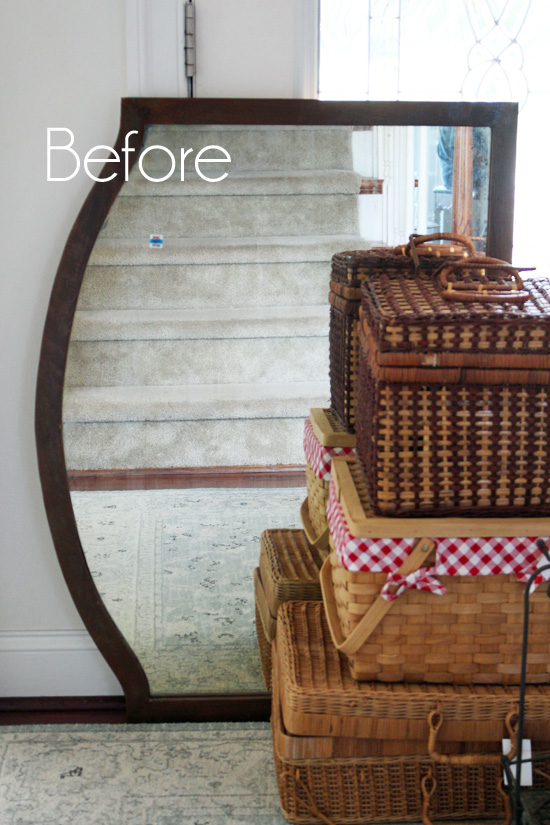
It’s this mirror I scored for $4.98:
If you missed what I did with the baskets, see them HERE.
I had passed it up twice before since the mirror in it was so heavy. Then when I saw it last Saturday, it had been marked down again and it occurred to me that it would make a fantastic chalkboard!
Don’t you think?
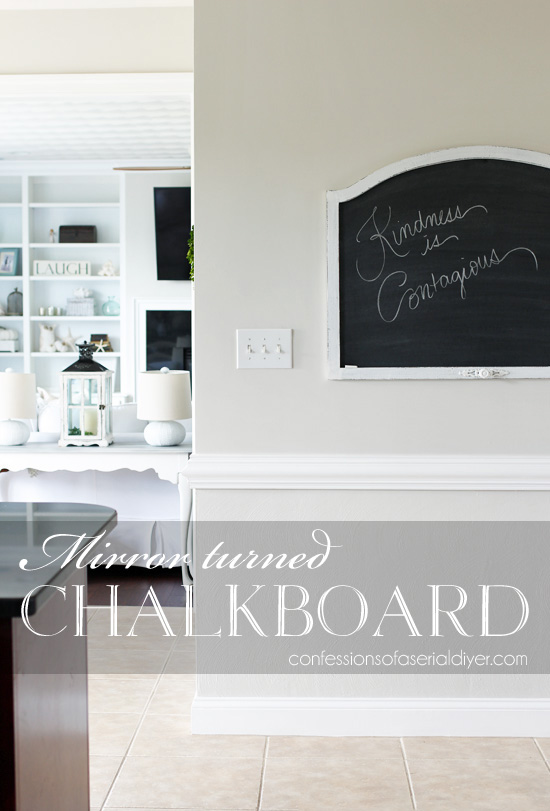
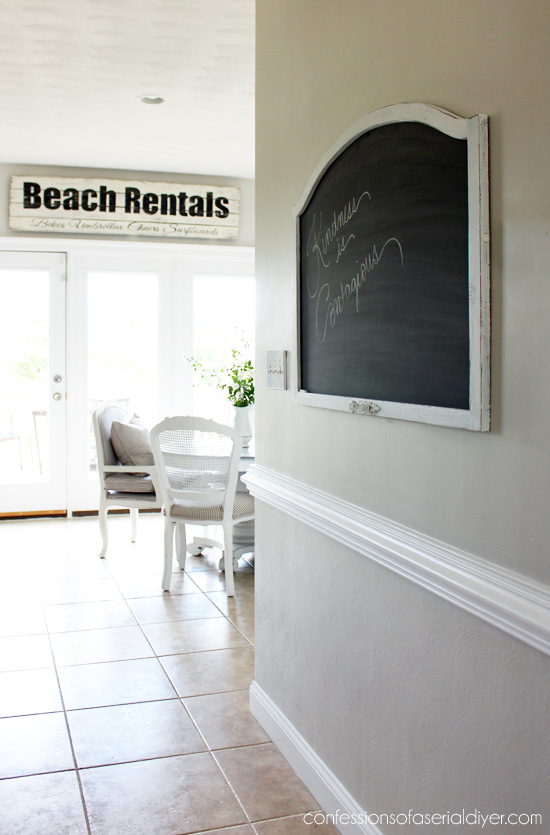
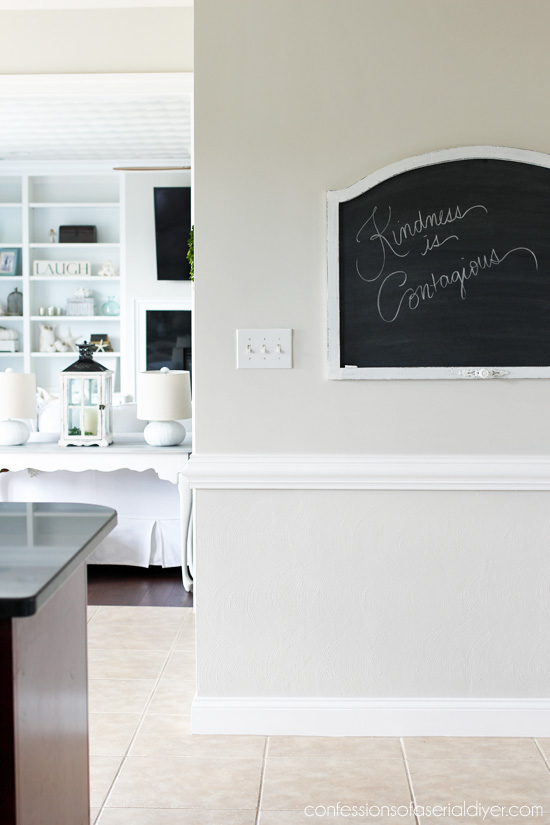
This wall is in our kitchen and I knew I wanted to put a chalkboard here. This frame was just the right size!
I have made tons of chalkboards for my booth, but never had a place to hang one in our old house. I have included a few affiliate links so you can find the products I use.
Have you ever made a chalkboard? Have you wanted to but didn’t know how?
I have shared how I make mine a few times before, but I thought I would share again just in case!
I start with a frame, of course. You can find so many pretty frames at thrift stores.
Mine started out as a mirror so I had to remove the backing and the mirror, then I painted it in just ONE coat of DIY chalk paint. (Recipe HERE.)
That way when I sand, I get a really nice worn look:
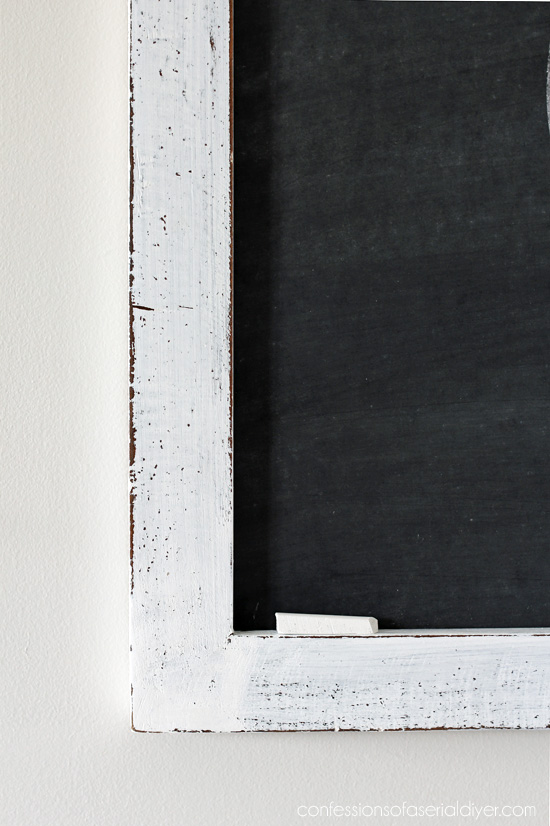
For the chalkboard, I prefer not to use the original glass or mirror because I am selling them, and my customers won’t know to be careful with them once they’re painted.
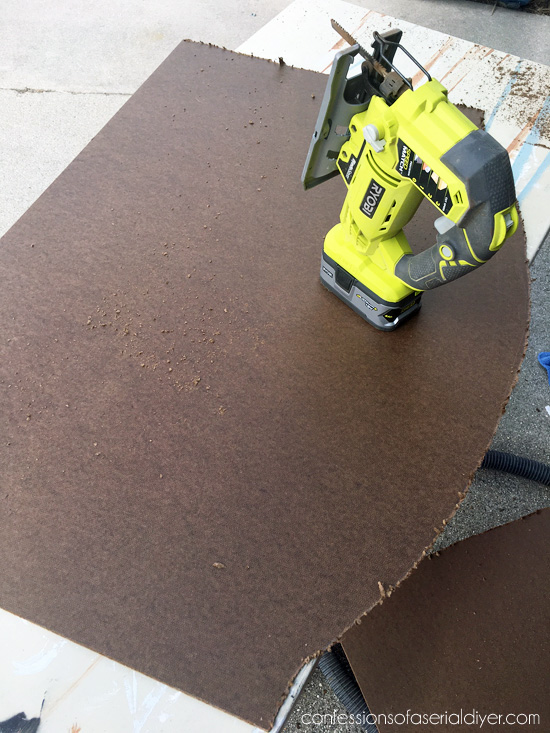
I head to Lowes or Home Depot for a sheet hardboard:
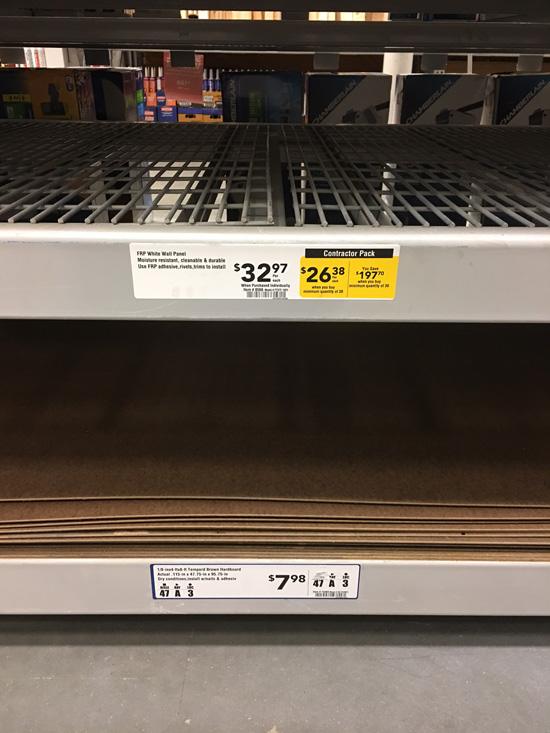
Hardboard is like pegboard but without the holes. For less than $10, I can make several chalkboards. They also sell a quarter sheet, but it’s much cheaper to buy a whole sheet if you want to make several!
I have them cut it in half for me so I can fit it into my car:
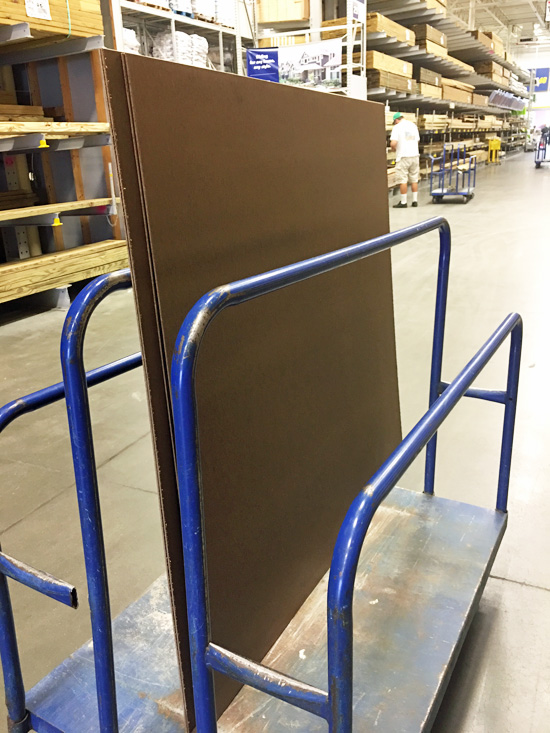
I bought two sheets on this trip.
I use whatever came out of the frame to trace for my new chalkboard:
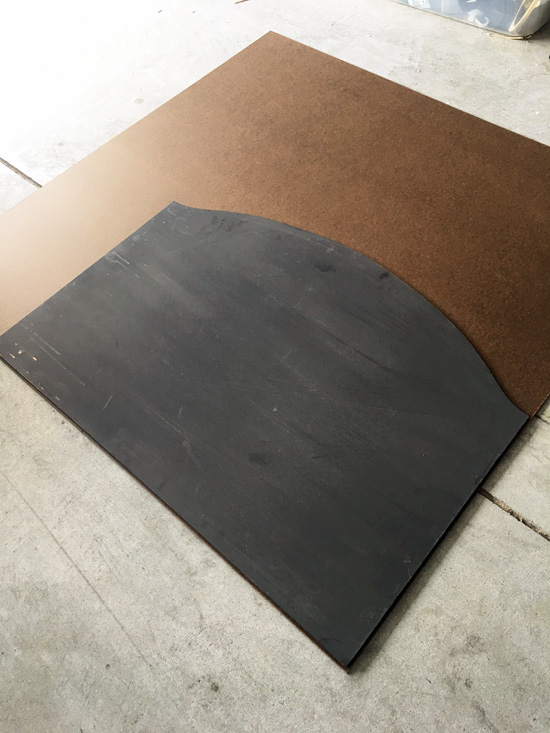
Then I use my Jigsaw to cut it out…
Always test fit to be sure because sometimes this happens:
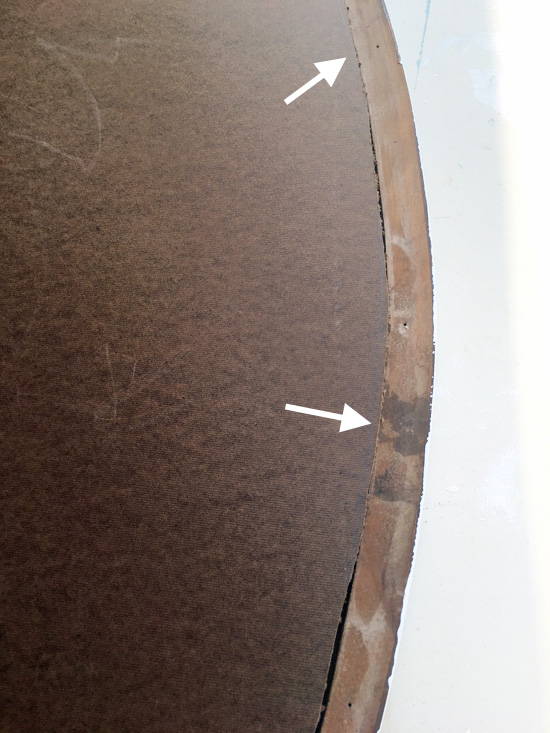
Oopsie…happens for me often actually. No worries…a quick trim does the trick.
The next step is to turn it into a chalkboard.
My favorite chalkboard paint is Rustoleum’s spray chalkboard paint:
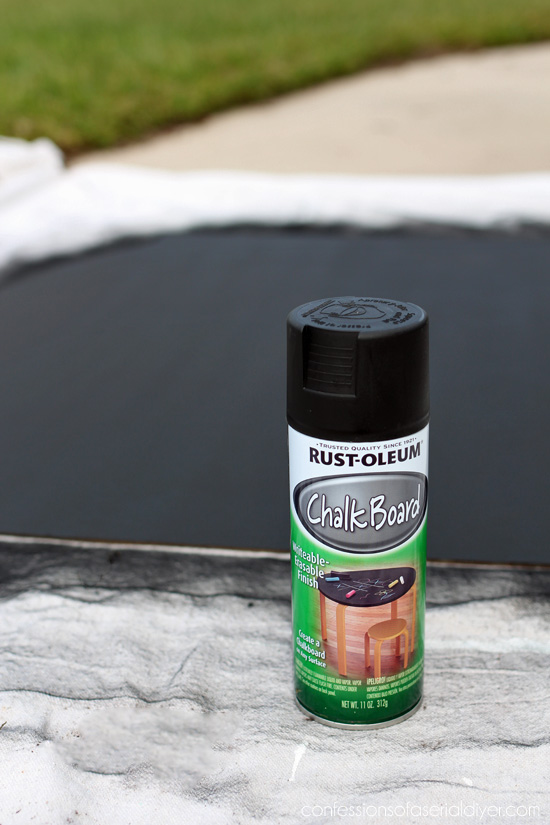
A couple of quick coats and it’s ready to go, and dries quickly too.
When it’s dry, I season the chalkboard by rubbing chalk all over the surface:
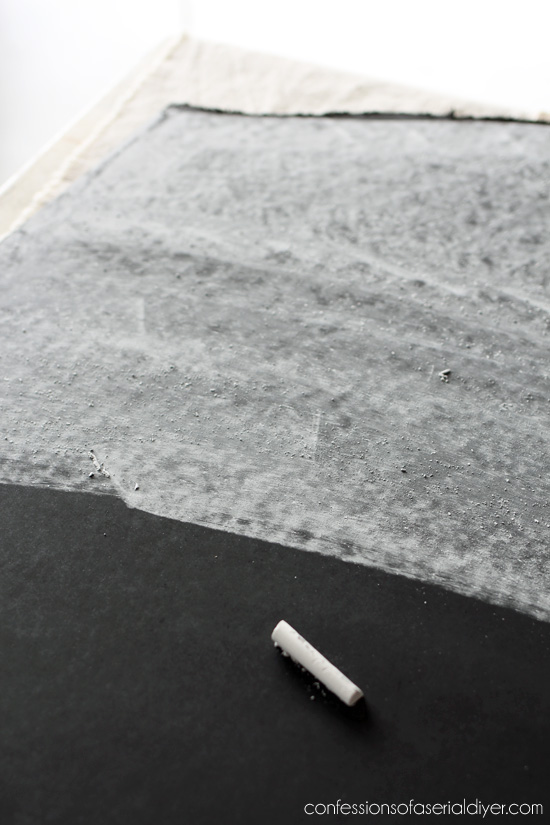
Then I wipe it off with a clean soft cloth. This is supposed to stop the first markings from leaving a permanent mark on the board. I have yet to test this theory.
This is my favorite chalk right now:
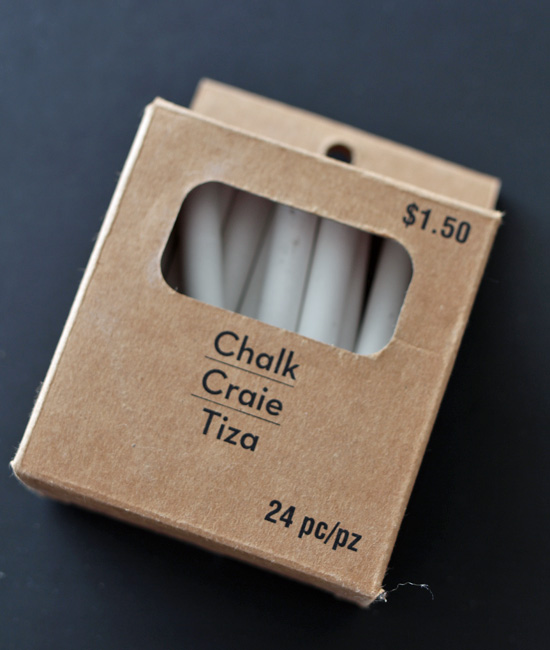
You can find it amongst the dollar items at Michaels, usually in bins near the registers.
Then I secure the chalkboard in the frame using my Logan Point Driver:
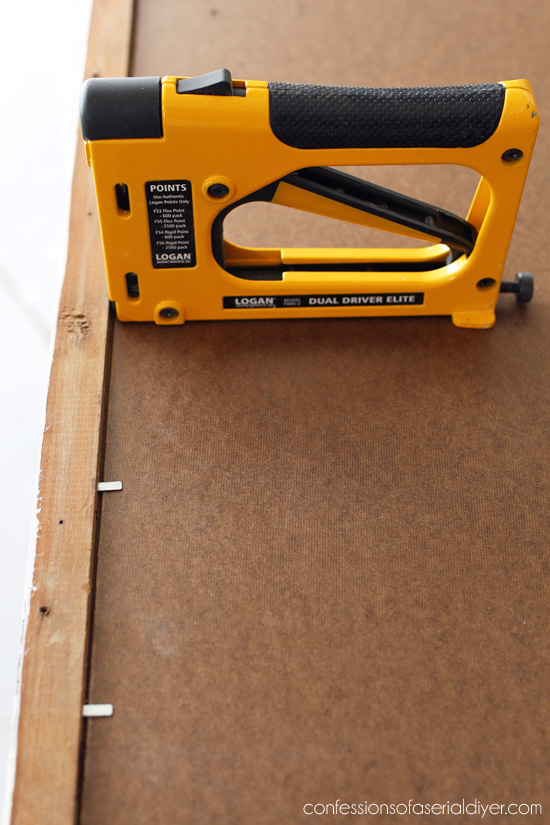
I love that thang! I use it to make trays as well. You could also use a hammer and small nails, hammered in sideways like the points above.
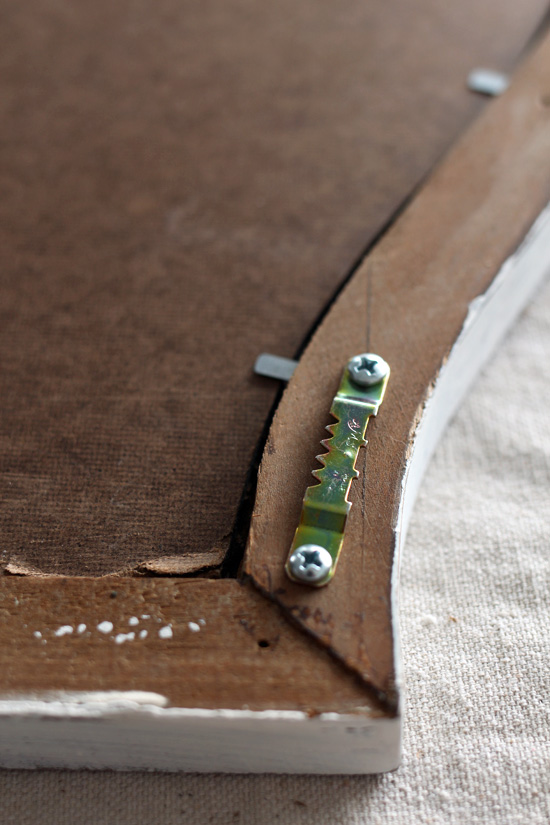
If this were heading to my booth, I would cover the back in pretty paper, but since it is for my kitchen, I skipped that step and went straight to adding the hanging hardware.
These sawtooth hangers or d-rings work just fine:
And you’ve got yourself a chalkboard!
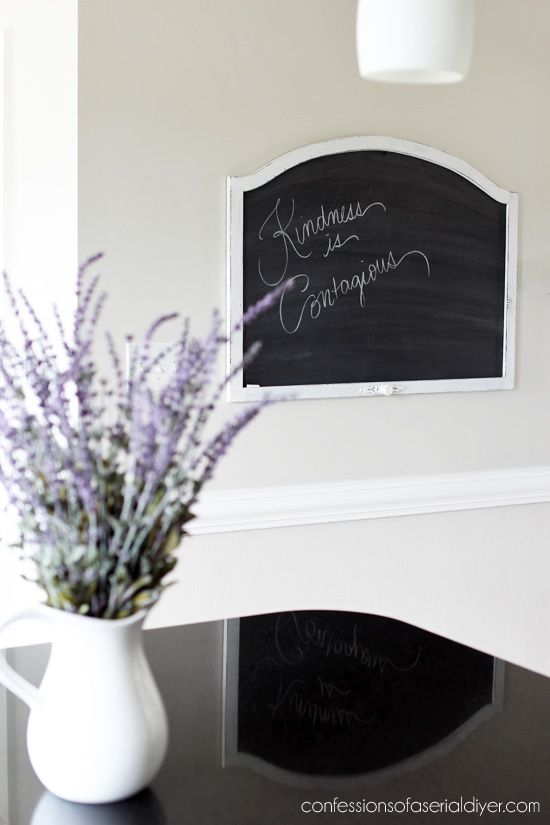
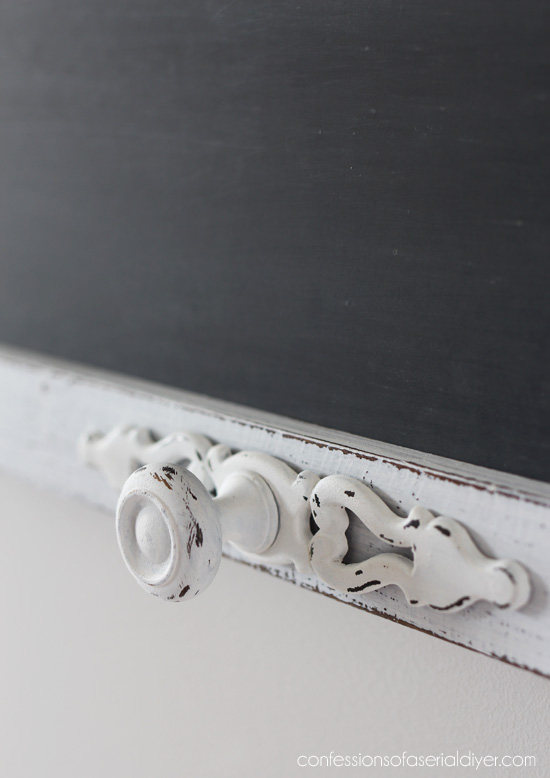
For a little extra detail on the bottom, I added an old knob I found while I was digging through my stash the other day looking for embellishments for my baskets. (See how they turned out HERE.)
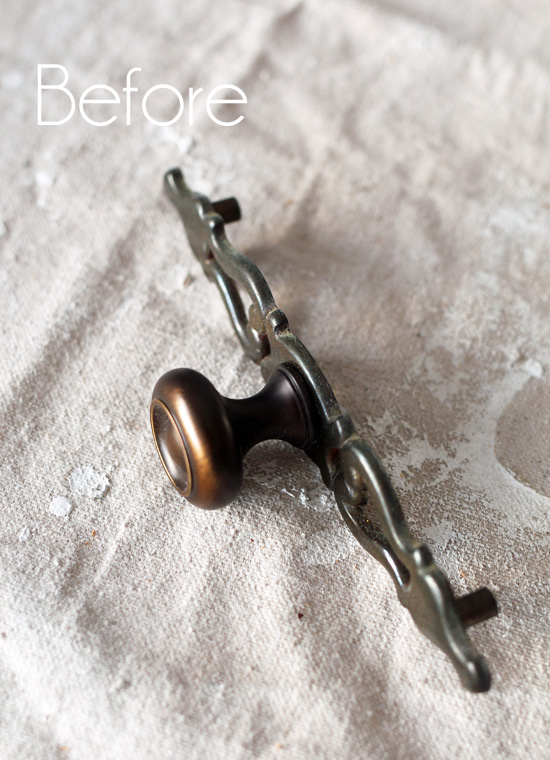
I chalk painted this with two coats, then used my nail to scratch some of the paint off here and there:
To insert it into the frame, I pressed it onto the wood slightly to leave indentions where I needed to drill. Then I drilled two shallow holes…
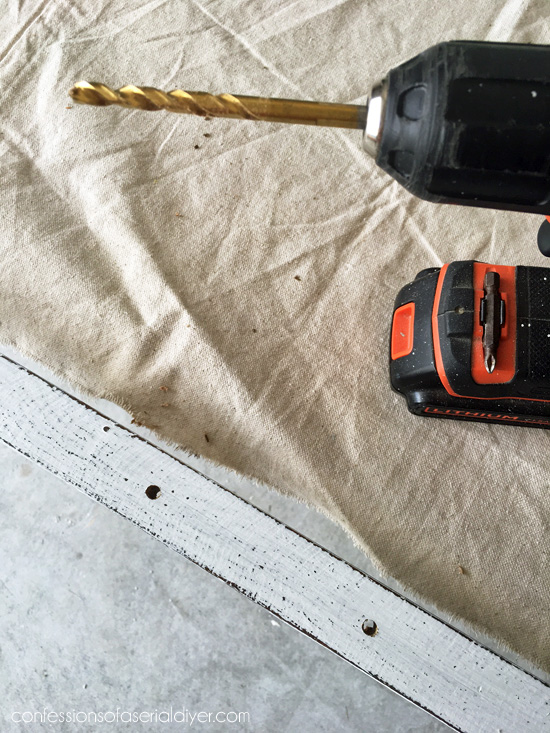
The hardware was a really tight fit so I was able to just push it in and it stayed put. Otherwise I would have dropped a bead of E6000 glue in each hole and then inserted the hardware, and let it sit over night to dry.
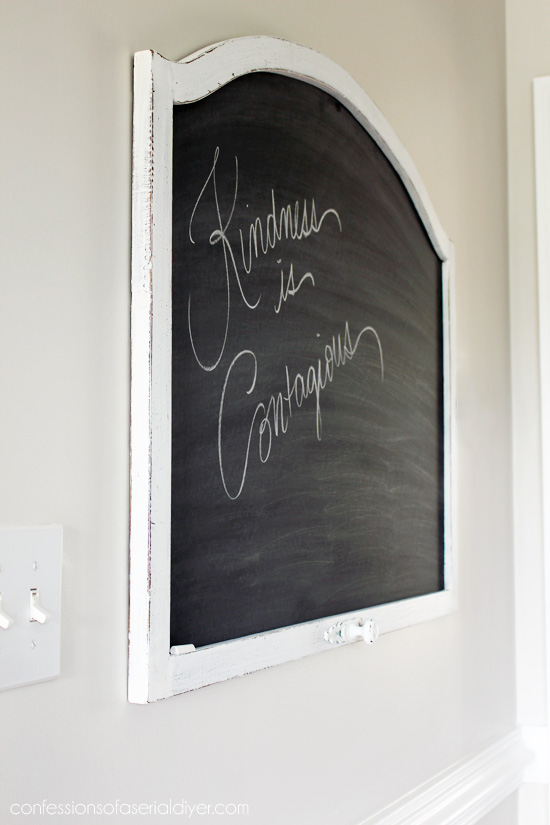
It adds a fun little detail to this otherwise plain frame.

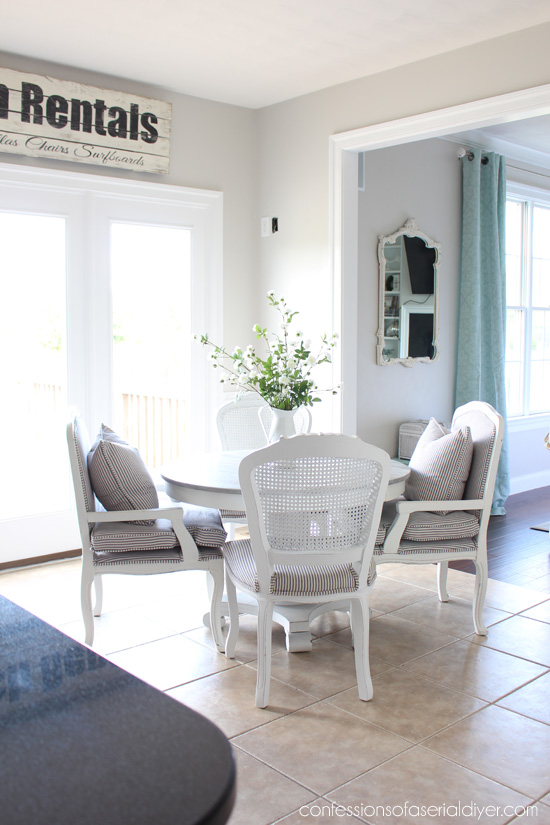
Now normally I would stage it really cute for photos, but this is where it will live, so this is what you get. 🙂
Can you tell I painted the walls and trim in here?

Before it was painted like what you see through the doorway there by the stairs…contractor white.
Our kitchen walls look so much better now, and our trim really pops.
This is the same color as I used in the living room: Campfire Ash by Behr…
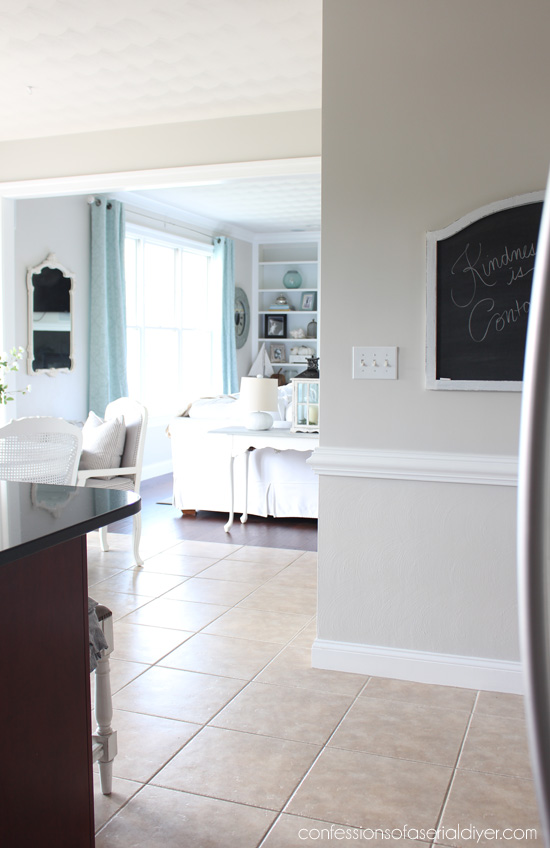
It’s a perfect neutral. Not too gray, not too beige.
I also did the hall that leads to the laundry, bath, garage, FROG, and storage room…that’s FIVE doors and doorways! (Not to mention the doorway into the hall!)

And here’s a quick shot of the rest of our kitchen in case you forgot what it looks like…
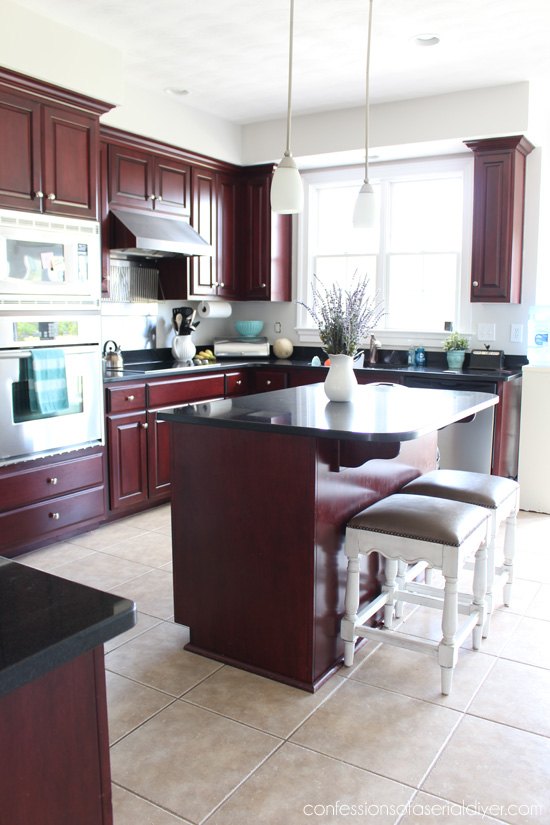
I can’t wait to paint these cabinets in here! That job is not very high on the to-do list right now though.
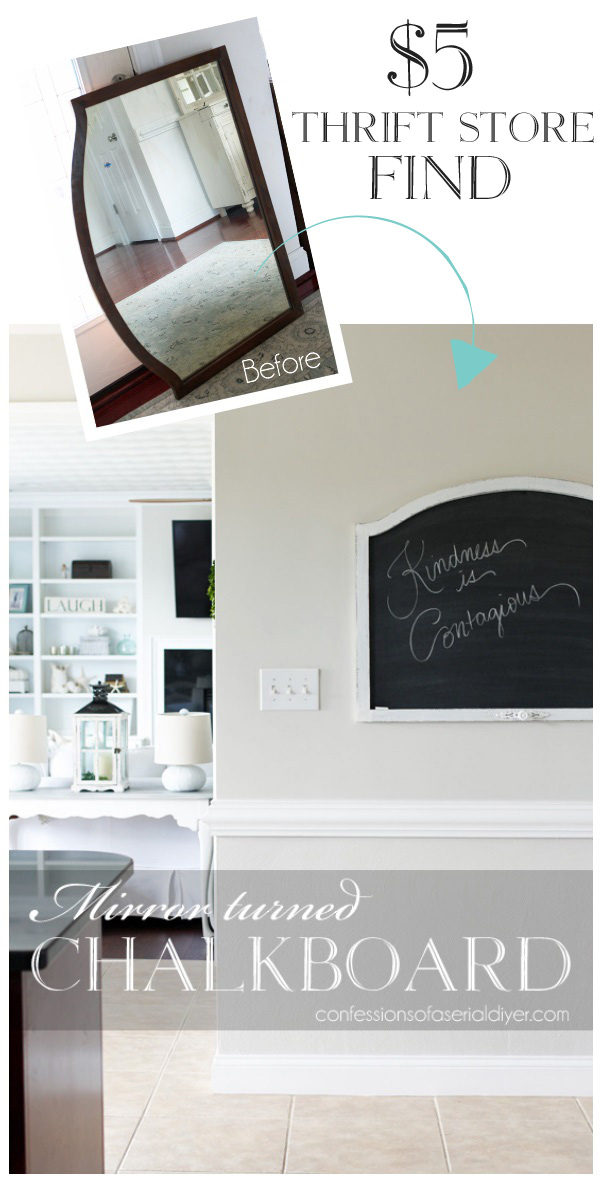
Be a little extra kind to those you encounter today. Kindness is contagious. I think we could all use some of that right about now!
I’ll see you soon with the makeover of this Craig’s List find:
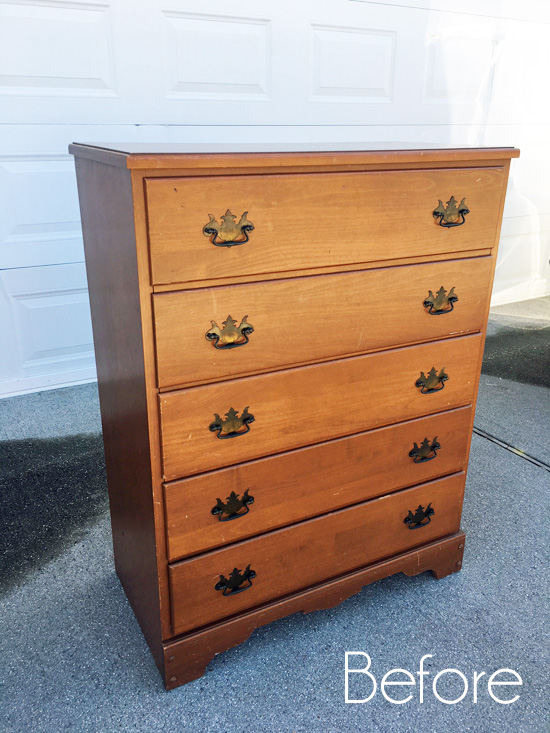
UPDATE: See how this dresser turned out HERE now!
XOXO,
![]()
Don’t Miss a Thing!
If you like what you see, there are several ways to follow along!


Christina in FL says
Oh Christy, this is a marvelous re-do! I need that point driver, thanks for the tip on the chalk, I’d love a “lip” on the bottom of the chalkboard to hold the chalk securely and I laughed when I saw your kitchen cabinets and thought about that dark cherry color… then you wrote you will paint them. :))) See? You have me trained. lol
I’ll be moving (only around 6 miles away) in the next 3-4 weeks so … some things will have to wait.
Christy says
Thanks, Christina! I had planned to use one of my scrabble tile holders (which I thought I remembered being made of wood) to hold the chalk. When I finally found the game, they were made of plastic boohoo. And yeah girl, those cabinets are on my hit list! Good luck with your move…it helps that it will be close by! 🙂
Kimberly Sperry says
I have used the same paint for my chalk boards but in places it sorta of bubbled! Do you think I sprayed to close and is there a way to fix it? Also, do you prime the glass first? I don’t.
Christy says
Hey Kimberly! I don’t use the mirror since I usually sell my chalkboards, because I would hate for it to break on them if they didn’t know to be careful. I replace the mirror with hardboard. You can absolutely just paint the mirror if you like, but I’m guessing the reason it bubbled is because it reacted with the coating on the mirror somehow.
Kimberly Sperry says
Thank you so much!!! I knew you kepted saying hard board now I know why!! Also, will need to do this for windows as well!!!
I started a blog http://www.livinglifewholeheartedly.com it’s geared toward large families, homeschooling ect. Would I be able to fit diy projects into this niche? My husband and I started a busines selling homemade decor and upcycled goods. I really don’t want to pay for another site. But, I do need a way to promote up coming flea markets ect..
Thanks so much for your imput!
Kimberly
Christy says
You’re welcome! It looks like your blog is more of a lifestyle blog which I think can encompass just about anything that pertains to what you have going on day to day, including a few DIY projects! 🙂
Marcie Lovett says
Lovely transformation, Christy! The house is coming together beautifully. I didn’t know Rustoleum chalkboard came in spray paint. I’ve used their brush-on to paint over chalkboards that have permanent “ghosting” from chalk markers and highly recommend it.
Christy says
Thanks, Marcie! I love their spray, but good to know about the brush-on! XOXO
Nancy @ Artsy Chicks Rule says
Oh, that’s just the perfect spot for it! Everything is looking so good and I love how bright and airy your home is! I’m needing one of those driver thangs too! Lol xo
Christy says
Thanks! I’m excited for you to see it in person! Let’s make a date!! And yes you definitely could use one of those drivers…they are awesome!! XOXO
burbmomoftwo says
Wow! Christy! You do so much! I can’t believe how much you have done in your house already! You are the “Energizer Bunny”! It looks great and I love the chalkboard tutorial. I can’t wait to give that a try.
Christy says
Thanks for the encouragement! It’s hard to sit still with so many tasks still on the list lol, but it is coming together! And yes, I hope you make a chalkboard…they are super easy to do! 🙂
Tori says
I’ve actually just flipped mirrors around and used the backside as chalkboards!
Christy says
I usually sell mine and I am afraid buyers won’t realize they are glass if I use the existing mirror, so I always replace them. But if it is for your own use, why not? It saves a lot of extra steps! 🙂
Ruth Anne says
Your chalkboard turned out so nicely! I’d love to have wall space to hang one in my house.????
Christy says
Thanks, Ruth Anne! I didn’t have the space either before we moved. My kids have already been doodling on it, including my biggest kid…my hubby! XOXO
Anita Ellison says
Do you use the mirror for anything after removing it from the frame or do you dispose of it?
Christy says
I usually only replace the mirror with a chalkboard if the mirror is damaged/scratched, so I generally toss the mirror. This mirror is super heavy and has an odd shape, so I don’t know that I will be able to reuse it. Of course I haven’t thrown it away just in case! 🙂
Julie Briones says
Beautiful! Love the chalkboard! My daughter is sitting with me looking at it and it very impressed with all your pics (she LOVED the baskets!). Did you do new curtains in the living room? I may have missed that post…. Are they aqua? 🙂
Christy says
Thanks, Julie! I am so happy to hear that you guys enjoy my blog together! The curtains are new, and yep surprise! They’re blue ha ha. I did mention them in the coffee table post since you could see them a bit in the background, but didn’t share a full picture. XOXO
At Rivercrest Cottage says
The new wall color is perfect! I love the shape of your new chalkboard.
Christy says
Thank you, Sugar! I am so pleased with that color so far. I’ll probably continue it in the dining room as well. 🙂
Debbie in TX says
Girl, I like the way you think!! The wonderful idea to turn the mirror into chalkboard was sheer genius, and it turned out beautiful. That fancy knob on the front is icing on the cake! Great job!!!!
Christy says
Thanks, Debbie! That mirror was just way too heavy, and now it is super lightweight. My kids have already christened it ha ha! XOXO
Marilyn says
Hey Christy, I have followed you for such a long time. I’ve collected so many things so I can do what you do. Headboards, wonderful picture frames, unique old chairs and much, much more. I’ve bought the jig saw, point driver, everything for chalk paint, blackboard paint, sander, bags of rags, knobs, pulls, hooks, stencils, hardboard and on and on. I haven’t done one single thing. I think about it a lot but, that’s about all. I guess I’m too nervous or too old (71) I don’t know. Anyway, keep on posting and I’ll keep on buying and thinking, and thinking, and thinking about trying something. I love your work.
Christy says
Thank you SO much, Marilyn!! I LOVE that you have been inspired! Gathering the supplies is a step in the right direction. Just start with something small. You can totally do this!! Keep me posted on how it goes! XOXO
Norma says
Oh beautiful idea with the mirror as a chalkboard Great finds God bless
Christy says
Thank you, Norma!! XOXO
Penny says
Hi Christy,
I love your new house-already looks so beautiful! I was wondering what type of thrift store you shop at? I can never find any good finds at the Goodwill or Salvation Army in my area. You seem to find so many great items.
Thanks
Christy says
Thank you, Penny!! We have a ton of thrift stores in my area, so I have a lot to choose from. We have one in particular that benefits disabled veterans that picks up from our neighborhood on a regular basis. I find that they have the best merchandise. (There are three locations.) Your best bet is to go just after the weekend when most people drop off their items, and close to the end of the month since that is when people tend to move and get rid of things. Also, stores near better neighborhoods usually have better quality items as well. Hope this helps!
Cyndy says
How on earth do you know how to do all of this stuff? So often I find myself putting off projects because I’m worried I’ll screw it up. You never fail to inspire me to give it a shot!
Christy says
I guess I like a challenge? Ha ha I just go for it. “It is better to have tried and failed than to never have tried at all.” Well now you never know if you don’t try, right?? I bet you will surprise yourself! 🙂
MaryJean says
Had to pin this one. You had some great ideas for making the chalkboard on where to buy things and I didn’t want to forget so it went to my “Projects for Me” board on Pinterest. Thanks!
Christy says
Oh good! I hope you give it a try! 🙂
Penny says
Hi Christy,
I love your house. You’ve done so much in such a short amount of time. I was wondering what type of store do you find all your treasures? I never find anything at the Goodwill or Salvation Army. I think so many people nowadays are re-purposing and it’s hard to find good things, especially at the prices you find.
Thanks.
Deena says
I love it! I’ve never done a chalkboard but my future DIL wants to paint it on one of their kitchen walls. I put a temporary one on my pantry door using Contact chalkboard paper about 3 years ago and it’s still going strong.
Christy says
Thanks, Deena! My kids love hangman so we have had fun with it already! Love the idea to paint a kitchen wall with chalkboard paint. 🙂
Sheila DelCharco says
I’ve been out of town and have fallen behind on your posts. Now I’m back and I want to PAINT ALL THE THINGS! Thank you for this inspiring post! I wish I had a place for a chalkboard!
Christy says
Oh ha ha! You are so welcome! I have wanted one for a long time! 🙂