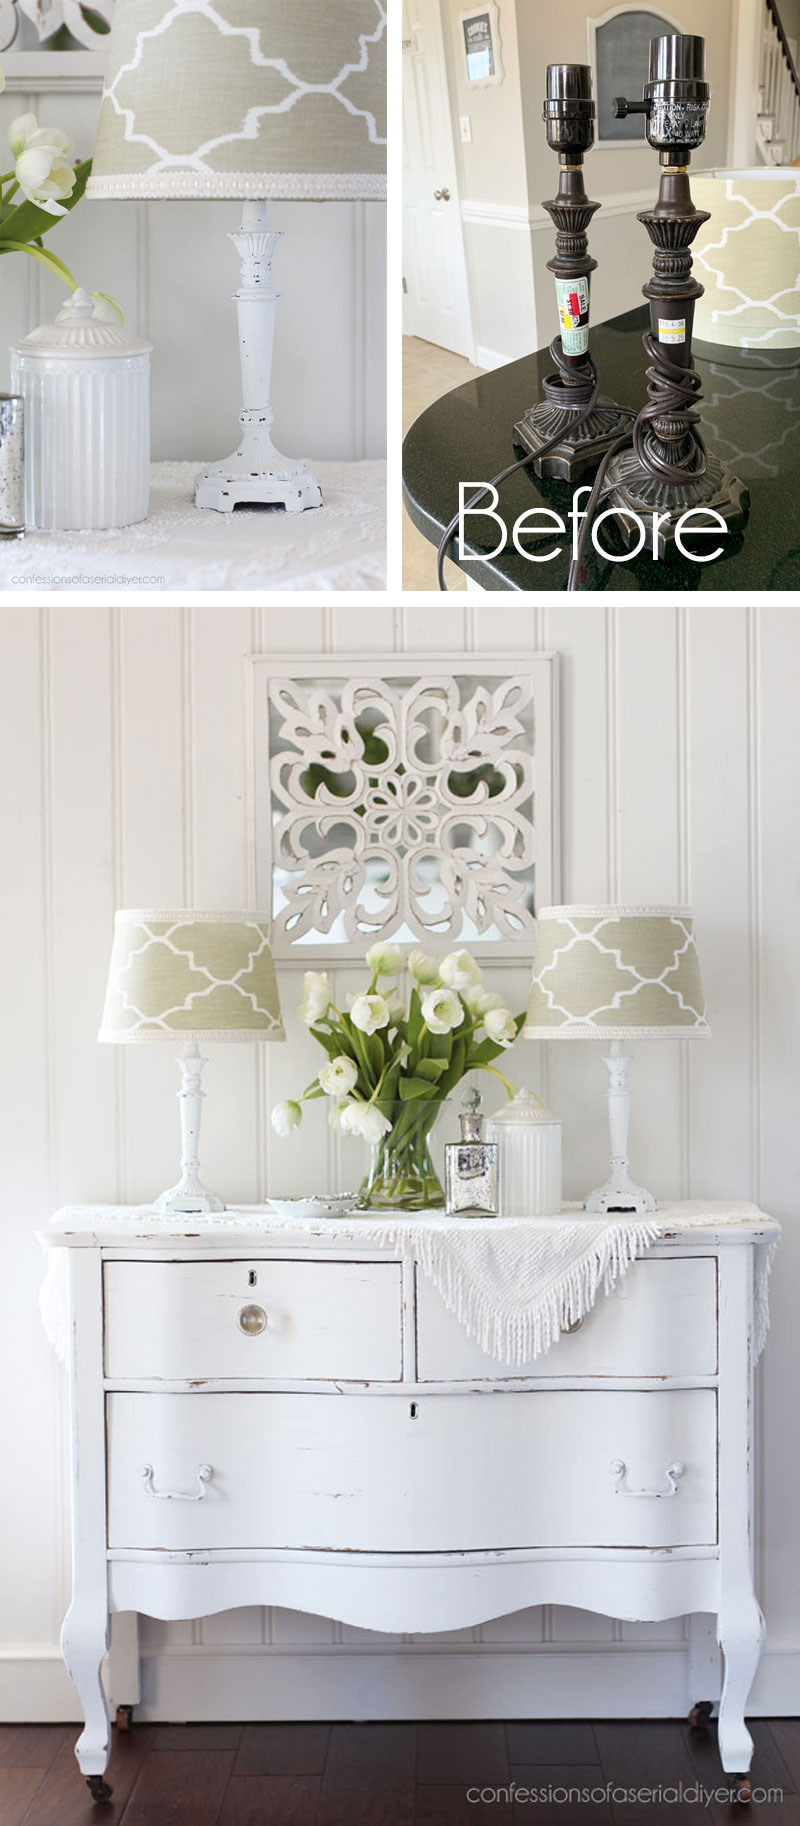
Hello lovelies! Today’s makeover is a two-for! I’m sharing how I redid two lamps, and as a bonus, I’ll also be sharing how to cover a lamp shade!
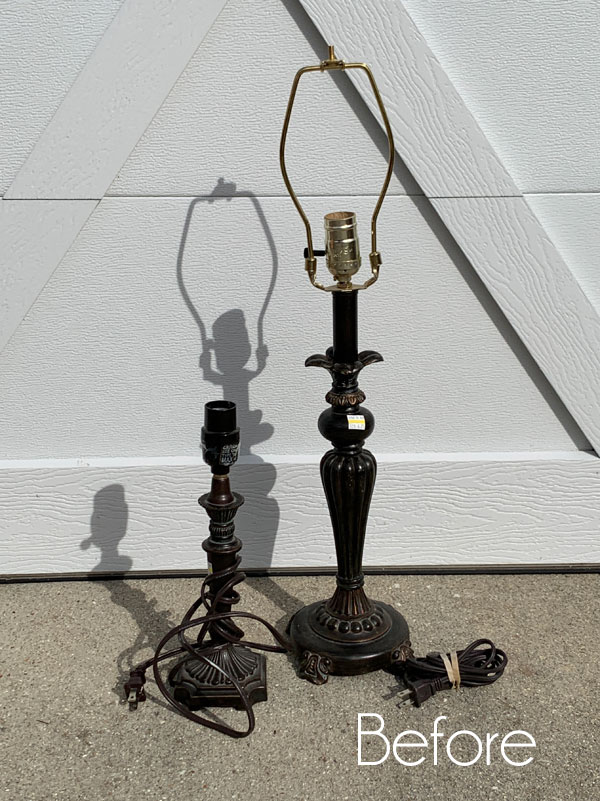
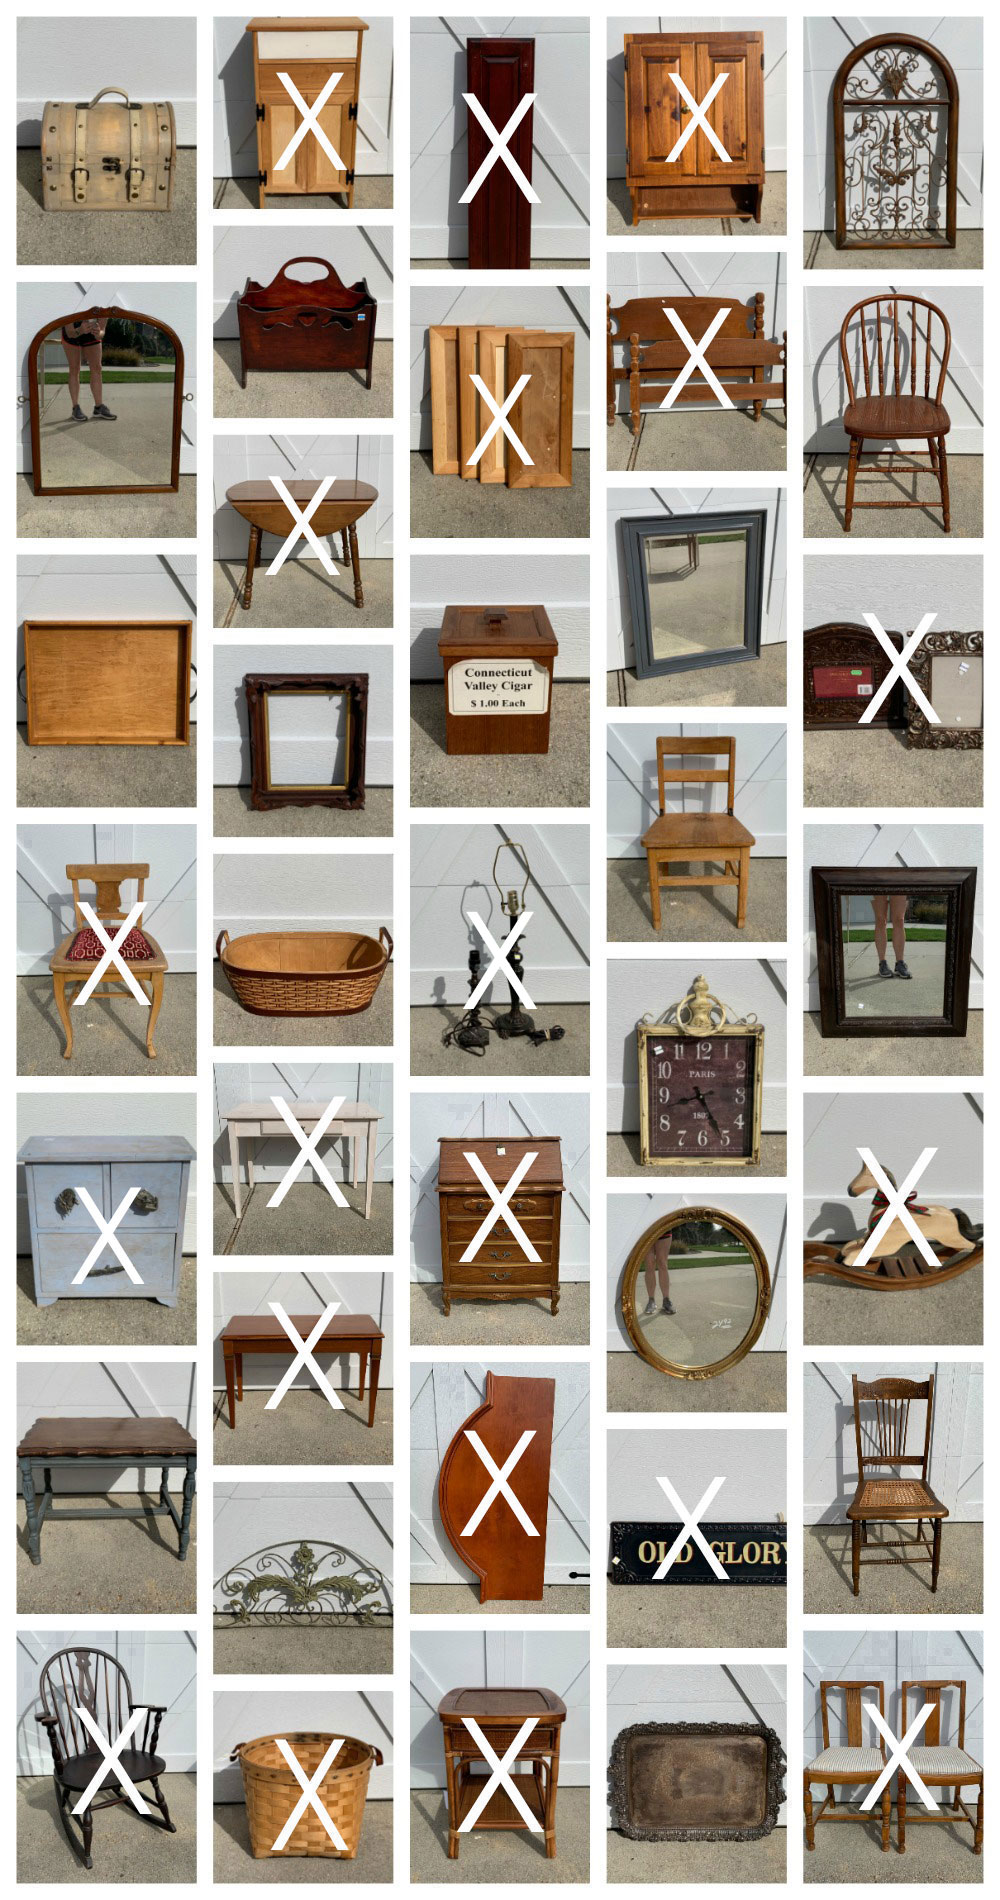
These are my subjects for today’s makeover…I picked them both up at the same time at the thrift store:
I’m going to show you how I brought them back to life! I’ve included a few affiliate links so you can find the products I love.
Lamp #1
Let’s start with the bigger of the two. I picked this one up for $6.25 without a shade or finial. I liked the shape of it though, so in the cart it went.
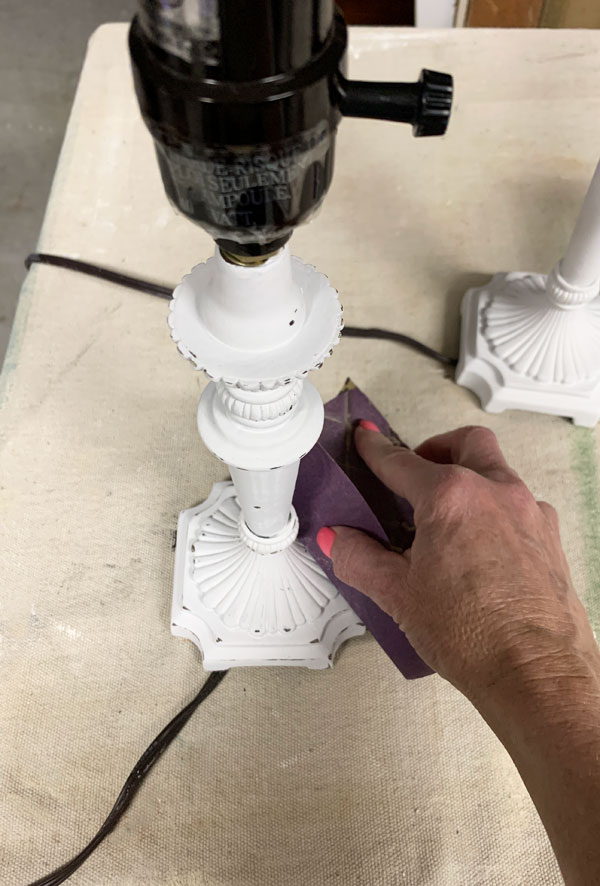
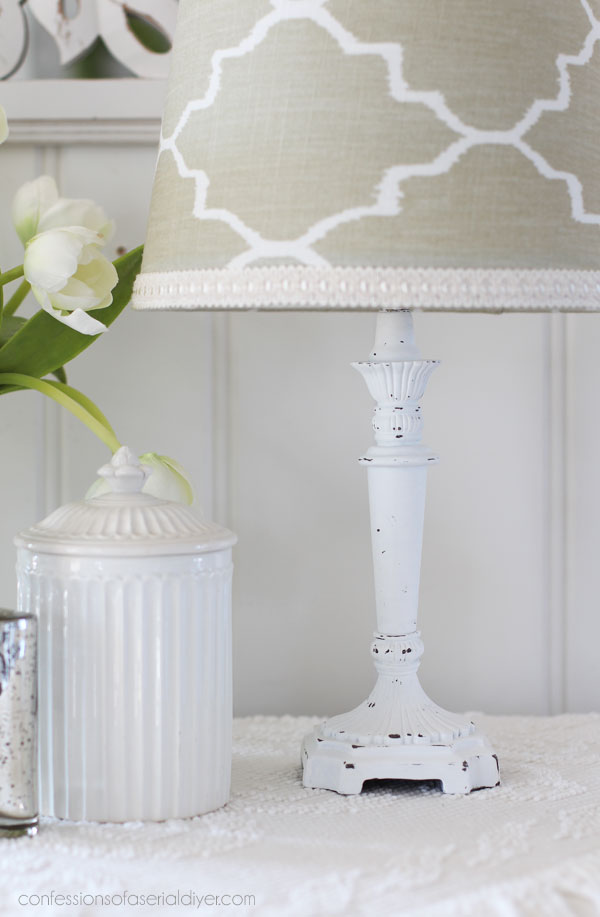
I started with a good cleaning, followed by two coats of Cotton. When the Cotton was barely dry, I used a damp rag to wet-distress the lamp:
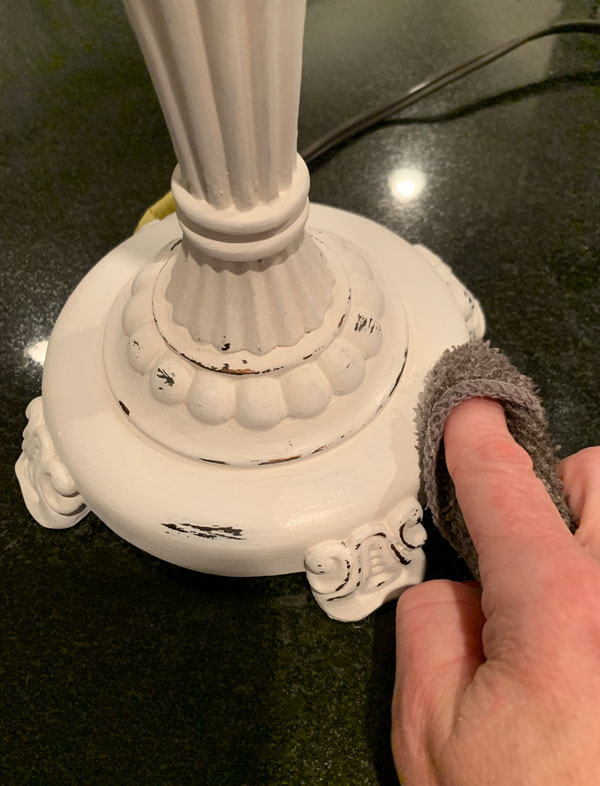
Wet-distressing is simply scrubbing away the paint on the raised areas. This becomes increasingly harder to do the longer the paint has had to dry, so you want to do it soon after painting.
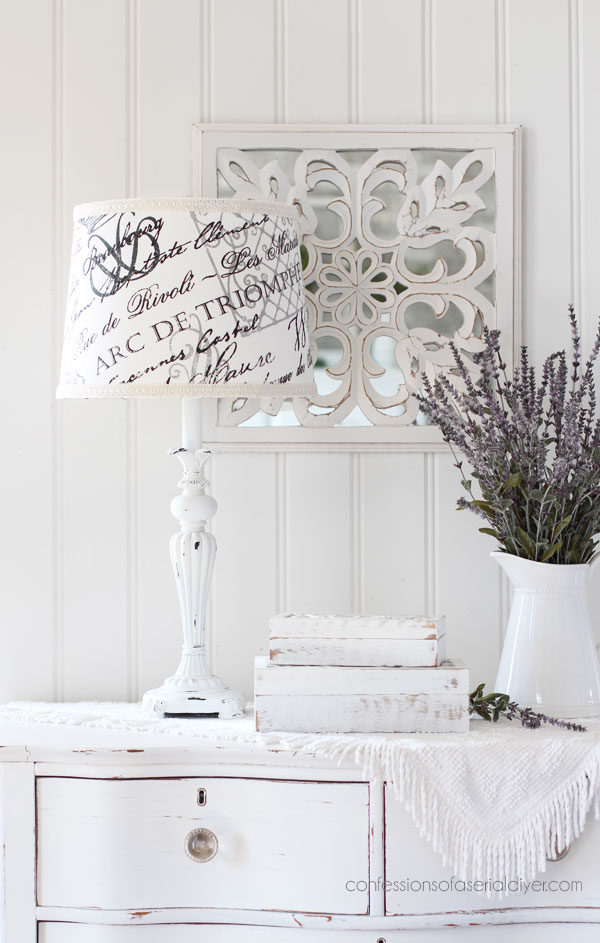
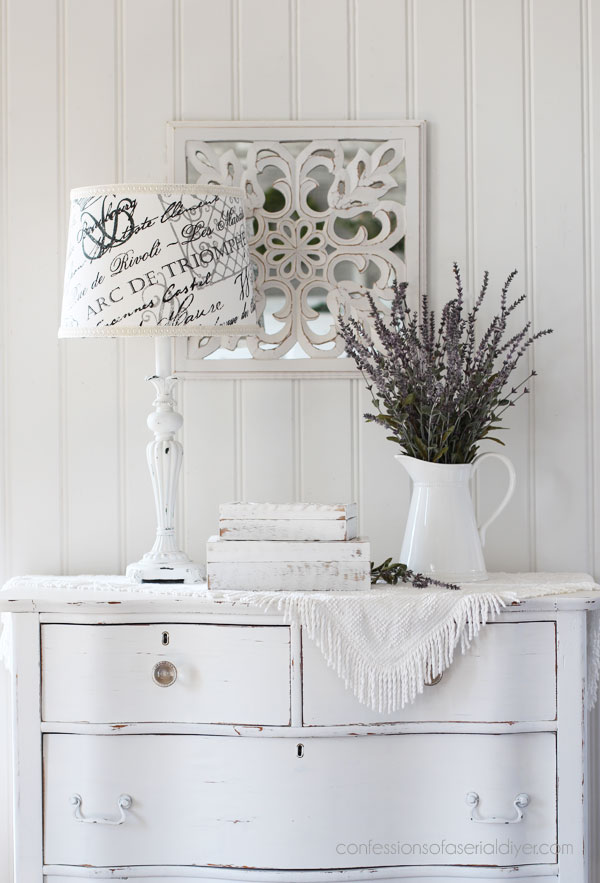
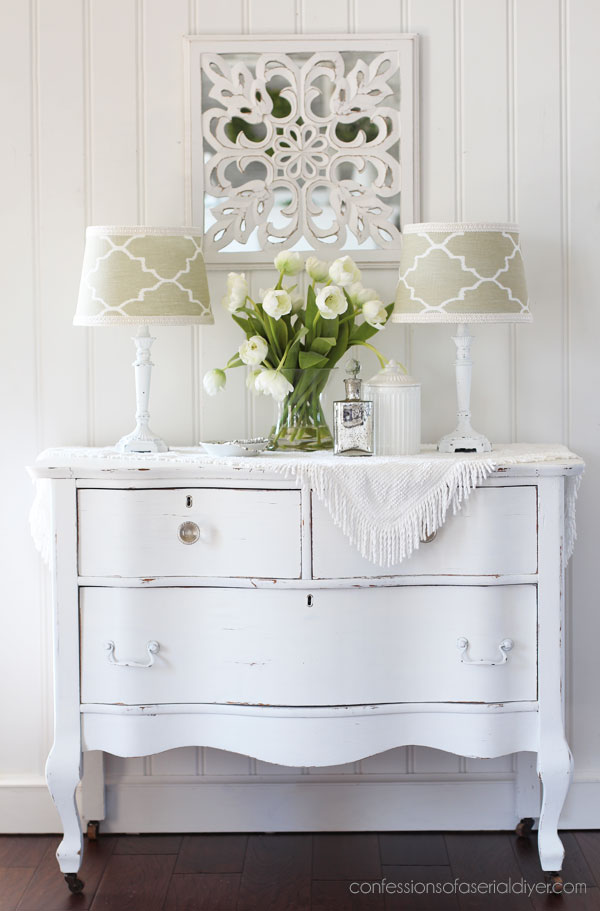
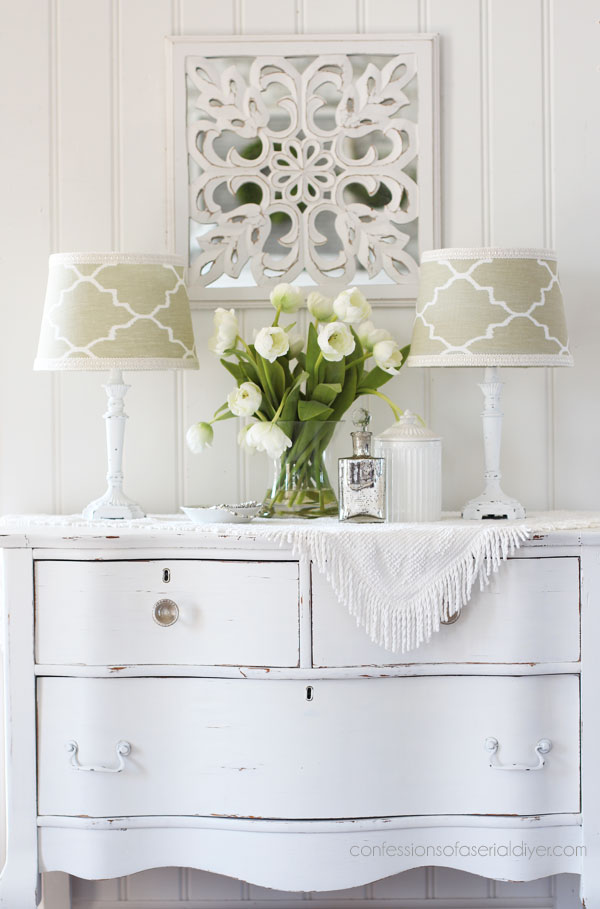
I have a few lamps in my booth already, so I know the chances of selling these quickly is greater if I stick to a simple white shabby look.
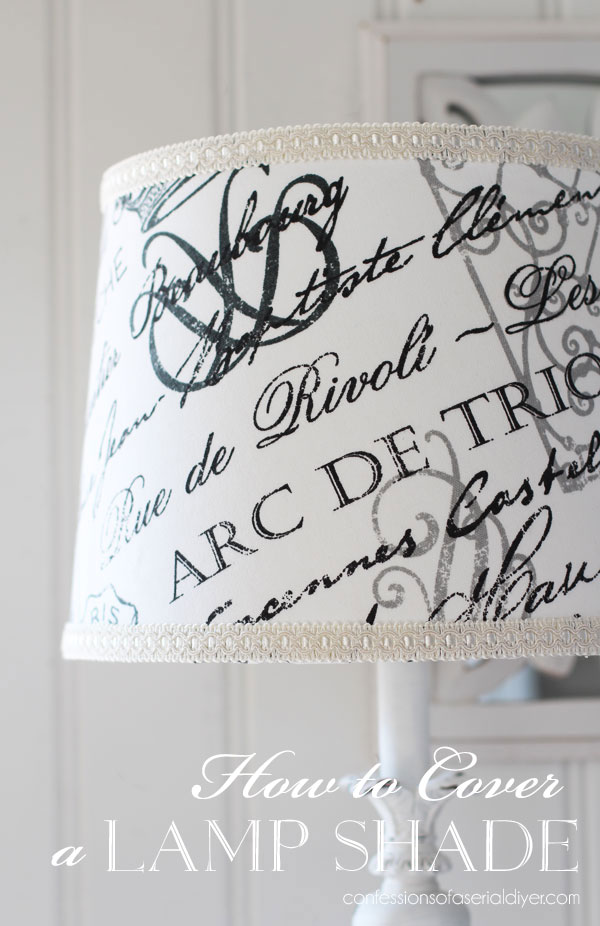
How to Cover a lamp shade
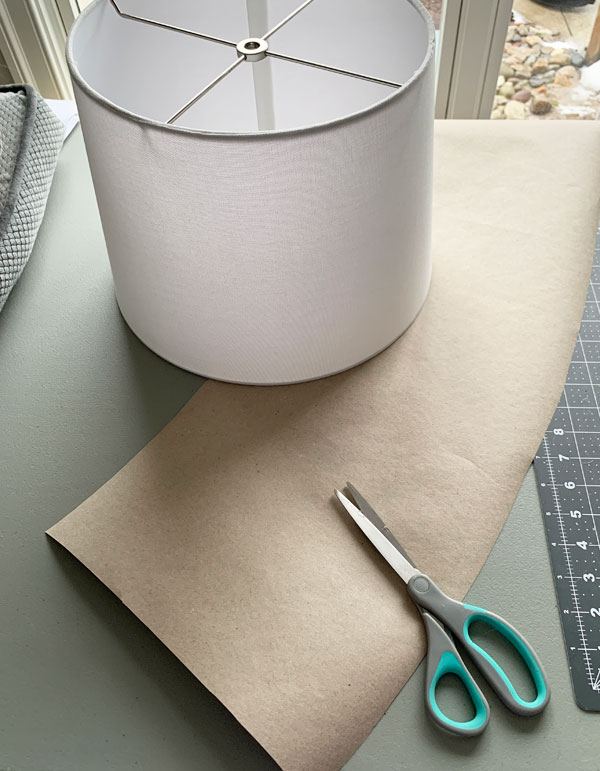
This lamp did not have a shade with it, as is often the case with thrift store lamps, so I always keep my eyes out for inexpensive shades.
I found this plain white one at HomeGoods for $9.99 a while back, and it was the perfect size for this lamp:
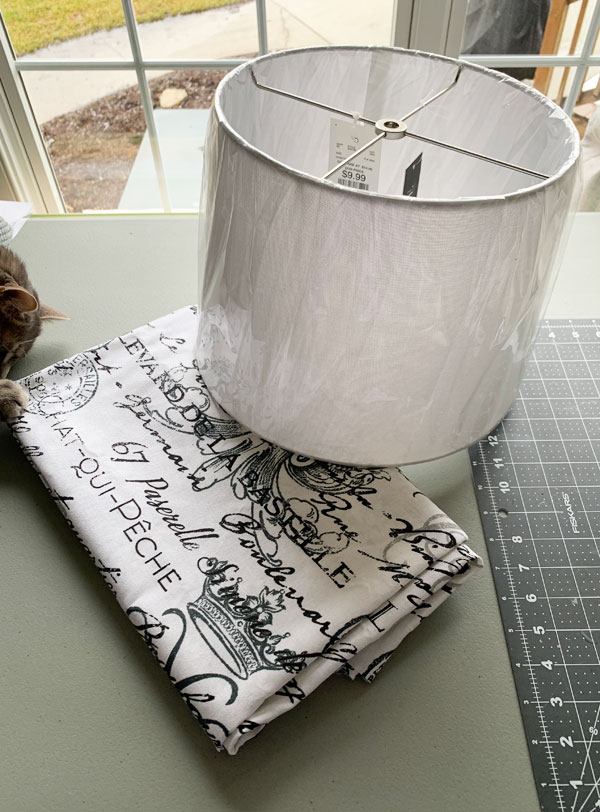
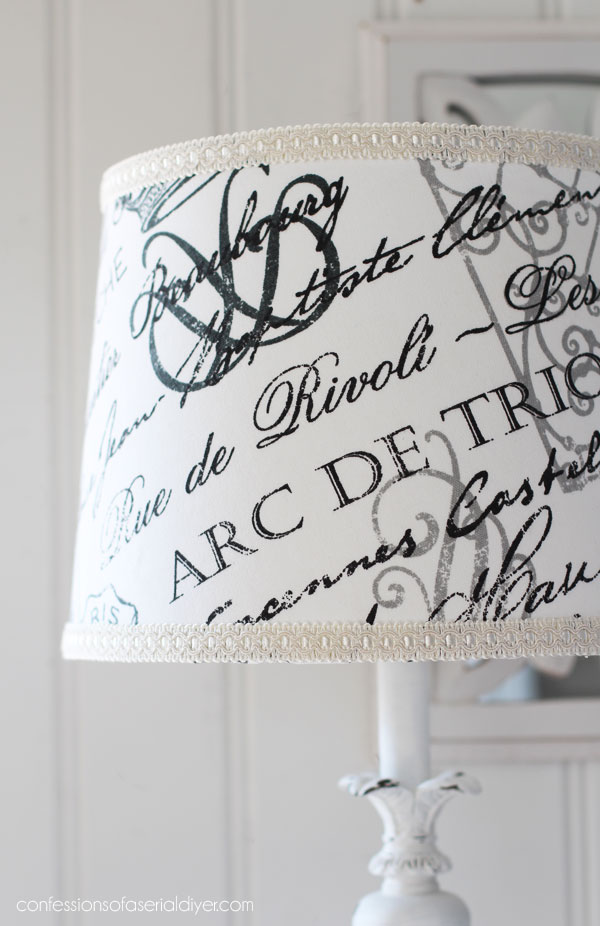
However, I didn’t want just a plain shade for this lamp and found this fabric in my stash that I knew would dress it right up!
Lyla thought I brought it out for her enjoyment only…
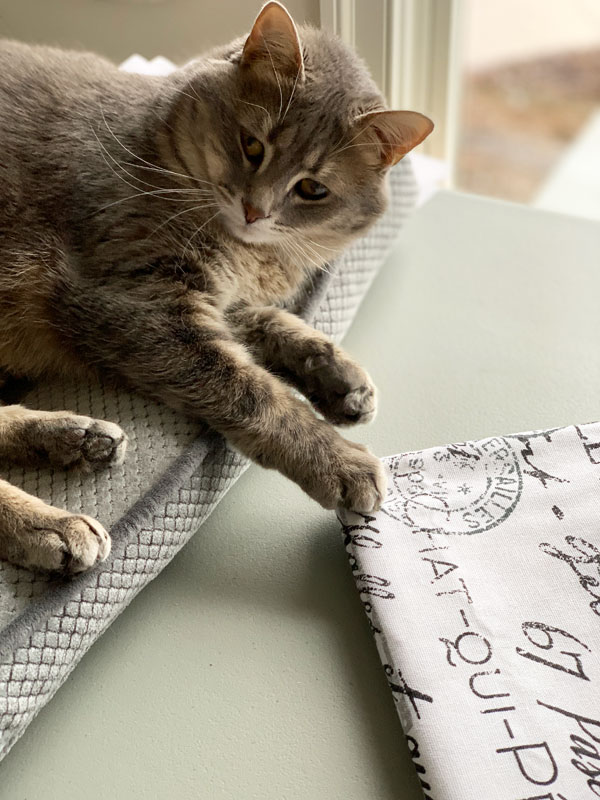
No, ma’am…get your paws off my fabric! (It’s hard to say no to that face.)
- The first step in covering a lamp shade is making a pattern. I used brown craft paper. I then rolled the lampshade on its side (starting at the seam in the shade) and traced along the edge with a pencil as I went:
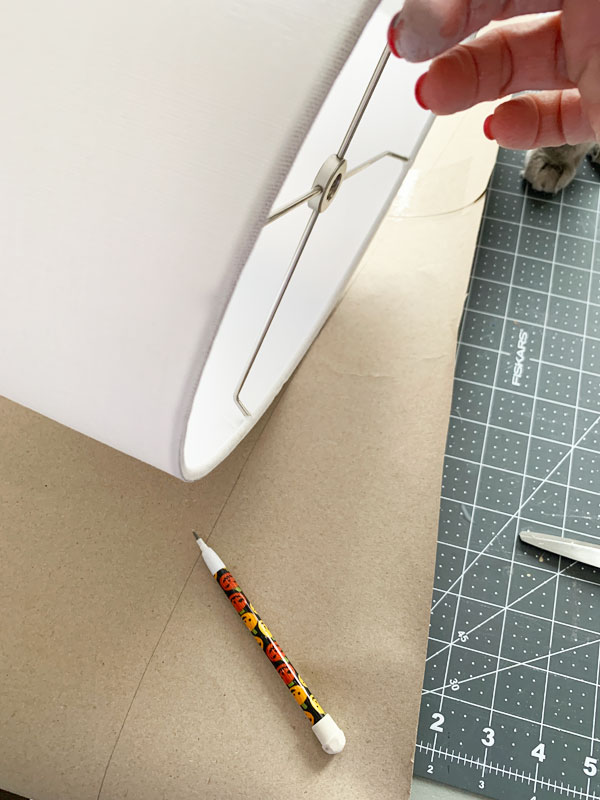
(5th grader’s pumpkin pencil optional)
- Next I cut my pattern about a 1/2″ wider than the shade on both the top and the bottom edges:
- Then I pinned it to my fabric and cut:
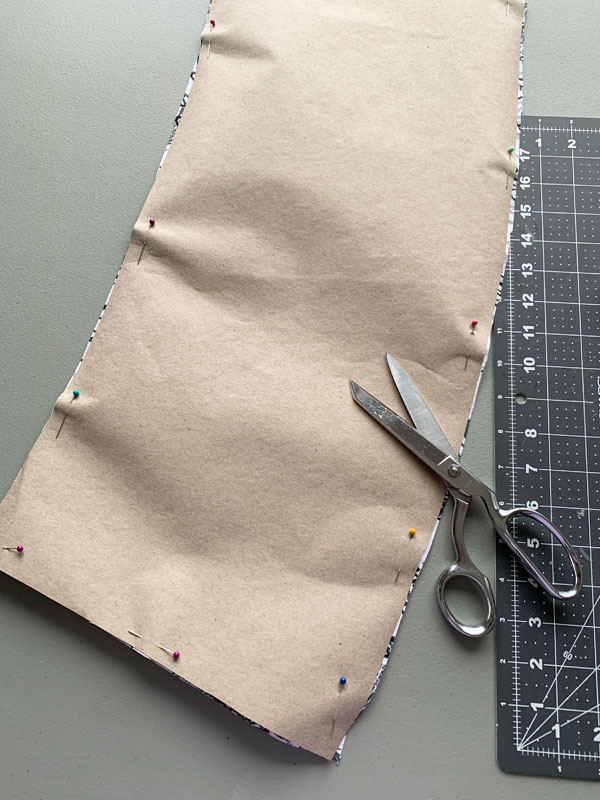
I cut the fabric on the diagonal. Since my shade is smaller at the top than the bottom, the wording would not have been straight all the way around, so I chose this way instead.
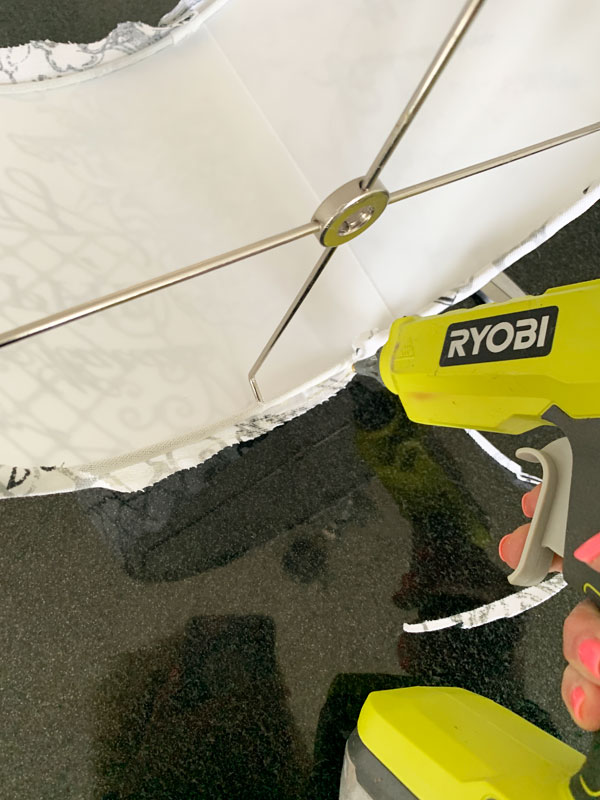
- I used my hot glue gun to attach the fabric to the shade:
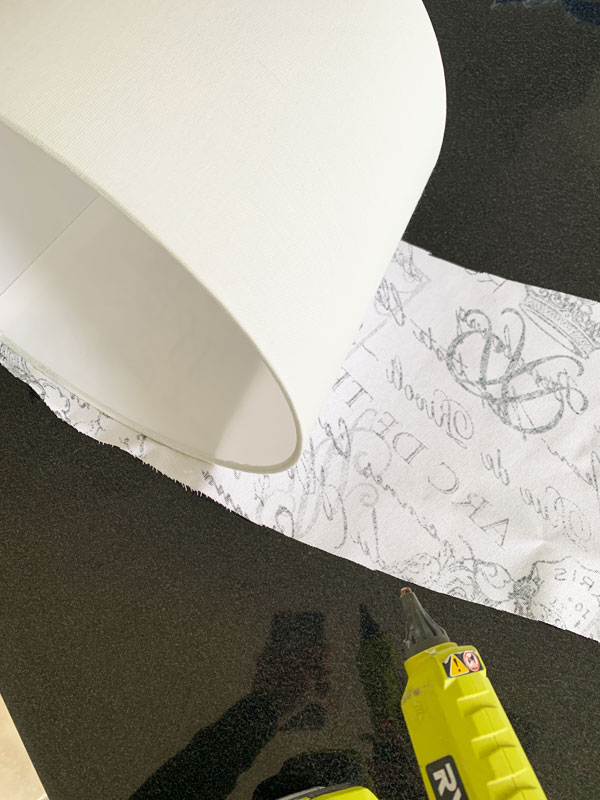
Then I applied the glue to the top and bottom edges.
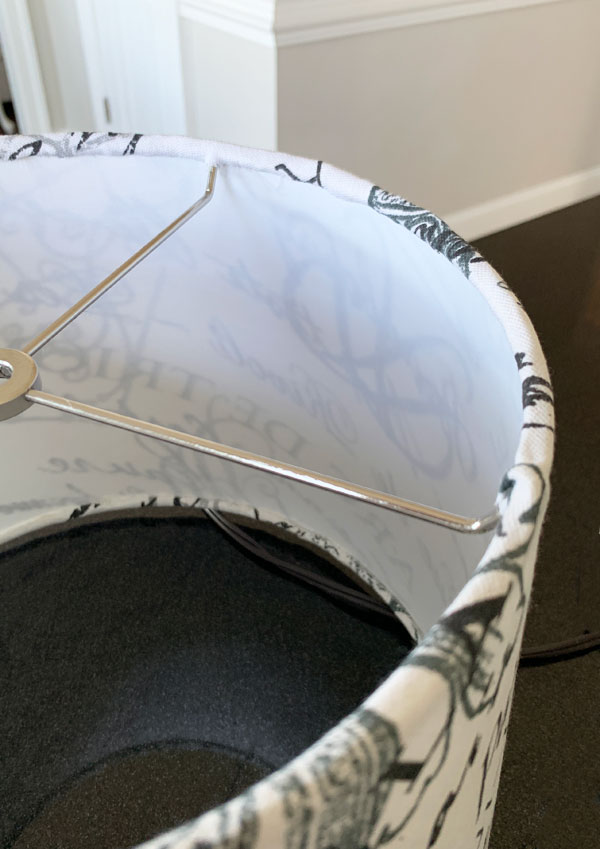
- I then glued the top and bottom edges down and tucked them as best I could into the ring that supports the frame of the lamp shade:
- And this is what that looks like when finished…
I could have called it done at this point, but it seemed like it needed a little something more, so I dug through my stash and pulled out this cording that I scored big time on at a yard sale a few years back:
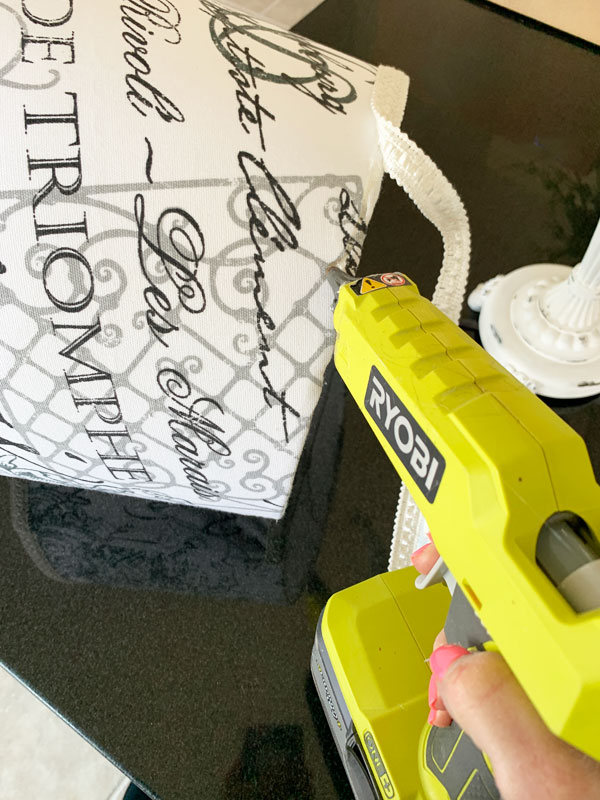
I got a whole roll of this beautiful gimp trim for only $2!
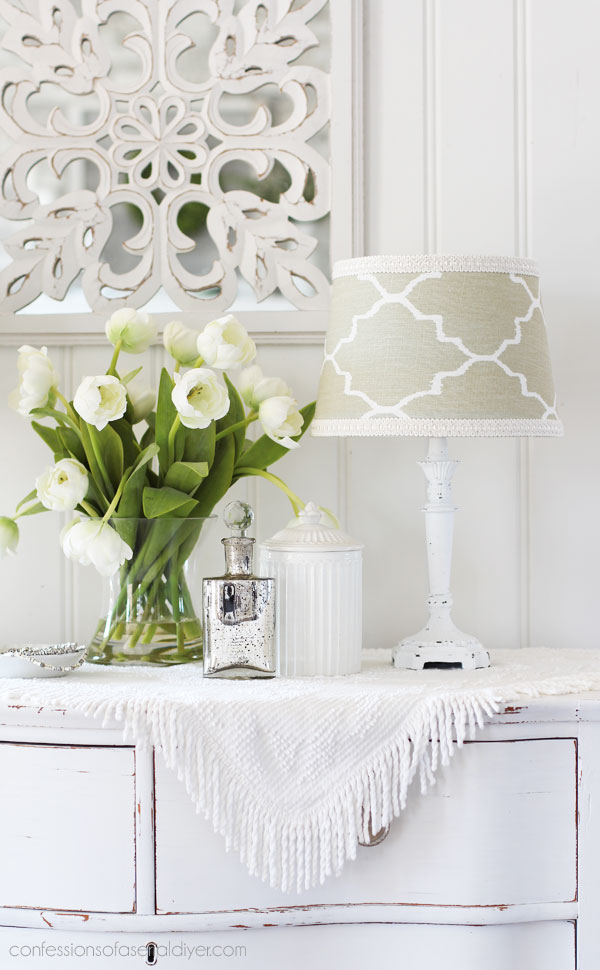
The finished result
That trim was just what this pretty shade needed to finish it off!
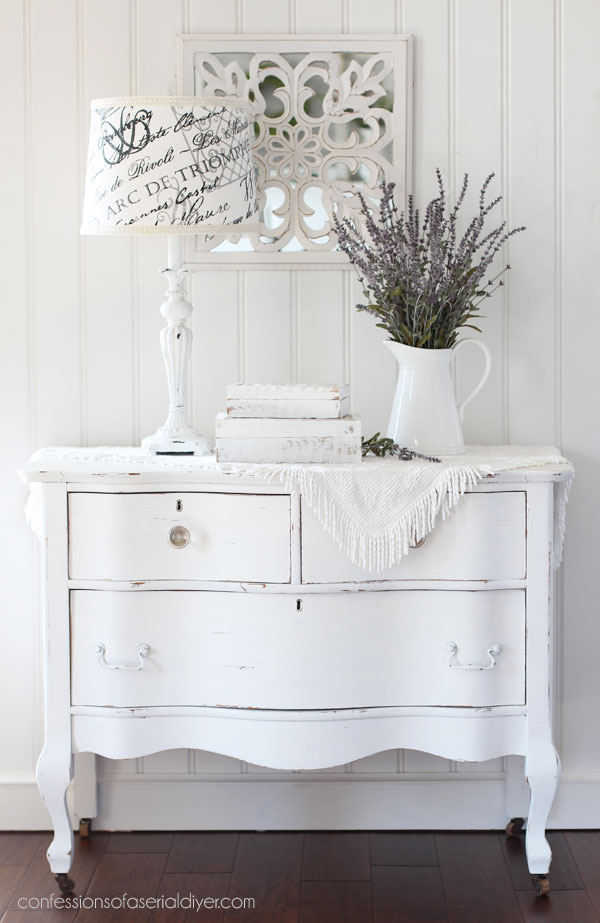
And I love how the pattern looks on the diagonal:
I found this fabric at JoAnn Fabrics last Summer. I purchased it for another project, but ended up not using it.
I didn’t seal the Cotton at all…just left it as is.
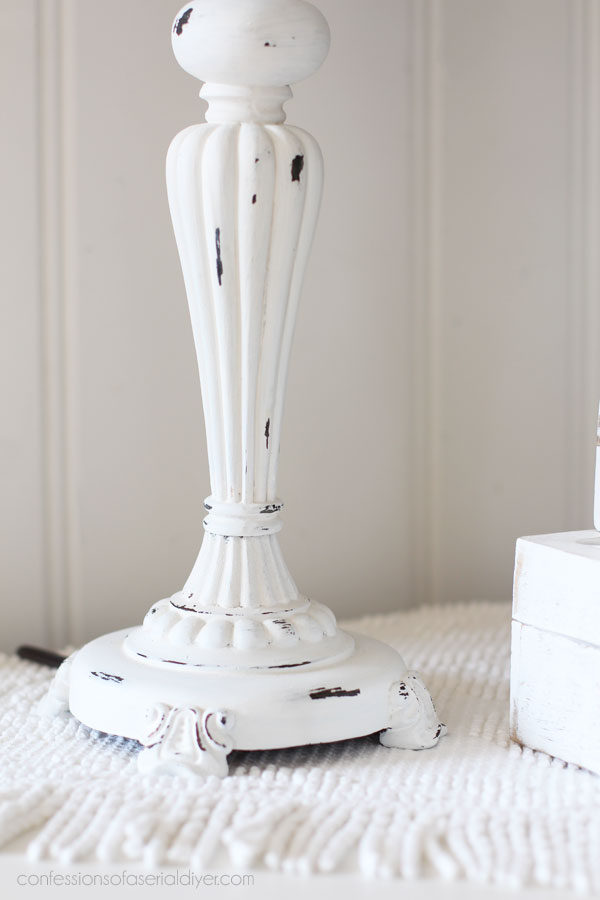
And I didn’t realize that I didn’t get a shot of the finial I used until I was editing the photos, but I bought a four-pack of these small finials on Amazon that I painted to match.
Lamp #2
I have a pretty large lamp hoard and noticed that the smaller lamp looked familiar. Sure enough, I discovered that I already had one like it!
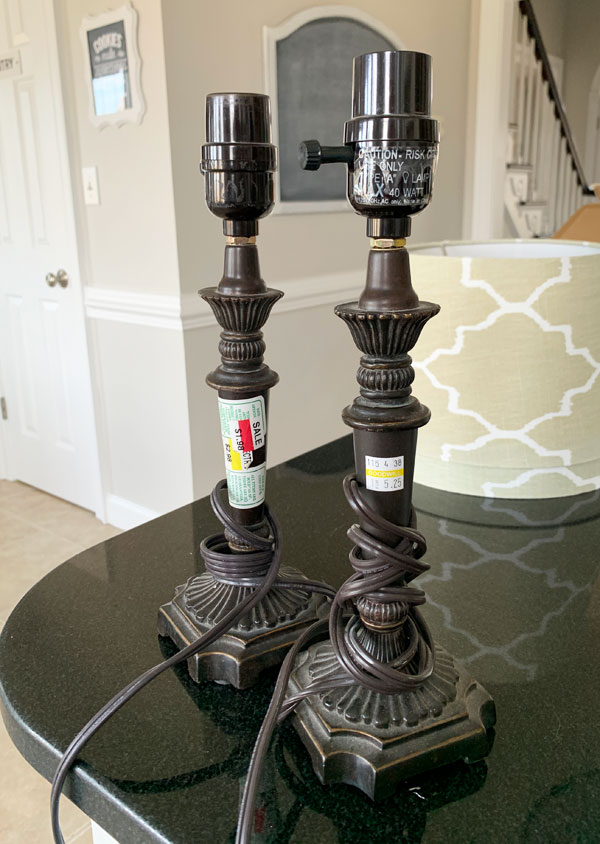
I got a way better deal on that one! This one was $5.25, and the other was on clearance for $1.98, but not too bad at all for $7 for a set of lamps, right?
The only problem was, these were missing shades also and that always adds to the bottom line.
Enter these two cuties:

I had one on a lamp in my booth for forever and it just wasn’t selling, so I switched it out. Then, I found a second shade just like it at the thrift store for $3. I’ve been hanging onto the pair for a while now and luckily, they were the perfect size for these lamps!
And as you can see, I added some trim detail to dress these up also.
I started this set of lamps by taping off the parts I didn’t want to get paint on and then gave them each a quick coat of spray primer:
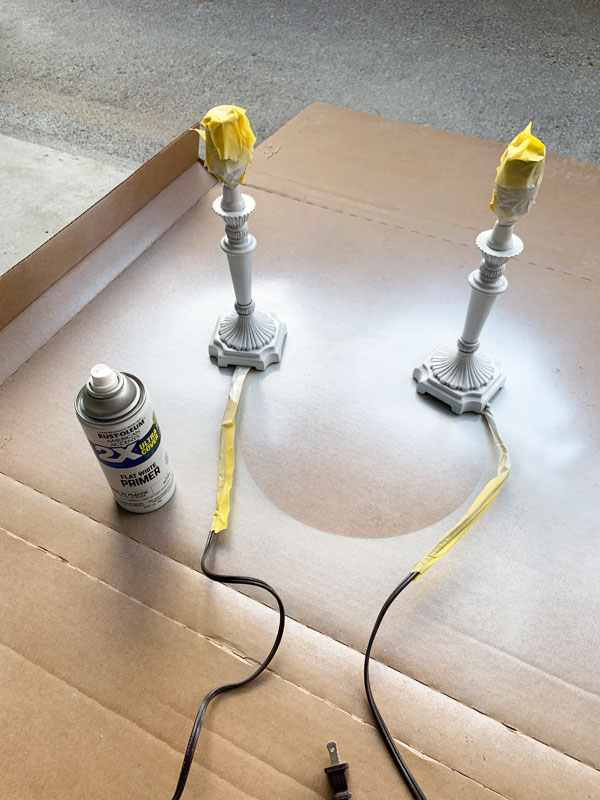
There is no need to prime under chalk paint. This was just a way to get a first coat on there quickly. I followed up with two coats of Cotton, and then gave them a quick sanding with 220 grit sandpaper:
The result
I just love how this sweet set turned out!
I hope you enjoyed seeing these lamps come back to life! I was excited that not only was I able to move three lamps from my stash, but also two shades!
Visit any of these makeovers at the links below:
Cabinet Door Repurposed
$3 Trinket Box Makeover
Piano Bemch Makeover
$20 Thrift Store Desk Makeover
$5 Thrift Store Chair Makeover & How to Use Silk All-in-One Mineral Paint
Unfinished Wood Cabinet Makeover
Cabinet Door turned Shelf
Painting the Smalls, Holiday Edition (Five of these pieces are in this post!)
Kudzu Painted Side Table
REPURPOSED HEADBOARD AND FOOTBOARD
VINTAGE SECRETARY DESK MAKEOVER
$3 THRIFT STORE HEADBOARD REPURPOSED
WALL CABINET REPURPOSED
WINDSOR ROCKER MAKEOVER
DROPLEAF TABLE AND CHAIRS MAKEOVER
I hope you’ll join me on Tuesday to see what I did with this mirror:
UPDATE: I think you’ll be very pleasantly surprised with this one! See how it turned out now HERE!
XOXO,
![]()
Don’t Miss a Thing!
If you like what you see, there are several ways to follow along!
EMAIL * INSTAGRAM * FACEBOOK * PINTEREST * TWITTER


Petra says
I always love seeing your lamps, and Lyla is just too cute!! I’m going to try wet-distressing on my next project! Hope they sell super fast! Have a great weekend! xo
Christy says
Thank you, Petra! Wet distressing is fantastic on things like lamps and frames that might be a whitish color underneath the darker topcoat. That way, you don’t sand down to the white. Enjoy your weekend too!! XOXO
Maryellen Webber says
I love the fabric in the lamp shade! Both of them look fantastic with their fresh new look! Have a great day Christy!
Christy says
Thank you, Maryellen! I’m glad I found a project to use that pretty fabric on! Enjoy your day too! XOXO
Sharry says
I find myself disappointed that you didn’t describe how you dealt with the dreams of the fabric and trim. That’s a detail that can make our break an otherwise simple project.
Sharry says
Dealt with the SEAMS…
Christy says
Hi Sharry! I just folded the fabric at the seams over and ironed it crisp, then glued it in place. I butted the ends of the trim right against one another. I didn’t even think to take a photo. Sorry about that! XOXO
Christiane Lavoie says
I love how it Turner out and they look great on the dresser. Is it th same process with à rectangular lampshade. Thanks for sharing.
Christy says
Thank you, Christiane! I would probably use the same process on a rectangular shade. XOXO
Meg Habasevich says
These lamps are precious and look like very high end lamps. The Joann’s fabric is perfect and all the little details make for a very impressive result. I have to have that fabric. Thank you AGAIN for sharing your creativity and a shot of inspiration on one of our coldest days here in Texas!
Christy says
Thank you, Meg! Isn’t that fabric so pretty?? I’m glad I was finally able to use it on something! Stay warm!! XOXO
Deanna Casto says
What a happy surprise, to wake up to your lamp redos! I’m actually attacking my lamp hoard today and this is much needed inspiration. Thank you again!
Christy says
Aww yay!! We were on the same page today lol! Have fun with yours! XOXO
Christina says
Beautiful and so glad Lyla was helping. She’s grown into such a gorgeous girl. (By the way real tulips are VERY toxic to cats)
Love these lamps and how you gave them new life. Your recovered shade is fantastic, I love the angle of the fabric!
Be well and create on!!
Christy says
Thank you, Christina! She is such a sweet girl! And luckily for Lyla, I am too cheap to buy real flowers ha ha! Have a great day! XOXO
Cheryl r Atkinson says
Hi Christy! What are the odds of finding the same lamp at a different time? You can’t go wrong with white. I love how you wrapped the lamp shade. I pinned for later. I have to try that. Thank you!!
Christy says
I know, right? Although, my hoard is pretty big lol. I should have taken a picture! Have a great day! XOXO
Cecilia says
Ooo, those look great. Really like the shade on the first one…putting the fabric on the diagonal was brilliant! These lamps have new life now!
Got to love bargains like you found on the trim. That was a great find!
🙂 Cecilia
Christy says
Thank you, Cecilia! I was so excited to find that trim…she also had a very vintage tufted sofa that she had out for sale that was a hot mess. She had purchased the trim for when she upholstered the sofa, but decided to ditch the project altogether. That was lucky for me! XOXO
Toby Peplow says
Great projects Christie! I have a shade I have been wanting to do also, now I know how! Have a great weekend!!
Christy says
Thank you, Toby! Glad I could help! Enjoy your weekend too! XOXO
Janina says
The lamp fabric on the diagonal is perfect and so much more interesting than it would have been on the straight . I have two lamp shades that are pretty beat up and l never thought about recovering them.Thanks foe the great DIY.
Christy says
Thank you, Janina! I’m glad shifting the fabric to the diagonal worked out as well as it did! Good luck with yours! XOXO
Mary Kaiser says
They are BEAUTIFUL now! What a great transformation! I love the lamp bases very much, but the fabric and the trim you used are stealing the show! I am always amazed at your talent, and once again you have created beauty where there wasn’t any! So inspirational, I am going thru my house to check if I have lamps to redo to make beautiful like yours!
Christy says
Thank you so much, Mary! I’m so glad I found that beautiful trim in my stash…I had forgotten all about it! Have a fantastic weekend! XOXO
Geri Ann says
Gorgeous!!!
Christy says
Thank you, Geri Ann! XOXO
Sharon says
Hi Christy. I hope you don’t mind me asking…what will you charge for these great lamps? I also have a booth and am always unsure of what is too much or not enough. Thanks.
Christy says
Hi Sharon! I usually price my smaller lamps in the $30s. Lamps are pricey when you add the shades, finials, etc, and I love the extra lighting in my booth so I don’t mind if they sit awhile. Pairs usually sell quickly though. The larger will be priced in the $40s. Hope this helps! XOXO
Teresa says
Love the updated lamps. It’s like you breathed new air into them! Pretty and looks easy to do. Thanks for the ideas
Christy says
Thank you, Teresa! They were pretty quick redos! XOXO
Sharon Austin says
Very nice!! You always seem to get so lucky with your “finds” at the thrift store. And Joann’s. I rarely ever get that lucky; maybe I just need to shop more often! LOL
Christy says
Thank you, Sharon! You do have to go often for sure! XOXO
Janice Holt says
Love all three lamps. You do such a good job using the correct size shade. I have a hard time with that. I’m always afraid the size or shape won’t go with the lamp base. Great job again as always.
Christy says
Thank you, Janice! I wish there was a secret formula that I could share when choosing a shade. I do like it to at least come low enough to cover the on/off switch. XOXO
Marcie Lovett says
I think some people look for pairs of lamps and would be thrilled to find these. The solo lamp is beautiful with the new shade, such a good idea to cover it. Last week I got lucky and found a beautiful shade for $3.25. It didn’t work with the lamp I bought it for, but was the perfect size and color for another lamp I had. Gotta love those thrift shop moments! Now you’ve inspired me to cover a different shade that’s boring white. I think I’ll play it safe and stay away from directional prints. I’m not as adventurous as you, Christy!
Christy says
Thank you, Marcie! I dropped these off at my booth yesterday, and the small set sold already! I’m thinking I should have asked more for them now lol. And yes, don’t you just love when something works out just right? Have a great weekend! XOXO
Sandi Allen says
Those lamps turned out Beautiful ! What a great transformation! This would be a great idea to transform one of my lamps that I dislike, instead of buying a new one!
Christy says
Thank you, Sandi! Oh yes, absolutely! New lamps are so pricey! XOXO
Lori says
Love these lamps. I have one almost like your big one and I’m going to do it this weekend. Love your posts. You are an inspiration. Thanks.
Christy says
Thanks so much, Lori! I love that you are feeling inspired, my friend! XOXO
Susan Cox says
I never seem to know what size lampshade to buy–I buy shades that are too big or too small! Without lugging the lamp to the store with you, do you have a formula you use to help you you find the right size shade for an orphan lamp?
Christy says
Hi Susan! I don’t have a secret formula, unfortunately. I do like to be sure that it at least comes low enough to cover up the on-off switch. XOXO
Becky says
Very pretty! I wish I could recover a lampshade as smoothly as you do. I think I lack patience. 😉
Christy says
Thank you, Becky! You could totally do it lol! XOXO
Sue Mellette says
WOW! I love the two lamp makeovers! I really like the cotton distressed whether it is a wet distress or a sanding one. The effects bring out the curves and lines of the lamps. The lamp shades are a perfect touch to the lamps! Your finishing touches on the lamp shades really make each one pop. This makeover and others you have finished in the past, especially, white finishes, make me want to paint all wood furniture white and distress each one! LOL. I do plan to try the cotton on several of my mom’s lamps that are way out of date! Thanks again for the inspiration! Have a wonderful and restful weekend.
Christy says
Thanks so much, Sue! I too love a distressed look as it really does enhance all the pretty parts! Have fun with your Mom’s lamps, and enjoy your weekend too! XOXO
Michele M. says
WOW!!!!!! What glorious transformations. And such a wow from so bleh and outdated. Love these lamps! Well done, Christy!
Christy says
Thank you so much, Michele! XOXO
Cecilia from Georgia says
I bet you laughed out loud when you found the mate to the lamp in your treasure trove! Love how the distressed white looks. I have been waiting patiently to see what you do with the little treasure chest at the top of the stash picture! I have one and painted it white but never had a vision as to what to do with it. When I saw yours on your first post of this stash I was delighted! You have such a good vision for transforming T2T!
Christy says
Thank you so much, Cecilia! I was excited to find a matching lamp, and then you know I was super excited when I realized I had that set of matching shades that fit just right! I do have an idea for that little chest…hopefully soon! XOXO
Carolyn Huffman says
NeatO lamp makeovers! Sweet Lyla clearly points to a Paris street name on the fabric. Rue de Chat Qui Pêche (Street of the Cat Who Fishes), located on the Left Bank, is the shortest, narrowest street in Paris. It is possible to touch the buildings on either side of the approximately 40-foot-long street at the same time! Lyla knows. I see it in her eyes!
Christy says
Thank you, Carolyn! Oh wow…she must have known something I didn’t ha ha! XOXO
Rosie says
They turned out lovely, good luck in selling and have a great weekend!
Christy says
Thank you, Rosie! Enjoy your weekend too! XOXO
Rebecca - Knoxville, TN says
Look at all those X’s! I’d like to put an O on the clock and see what you do with it 🙂
Christy says
Yes! Woohoo! I will likely do the clock as part of a smalls post, hopefully soon! XOXO
Mandy B says
I love these! I did the same to an old brassy lamp I bought for $2. I liked the silhouette of it and knew it would look so much better painted. I have several lamp shades that I’m going to try your technique on. Have you tried recovering just the frame? Do I need to buy new vellum first? The old shade was just too dark and it would have shown through a lighter fabric
Christy says
Thanks, Mandy! With lamps being so pricey, it’s nice to be able to paint an older one instead! I have not attempted to recover one from scratch, so I’m no help there. Sorry! XOXO
patty cowan says
OMG ! Just when I think your talents have peaked, you go and do it again!! LOVE your projects!
Christy says
Aww thank you so much, Patty!! XOXO