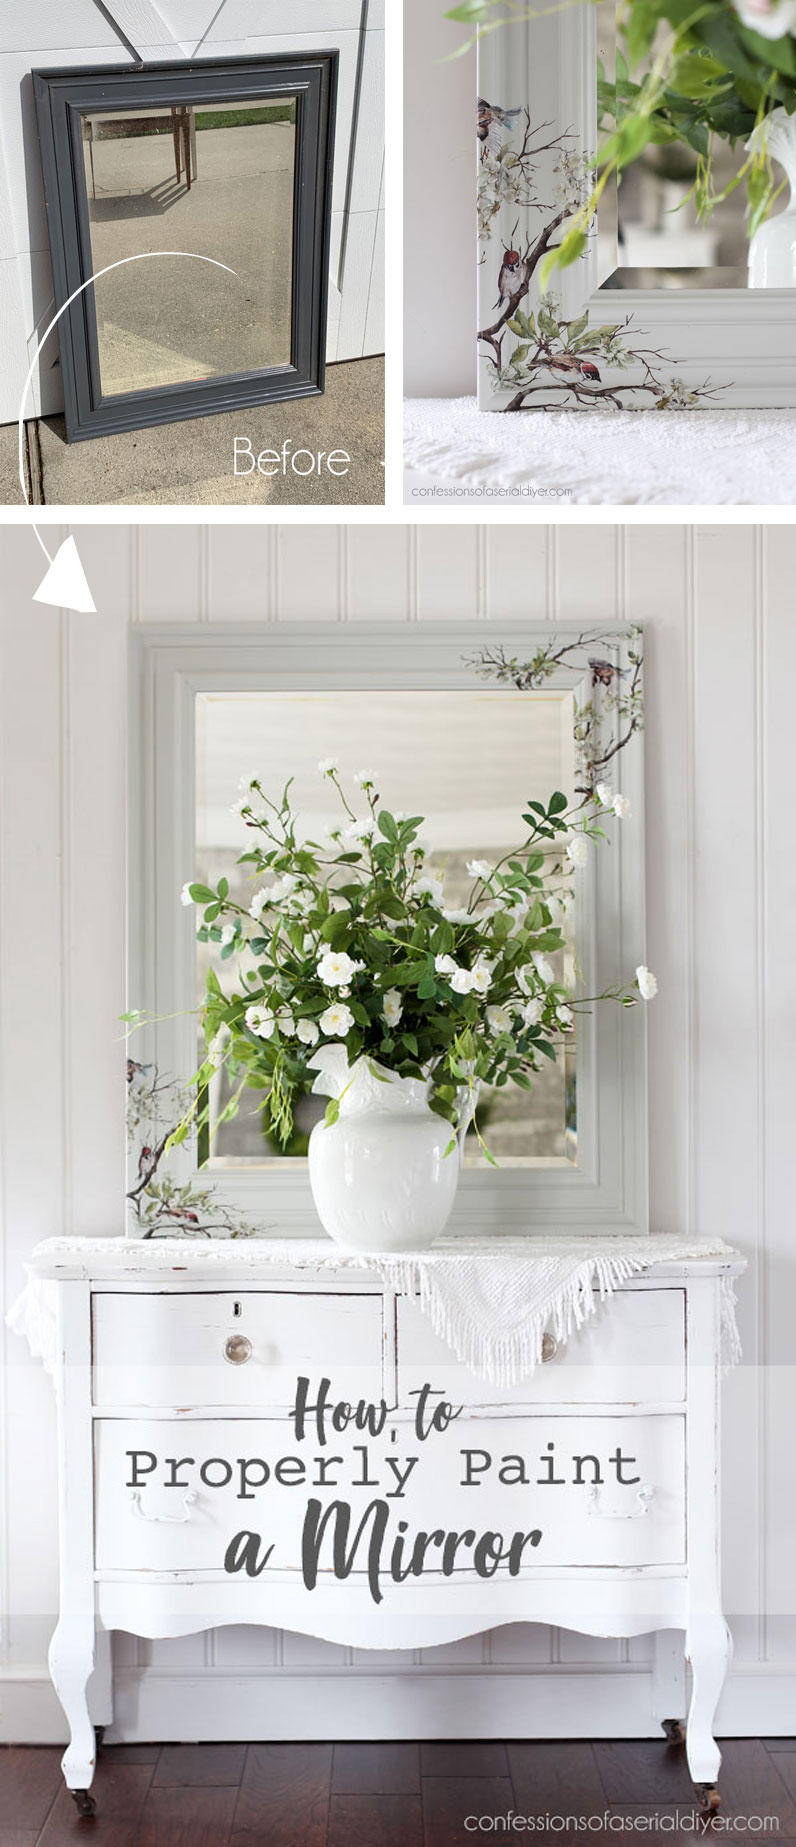
Today, I’m sharing how to properly paint a mirror!
I know many of you can relate to today’s makeover. You hang onto something because you know you can do something with it, but you have absolutely zero desire to actually do so. Am I right?
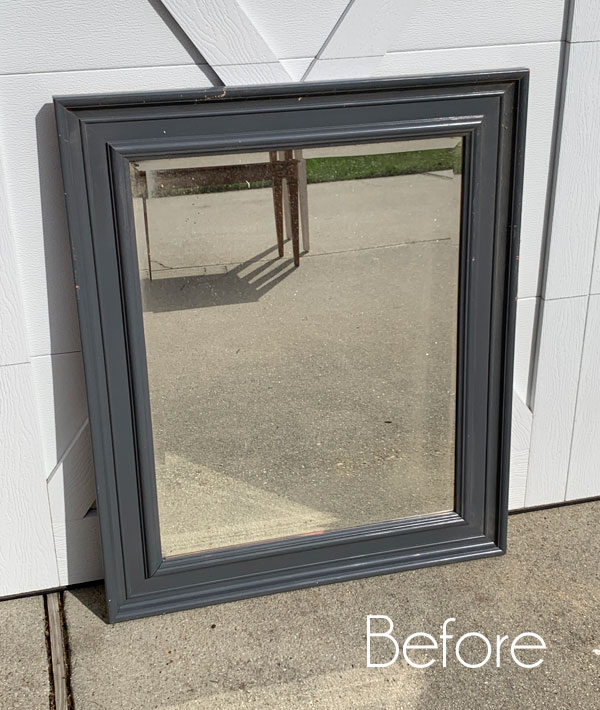
Amazing friends, this mirror is one of those pieces for me:
It came with this dresser that Jack and I teamed up on several years ago:

The dresser was only $30 and the mirror seemed oversized for the dresser, so we left it off. I was tempted to donate it on more than one occasion, but it has a nice beveled edge, so I just couldn’t part with it. But then it sat. And sat.
And yes, looking at that photo above, you can see that this was taken at our old house, so we actually dragged the mirror to our new house back in 2017! (We redid this dresser when Jack was in middle school…he’s in college now!!)
Well, today is the big day!
I’m going to share a pretty mirror makeover AND how to properly paint a mirror!
I’ve included a few affiliate links so you can find the products I love.
Remove the mirror
To start this (and all mirror makeovers), I removed the mirror. I know it seems like too much work sometimes, but to do it right, you know?
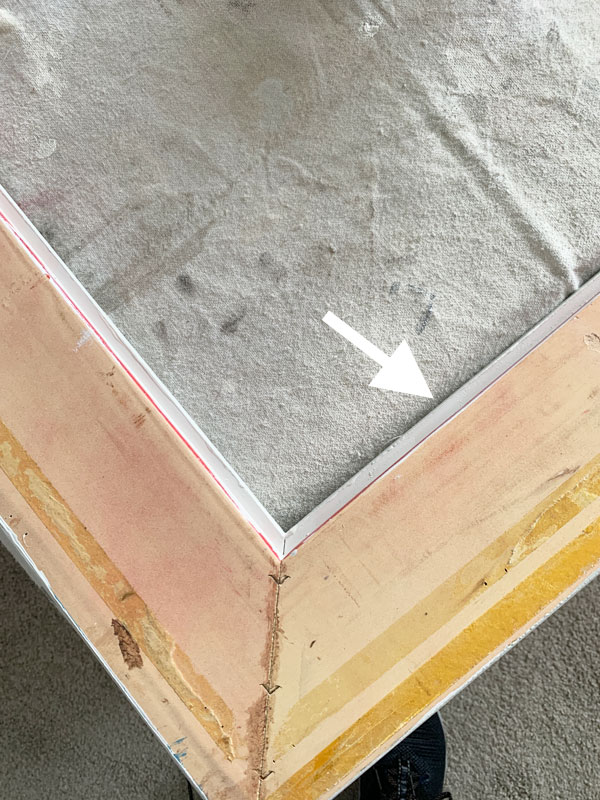
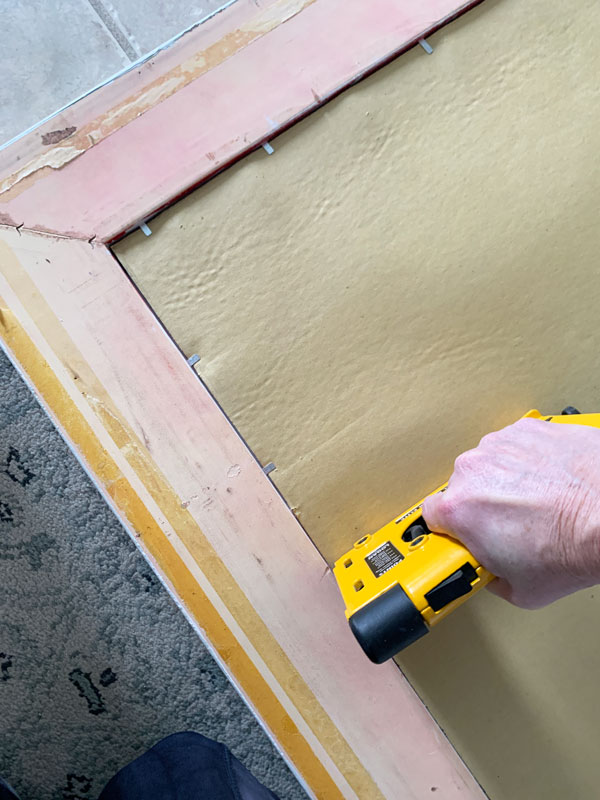
To do that, I removed the paper backing and then pulled the narrow staples that were holding it in place:
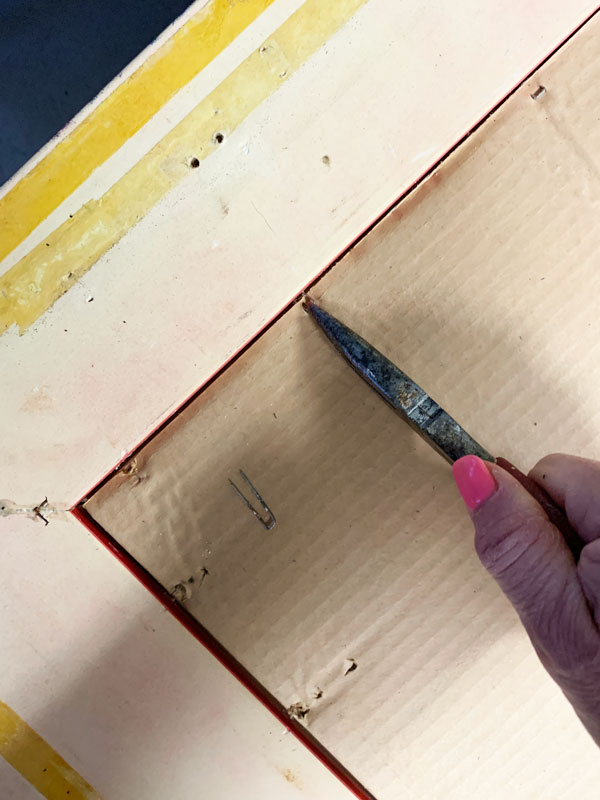
Sometimes there will be nails or metal points instead of staples, and if it is an older mirror, it may be held in place with small pieces of wood that are nailed in place. All can be removed. Once I got these staples removed, I removed the mirror and put it in a safe place.
Proper prep for shiny surfaces
One of the things that was holding me back on this mirror was that it had what looked like a heavily laquered finish on it. I knew I would need to prep it differently.
For a shiny finish like this, I would usually sand it to give the paint something to grip onto. Now chalk paint will adhere to just about any surface, but for laminate, metal, glass, and heavily laquered pieces, a little extra prep doesn’t hurt, and I didn’t want to sand this surface because I didn’t want to disturb the existing paint finish. Besides, I planned to use the new Silk Mineral Paint on this piece.
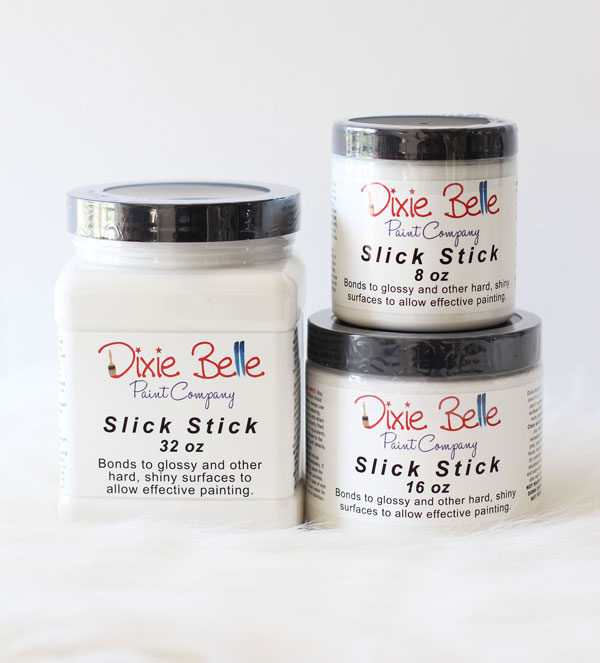
A light sanding is recommended prior to using Silk, however, there is an alternative: Slick Stick:
After giving my frame a good cleaning with White Lightning, I proceeded to give my frame a coat of Slick Stick:
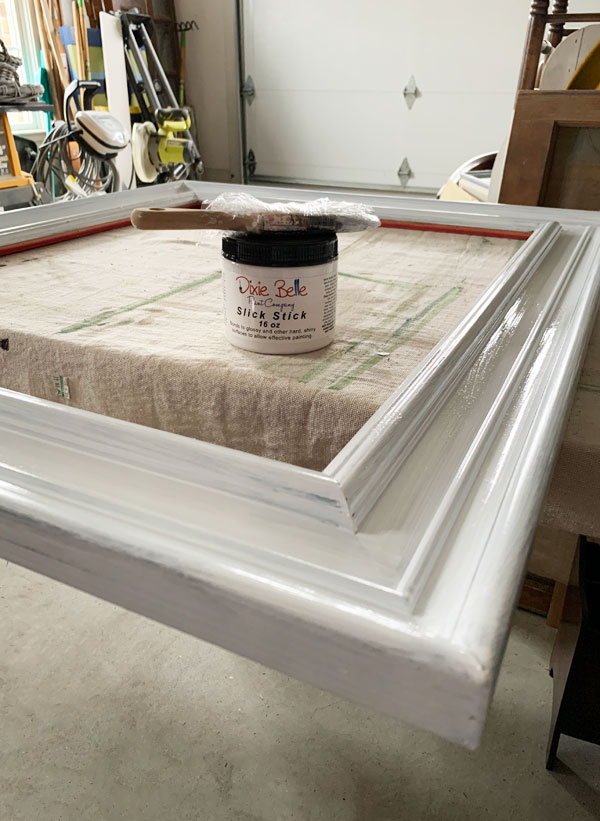
I allowed it to dry for two hours, and then followed up with one more coat. Then, I let it sit overnight.
Painting with Silk Mineral Paint
The next morning, my mirror frame was ready for paint! I chose the Silk color, Oyster for this project:
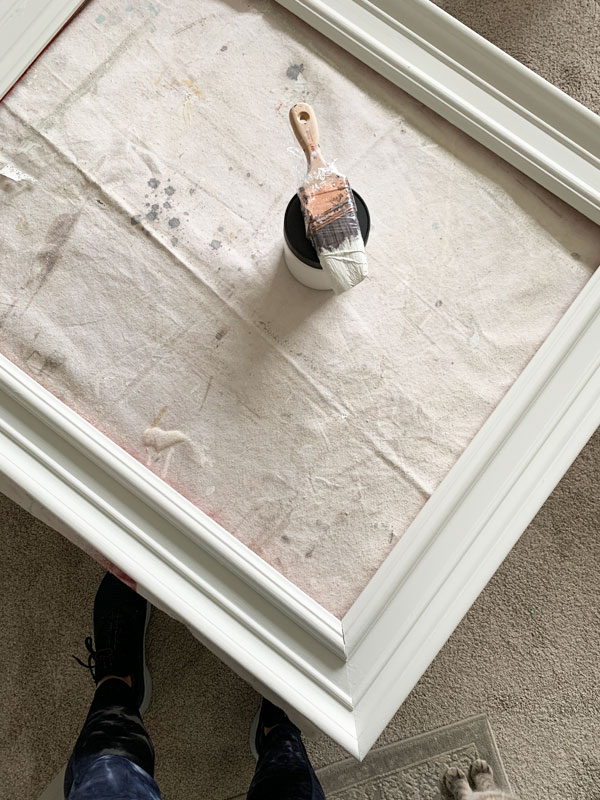
I LOVE this color! It has been a good seller, so I was really excited to try it on something. I know…it is just another neutral, but whites and neutrals are my jam. I just can’t help it! ( Do you spy my boss supervising in that photo? :D)
I waited two hours and then followed up with a second coat.
Read more about Dixie Belle’s new Silk All-in-One Mineral paint as well as the differences between Silk paint and chalk paint HERE!
Be sure to flip your mirror frame over and paint the groove where the mirror will sit, so that you see the same color paint in the reflection:
I could have called it done at this point since the Silk Mineral Paint has a built-in sealer, but I decided to take it a step further.
Adding a transfer
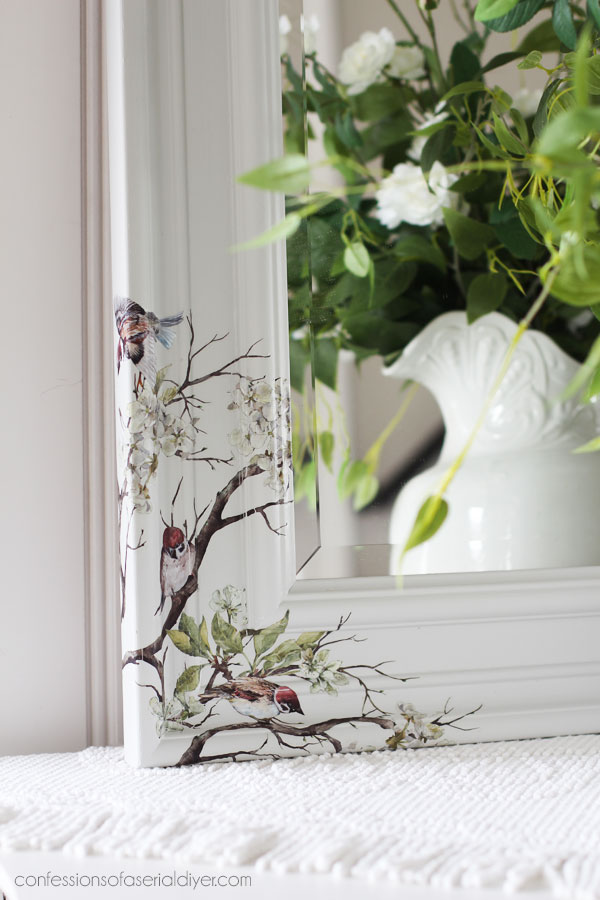
I thought this beautiful Blossom Flight transfer would really dress up this otherwise plain mirror:
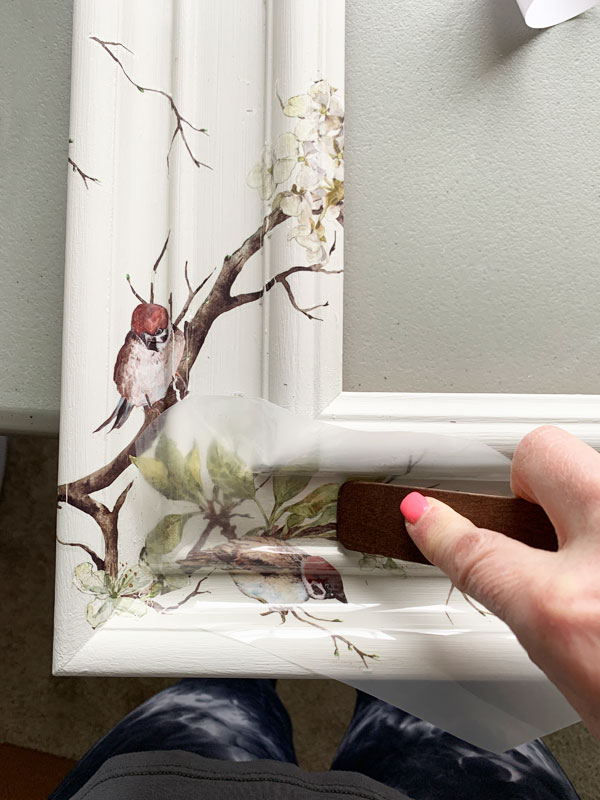
It is a bit of work to apply a transfer over trim work like I have here, but I was able to cut it in a few strategic areas and that helped. Once you cut the transfer apart, you can easily match it up seamlessly with the rest of the pattern.
I continued to add bits and pieces of this transfer until I got a look I liked.
Putting the mirror back together
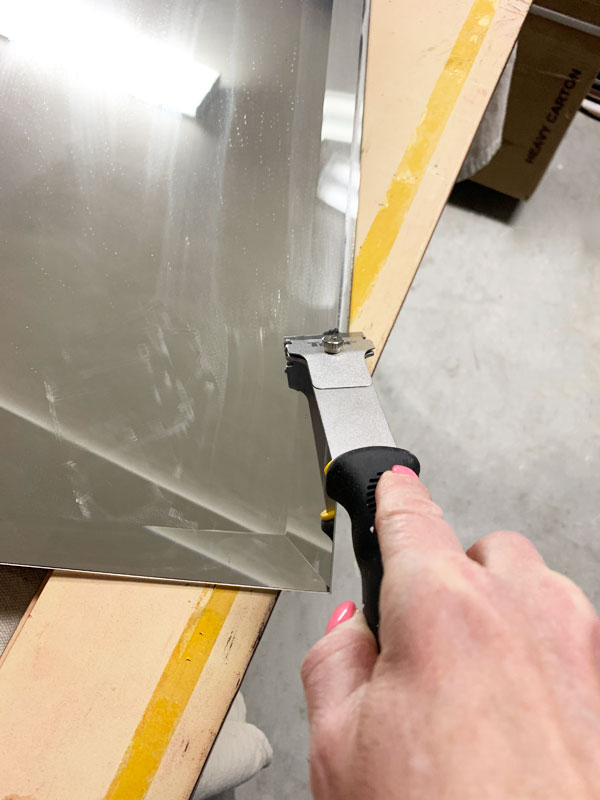
Before I reassembled the mirror, I used a razor blade to scrape away the paint that had gotten on the surface of the mirror from the last person who had painted it:
Then, to reassemble the mirror, I placed the mirror in the frame and added the cardboard that was on the back protecting it previously. I used my Logan Point Driver to secure the mirror back in place:
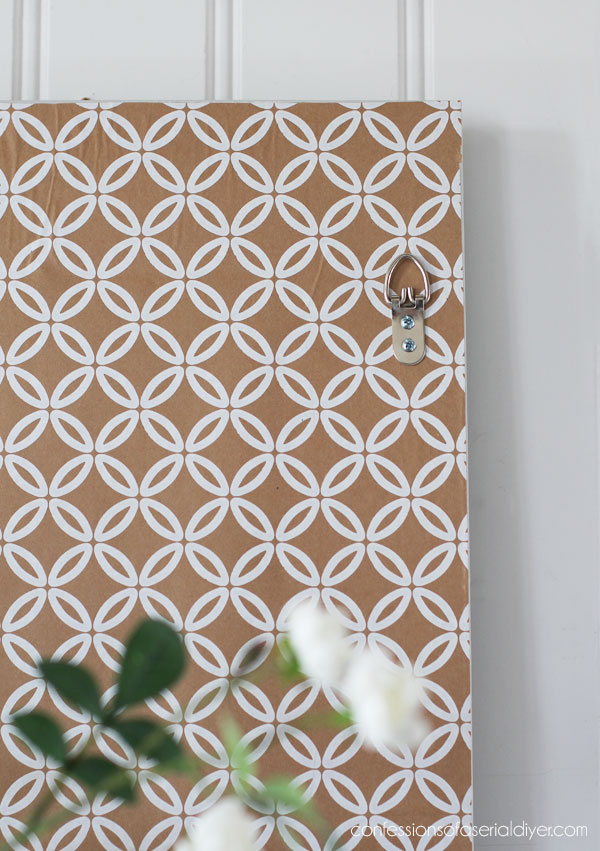
To make the back pretty, I first applied Mod Podge like a glue using a cheap chip brush, to the frame:
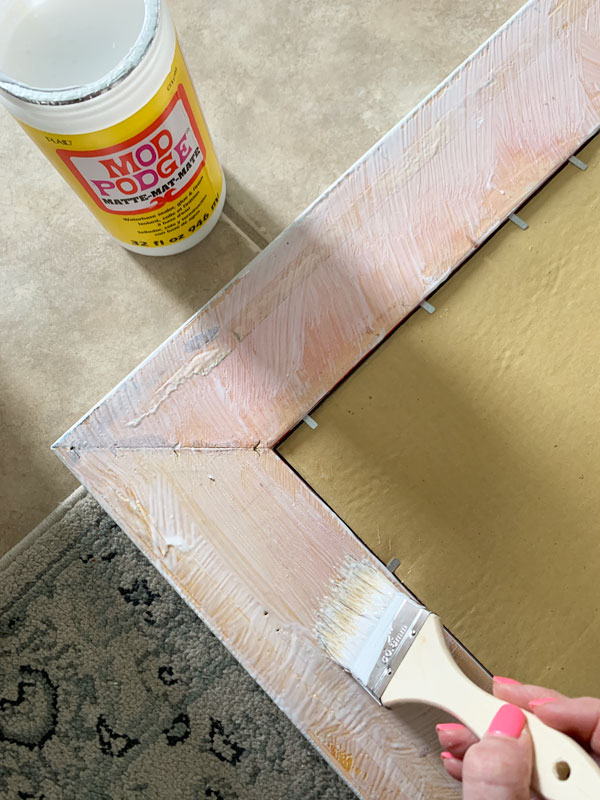
Then I covered the back of the framed mirror with this pretty patterned kraft paper:
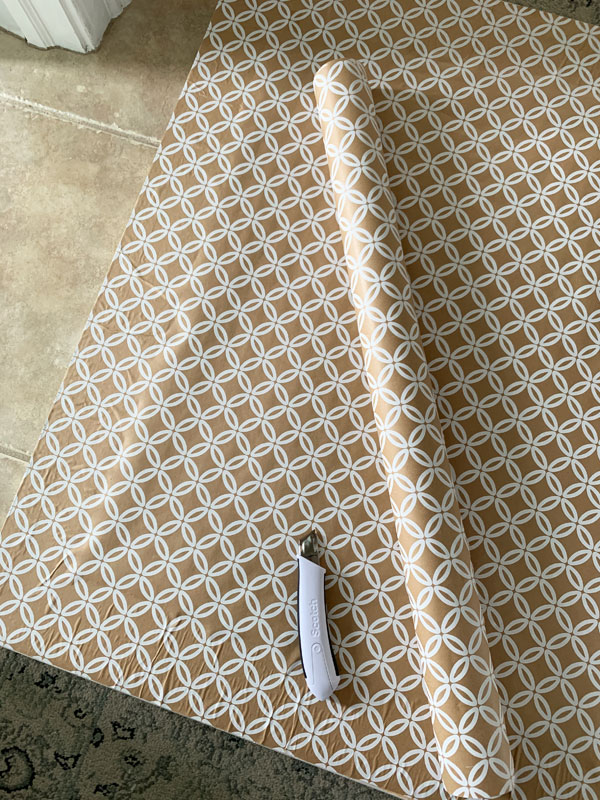
I used a utility knife to cut the excess paper.
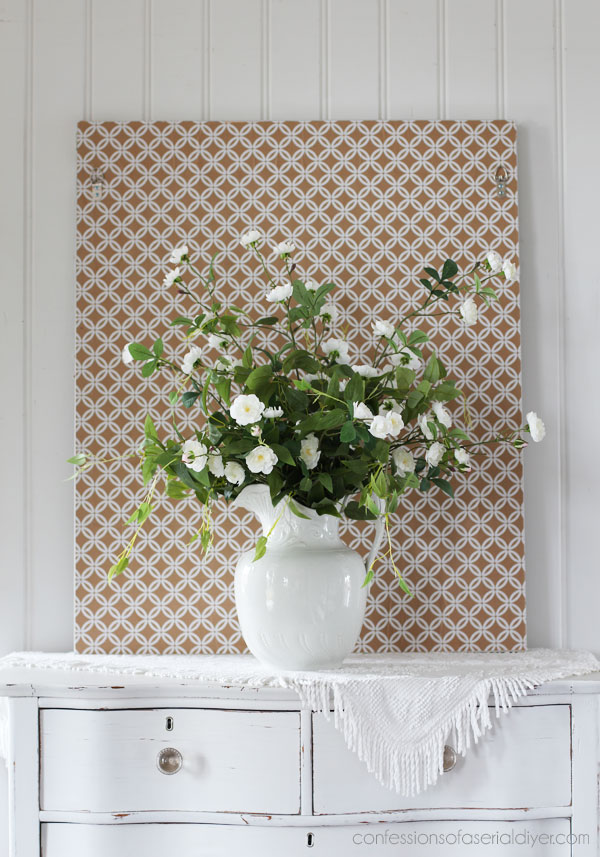
The big reveal
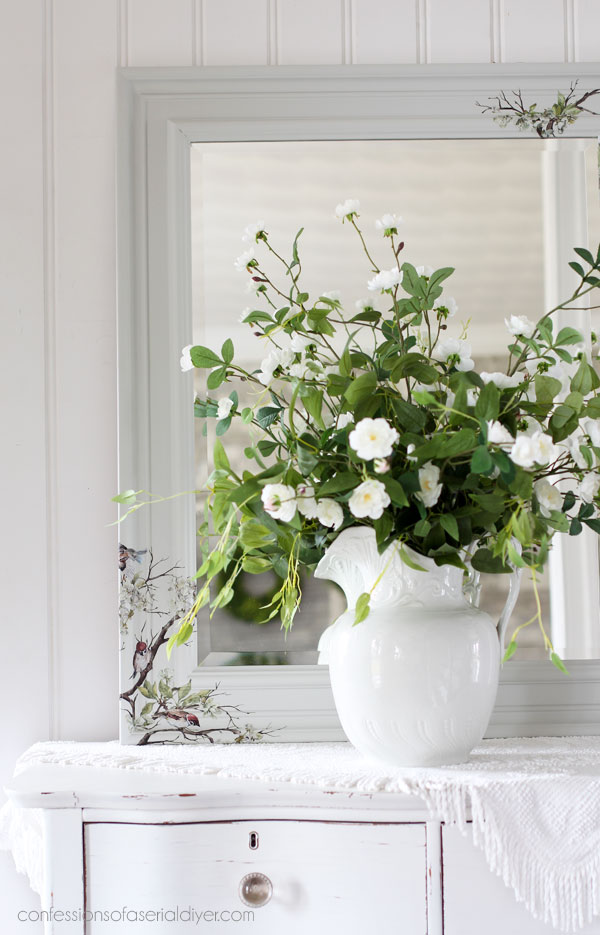
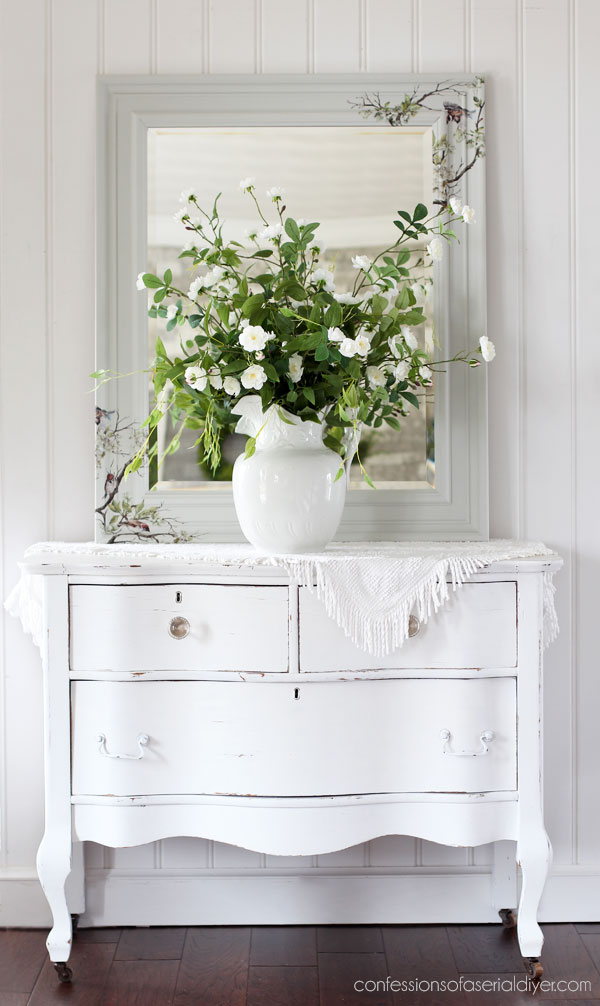
I couldn’t be happier with how this mirror, that I almost gave up on several times, came out:
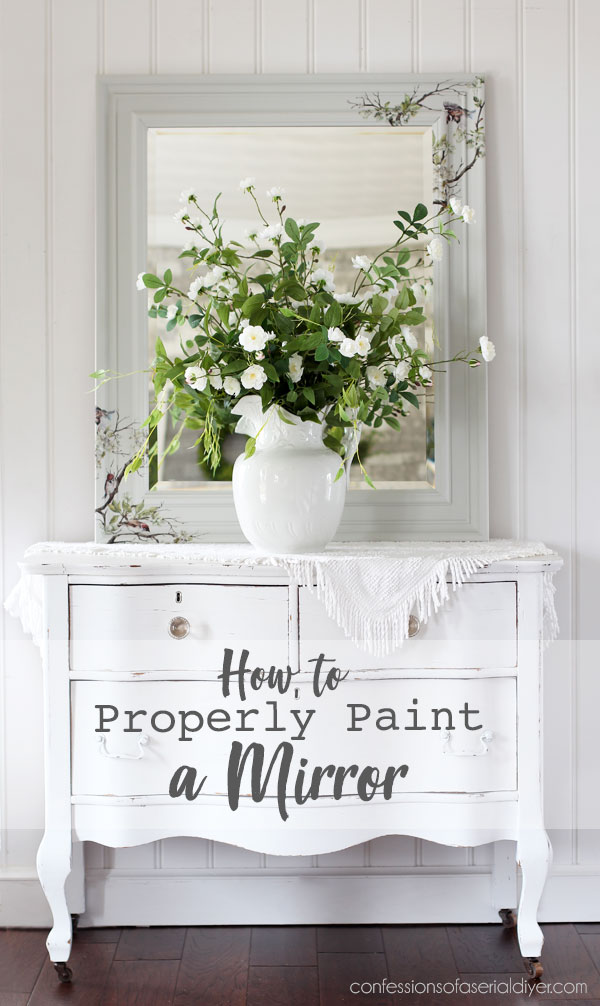
In the in-progress photos, Oyster just looked like another shade of white. Pairing it with this bright white dresser, you can see what a lovely contrast it is to the bright white.
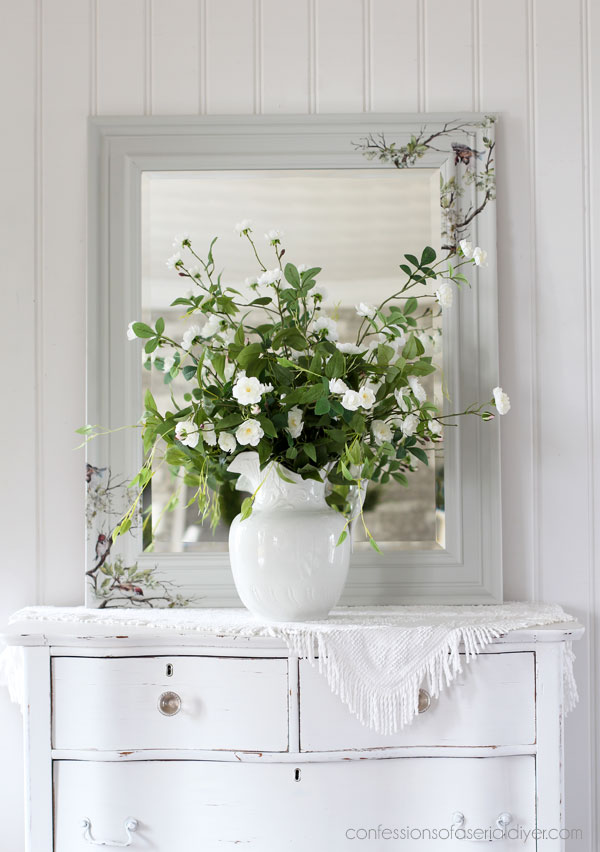
And this delicate Blossom Flight transfer really add so much to this simple mirror…
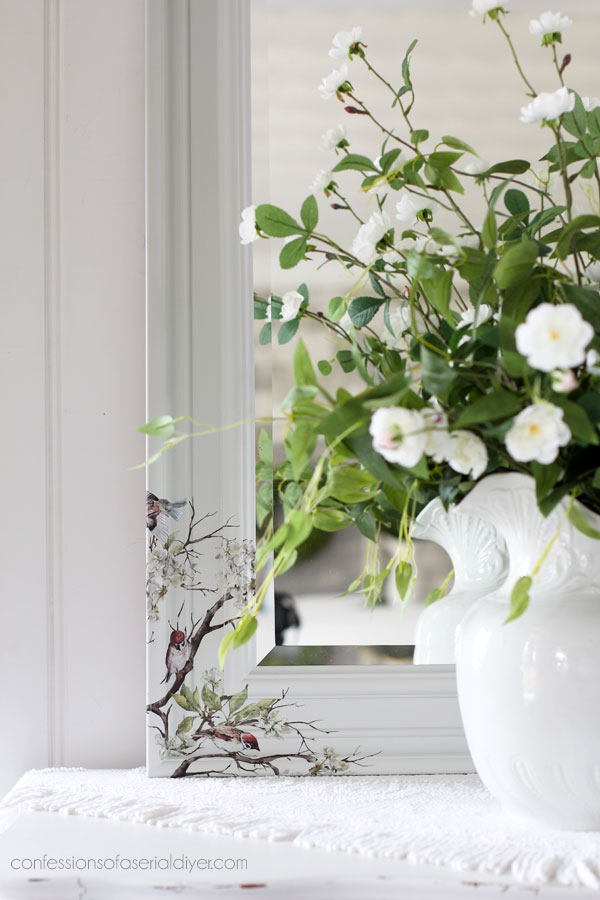
I wrapped the transfer all the way to the edge, both on the inside as you can see it reflected in the mirror…
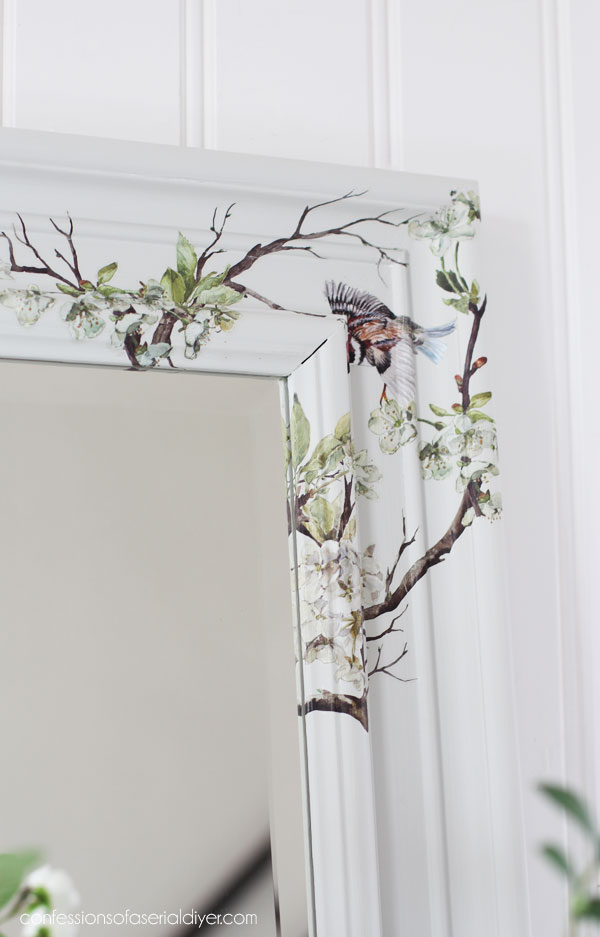
And on the outside:
Here is the back…
I added the original D-ring hardware for hanging:
And that is how you properly paint a mirror! It is a little more work, but well worth it!
Can you believe I almost donated this back to the thrift store? I’m so glad I didn’t!
I hope y’all enjoyed seeing this mirror come to life as much as I did!
I am REALLY excited to finally call this one DONE!
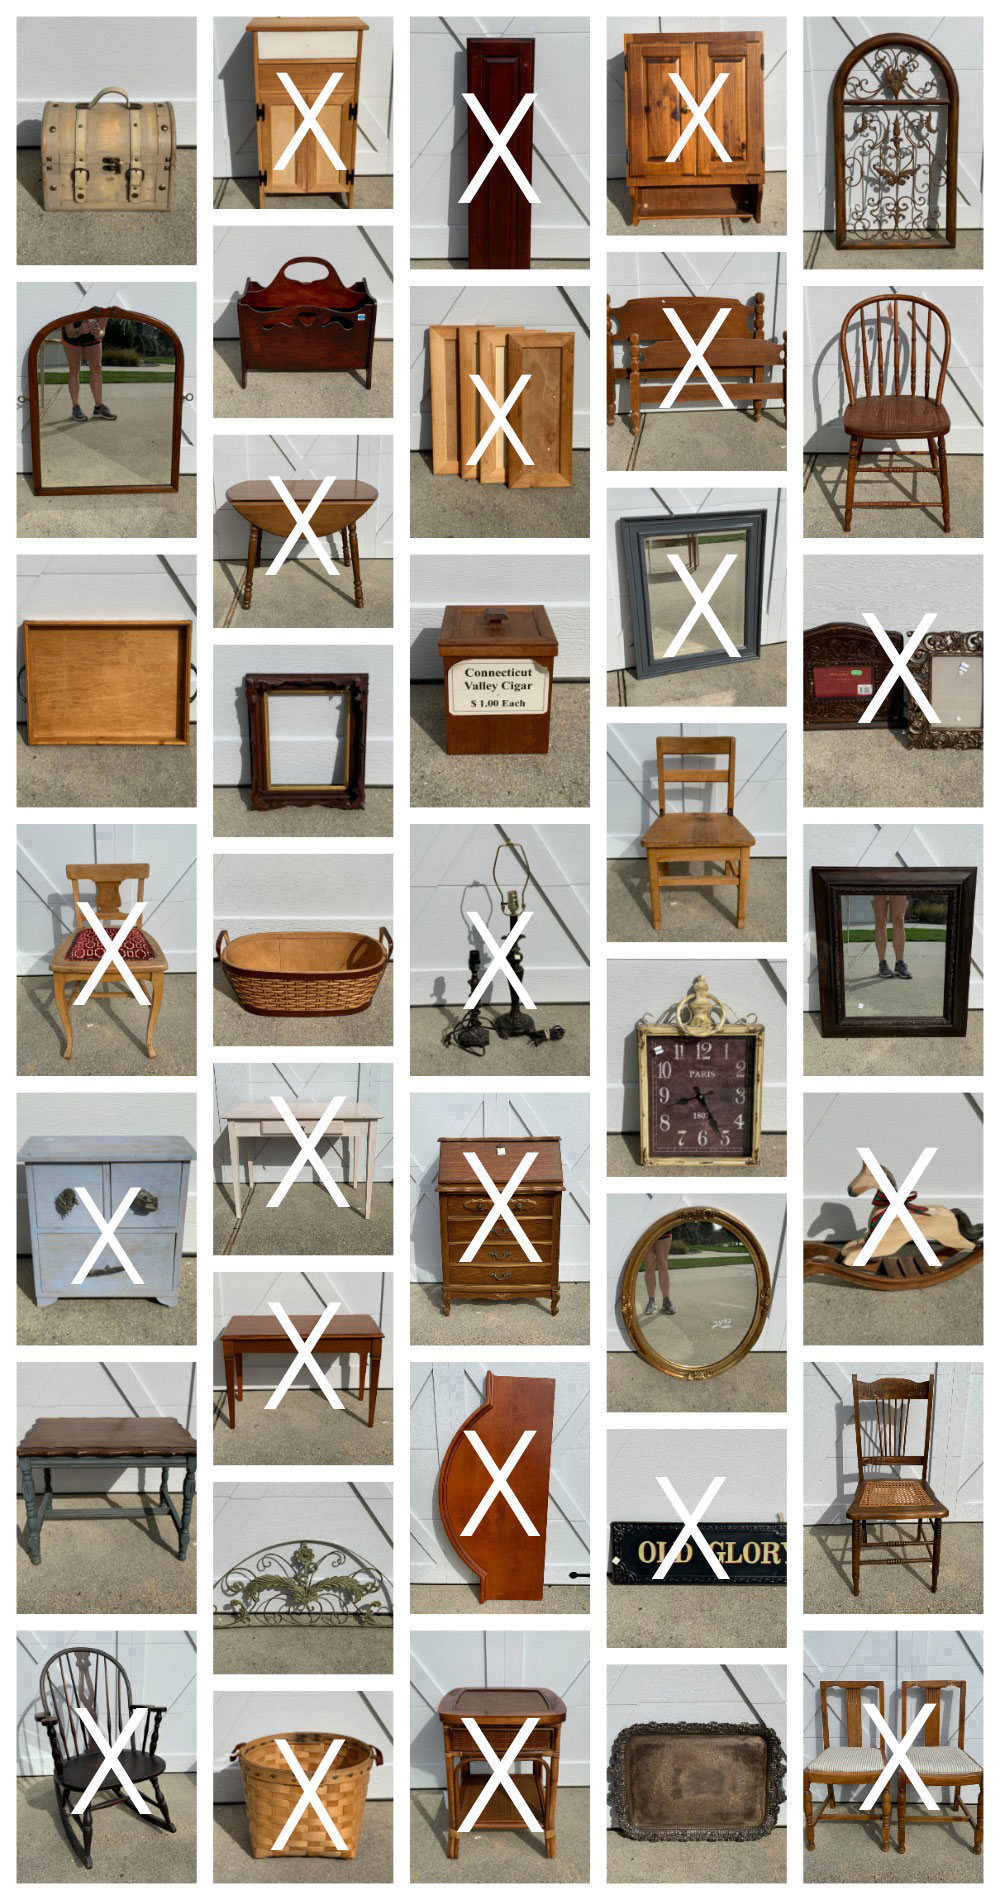
Here are links to all the makeovers in this haul so far!
Painted Thrift Store Lamps & How to Cover a Lampshade
Cabinet Doors Repurposed
$3 Trinket Box Makeover
Piano Bemch Makeover
$20 Thrift Store Desk Makeover
$5 Thrift Store Chair Makeover & How to Use Silk All-in-One Mineral Paint
Unfinished Wood Cabinet Makeover
Cabinet Door turned Shelf
Painting the Smalls, Holiday Edition (Five of these pieces are in this post!)
Kudzu Painted Side Table
REPURPOSED HEADBOARD AND FOOTBOARD
VINTAGE SECRETARY DESK MAKEOVER
$3 THRIFT STORE HEADBOARD REPURPOSED
WALL CABINET REPURPOSED
WINDSOR ROCKER MAKEOVER
DROPLEAF TABLE AND CHAIRS MAKEOVER
I’ll be back on Thursday with this sweet box I picked up:

UPDATE! No need to wait, see how this box went from mass-produced to one-of-a-kind here now!
Before I go, I just wanted to say a huge THANK YOU to all who go back and leave me a review for my Etsy Shop! I appreciate it SO much! You can also upload photos of your finished projects when you leave a review, and I love seeing what y’all create!
Have an amazing day!
XOXO,
![]()
Don’t Miss a Thing!
If you like what you see, there are several ways to follow along!
EMAIL * INSTAGRAM * FACEBOOK * PINTEREST * TWITTER


Michele M. says
OMG I love love looooooovvvvveeeeeee this mirror!!!! Seriously. Birds. They’re my jam. Can’t even tell you how happy I am you held onto that mirror because you just made a true beauty.
Do you ship large mirrors to Ohio, Christy!!!????? : – D
Christy says
Thank you SO much, Michele!! I really am so happy with the outcome too, especially after almost giving up on it more than once! Unfortunately, I don’t ship large mirrors…sorry! XOXO
Mary Kaiser says
Wow, what a beauty it is now! I would so buy that mirror from you if I lived closer. Mirror, mirror on the wall, who is the greatest of them all? Christy is the greatest of them all. Fantastic job!
Christy says
Aww you are the sweetest, Mary! Thank you!! And I would definitely sell it to you ha ha! XOXO
Cheryl says
Great job! I am like that too, think I will do something with it then it sits. I love the transfer, I used a ton in my work. Happy Day!!
Christy says
Thank you, Cheryl! Yes, that probably happens more than I care to admit lol. I can’t seem to get enough of transfers lately…they’re magic! XOXO
Maryellen Webber says
This mirror looks fantastic with the silk paint! The transfer is just beautiful.
Christy says
Thanks so much, Maryellen! XOXO
Micah says
Beautiful!!!
Christy says
Thank you, Micah! XOXO
Jeanne says
I admire your work, how you present your makeovers to us and your responses to people who write. I think you really do this because you love it. Either that or your cat is making you! You’re an inspiration, and of all the diyers out there, I always come back to you for that homey comfort feel.
BTW, I just noticed you on Bob Vila’s site and what a compliment he gave you! I’m sure I’m behind the times but I thought kudos to you, Christy!
Christy says
I can’t tell you how much I appreciate your very kind words, Jeanne! Thank you so much! I do absolutely love that I get to do this everyday, even with a very tough kitty boss ha ha. I don’t always know when I’m featured somewhere, and now I’m curious as to what Mr. Vila was saying about me lol! Thanks for following along with me!! XOXO
Jeanne says
He used the trifold screen you made over in his list of great projects!
Christy says
Oh wonderful! Thank you for sharing that! XOXO
Christina says
Christy I love this! I was laughing at myself because, at the start, I was thinking I hope she paints it white and adds a transfer! lol This is is even better than I had hoped. I love how you went the extra mile to wrap the transfer around to the back. You rock!!
Love seeing Lyla’s sweet toes! ♥️😻
I admit, I’ve been lazy when painting mirror frames and the end result shows it. lol I need to find something to put on the back.
Thanks again for such a great tutorial!!
Christy says
Oh ha ha…you just know me so well! That photo of Lyla’s toes makes me chuckle every time I see it…I didn’t even realize she was there when I was taking the photo ha ha! And I confess, I too have cheated on the occasional mirror makeover, but as with you, I wasn’t always happy with it. Have a great week! XOXO
Esthet says
Love the bird mirror. The paint color goes so well with the dresser color. It’s really a sweet piece.
Christy says
Thank you so much, Esther! XOXO
Cheryl says
Christie….
Christie…..
Enough said.
🤍🤍❤️🤍🤍
Christy says
Thank you, Cheryl!!
Jane says
Fabulous! Prettiest Frame I’ve ever seen. Love that transfer.
Christy says
Thanks so much, Jane! This is such a lovely transfer! XOXO
Janina says
Sweet! Or should I say “tweet!”?
Christy says
Ha ha yes! Thanks, Janina! XOXO
ColleenB.~TX. says
I love that mirror, even the pretty paper on put on the back.
If I only lived closer. I would be knocking at your door wanting to buy it as it would be perfect hanging on my wall as you come in the entry way.
Stay warm & stay safe.
Christy says
Thank you, Colleen! I wish you were closer too! You stay safe too and hopefully, you are and freezing where you are! XOXO
Raylene DeSanto says
This mirror is absolutely gorgeous! I love how you wrapped the transfer around the edges. You always go that extra mile and it makes such a difference in your finished pieces! Your talent never ceases to amaze me!
Christy says
Thank you so much, Raylene! I really appreciate that! XOXO
Cecilia says
Wow! I love this!! The transfer adds the perfect bling and takes it from plain to fabulous. Again, wow!
😊Cecilia
Christy says
Thank you, Cecilia! Those transfers are amazing! XOXO
Sheila Pack says
Absolutely stunning results! The lovely transfer really takes this mirror to a whole new level of beauty. LOVE IT!
Christy says
Thanks so much, Sheila! The transfer makes it for sure! XOXO
Toby Peplow says
Absolutely lovely!! I love the transfer too!! Some times they are too bold for me, but this one is so subtle…and just PERFECT! I too have a mirror that has been waiting ….ughhhh. It will likely be the next thing on the list thanks to you!! Have a great day Christie! Stay warm! Its absolutely brutal here in Central Illinois!
Christy says
Thank you, Toby! This transfer is really lovely, and I’m glad it worked so well on this mirror. Yes, just go for it and get it done ha ha. Stay warm up there!! XOXO
Becky says
Love this❤️❤️❤️❤️❤️
Christy says
Thank you, Becky! XOXO
Kaycee says
Hi Christy, what a gorgeous new look. The paint color and transfer made a huge difference. Papering the back of the mirror is a nice touch as well.
Christy says
Thank you, Kaycee! The transfer really worked wonders! XOXO
Shawn Ferrie says
Christy
This is my all time favorite of favorite mirrors that you have made over! You are an inspiration!
It’s beautiful, love the transfer and I want to try the products you used.
I’ll order soon. 🙂
Christy says
Aww thank you, Shawn! I appreciate that so much! XOXO
Cecilia from Georgia says
What a beautiful mirror now that you transformed it. When painting Slick Stick how do you know it’s ready to paint over? Does it help to sit longer before painting?
Christy says
Thank you, Cecilia! I’m not sure there is a way to tell if is ready…I just follow the directions. They say to paint one coat and let it sit two hours before applying a second coat. Then let it sit overnight. After all that dry-time, it should definitely be ready to paint over! XOXO
Sharon says
Love this SO much! The transfers are gorgeous! Thanks for sharing your work!!
Christy says
Thank you so much, Sharon! It is my pleasure to share! XOXO
Molly Norris Cooke says
You really are a magician, Christy! The transfer is such a lovely addition and the way you pay attention to detail is right up my alley! Kudos!
Christy says
Thank you so much, Molly! XOXO
Stacey says
Wow!! Just lovely!!! 💖
Christy says
Thank you, Stacey!! XOXO
Mandy B says
I’m normally not a fan of decoupage, but your mirror is beautiful! I have so many mirrors laying around from dressers and chests that I can’t bear to get rid of (let’s be honest, I can’t get rid of anything….lol). I like how you didn’t overdo it and decoupage the entire mirror and only put it on each corner. Looks amazing!
Christy says
Thanks so much, Mandy! Yes, sometimes less really is more. I had to stop myself from adding more ha ha! XOXO
Vickie R says
Wow, Wow, Wow, Something some what simple, yet so, I don” t know what word I”m looking for.
Christy says
Thank you, Vickie!! XOXO
Anita S. says
The mirror with the bird transfers is spectacular! Your use of these transfers is inspiring me to try them on the next piece that I do over. Keep up the good work!
Christy says
Thank you, Anita! Transfers add so much, and I love that you are feeling inspired to give them a try! Good luck! XOXO
Gloria Wyssbrod says
Beautiful is all I can say. I love it❤
Christy says
Thanks so much, Gloria! XOXO
Janina says
Your mirror turned out beautiful.Thank you for pointing out how to do it properly. The transfer is the cherry on top!
Christy says
Thank you, Janina! XOXO
Rebecca Payne says
I love your mirror. Great job!
Christy says
Thank you, Rebecca! XOXO
Lisa Johnson says
This mirror might be my most favorite project of yours, yet! So pretty! Keep doing your magic!
Christy says
Oh yay! I love that, Lisa! Thank you! XOXO
Catherine says
Love the way the mirror turned out and love your “boss”!
Christy says
Thank you, Catherine! Ha ha she runs a tight ship around here! XOXO
Debra Hubbs says
That mirror is so pretty! I love the transfers on it.
Christy says
Thank you, Debra! XOXO
Sue Mellette says
Very Lovely makeover! I love the oyster color. In the pics it looks, to me, to have gray in it which I love. And yes, the transfers really dress this mirror up. It looks as if it belongs in a designer’s showroom! What a difference. I will have to try this silk paint soon. Thanks for sharing. Have a great week!
Christy says
Thank you so much, Sue! Yes, it has a slight gray undertone to it…just lovely! Enjoy your week too! XOXO
Sharon Smith says
The mirror is stunning!
Christy says
Thank you, Sharon! XOXO
Marian says
Christy, I love the way the mirror turned out. It is so pretty. You have a wonderful instinct. Thank you.
Christy says
Thank you, Marian! I really appreciate that! XOXO
Wendy says
Love the mirror Christy. That gorgeous transfer really makes it a one of a kind. Where do you get your transfers from?
Christy says
Thanks, Wendy! I buy mine on Amazon and Etsy. I found this one on Etsy. I don’t have a particular retailer I buy from though. XOXO
Marty K says
Beautiful! I love the bird transfer! It really gives it a unique finish.
Christy says
Thank you, Marty! I thought this one was sweet with the little birds! XOXO
MADELINE NEWTON says
love how you redid the mirror love how it looks so real…wow ..great job…
Christy says
Thank you, Madeline! XOXO
susan says
This so pretty! Thanks for the tip about modge podge for putting paper on the back. One of my DUH moments 🤣
Christy says
Thank you, Susan! You’re welcome lol, it works great! XOXO
Marcie Lovett says
A coat of paint probably would have been enough to brighten it up but WOW! It looks so good now. Even that little bit of transfer makes a huge impact. Good thing you didn’t give up on it, Christy 😉
Christy says
Thank you so much, Marcie! Paint was my only intention for this piece originally, but I just couldn’t leave well enough alone, and thank goodness lol!
Kathy W F says
Hi Christy, I’ve been AWOL for a few weeks with my comments but I’m back! AAhhhh, this mirror….so glad you kept it all these years. Sometimes we just have to do that and then one day….it comes to us and it sure did for you and this project. Love the color of the mineral paint and the craft paper on the back is a perfect touch. It’s beautiful and the transfer makes it so unique. If you put this in your shop it won’t last long. Spring is just around the corner (even if it doesn’t feel like it) and someone will definitely take this home. See you on Thursday. I’m looking forward to seeing what you do with that treasure chest.
Christy says
Hi Kathy! Glad to hear from you! And thank you…I sure am glad I didn’t give up on it! See ya Thursday! XOXO
Sharon Austin says
Oh my gosh, I love everything about this, even the backing lol. The transfer was such a good idea and totally unexpected. This mirror shouldn’t last long! Assuming it’s going in your shop…
Christy says
Thank you, Sharon! I’m so glad to finally have this one done, and yep…it’s off to the shop! XOXO
LORRI says
Oh so pretty…. ❤ I always love it when you put tranfers on the edge of your pieces. I laughed when I saw Lyla’s paws..is that cute or what? She is thinking ..my Momma is always painting and talking to herself..😻
Christy says
Thank you, Lorri!! Lyla’s little paws sticking out on that photo cracked me up too as I didn’t realize she was sitting there when I took the photo! Always watching me ha ha, and yes, those were her thoughts exactly lol!! XOXO
Catherine Cave says
Love this mirror so much!
Christy says
Thank you, Catherine! XOXO
Patty says
Christy, my first comment didn’t go through – excuse if sent twice. I’ll just copy what others have stated – the mirror is beautiful!! Absolutely love it – even the back! How I wish I lived closer, you never fail to amaze me with your creativity. I have a mirror to repaint and will plan to use the new Silk Mineral paint. Thanks so much for showing the best way to paint so many different items. I learn something new each time. And that sweet little Lyla makes my heart flutter – she is so precious – those little paws! 🙂
Christy says
Thank you so much, Patty! And you are welcome…I love hearing that you learn new things from what I share! That photo of Lyla’s little paws cracks me up every time I see it ha ha! Good luck with your mirror! XOXO
CToth says
Good Morning,
I just wanted to thank you for this beautiful post. I loved this mirror soo much that I ordered the same transfer and copied your mirror.
You inspired me to redecorated a home in Palm Springs entirely from thrift store finds and chalk paint. I wrote to you before and thanked you. Well, this mirror is soo gorgeous I just had to try using a transfer. It was a new experience for me and it worked like a dream. The mirror I used was very large, an old brown dresser mirror, and the frame is narrower than yours, but it still looks beautiful. I could not find any pictures or tutorials on how to put a transfer on a ridged frame so I only had your blog for a reference. I hope you are ok that I duplicated your creation. It is SOO beautiful and I am so grateful for your sharing and inspiring blog.
Much gratitude and love,
Thank you!!!
Christy says
Good morning! I love this SO much, thank you!! I am so thrilled that you were inspired to create your own version, and I bet it turned out gorgeous! Happy creating!! XOXO
Cheryl Atkinson says
Hi Christy!! Your mirrors are always beautiful. This color kind of looks greige compared to cotton, doesnt it? That transfer was just the cherry on top. I will have to remember to try the contact paper on back. That is a special touch. Thank you for sharing this!
Christy says
Thank you, Cheryl! Yes, this color is almost a very very light gray compared to the cotton, but it works lovely with it! XOXO
Kerryanne says
This mirror is stunning Christy and as always, a great tutorial.
Thank you for sharing how to paint a mirror properly at Create, Bake, Grow & Gather this week. I’m delighted to be featuring this DIY project at tonight’s party and pinning too.
Happy Easter,
Kerryanne
Christy says
Thank you so much, my dear friend! Wishing you and yours a blessed Easter weekend!! XOXO
Cindy says
Hey Christy…
Question, will the Slick Stick work over Annie Sloan wax so that a piece can be repainted?
If not, do you have any recommendations of products or how-to’s to get paint to adhere to the wax??
Thank you
Cindy
Christy says
Hi Cindy! For Annie Sloan wax, you will want to remove it. You can do that by wiping it down with odorless mineral spirits. Good luck! XOXO
Cindy says
Thanks so much!! Enjoy your day 🙂
Christy says
You’re welcome! Thank you! XOXO