Hello, sweet friends! Today, I have a very plain thrift store box updated with decor moulds to share with you! You wouldn’t even recognize the after, and I can’t wait to hear what y’all think of this one! And if you missed it on Tuesday, Nancy and I shared a brand new Thrift shop Shakedown video! It’s been a hot minute since we last took y’all shopping with us! See it HERE if you missed it!
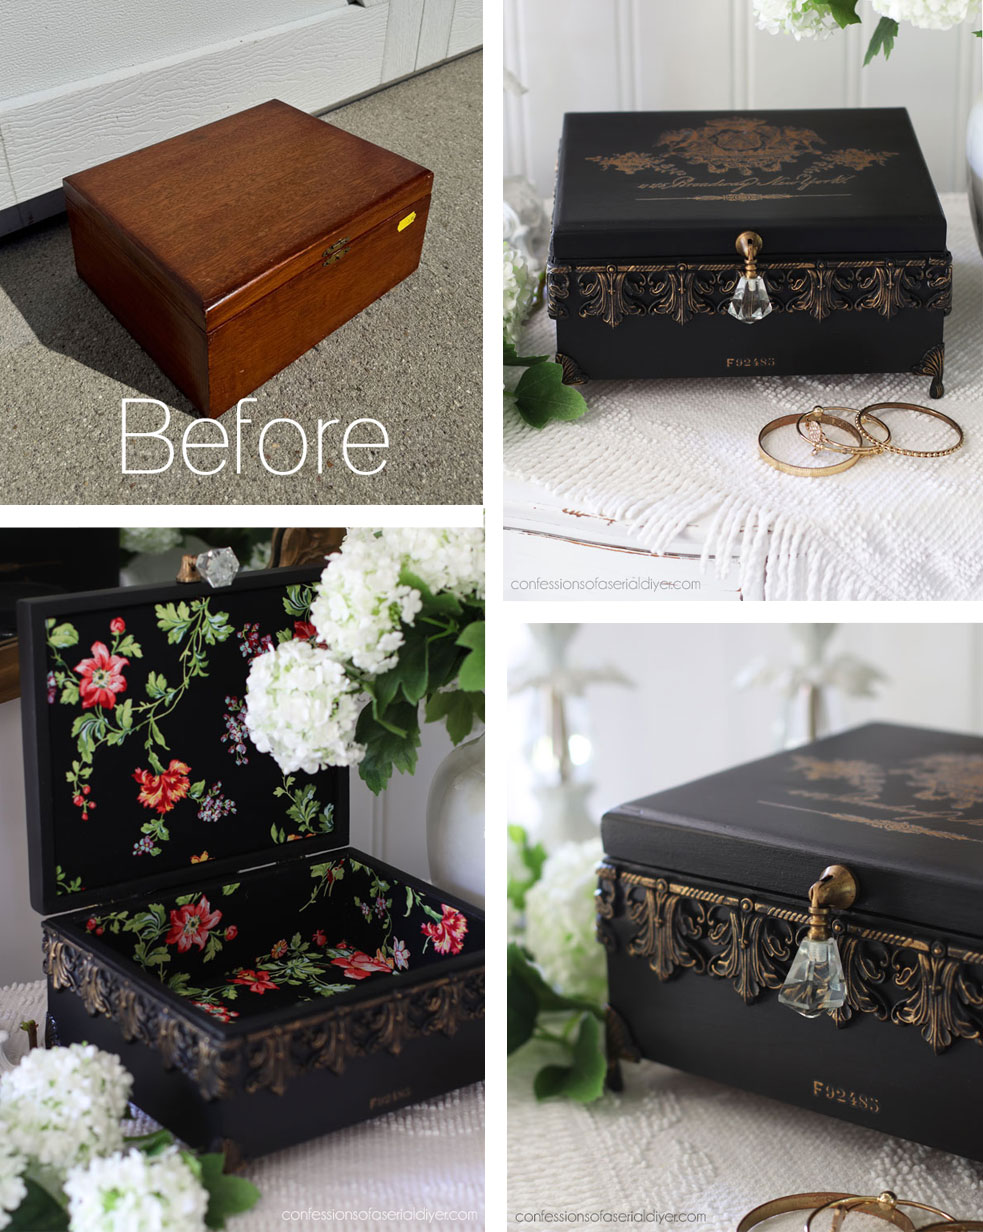
Here is how this $3.99 thrift store box started:
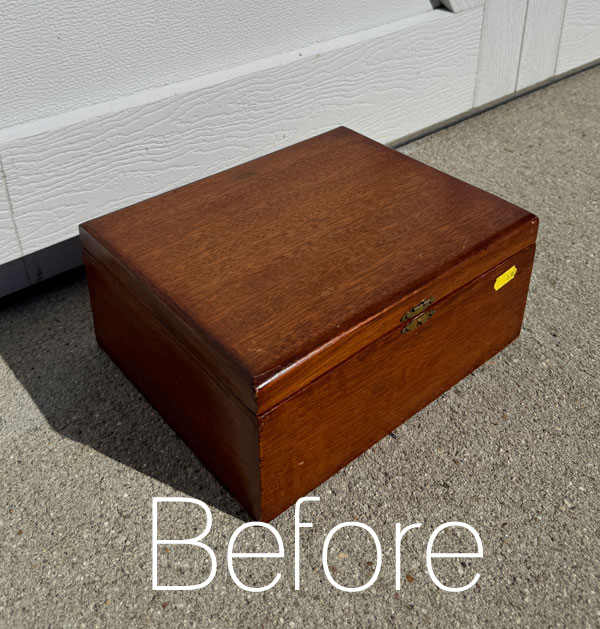
Not bad on the outside at all, but here is what the inside looked like before:
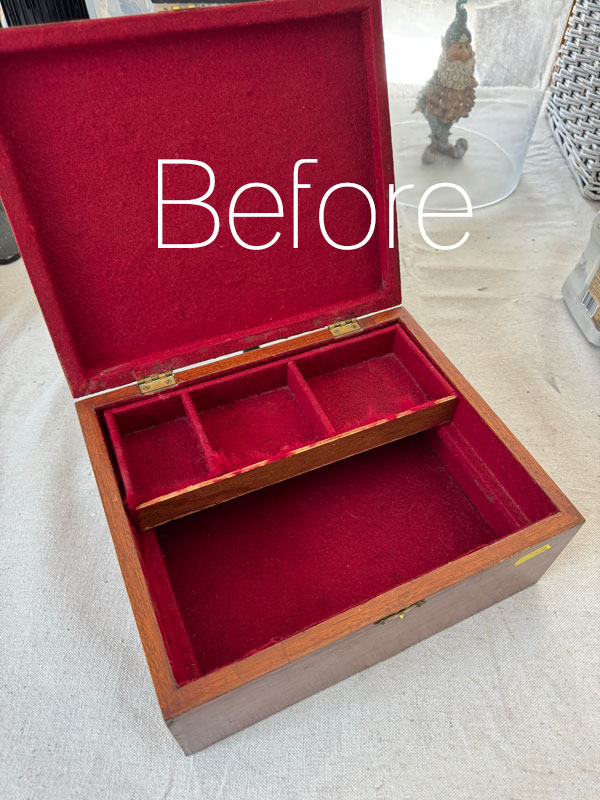
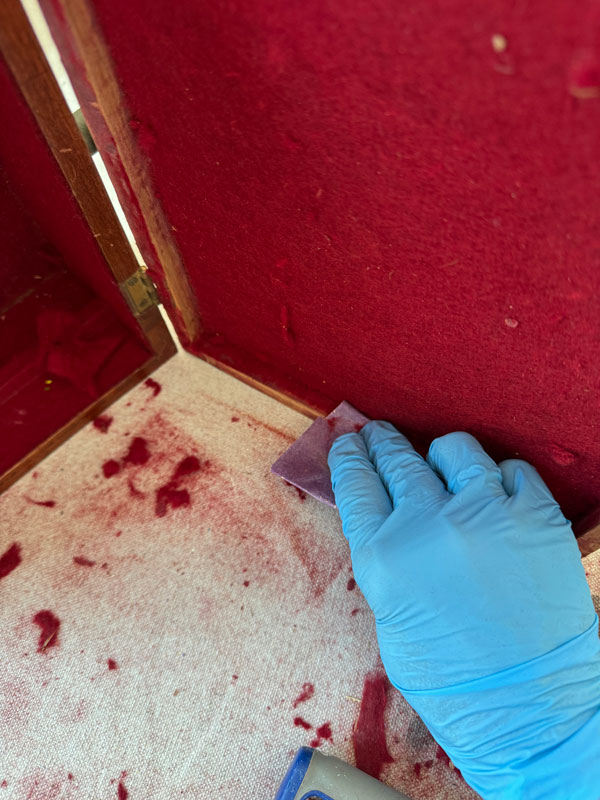
That red felt interior didn’t do me any favors… it was on there good!
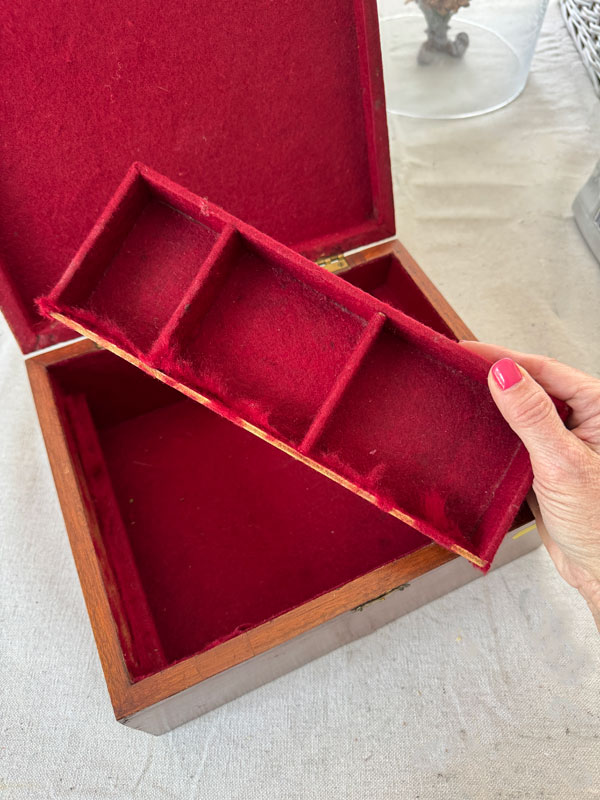
I always start these boxes by removing the lining. The lining was so hard to remove and that is the reason I waited so long to get to this box!
The tray was removable, and while I was able to get that fabric off of the outside of the tray without too much trouble, the interior was a hot mess! I decided to set that aside and not use it at all…
I knew that if I could get the pieces out that were supporting that little tray and remove the fabric that was around the inside of the lid edge, that I could pretty much cover the rest with new fabric. So, that’s what I did. I was able to get rid of the supports, and then I used a couple of different tools to get rid of the fabric on the inside lip of the lid, including this multitool:
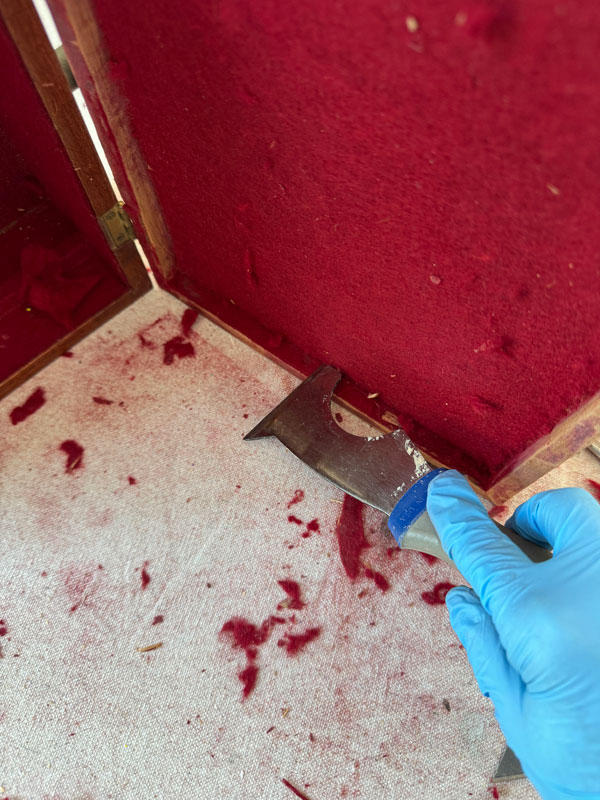
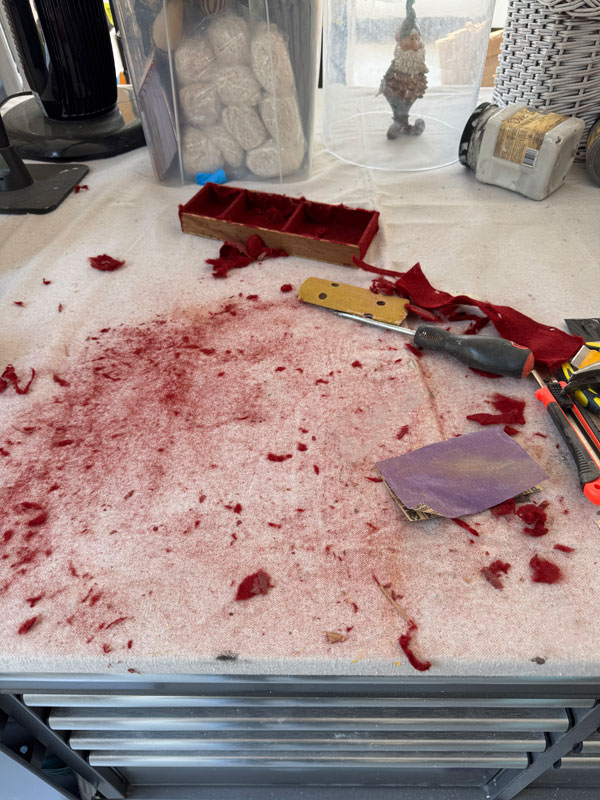
I used that to scrape away as much as I could, and then I sanded what was left away:
That seems simple enough, but it took me over an hour lol. And here’s the mess that was left behind:
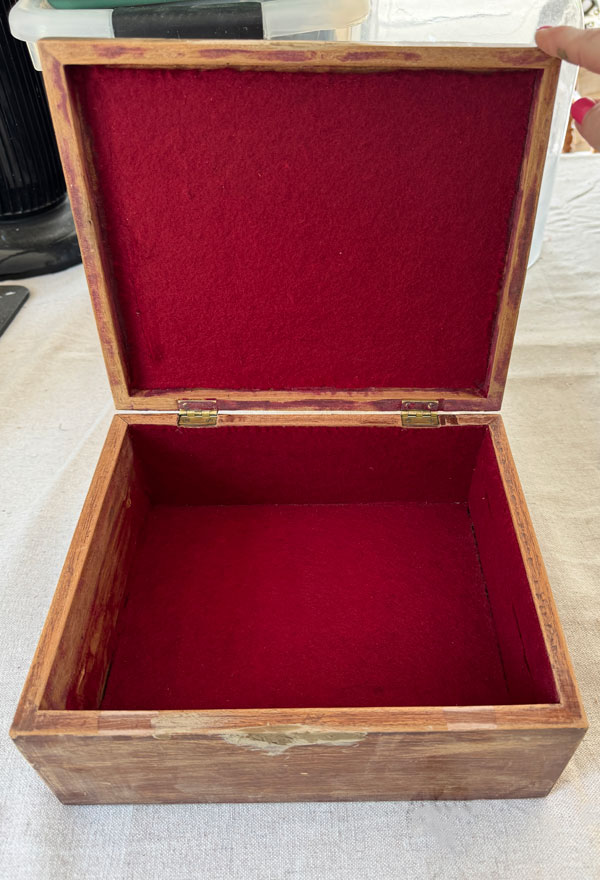
Here is what I ended up with:
I’ve included a few affiliate links so you can find the products I love.
Fill the Holes
I removed the broken latch from the front, so that got filled with Dixie Mud:
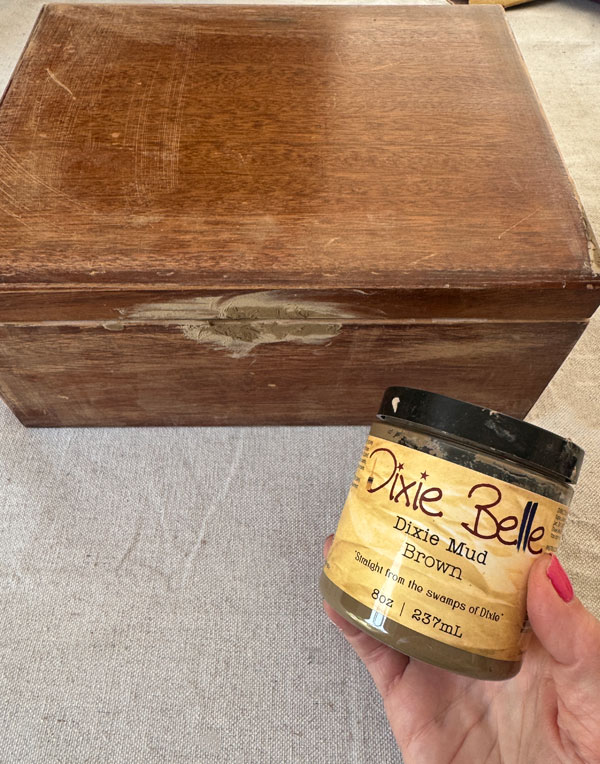
As you can see there, this box got pretty scratched up from all the man-handling while removing the insides.
Clean
At this point I gave the outside of the box a good cleaning with White Lightening (taking care not to mess with the area I filled), rinsed it with clean water, and it was ready for the fun part!
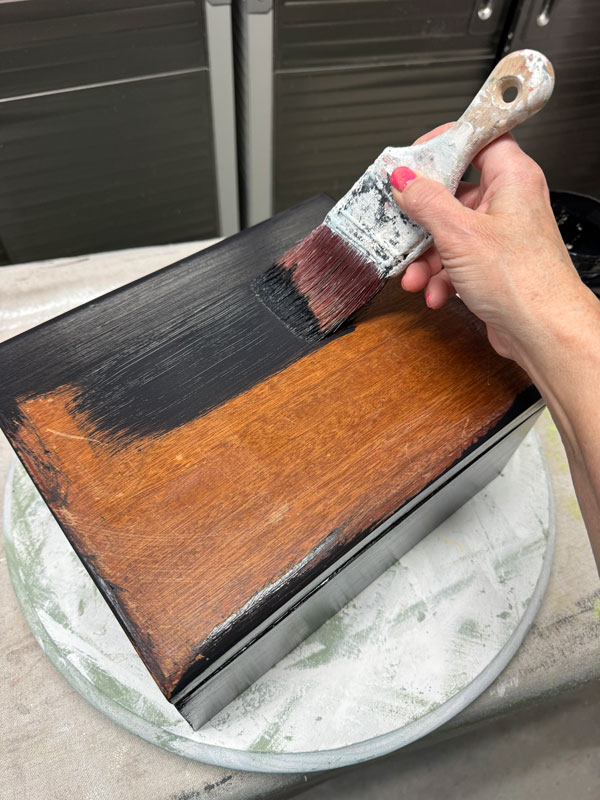
Paint
For what I had planned for this piece, I chose Caviar:
After resharing these Singer Drawers last week, I sold a lot of Caviar!
I gave it two coats.
Sand
Once that was good and dry, I sanded all over with this fine grit sanding sponge:
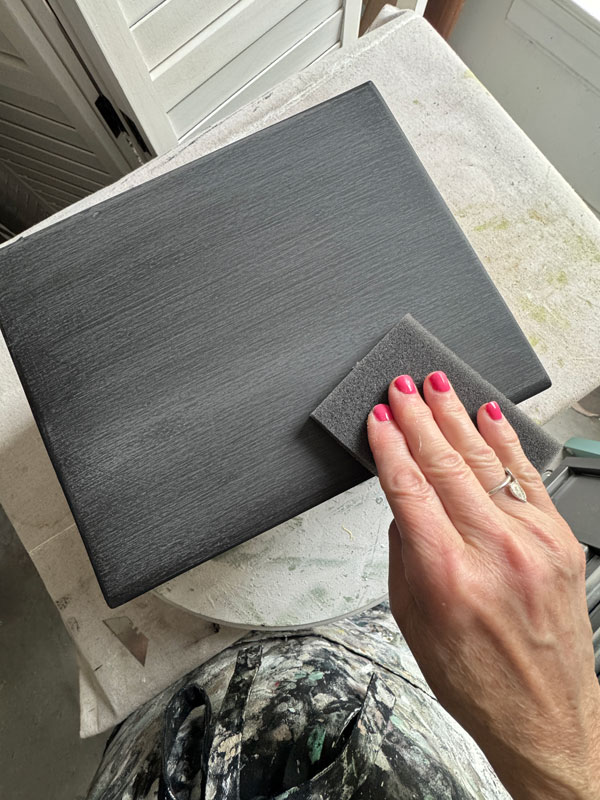
These sponges are great at not going too far down when I don’t want a distressed look.
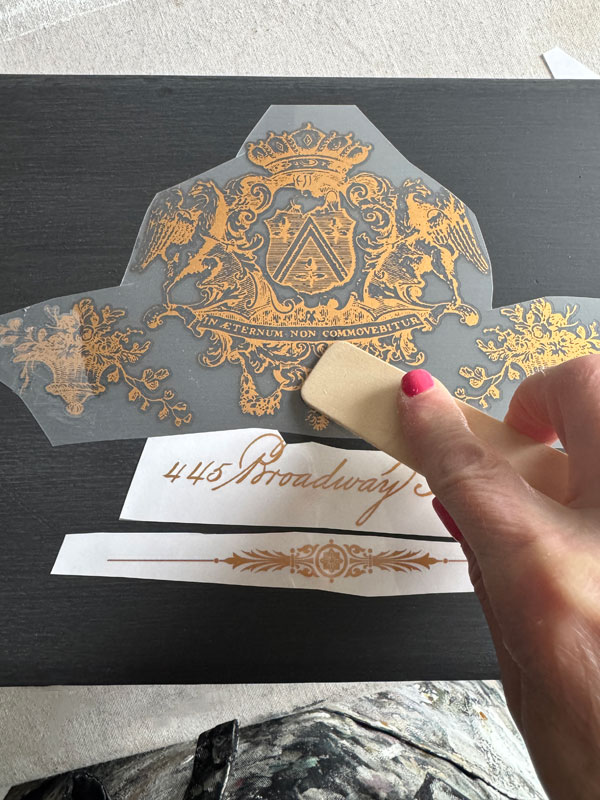
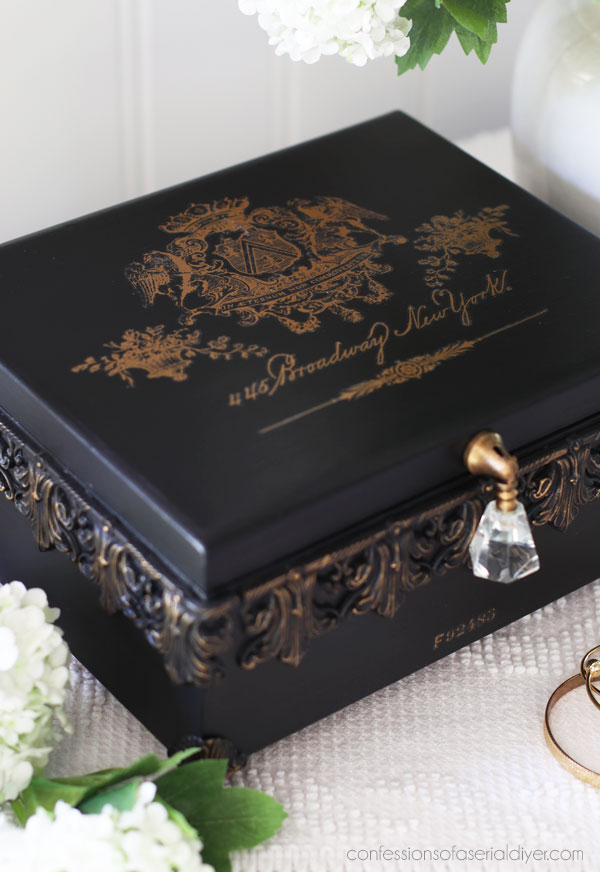
Adding a transfer
The next step was to add a little something to the top, so I pulled out what I had left of the Queen’s Glory transfer and chose these pieces for the top:
Seal
I then sealed the box using Clear Coat in Satin, applying it wit the blue sponge applicator. I like to add a touch of the paint to the sealer when using darker colors for a better result:
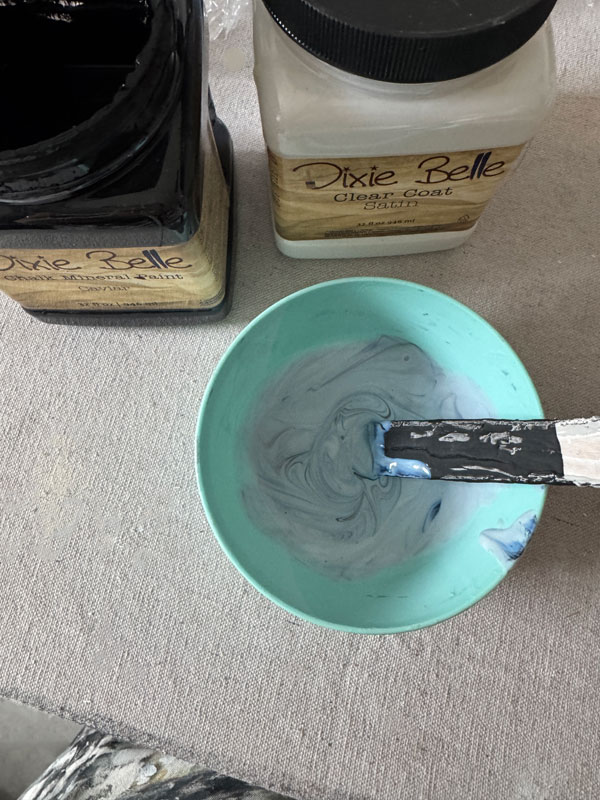
I gave it two coats. But I wasn’t quite done…not even close!
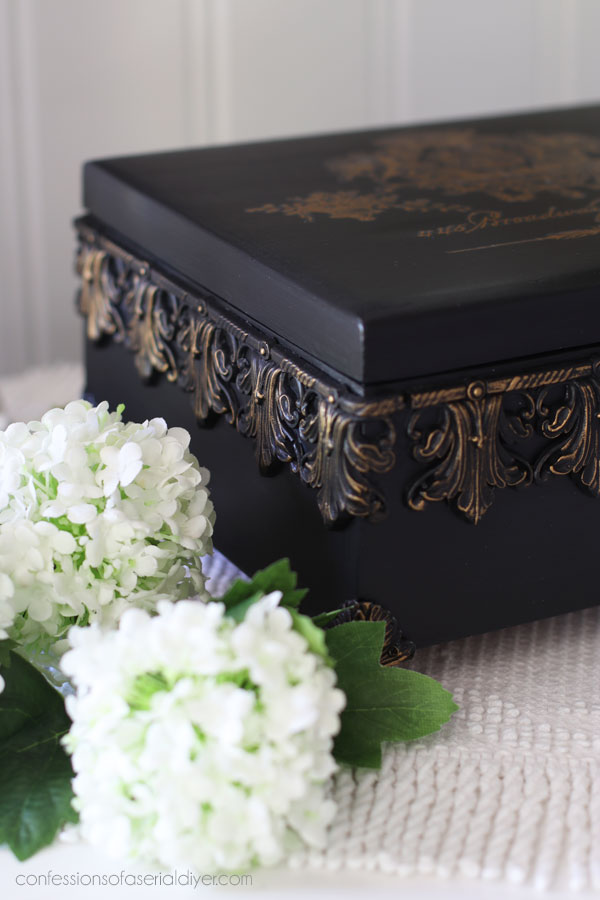
Adding Decor Moulds
Redesign’s decor moulds are the best invention ever! I love that they are reusable, so I can cast dozens of pieces from them! (They are also food safe, so you can use them for decorating cakes, for melting chocolate in. etc.)
I just use them for making things pretty, so I used Amazing Casting Resin in mine.
You just mix equal parts of two liquids and pour…
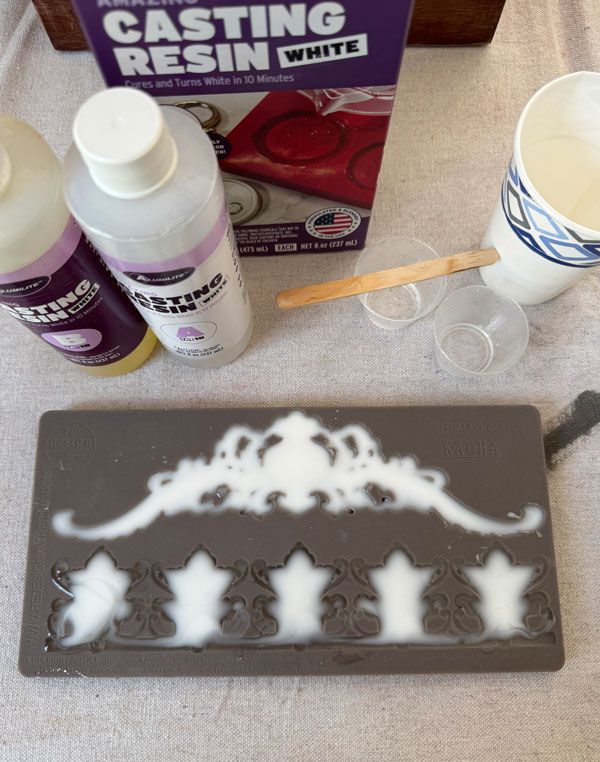
In about 12 minutes, they are ready to remove from the mould.
This is the Enlightened Etchings Mould from Redesign, and I just used that top piece on this pine armoire last week.
Today, we are using the bottom part!
I cast three pieces and then painted them in Caviar also:
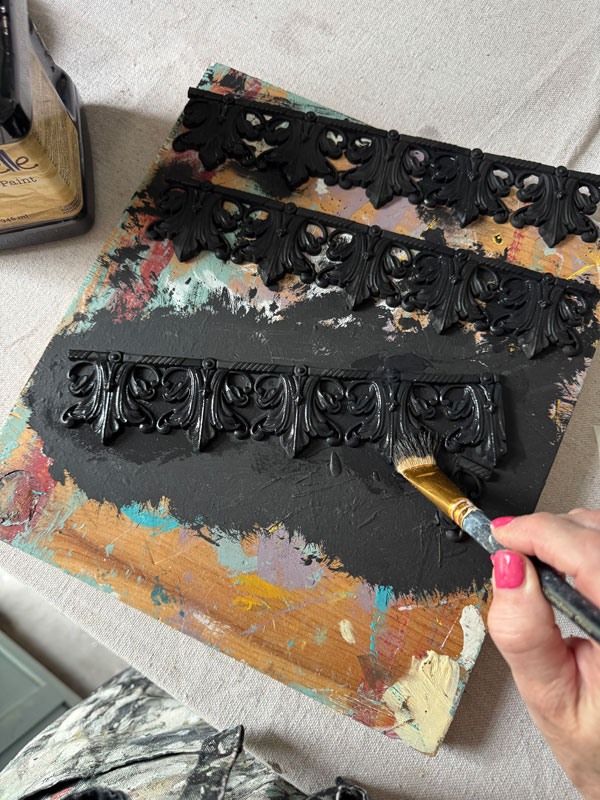
I decided to seal them before adding them to the box and I did that with Clear Coat in Satin also, applying it with a small brush this time.
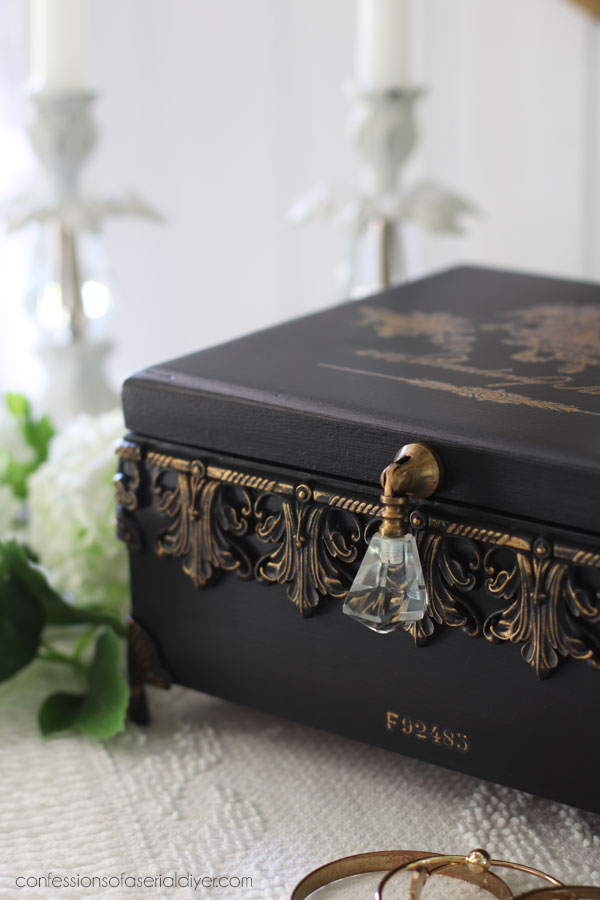
My plan was to wrap the mould around the front edge of the box, so I added the first piece to the center using Titebond Quick and Thick Glue:
Then, I tried to heat up the casting enough to bend it to wrap around the corner, but the part where it needed to bend was quite thick and it was tough.
These castings are very warm when they are first dry and super pliable, so I decided instead to cast another piece and bend it while it was still warm…

I didn’t want to mess up the box trying to do this, so as you can see, I bent it around a piece of wood.
I did one for each corner and once they were cooled and set, I painted and sealed them and added them to the box as well.
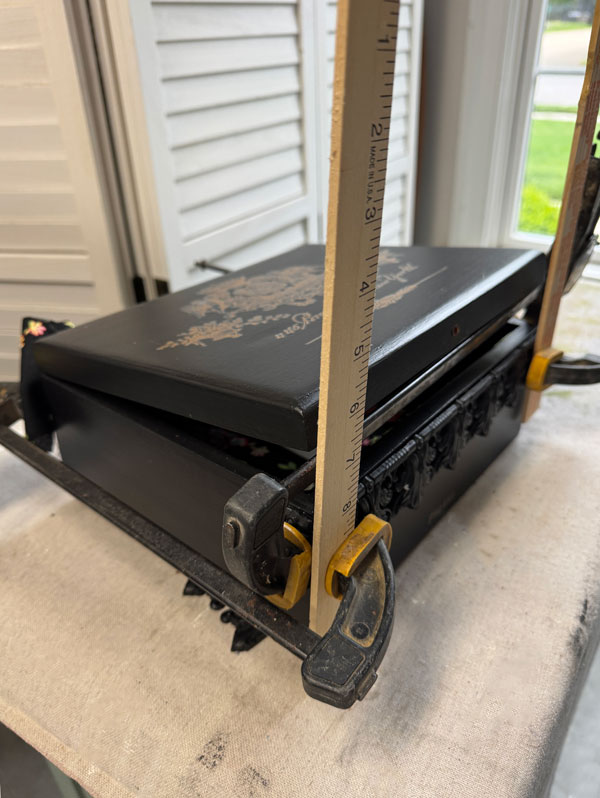
The box looks like it’s in traction ha ha!
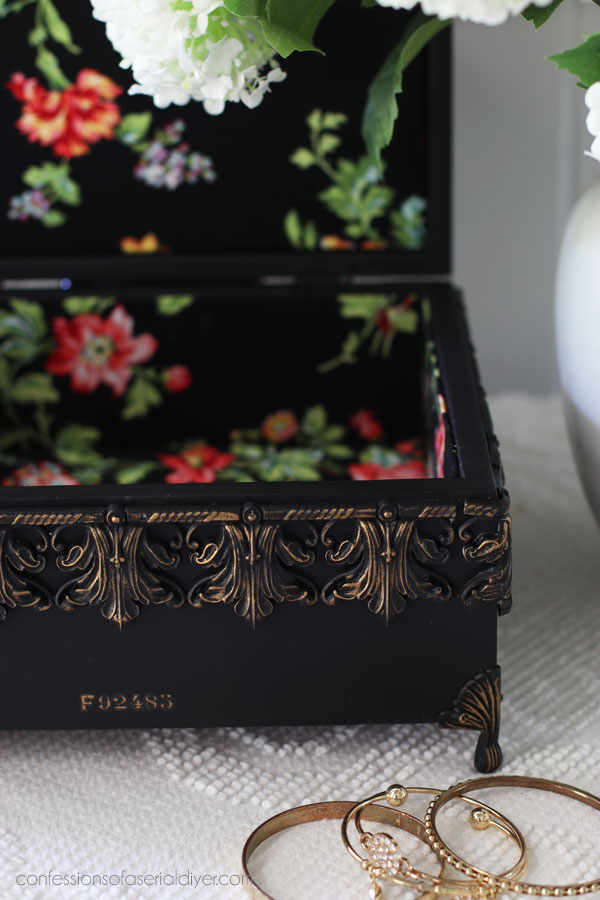
I then added the rest of the pieces for each side.
Once they were all adhered well, I highlighted those amazing details using Dixie Belle’s Gilding Wax in Antique Gold:

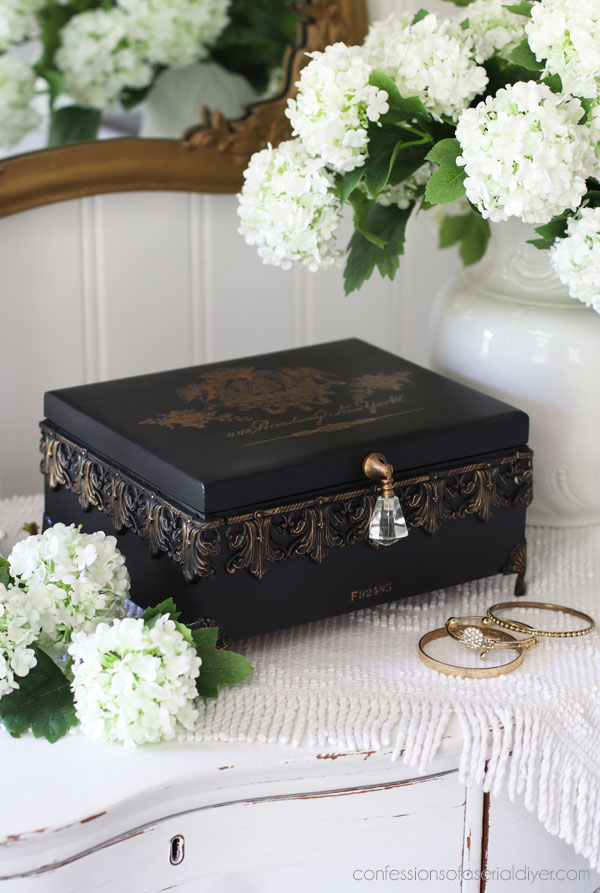
Ready to see how it looks now??
Thrift Store Box Updated with Decor Moulds, the After
Here ya go!
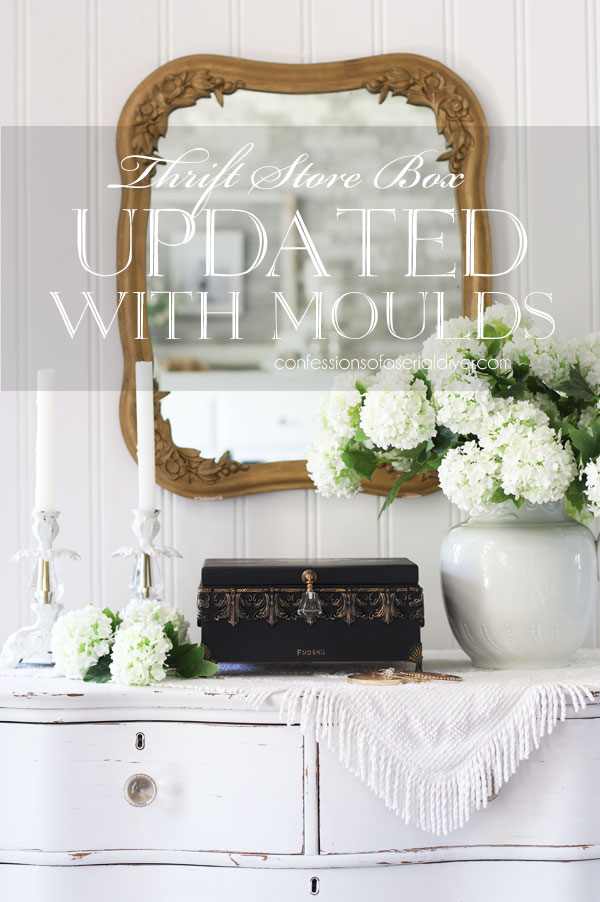
This box is unrecognizable now!
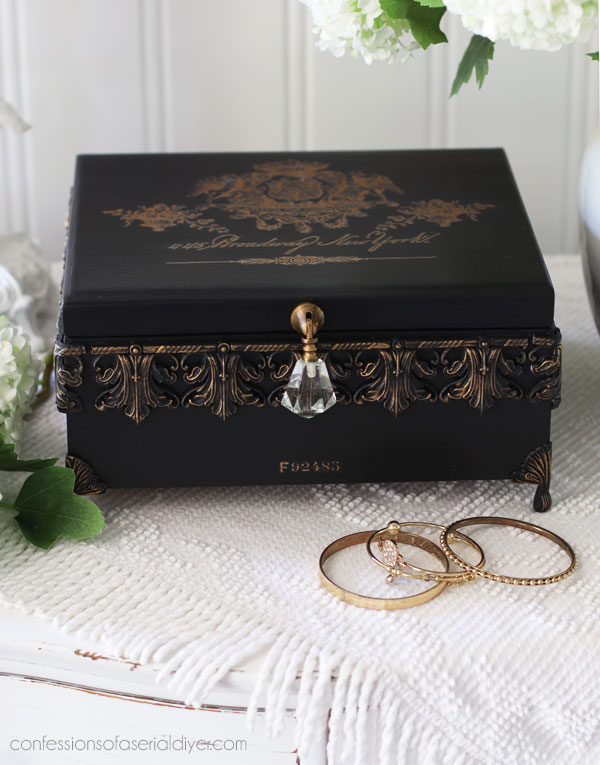
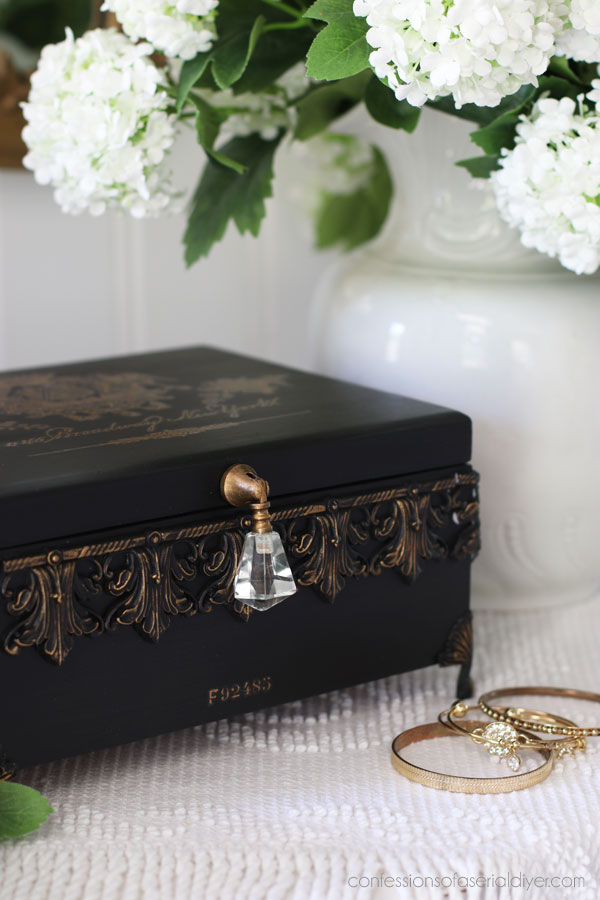
As you can see, I added this beautiful drop pull to the front also, courtesy of Hobby Lobby…
I added Antique Gold Gilding wax to tie it in with the rest of the elements of this box.
I also added that tiny piece of transfer to the front from the Queen’s Glory transfer, but this mould is everything on this box!
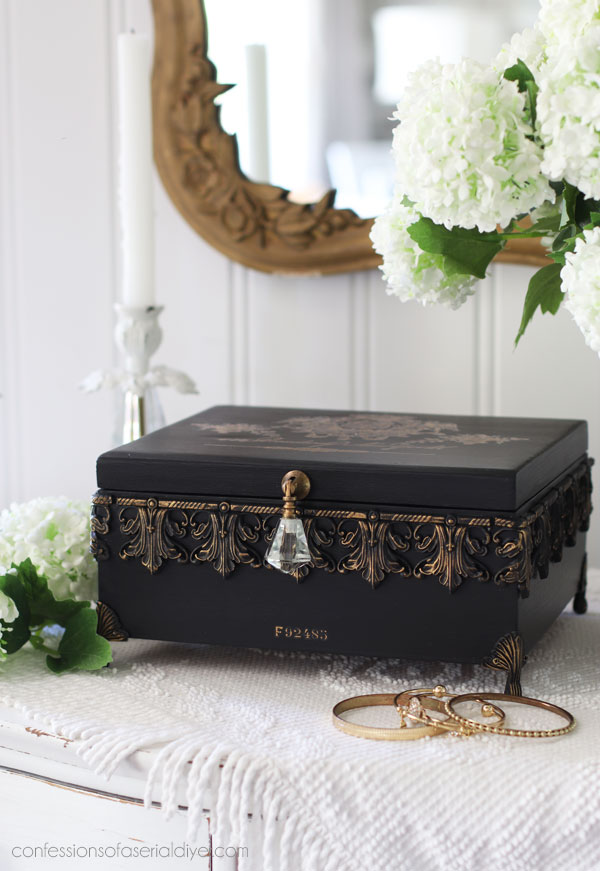
An absolutely beautiful addition…
The inside
Ah the inside…remember that??
Here is a reminder for you:
I found this pretty fabric in my stash that I have used on several other projects:
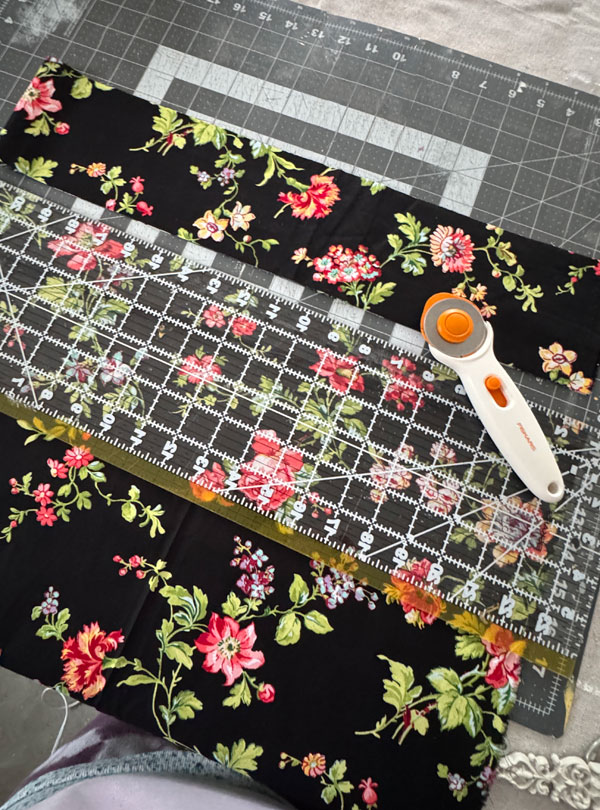
I needed something that would cover that red and this was it!
See how I line a box with fabric in much more detail HERE.
But basically, it involves cutting a piece of fabric that will go all the way around, ironing it over at the top to create a nice edge, and hot gluing it in place:
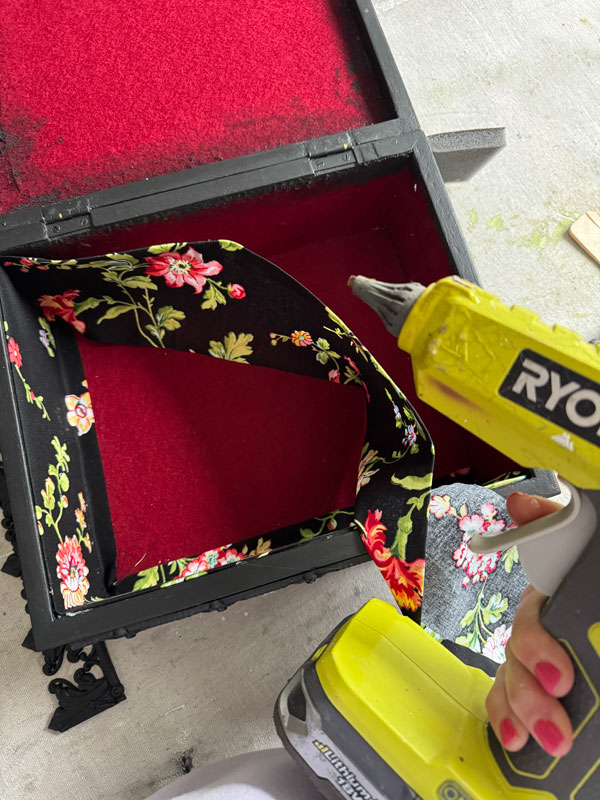
For the bottom and the inside of the top, I cut a piece of foam core to fit and wrap that in fabric. Then, it gets glued in place also:

And here is the result:
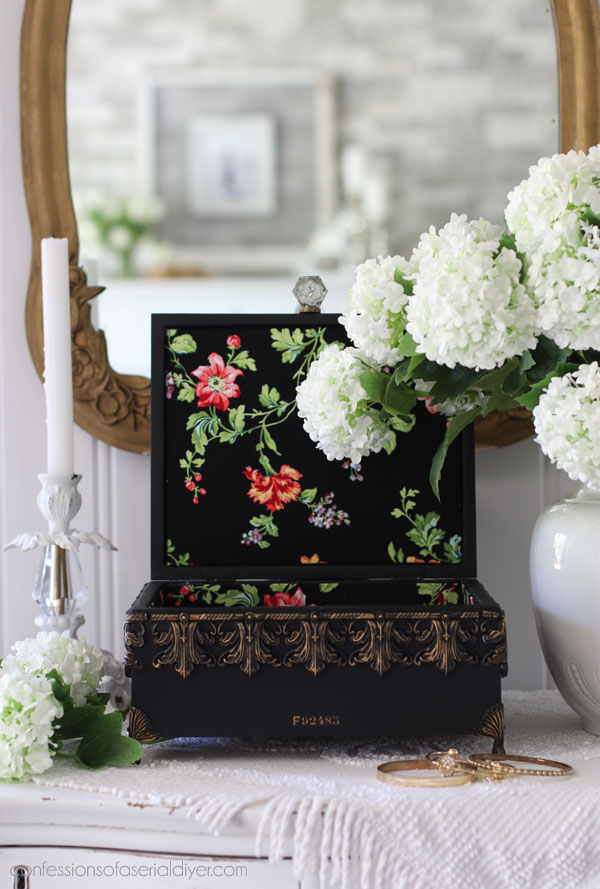
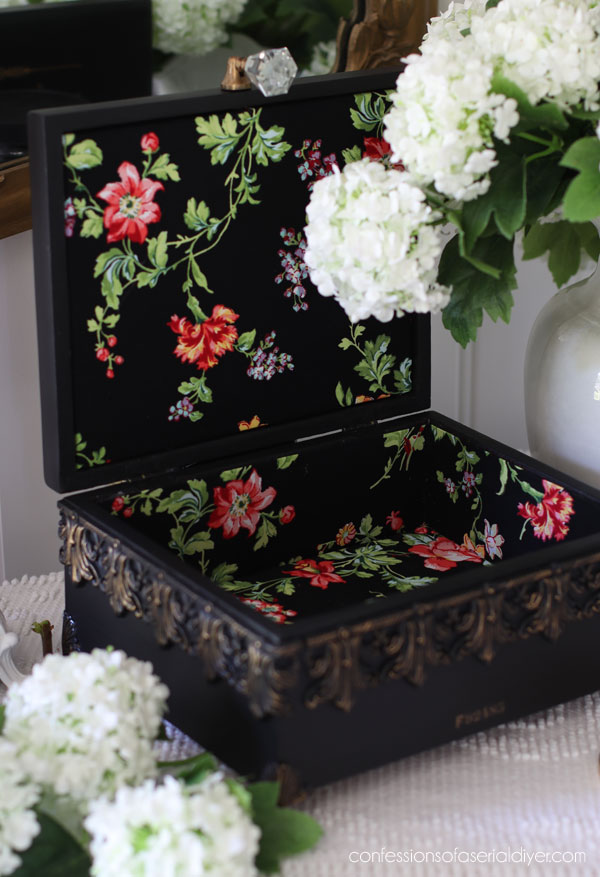
Much better than that red felt!
And I almost forgot to mention that I added these feet as well:
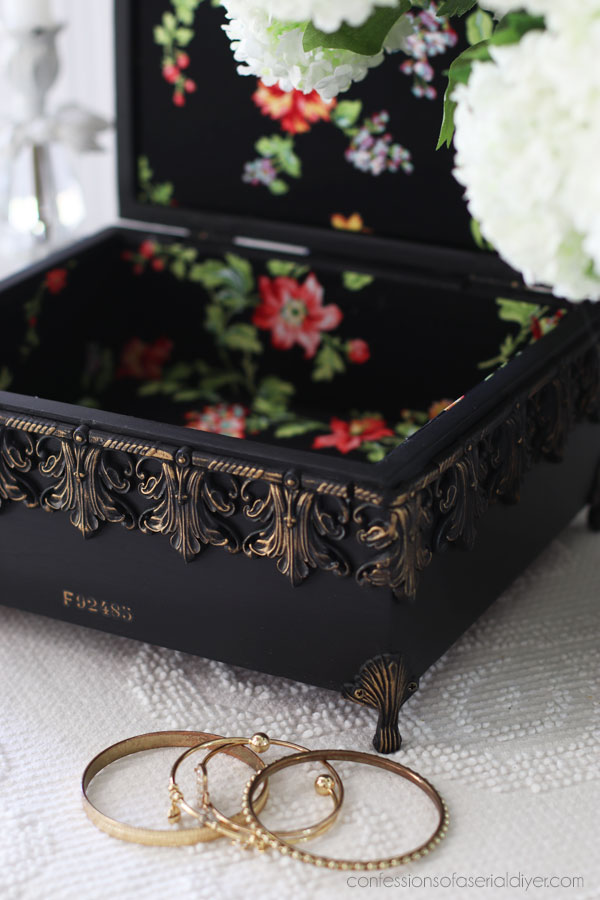
They were painted black and sealed. Then, I glued them in place and more securely attached them with the tiny screws they came with as well. And of course, I gilded those also!
I’m thrilled with how this box came out!
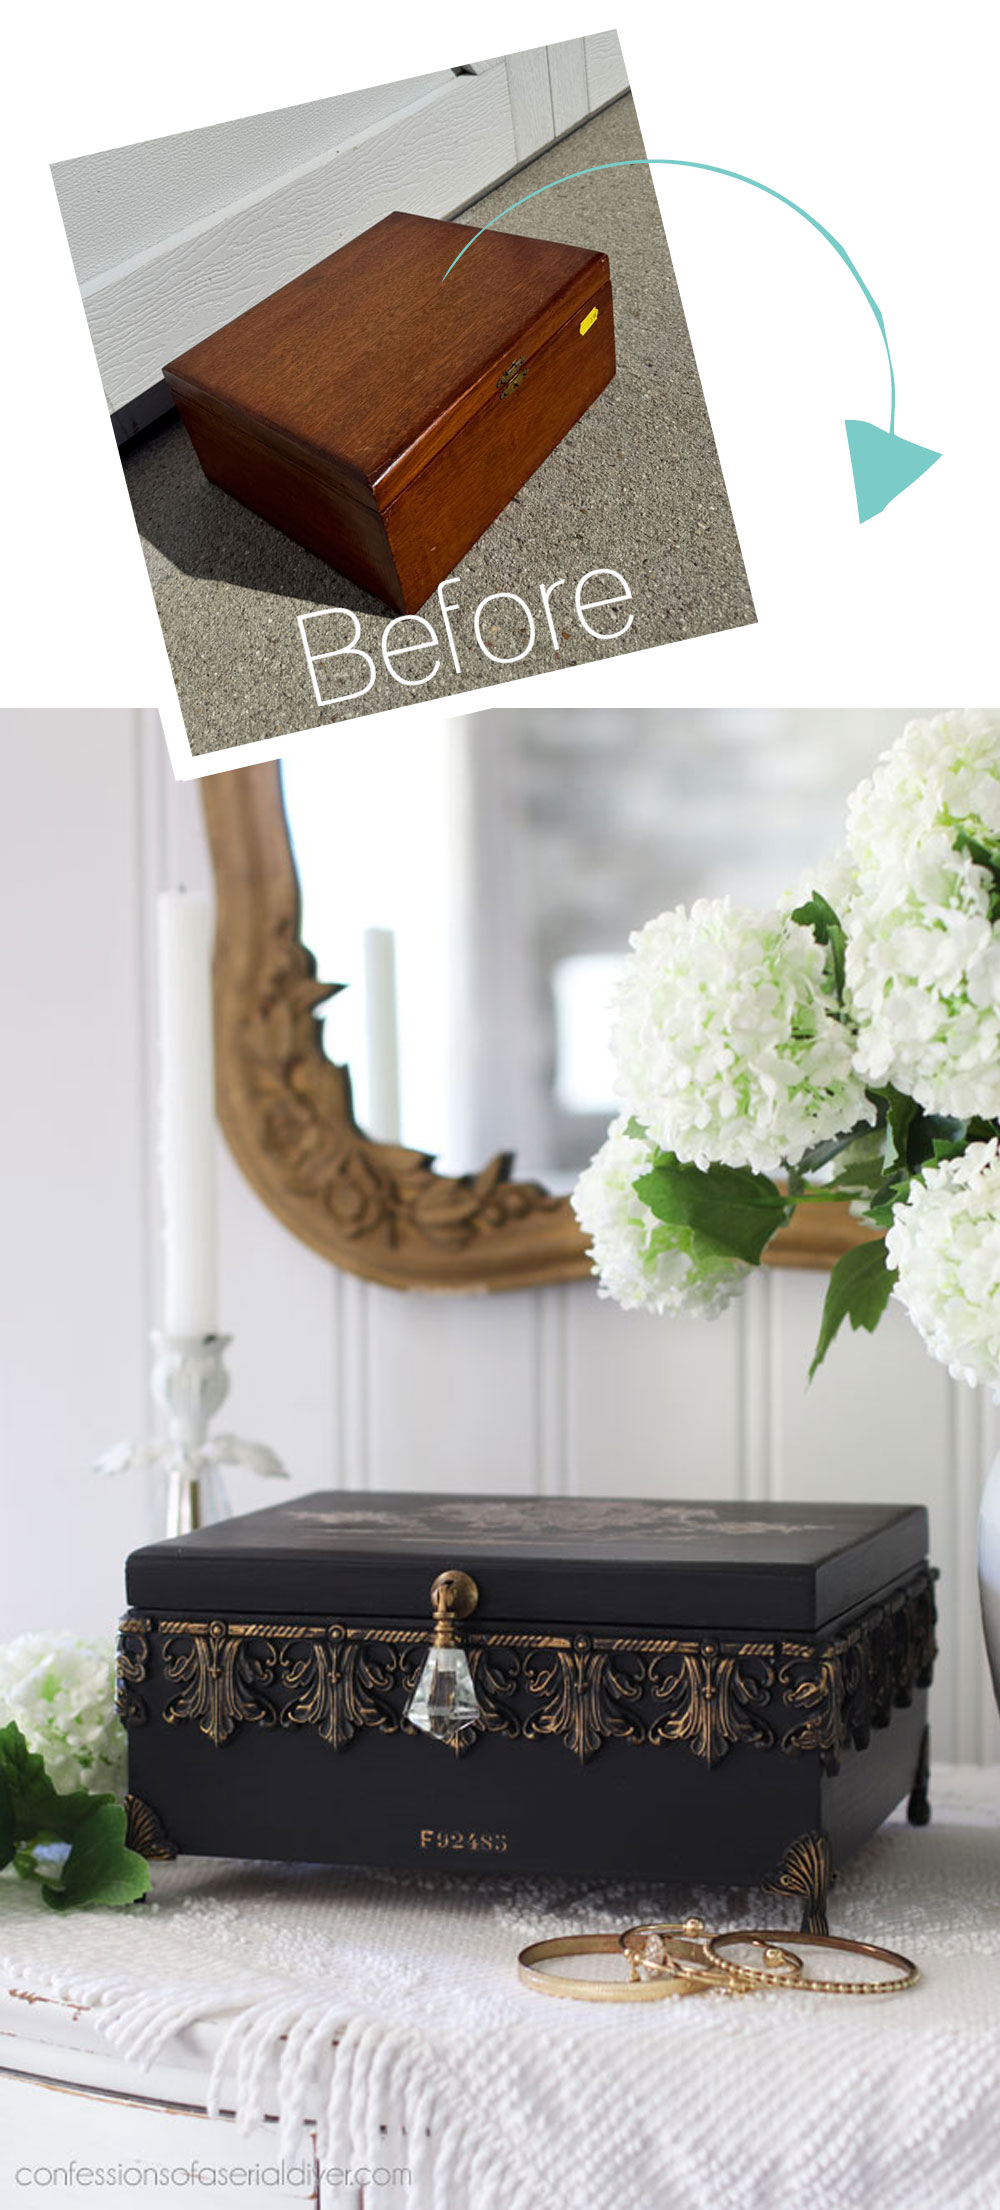
Who knew this sad thrift store box could look so high end??
And that is one piece closer to the end of this haul!!
**SHOP NEWS**
In shop news, I’ll be back on Tuesday at 11:00 am EST sharing all the BRAND NEW Q2 goodies coming to my Etsy Shop from Redesign! As always, there are a bunch of beautiful things in this release to create with, and I can’t wait to share!
Again, I won’t be in your inbox until 11:00 am since Redesign is not allowing us to unveil the new line until 8:00 am PST, so don’t think I forgot about you!
Then, I’ll be back with this round of smalls:
Have any amazing weekend, dear friends!!
UPDATE: See what I did with this round of smalls as well as all the new Redesign merch HERE now!
I’m hoping to shop for my next haul woohoo!!
XOXO,

Don’t Miss a Thing!
If you like what you see, there are several ways to follow along!
EMAIL * INSTAGRAM * FACEBOOK * PINTEREST

Get FREE SHIPPING on all orders over $50 in my Etsy shop. (No code needed at checkout!) Orders under $50 enjoy $8 flat rate shipping!
Most orders ship same or next business day! Visit my shop below!


Mary Kaiser says
WOW WOW WOW! You were not kidding when you said we wouldn’t reconize this box after! It is soooo beautiful! I love it all so much! I really love the drop handle, so pretty! That is an amazing transformation!
Christy says
Right?? I am always amazed at what a plain box like this can become! Thank you so much, my friend!! XOXO
Toby says
It never gets old seeing what you do with these boxes! This one really is fabulous and unrecognizable! Great job!
Christy says
Aww I appreciate that, Toby, thank you so much!! XOXO
Irene Sokol says
Another beatiful make over. Can’t wait for your next one.
Christy says
Thanks so much, Irene! XOXO
Nana Diana says
Fantastic transformation! I have one that I need to redo that has been mine since I was young. This is a fantastic inspiration piece. I can’t wait until it is warm enough to get outside to work on some projects. Right now it is 29˚ F on my porch. CRAZY!
Have a great day, Kristy. xo Diana
Christy says
Thank you, Diana! 29?? Wow! I hope it warms up for you soon, my friend! XOXO
Cecilia says
Wow, what an upgrade! Love the decorative pieces you added to the outside. They really dress the box up! Ugh on the lining. I bet you’re glad you did have to scrape the whole box! It’s absolutely stunning now. Great transformation!
😊Cecilia
Christy says
Thank you so much, my friend! It’s hard to believe those pieces are just plastic ha ha…they make such a difference! And yes, amen on not having to remove the entire lining!! XOXO
Carla Erickson says
Christy, this box is beautiful! I love your color choices! The glass pull is the perfect touch! This is one of my favorite projects of yours!
Christy says
Thank you so much, Carla!! I’m so glad you love this one! It was a fun one to redo! XOXO
Tracy says
Absolutely gorgeous 😍
Christy says
Thank you, Tracy! XOXO
Pamela Klug says
Absolutely amazing! Love how a plain old box turned into a beautiful piece!
Pam
Christy says
Thank you, Pamela! The possibilities are endless! XOXO
Susan says
Oh my isn’t she fancy! So pretty! The glass knob really sets it off!
Christy says
Yes, so fancy ha ha! Thank you, Susan! XOXO
Jackie C says
I feel like a broken record because I keep saying how beautiful, gorgeous, amazing the pieces you finish are. But here I am, saying it again! This is just beautiful. One of the prettiest boxes you’ve done. I like the depth of this box. It seems to be about twice as thick as most of them. Black and gold, so elegant.
Christy says
Aww you are the sweetest, Jackie! I appreciate every kind word, thank you! I really love how this one came out too, and my mom already tried to steal it lol! XOXO
Lucy Caldwell says
Gorgeous!! That won’t last long in your booth!!
Christy says
Thank you, Lucy! I predict the same ha ha! XOXO
Lorri R says
Wowsza!!! So bougie! This will be snapped up in your booth in minutes!!!❤️
Christy says
Ha ha thank you, Lorri! This box never knew it could be so bougie! XOXO
Laura J. says
Absolutely stunning Christy!!! Love the wrap-around molding highlighted in gold with the sophisticated feet! Perfect gold transfer. And the drop pull is icing on the cake! Do you ever save any of your makeovers for future birthdays or any occasion gifts for family or friends??? This beauty is a keeper!!!
Christy says
Thank you so much, Laura! I was so pleased with how all the details came together! I don’t usually save things for gifts, but my mom already tried to steal this one, and then my friend wanted it ha ha! XOXO
Cyndi says
Oh, my goodness…that is SO gorgeous! The transfer would have been beautiful on its own, but the mould really transforms it!
Christy says
Thank you so much, Cyndi! This mould is really beautiful, and it made the box for sure! XOXO
Bridget McGovern says
Wow! This is really quite stunning! This is my favorite thrift box you have done yet!!
Christy says
Thanks so much, Bridget! This might be my favorite too! XOXO
Rhonda Storey says
Hi Christy! That black box is gorgeous!! Is it possible to purchase it? I would be glad to pay S&H too. I’ve ordered several of your transfers from Etsy and love them. Thanks! Rhonda
Christy says
Thank you so much, Rhonda! I’ll send you an email. 🙂 XOXO
Vicki says
A very classy redo, as always !! Love it!!
Christy says
I’m so glad you love it, Vicki, thank you!! XOXO
Margie Fondse says
BEAUTIFUL!!!!
Christy says
Thanks so much, Margie! XOXO
Jewels L says
My goodness you amazed us once again! You were right, I wouldn’t recognize it as the box before! Love the color choices from the caviar paint to the fabric and gilding. Thanks for including us on yet another wonderful thrift box transformation.
Christy says
Aww thank you, Jewels! Night and day, right?? I’m so glad you enjoyed this one!! XOXO
TJ says
Oh, it is a beautiful “new” box! You make it look so easy (when it is not)! ha
Christy says
Thank you, TJ! I know it can seem like makeovers are so easy sometimes, but I shared the ugly truth on this one lol! XOXO
Colleen says
Christy, this redo is absolutely gorgeous!! I have a similar box to restyle and I’m going to try the black and gold like you used here. You are right, the moulds are everything! Another fantastic project!.
Christy says
I’m so glad you like it, Colleen, thank you! Enjoy recreating your own box! XOXO
Marlene says
Wow, that will be a beautiful place to put special things. You have made it so much prettier. Thanks for sharing.
Christy says
Thank you, Marlene! It sure will!! XOXO
Debra Hubbs says
Just wow! This is so beautiful! Absolutely love everything about it.
Christy says
I’m so glad you love it, Debra, thank you, my friend! XOXO
Caye says
Well, what can I say! Yet another WIN for Christy. You gave me courage with this one because I have one to do and I was afraid to tackle it because I was worried that I wouldn’t be able to get the insides out. But, I shall persevere thanks to you!
Great job, again.
Christy says
Thank you so much, Caye! I’m glad this was helpful…now drag that box out and get started ha ha! XOXO
Cheryl Acampora says
Christy girl,
You have outdone yourself! I do believe that is the prettiest box you have ever done. Black and gold is just so classy. Keep it up, because you do boxes better than anybody else!
Christy says
Aww thank you, my friend! I am smitten with this one as well! I need to find more boxes ASAP!! XOXO
Trish says
WOW, just WOW! You are so inspiring with your beautiful transformations. Thank you for sharing your talents with us.
Christy says
Aww thank you so much, Trish! I really appreciate that, and I’m so glad you enjoy what I share!! XOXO
Phyllis says
Just – lovely!
Christy says
Thank you, Phyllis! XOXO
p says
Ohhh my. This is an amazing redesign. The moulding is perfection, as are the feet, and… that drop pull is stunning. Such an elegant piece.
Looots of work – that you make look way easier than it is. 🙂
This an amazing inspiration piece. As others have said – I have an old box – from Grandma. (luckily no inside stuff to remove) Tried to sand it once – to No avail. Guess this one needs stripper – or sealer if painted).
Has a mirror on the inside lid.
I am always amazed how you do such creative redesigns – Every week !!!
Thank you 🙂
Christy says
I’m so glad you love this one, P, thank you! I really loved seeing it come to life with each step. If you can sand yours just enough to make the surface smooth, you can paint right over whatever is left on there. You guys definitely make it fun for me to share each week! XOXO