Beautiful friends, welcome back! Today, I’m sharing how to easily update a shelf with a stencil! Not that you need a how-to for that necessarily, but more to show how a stencil can really update a boring shelf!
I just shared a shelf, but I decided to pull this one from my archives to share today since we are moving Jack back into his apartment at UVA this weekend, and I’m trying to enjoy some summer moments before we have to say good bye!
This shelf was a $6.98 thrift store find:
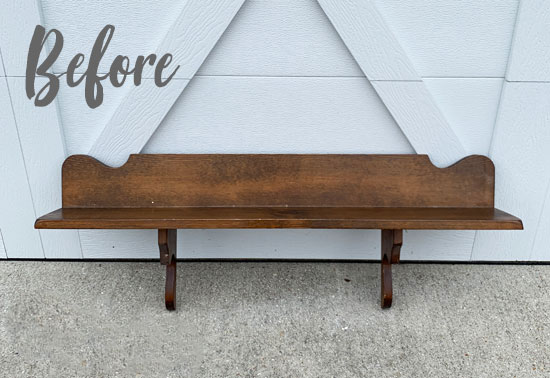
It took me a long time to get around to tackling this piece. I loved that it was solid and that it appeared to be handmade, but the weirdness of how close together the support brackets were kept throwing me off.
I couldn’t move the brackets because they had been secured to the back of the shelf with hand-carved notches, so I had to work with it the way it was.
I’ve included a few affiliate links so you can find the products I love.
How do you get motivated??
Just start painting!! After giving it a good cleaning, I finally decided to do what I often do when I’m feeling unmotivated about a piece…I just started painting! Works every time!
Paint
I decided on this gorgeous blue/gray by Dixie Belle called Savannah Mist:
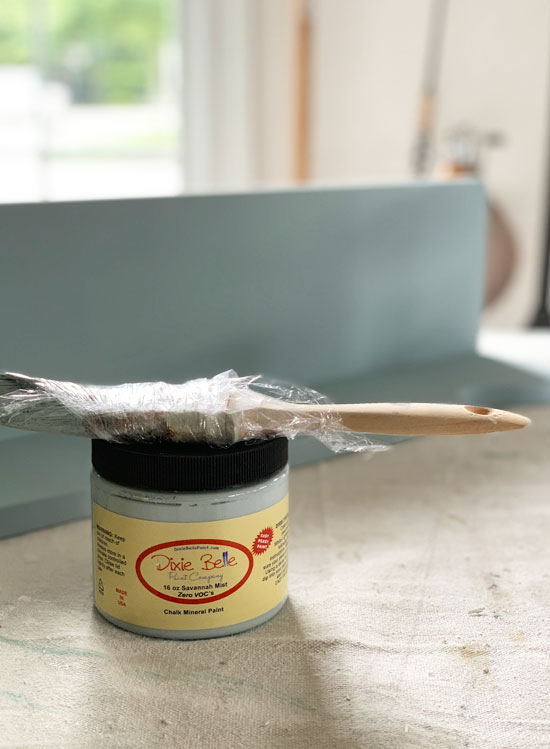
It is one of my absolute favorites! And, it has excellent coverage, but I gave this shelf two coats.
Adding a stencil
Then I decided to add part of a stencil I had in my stash to the back of the shelf:

I used spray adhesive to hold the stencil in place and then used a small brush and white acrylic craft paint to color in the stencil, trying not to brush against the edges as much as possible. It took three coats. You can see in the photo above that I just covered the parts of the stencil that I didn’t want to use with FrogTape.
I removed the stencil as soon as I applied the third coat. Once the paint was dry, I sanded across the stencil to smooth it out and all over the rest of the shelf as well with 220 grit sandpaper.
Seal
It was then sealed with Clear Coat in satin using DB’s blue sponge applicator. (You can see a video of how easy that is to do in this post.)
I added D-ring hardware to the top of either side of the back of the shelf to hang it.
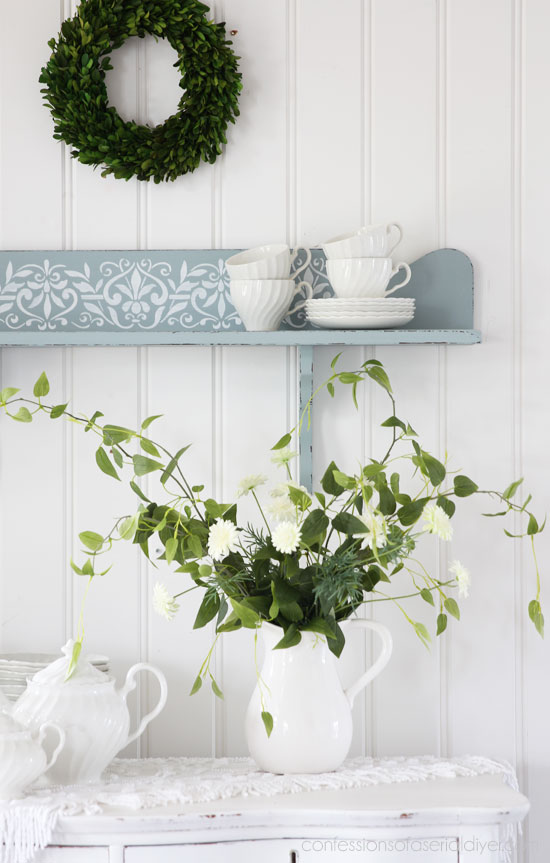
The after
And now I have a sweet new shelf:
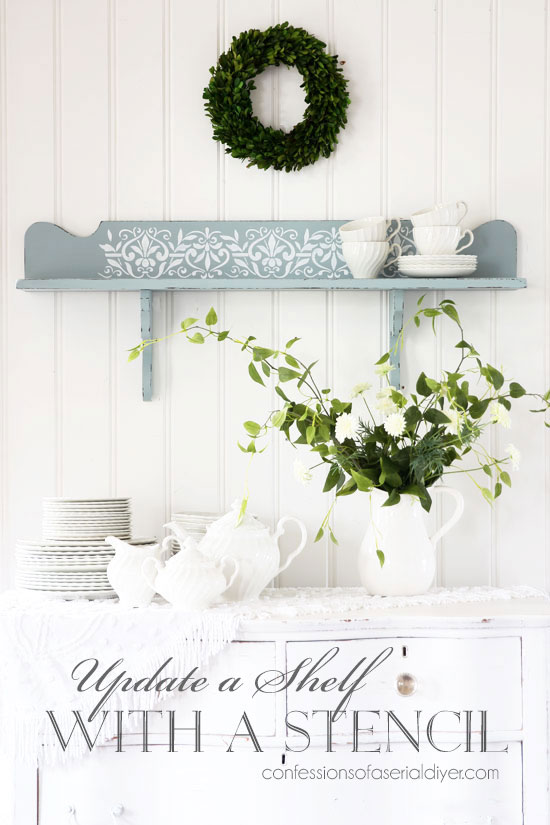
The curves and the blue along with the stencil give it a cottage vibe don’t you think?
The stencil really adds such a unique and fun detail…
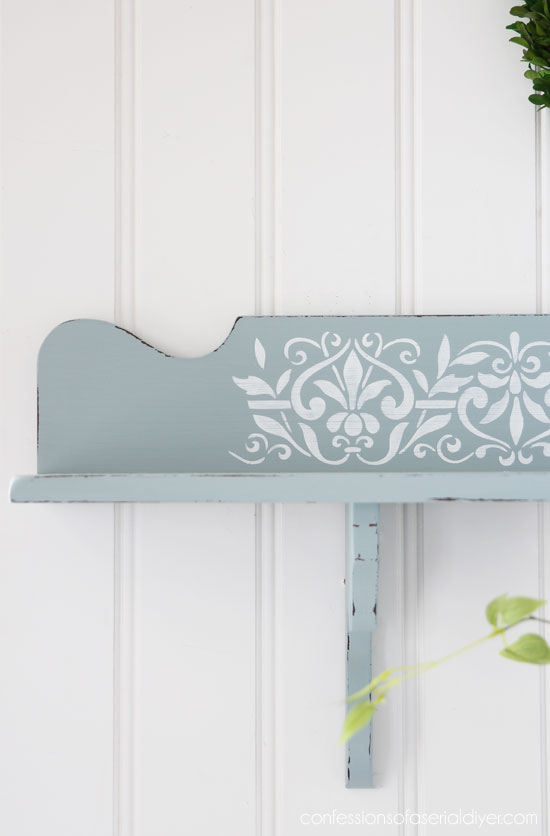
And I don’t think the shelf support brackets look too close together anymore since they sit just inside where the stencil ends…
Right??
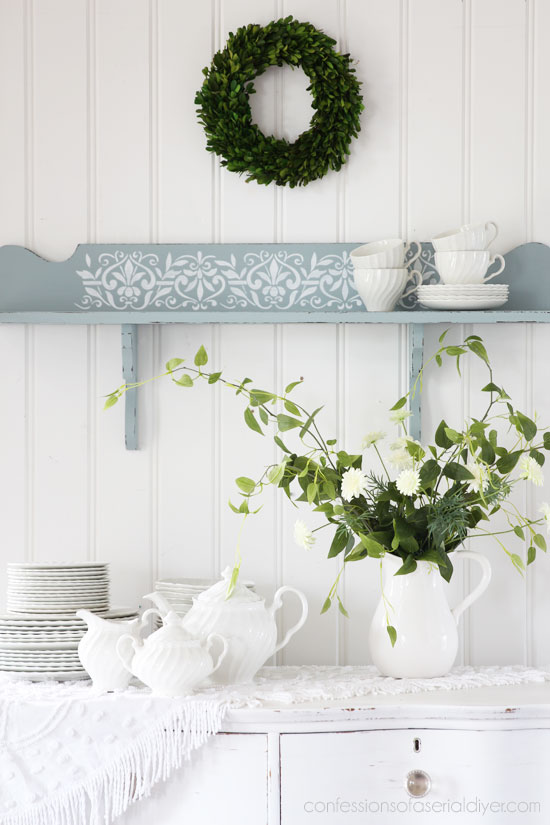
I love this pretty blue against all the white!

Most shelves don’t have a piece on the top like this one does, but most do have a piece on the bottom where you could add your stencil!

If you are hesitant to use stencils, Silkscreen stencils like the one I shared on my half moon table HERE are SO much easier to use with great results!
Dixie Belle had not come out with their line of silkscreen stencils when this post was originally shared, but I have a bunch in my shop:

You can see them all HERE.
And, they can be cut apart to use any way you like!


I was so happy to see this piece turn out so cute since someone had put a lot of care into building it!
I’ll be back with another repost, this beautiful hutch that belongs to my sweet mama:

See ya then!
UPDATE: No need to wait, see the after of this pretty piece HERE now!
XOXO,

Don’t Miss a Thing!
If you like what you see, there are several ways to follow along!
EMAIL * INSTAGRAM * FACEBOOK * PINTEREST


Get FREE SHIPPING on all orders over $50. No code needed at checkout! Orders under $50 always enjoy $8 flat rate shipping! Most orders ship same or next business day!


Mary Kaiser says
Wow I can’t believe it’s time for Jack to go back to college already! Is this his 3rd year? I am amazed he is old enough to even be going to college, yet alone going on his 3rd year! I remember him when he was a little tyke. I loved this shelf when you did it, especially the color you used. I turned out super cute! Have fun with your family! What grade is Brenndan in?
Christy says
I know!! I didn’t go into detail in my post, but he actually took four classes over two summer sessions this summer to get ahead and lighten his load for the Fall a bit. So, he was at school in June for four weeks and then came home for a month, then he was back for four more weeks and just has this week before the Fall semester starts. That’s why I wanted to soak up some time with him this week! Yep, he’s heading into his third year already! I can hardly believe it! Brennan is going into 7th grade, and he is almost at my height! Crazy! Glad you enjoyed this replay, my friend! XOXO
Shirley says
I’m actually really surprised at how this came out. I can see where the support brackets threw you off. I took one look at it and said to myself, what would you do with that? Lol I guess it’s the paint because you seem to have “put it in its place” if you know what I mean..lol! I also think you did a smart thing by only going so far with the stencil. I think if you had gone all the way to the ends it may have looked awkward. Just going so far gave it the balance it needed. I don’t care for the color, however, this piece needed it, and I’d actually buy it. Beautiful job Christy!!
Christy says
Thank you so much, Shirley! Yes, somehow the stencil helped to balance out those awkward brackets! I’m glad you enjoyed this one! XOXO
Petra says
So pretty, and the perfect colour. I’m the same – if I’m lacking a bit of inspiration, I just start painting anyway 🙂 The blue-grey is perfect for it.
Christy says
Thank you, Petra! I really love this color! And yep…best advice…just start painting lol! XOXO
Cory says
It’s gorgeous! What a huge difference in feel after your refresh! What did you do to obtain the slight distressing? Thank you for sharing all your fabulous work!!
😍😍😍
Christy says
Thanks SO much, Cory! I used 220 grit sandpaper wrapped around an old sanding block to sand all over, and then I hit the edges a bit more to distress. 🙂 XOXO
Cheryl r Atkinson says
Hi Christy! I hope you are enjoying the end of summer with your son. You are the Shelf flipper queen.
Christy says
Aww thank you, my friend! I appreciate that and the boys and I are making the most of our week together for sure! XOXO
Cecilia from Georgia says
This turned out so pretty! I am so bad about overthinking what I want to do with a piece, so good advise about just start painting! You can always paint over it if it’s not working out!!
Christy says
Thank you, Cecilia! Yes, exactly!! I often just start and ideas start to follow! XOXO
Julie says
I love this transformation. I’m kind of watching everything you do as I prepare to start my own stenciling and transforming adventure! Thank you for sharing!!
Christy says
Thank you, Julie! I hope you find some inspiration for your own projects! XOXO
Cyndi says
Perfect! 🙂
Christy says
Thank you, Cyndi! XOXO
Mikki says
I love this! The color is so pretty and the stencil is perfect! I have found a number of this style of shelf recently. Unfortunately, the shelves I keep coming across have a heart cut out on the back board. I found two a few weeks ago that were about 3-4 feet long and only $1. I left them. I don’t know how to work around the heart. Do you have any ideas? Have a great week! XOXOX
Christy says
Thank you, Mikki! Wow, a dollar was a steal for long shelves. If the part that has the heart can be removed altogether, I will do that. Sometimes they can’t though and that is a real bummer as I don’t think there’s much hope for those pieces unless you just repurpose the rest of the wood! Enjoy your week too!! XOXO
Renee says
Beautiful! I LOVE the color and stencil – perfect together. I really appreciate the way you tell exactly what you’re doing along with the products you used.
Thank you!
Christy says
Thank you so much, Renee! I’m glad you enjoy seeing the steps along the way! XOXO
Niki says
That is a very strange, unique; I guess, shaped shelf. This may be weird but I see a horse head in the support piece. So I’m going to go with this being a miniature buckboard seat looking shelf. 😂😂😂 I think the blue does look good against the white and the stencil as a nice compliment to it!
Christy says
Thank you, Niki! Yes, let’s go with that lol! It was a strange configuration for sure! XOXO
Mary says
Hi Christy 🙂 I thought for sure you would just pull those skinny brackets off and use the shelf that way. But, as usual, you surprised and the finished product is beautiful! I’m continually amazed at the difference paint/stencils, etc make in taking a ho-hum piece and turning it into the belle of the ball 🙂
Christy says
Thank you, Mary! The way it was built, the brackets were notched into the shelf in a way that they could not be removed, or else I definitely would have moved them, but yes…paint is magical lol! XOXO
Dalila says
Well, you saved an ugly duckling. This is a big improvement…
Christy says
Thank you, Dalila! I think so too! XOXO
Andrea says
I love that stencil!
Could you please let me know where I can buy it?
Thank you.
Christy says
Thank you, Andrea! Unfortunately, I’ve had it a while and I no longer have the original packaging. I did buy it at Michaels though! XOXO
Karen says
Hi Christy, I love the way this shelf turned out, but all the time I was reading your post and about the “problem” with the brackets being too close, I kept thinking… I would just turn it upside down and use the brackets as built-in book ends! Maybe It’s just me, but I flipped my laptop upside down and I think it would work! Beautiful job though and I love the color scheme.
Christy says
Thank you so much, Karen! I did consider that as we did something similar with a shelf in my son’s room, and certainly whoever bought it could still use it for that purpose! XOXO
Rose Lefebvre says
It is much prettier and very tasteful. I would put it up!
Christy says
Thank you, Rose! It sure looks a lot happier now lol! XOXO