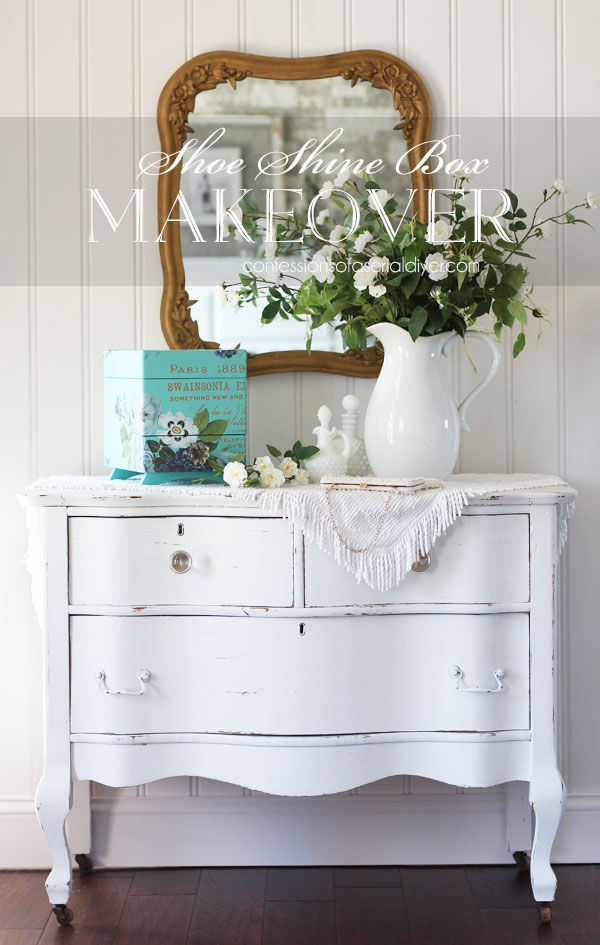
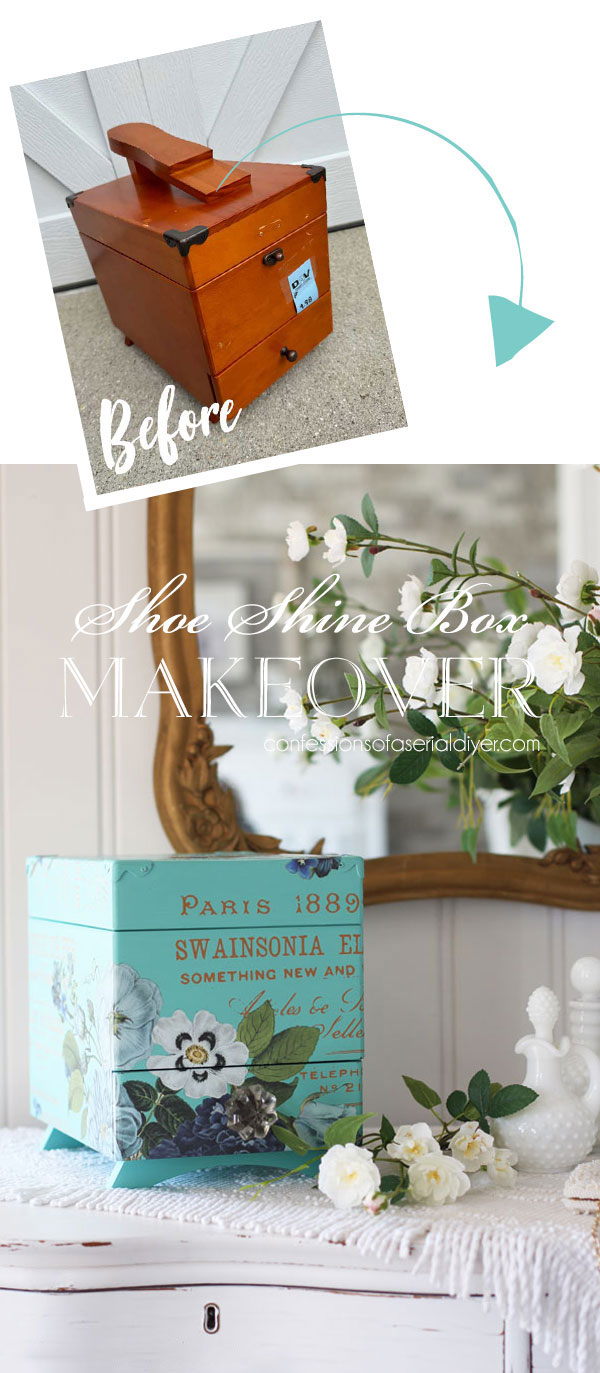
Hello, amazing friends! I just love when y’all stop by to visit, and I am so grateful for each and every one of you! When I asked which piece from my brand new haul I should redo after the table I shared on Tuesday, the answer was overwhelmingly, the shoe shine box. I guess there are a lot of those roaming around out there! Today’s shoe shine box makeover started out like this:
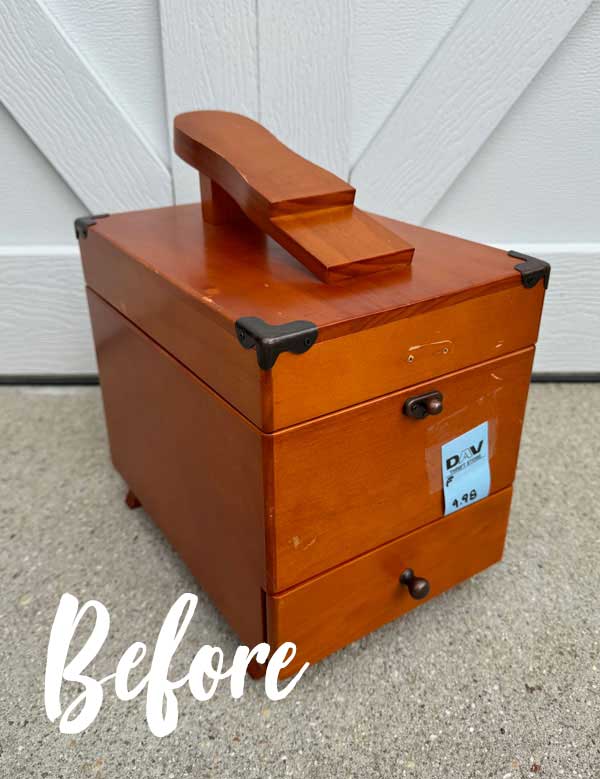
It looks like the tag read $4.98, but it was actually $9.98.
Before I even put it in my cart, I made sure the piece on top could be removed, and luckily, it was just held in place by two screws.
That was the first thing to go:
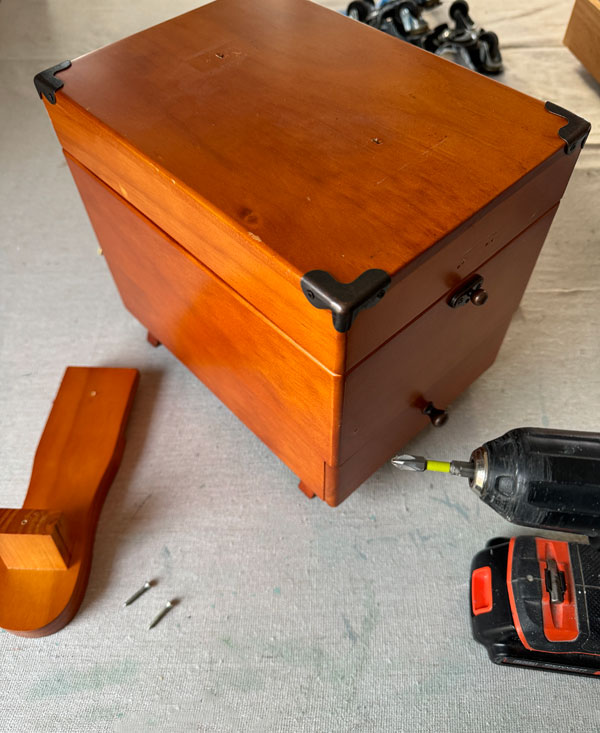
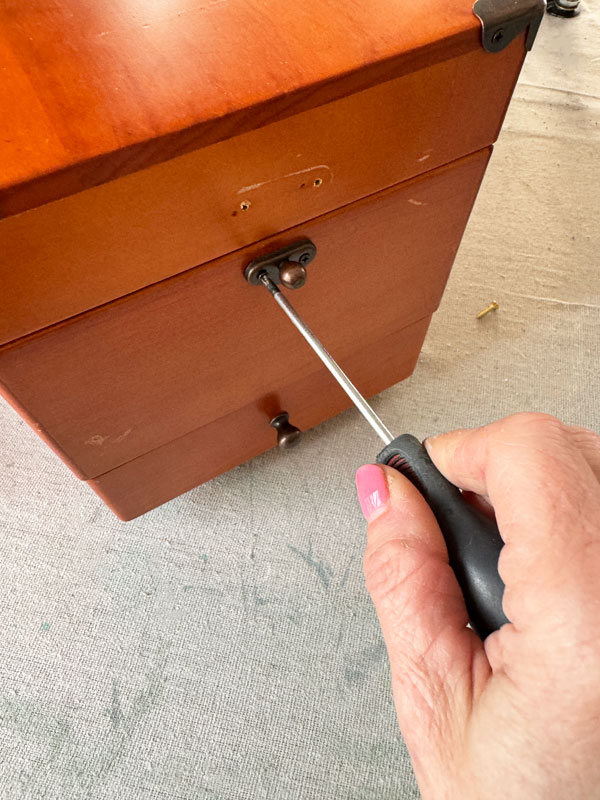
I also removed the latch on the front and the small knob on the drawer:
Clean
It was already pretty clean, but I still gave it a wipe down with White Lightning using an applicator pad. I rinsed it with clean water and I was ready to fill the holes!
Fill holes
To fill the holes left by all the screws, I used Dixie Mud:
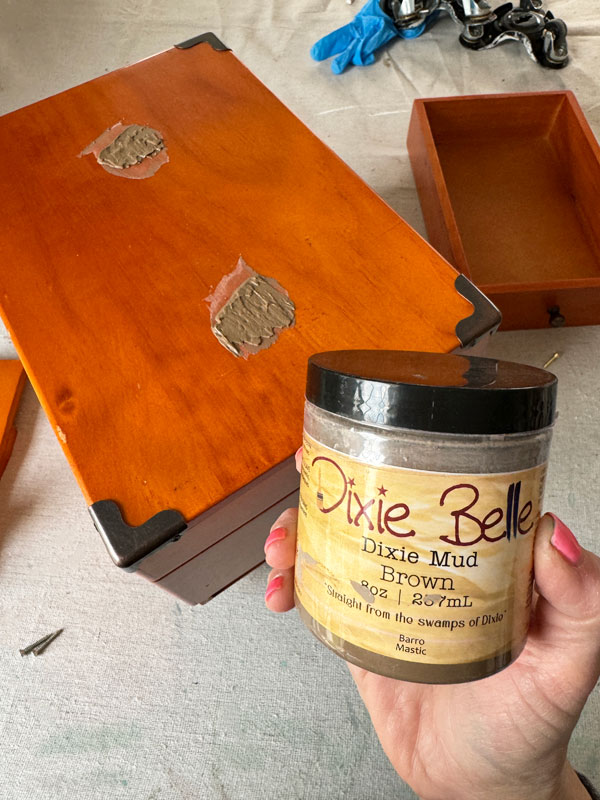
I left it to dry for a couple of hours and then sanded those areas smooth with a sanding sponge.
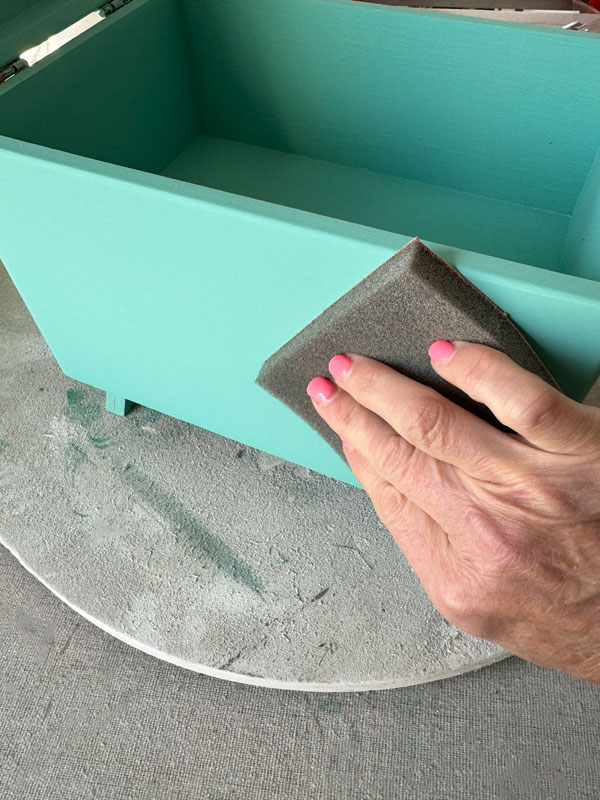
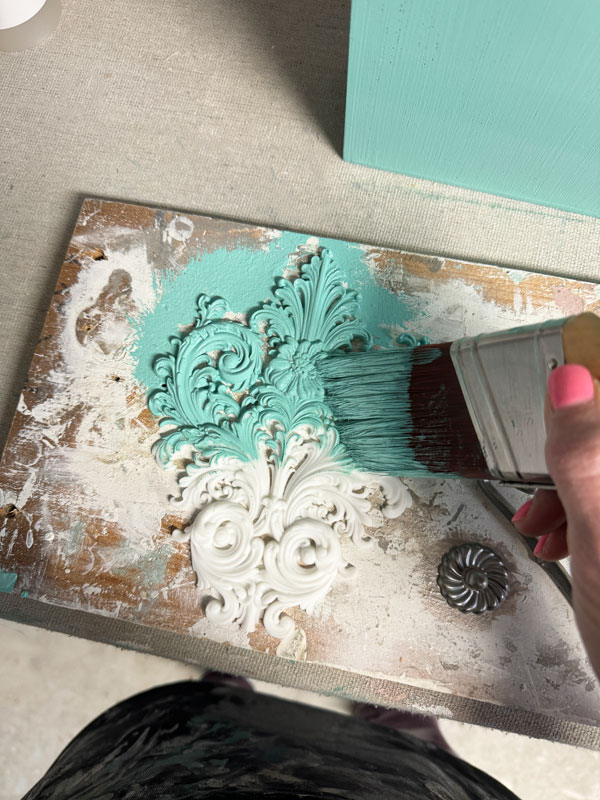
Paint
I wanted to play with color for this makeover and pulled out this gorgeous blue, The Gulf:
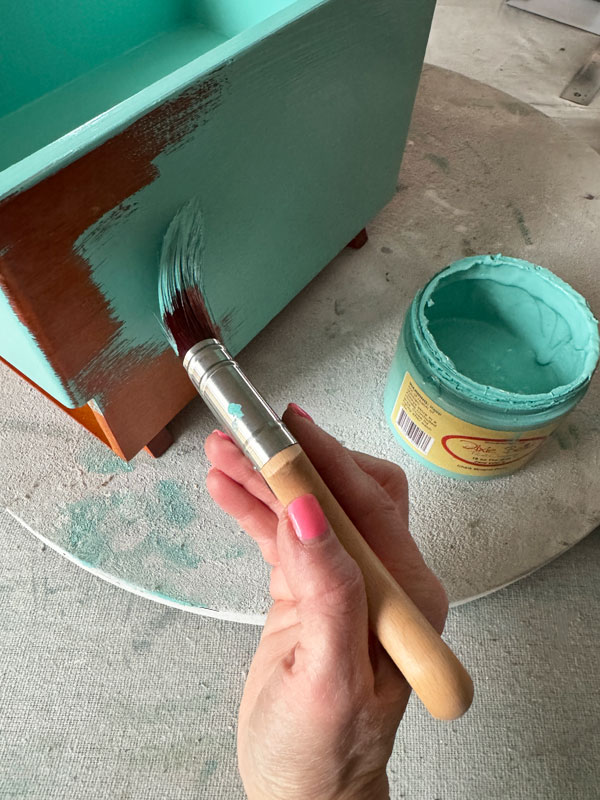
It got two coats and then a light sanding with a sanding sponge to smooth it all out:
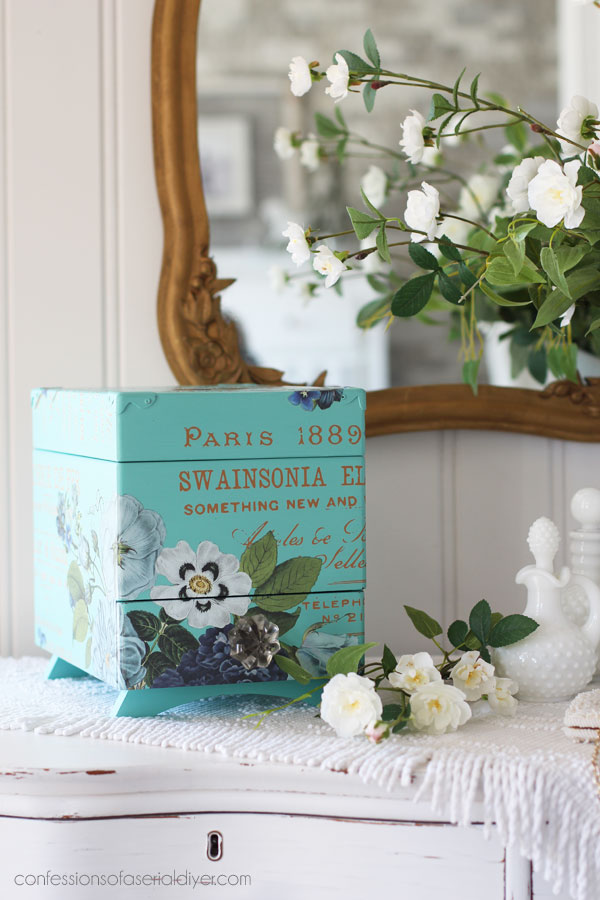
Adding a Transfer
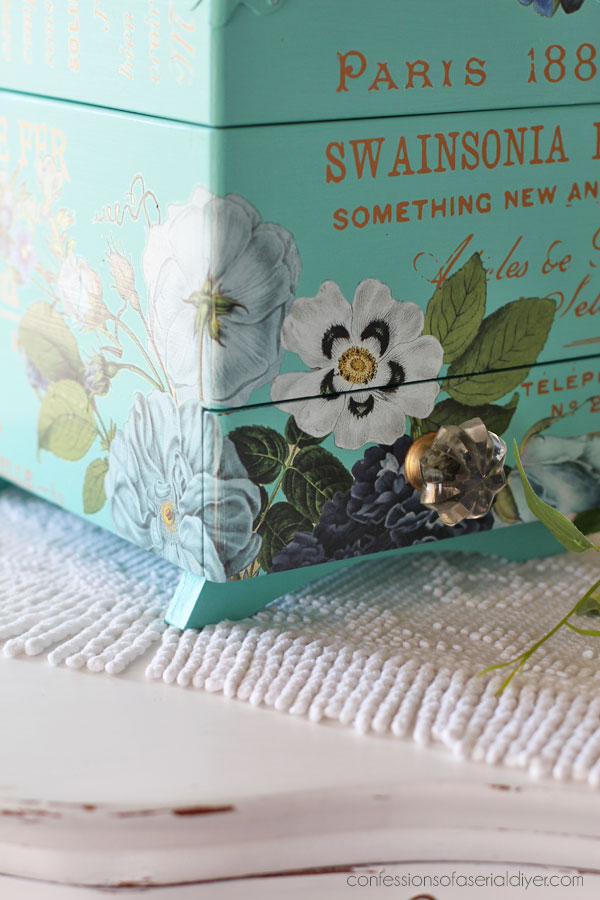
I chose the Cosmic Roses transfer to pretty this piece up since I thought it would be gorgeous over this blue:
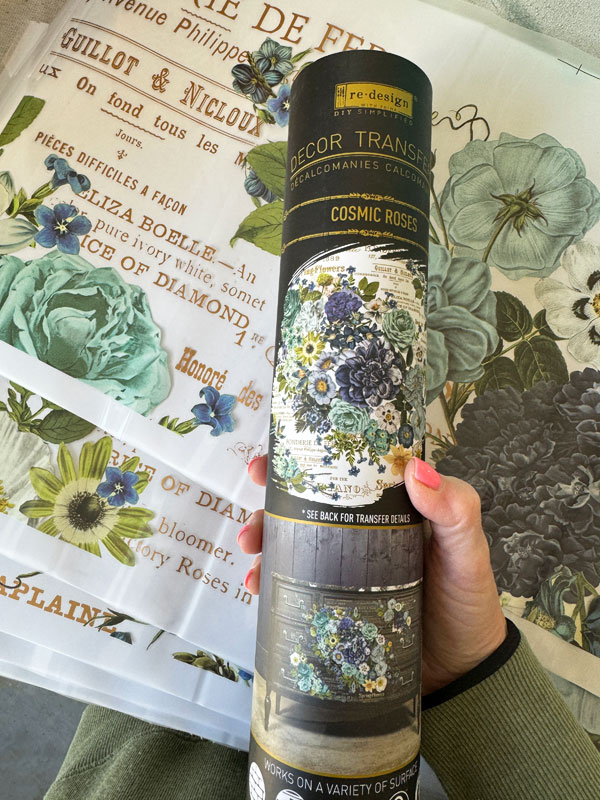
This transfer comes with six sheets, and each one matches up to another to make one large design, but I cut the heck out of it to get just the right pieces for each section lol.
I started by wrapping the first piece I cut around the front…
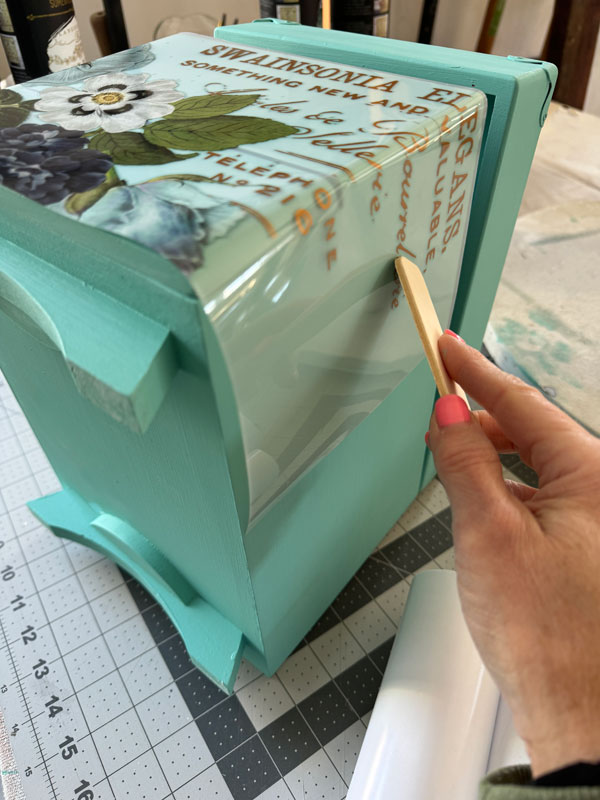
If you haven’t used a transfer before, they are pretty easy to apply.
HOW TO APPLY A TRANSFER:
- Remove the white backing
- Position the transfer where you want it
- Use the burnishing tool included to burnish (rub with pressure) the transfer to your surface
- It is best to start in one corner and pull the clear plastic layer on top away from the transfer as you go.
- If you get any pieces that stick to the clear plastic layer on top, lay it back down and burnish some more
You may need to cut your transfer into smaller pieces and match it up to make it easier to apply if you have mouldings or trim you are trying to work around. This box was easier because it was nice and flat.
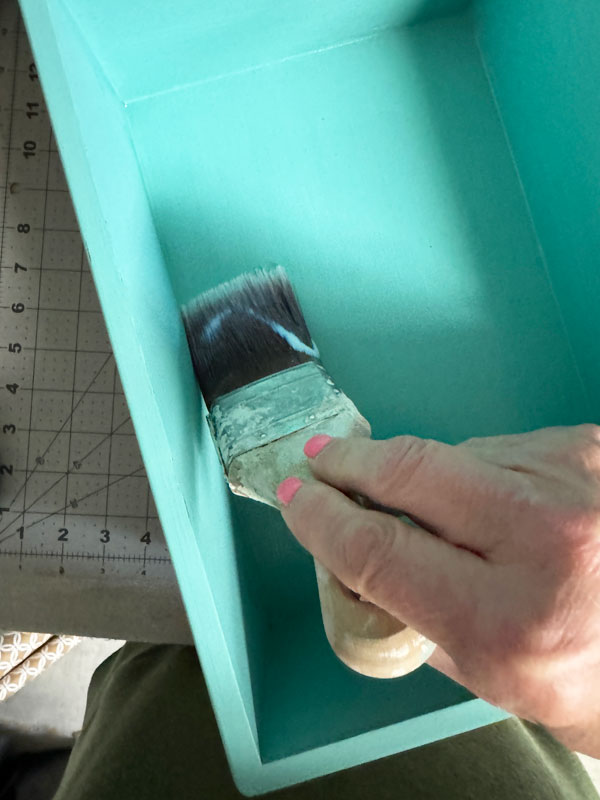
Seal
Once I had the transfer applied where I wanted, I sealed with Clear Coat in Satin using a brush this time since it is much easier to apply it to these small interior spaces than the blue sponge…
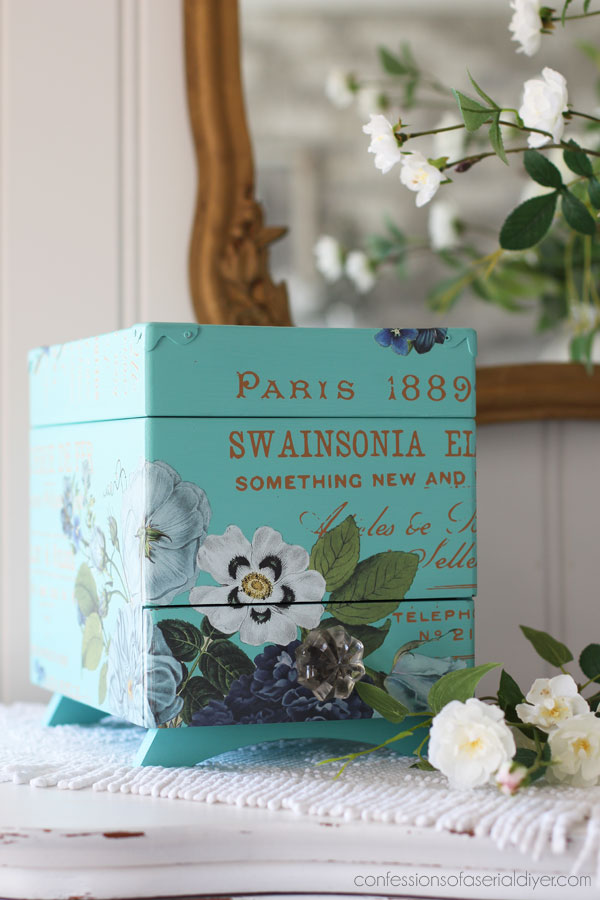
The after
Here is how this shoeshine box looks now!
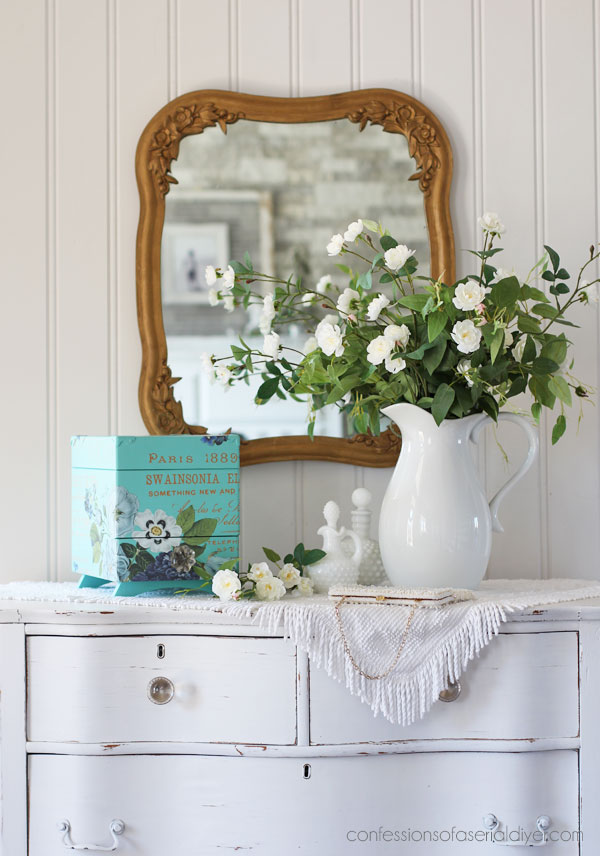
What shoe shine box?
It just looks like a cute little storage box now!
What I liked about this one is it had these little feet on it:
Most of the shoe shine boxes I see in thrift stores do not. You could always add them though!
I also liked that it had a small drawer:
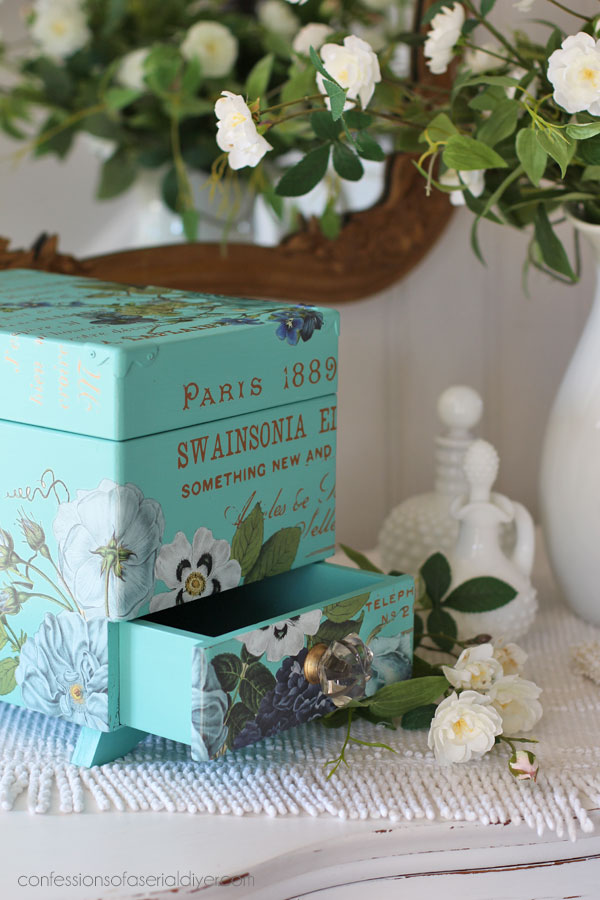
The top lifts up to reveal a larger compartment:
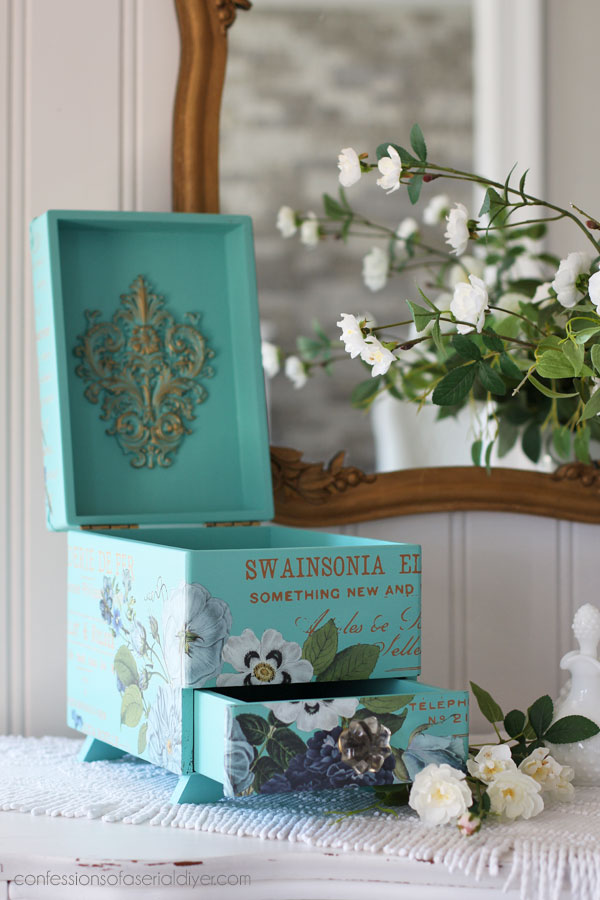
I decided to add something pretty inside…
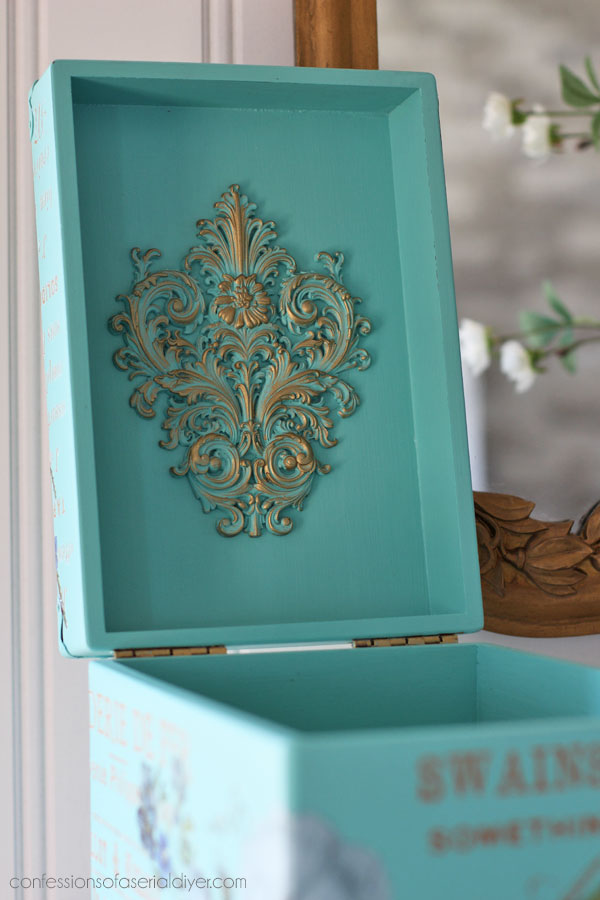
Would you believe I made that gorgeous piece with a mould?
It’s a new one in my shop called Salon de La Belle Epoque:
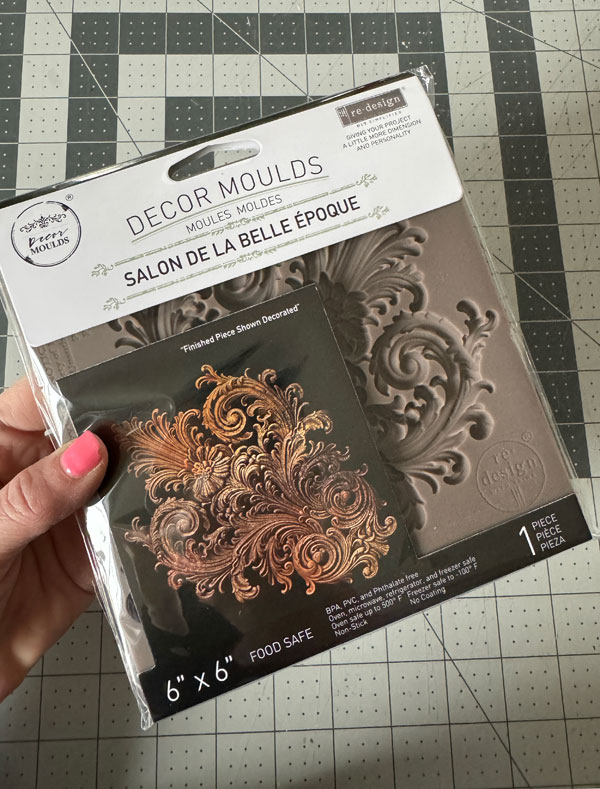
I had planned to use it on the top, but decided to go with the transfer instead, so it is now a lovely surprise when you open the lid.
Making these resin pieces could not be easier!
I used Amazing Casting Resin which comes with two liquids:
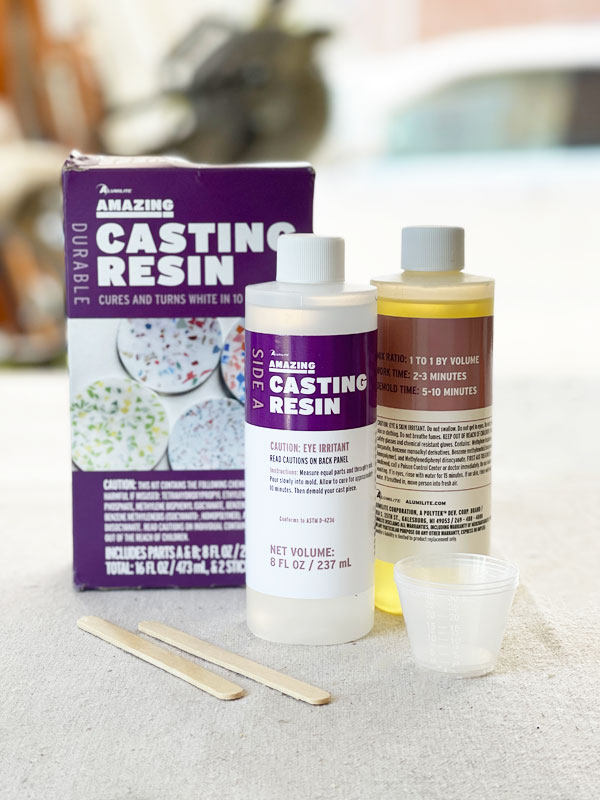
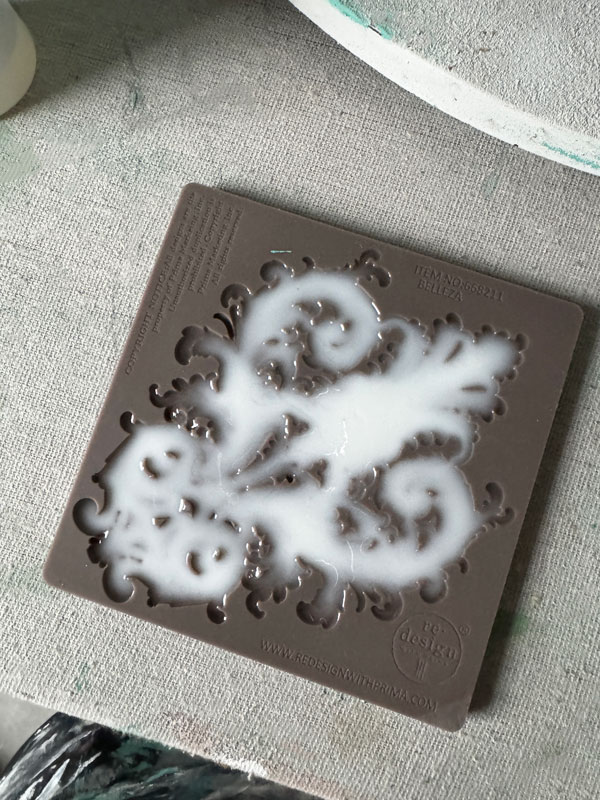
You just mix equal parts of each in a small cup and pour it into your mould, making sure not to let it overflow:

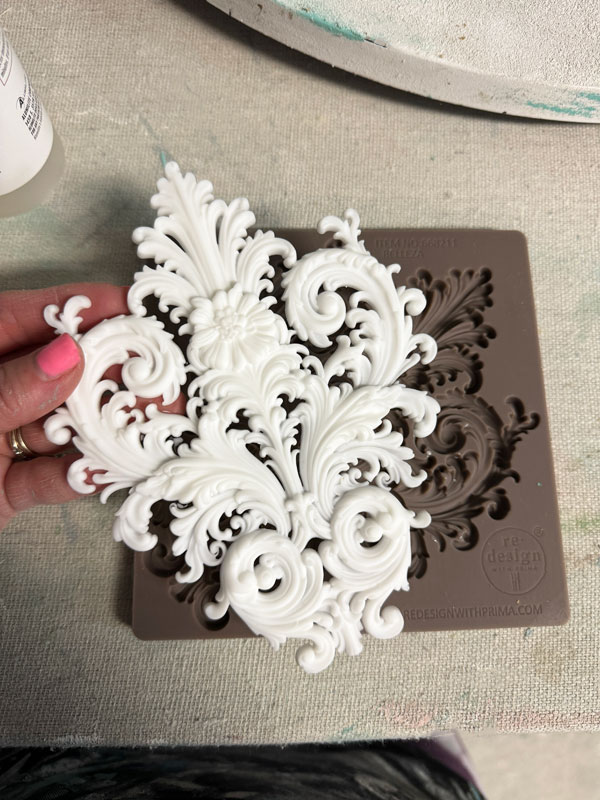
Let it sit for about 15 minutes to cure…
Then pull it out of the mould. Look at that detail!
I painted this one in The Gulf first:
Followed by Gold Gilding wax that I dry brushed on with an old stencil brush I’ve been saving for this purpose.
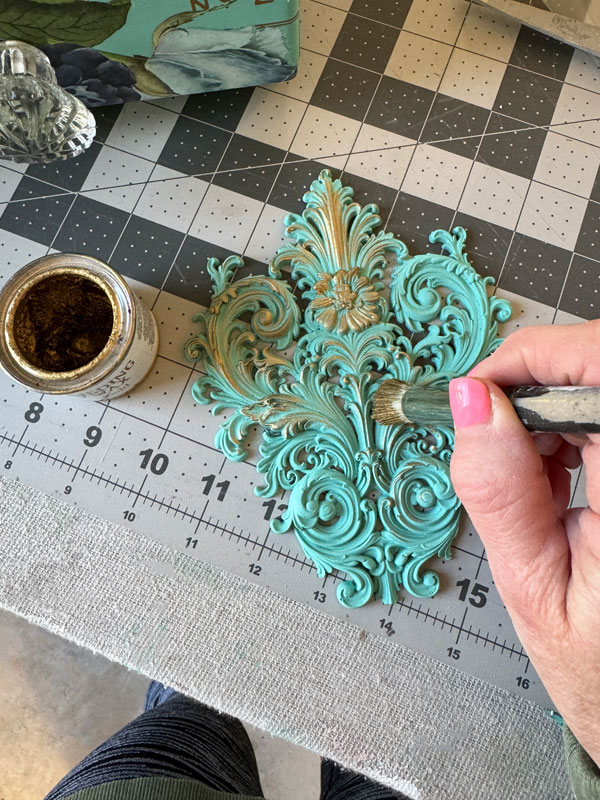
Isn’t that gold so pretty over this blue?
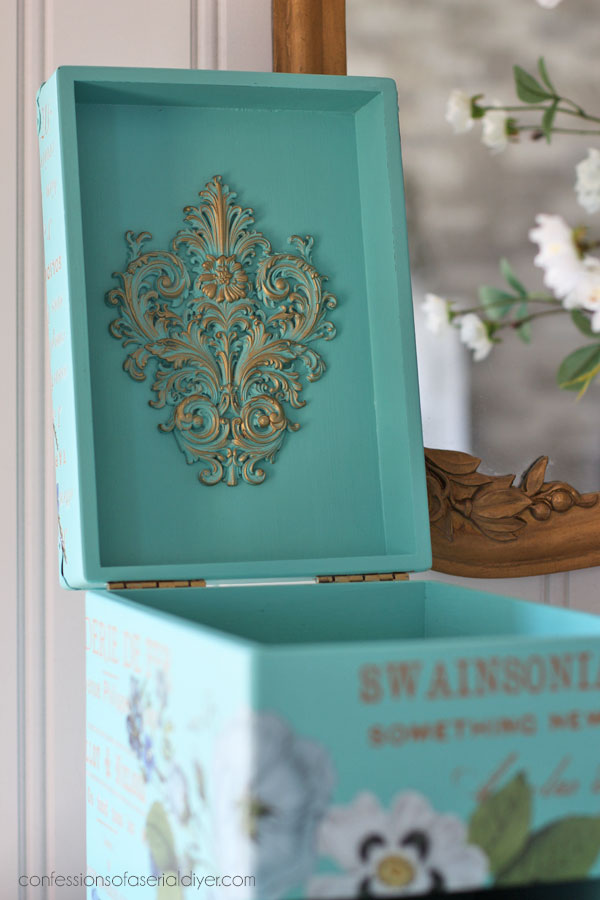
I attached to the lid with E6000 glue.
See all the moulds I have available in my shop HERE.
I left the interior of the cubby on top and the drawer plain since there was a lot going on outside:
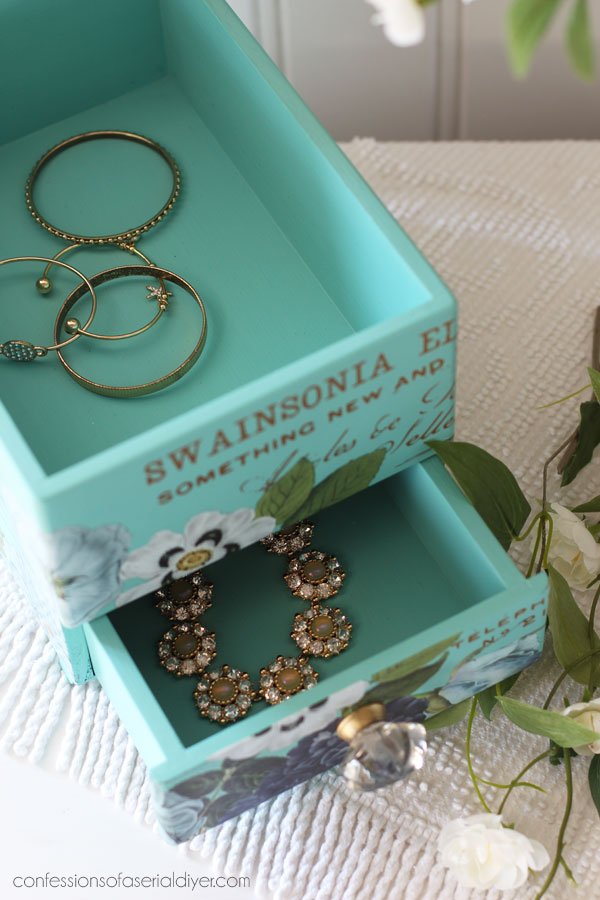
I swapped out the original tiny knob for this larger glass one, but I added a little gold gilding wax to the metal part…
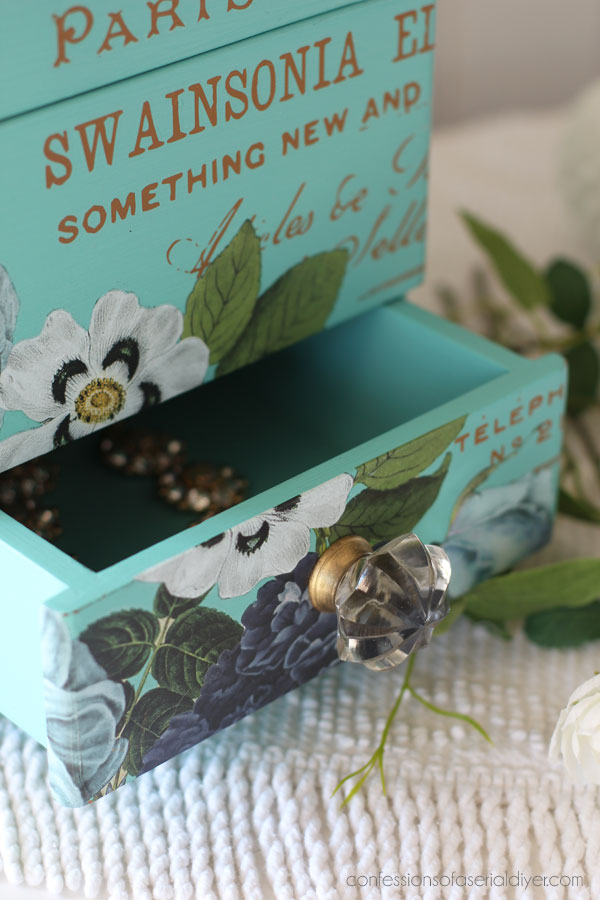
I’m displaying jewelry in it, but it could be great for holding makeup, office supplies, medications, or it could just sit looking pretty!
What would you use it for??
A peek at the top…
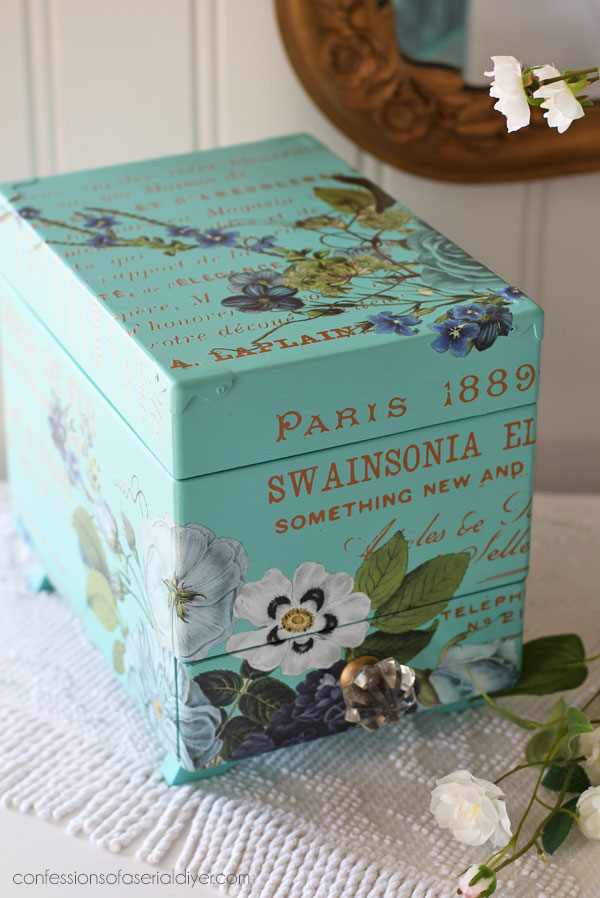
And you can see the design wraps around on either side…

This transfer could be used for a ton of small projects! It is one of my favorites.
Piece #2 is complete!!
Lots to go!
If you missed the first piece, you can see that HERE!
And if you want to see a larger project using this transfer, check out this dresser set:
You can see that makeover HERE!
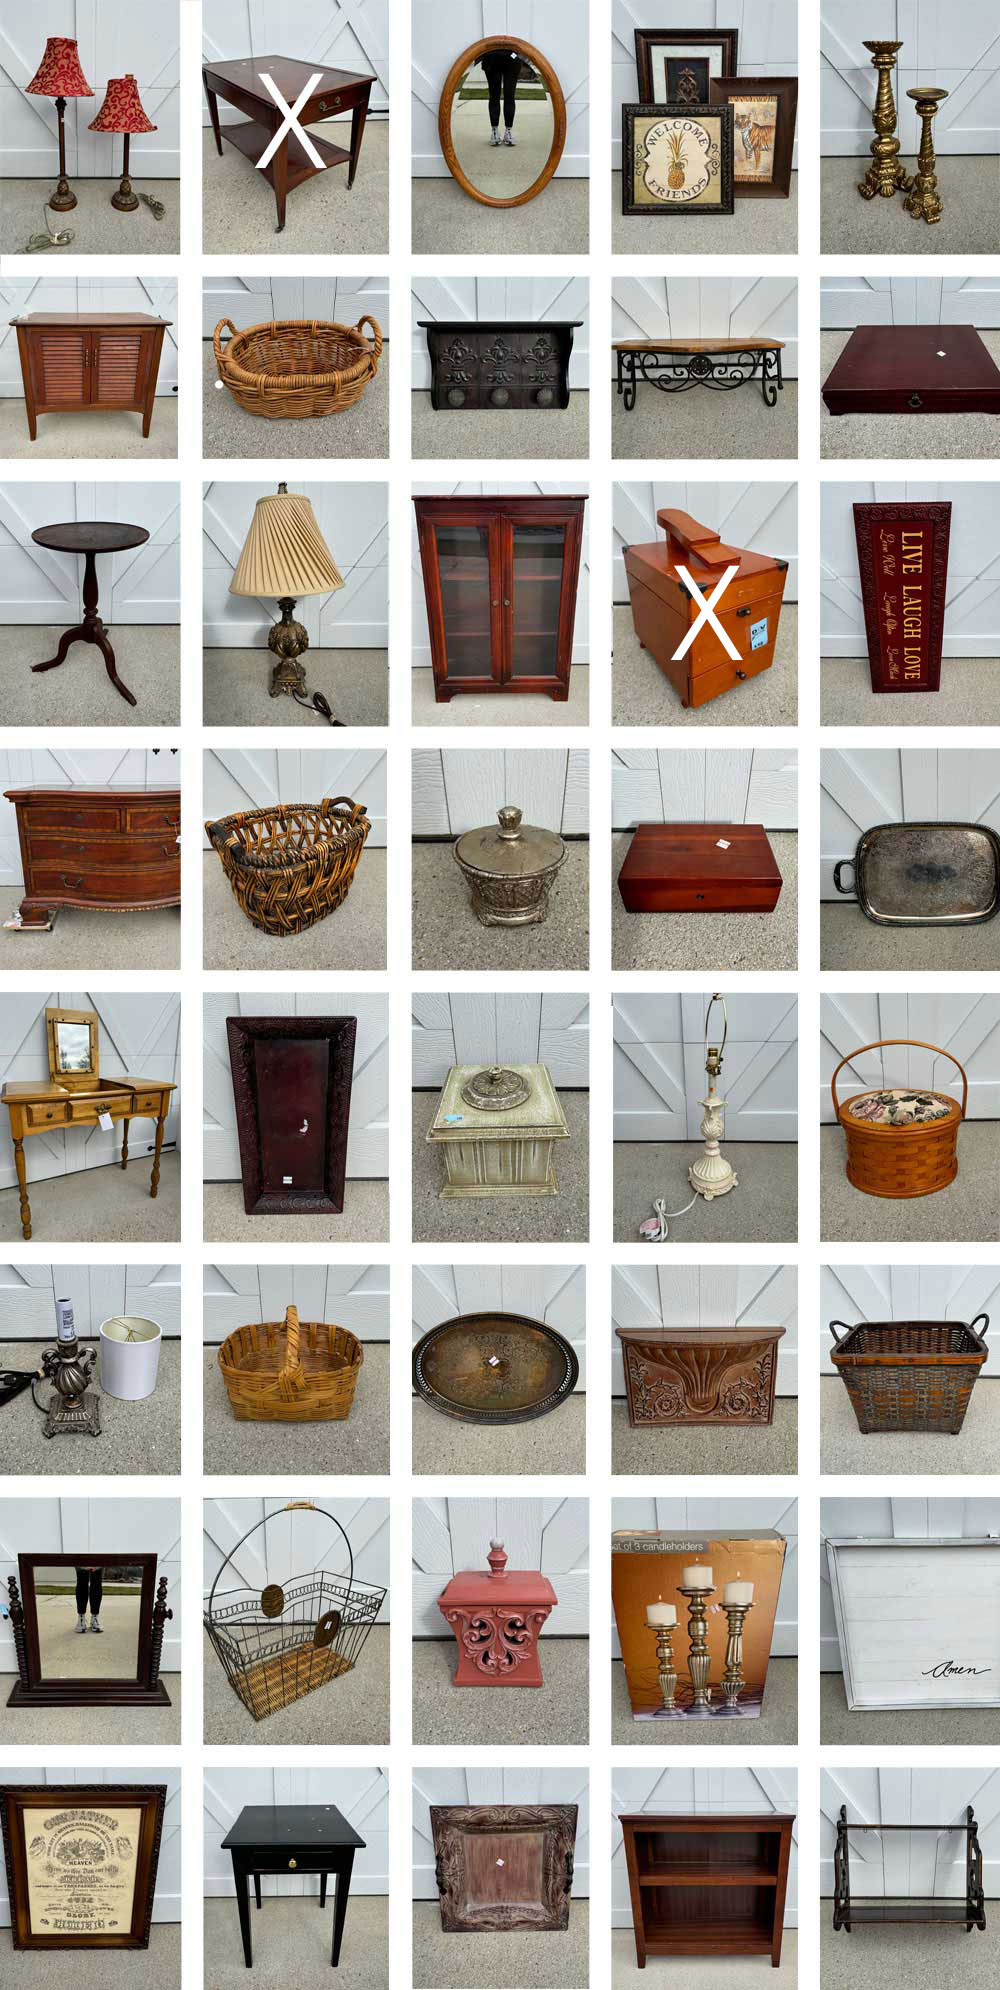
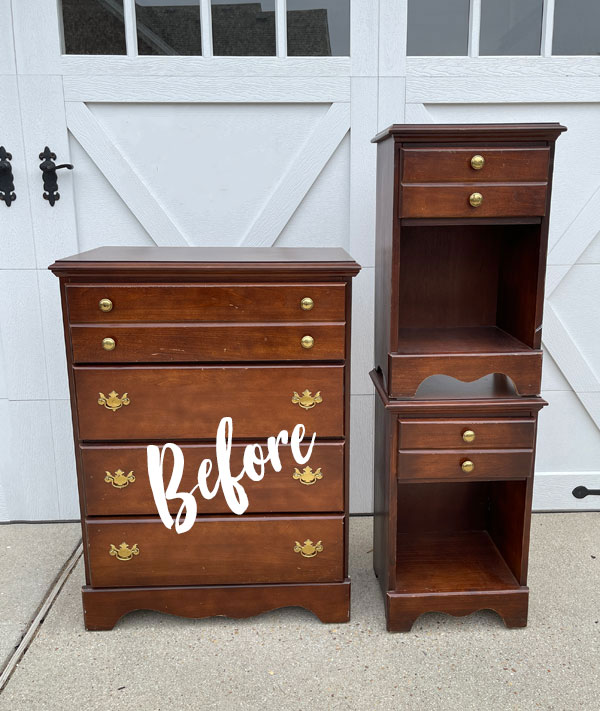
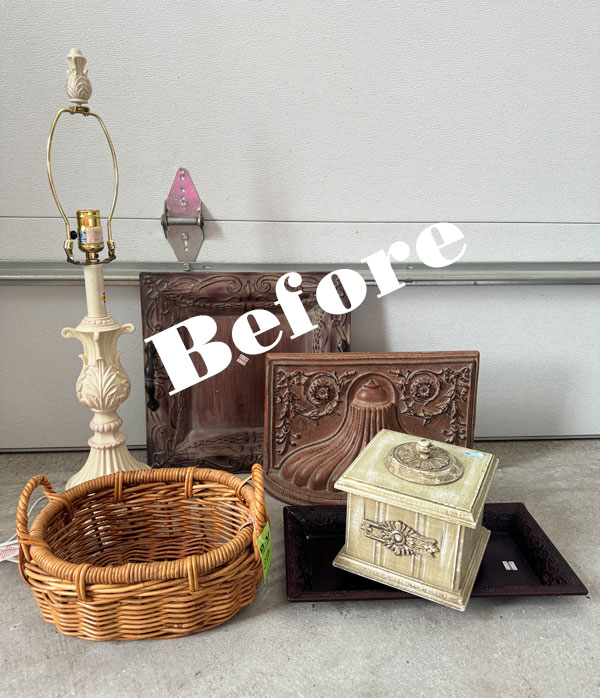
I’ll be back on Tuesday with this round of smalls:
UPDATE: It’s done and ready for you now woohoo! See it all HERE!
Have an amazing weekend!
XOXO,

Don’t Miss a Thing!
If you like what you see, there are several ways to follow along!
EMAIL * INSTAGRAM * FACEBOOK * PINTEREST


Mary Kaiser says
Oh it is so pretty in that color with that transfer! I just love wooden boxes, and this one turned out so beautiful! Yay for the smalls on tuesday, I love the smalls, and you have amazing ideas for them I am sure! I can’t remember when your birthday is, can you remind me? I have something for that occasion but can’t remember.
Christy says
Thank you, Mary!! I am such a sucker for any small wooden box too…so many options for them! My birthday is 9/15…I was made at Christmas ha ha! XOXO
TRACY TOTTY says
The box is really cute but I would have left the part on top. It is a reminder of a simpler time and I thought it was really cool as a shoe shine box
Christy says
Thanks, Tracy! I appreciate your thoughts! XOXO
Cory says
I love how you changed the shoeshine box into a gorgeous box you could use for anything! The paint and transfer look great together, and I love the new mould. Beautiful job!!
Christy says
Thank you, Cory! I love that I can go a bit bolder with these smaller pieces! XOXO
Karen Cifield says
So pretty! I have one of those boxes. You’ve inspired me!
Christy says
Oh I love that you are feeling inspired, Karen! Thank you! XOXO
Janice Redden says
Christy, you are right – what shoe shine box? Beautiful. You are the master (mistress?) of creative disguise; no one would ever guess the prior life of this piece; what stories it could tell !! I recently passed one up – bummer!
Now, what will you do with that “shoe” form you removed…hmm.
Christy says
I hadn’t considered what I would do with that piece, but now I feel a challenge coming on!! Ha ha! Thank you so much, my friend! I’m sure you’ll come across another of these boxes! XOXO
Janice Holt says
So pretty. I always love anything that resembles a box you do. Of course I love everything thing you redo. You always match transfers so well with colors of paint. You never skimp on anything and that’s what makes your pieces so much better than others. Have a great week-end.
Christy says
Aww I appreciate that so much, Janice!! Thank you! Enjoy your weekend too, my friend! XOXO
Kathie says
Wow, so beautiful
Christy says
Thank you, Kathie! XOXO
Jackie C says
Wow! I love everything about this one! The mold stole the show! It’s beautiful! I’ve seen people use hot glue in the molds, have you tried that? Seems like it would be hard to work with, besides the back, not being flat.
Christy says
Yay thank you, Jackie! I was hoping to use that on the top, but it just didn’t seem to work as well there. That mould is so pretty, so I was glad to be able to still use it. And I agree…you might save a little money using hot glue, but it doesn’t seem like it would lay nice and flat like a liquid does. The resin is SO easy to use and one package can do a ton of moulds! XOXO
Abbe K says
Shave and haircut, two bits box now. ;~) I love it! The mold was the finishing touch. How fun and the colors ❤️????????.
Christy says
Thank you so much, Abbe!! XOXO
Nana Diana says
What a cute makeover for a shoebox. Wonder if I stole the one my hubby has (but doesn’t really use) he would even notice?! lol
Have a wonderful Thursday-xo Diana
Christy says
Thank you, Diana! I would definitely steal it lol. Have a fantastic day too! XOXO
Cecilia says
Haha, I figured you were going to remove the shoeshine part. It makes a great storage box. Love the color – would you call that a turquoise? I love it! The transfer is gorgeous too. Makes me want to find things to paint…like I need more projects, lol. I’ll just live vicariously through you. ????
❤️Cecilia
Christy says
Yep, that piece had to go lol! Thank you, Cecilia! I would call it an aqua, maybe? I love it too! Ha ha! XOXO
Tracey A says
So pretty!
Christy says
Thank you, Tracey! XOXO
Sue says
Ii was so curious to see how you redesigned this one and what
a pleasant surprise. This shoe/jewelry box is so cute! Love the colors, transfer and the surprise mold on the inside!
Christy says
I’m so glad you like the result on this one, Sue, thank you! It was fun to bring it all together! XOXO
Shari Clines says
Who doesn’t love a great box makeover?! It could be used for so many things. Love it!
Christy says
Right? I am drawn to any type of box! Thank you, Shari! XOXO
Denise says
I knew you were going to do something special with that box, but I had no idea how special! That makeover is absolutely stunning. Your attention to detail is amazing. As always, thanks for sharing all the steps. That mold is very interesting. Take good care. Denise
Christy says
I’m so glad you like it, Denise, thank you! I really appreciate you kind words! XOXO
Cyndi says
You are so clever! This is beautiful! I can remember us selling my husband’s old shoe shine box at a garage sale years ago. I sure regret that now! 🙁
Christy says
Oh no! I see them all the time at thrift stores. I can’t tell you how many things I’ve sold at garage sales over the years that I could have redone also. Thank you, Cyndi! XOXO
Marcie Lovett says
If I hadn’t seen it with my own eyes, there’s no way I would believe that started as a shoe shine box, Christy! I was sure you were going to have to whack that foot off the top, nice that it came off so easily. It’s amazing now, and someone is going to be delighted to have it.
Christy says
Oh yay! The goal is to make it unrecognizable, and I guess I did that! I’m thinking that other boxes I’ve seen may have had that foot thing attached more securely or I surely would have picked one up by now. Thank you, my friend! XOXO
Janina Fisher says
Oh, SO pretty! No idea what I’d use it for, but it matches my house! Who knew a shoe shine box could be so transformed. That mould is lovely! I’d love to try making one one day. Looking forward to seeing what you do with that glass-fronted cabinet. Knowing you, the glass doors will likely go, but I could use one like that to corral my art supplies and kerp out the dust. You always come up with beautiful ideas!
Christy says
Aww thank you, my friend! I’m so glad you like it! I will definitely be keeping the doors on the glass cabinet…ever since I removed the glass doors from that cabinet I used for a short time to display my paints in my booth, I have regretted it lol! XOXO
Gerri Conner says
Love this! I just bought Dixie mud for the 1st time, was curious why it has to be refrigerated after opening? Have I been storing my Dixie paints wrong by not refrigerating them?
Christy says
Thank you, Gerri! I do not refrigerate mine here in coastal VA and have never had an issue, however, in some climates, it can mold. That is why they recommend storing it in the fridge after opening. If your climate is similar to mine, you are probably fine. The paints do not have that issue, only the Mud. XOXO
Cheryl atkinson says
Hi Christy! It came out beautiful!! I love the
Gulf and that transfer is gorgeous! I wish i had something to use that mould on. Wow is it pretty. Thank you for sharing!
Christy says
Thank you so much, Cheryl! The Gulf is such a gorgeous color, but I’m afraid to use it on larger pieces lol. It was just right on this box though. XOXO
Luana Stone says
The box is absolutely beautiful. I am wondering why you painted over those metal corners rather than remove them. It looks great with them painted, but I think I would’ve removed them altogether or cleaned and replaced them.
Christy says
Thank you, Luana! I originally had plans to add some gold Gilding Wax to them at the end, but they seemed to blend in so nicely that I chose to leave them as is. XOXO
Denise Zdziennicki says
The cosmic rose transfer with the blue is gorgeous and the inside detail is the icing on the cake my friend. Beautiful! XOXO
Christy says
Thank you so much, my friend!! XOXO
Roberta says
Definitely use for jewelry. Or special cutlery if it would fit. I didn’t think of removing the shoe! Duh. That is why I follow you.
Christy says
Ha ha thank you, Roberta! I’m glad that was easy to remove! XOXO
Caye Cooper says
That’s pretty special, Christy. Such a lovely difference, and that lace transfer is so appealing on the scallops! Great job! Next…….:-)
Christy says
Thank you, Caye! XOXO
p says
What a Cute box ! It’s verrry cute now.
I wonder… why is it that some of us have a fettish for wooden boxes ?
(and metal pieces too. )
Just so stinkin adorable I guess 🙂
Thanks
Christy says
Thank you, P!! I certainly do have a thing for wooden boxes too…they are just so fun to reimagine!! XOXO
Bonnie says
That color was perfect for that box and the transfer was just what it needed to bring it out. May I ask why you didn’t put a knob on the top?
Hugs Bonnie
Christy says
Thank you, Bonnie! Absolutely…I just couldn’t find one that looked right with the glass one I had chosen. It didn’t have a knob there to start, so I just didn’t add one. 🙂 XOXO
Patricia Marshall says
I love what you did to this box. You took something from the past and made it useful again. I love the aplaque on in inside of the lid.
Patricia
Christy says
I’m so glad you enjoyed this one, Patricia, thank you! XOXO
Michele M. says
What a beautiful transformation! I really cannot even believe it is the same piece. WOW!! Well done, Christy!
Christy says
Thank you, Michele! I won’t be so quick to pass up the next one I see now! XOXO
Cheryl B Acampora says
It’s BEAUTIFUL……that’s all I got! U R AMAZING!!!!!
Christy says
Aww thank you, my sweet friend!!! XOXOXO
Robin says
Well of course I love the box, Christy! The challenge has already been presented…how are you going to use the scrapped foot rest? LOL!
Christy says
Ha ha thank you, Robin! I have to think hard about that one, but I’m going to do something with it! XOXO
Rose Lefebvre says
You are so creative! Such a lovely little box which can be used in so many ways.
Christy says
Thank you so much, Rose! I love to redo boxes…so many possibilities! XOXO
Vicki Pelfrey says
Well, this is just MY personal opinion. I would nvr have painted it………maybe refinished it. Leave as is ; do not remove anything from it. Not sure what I would use it for….maybe a stool ?
But as I said………just my personal thoughts.
Christy says
I appreciate your input, Vicki! XO
Susan Renaud says
This is fantastic. I shared it to Facebook so my friends could take a look at all the lovely makeovers. And before I scrolled all the way down, I thought that I would use the box for jewelry as well. I had thought to store all those tiny jewelry boxes and fancy bags with their treasures still inside. Some of them are so pretty.
Christy says
Thank you so much, Susan, and I appreciate the share! This would be fantastic to store all those tiny boxes with that roomy compartment on top for sure! XOXO