Hello sweet friends!! We got a lovely break in the rainy weather this weekend and I was able to finally finish up the repurposing of these frames:
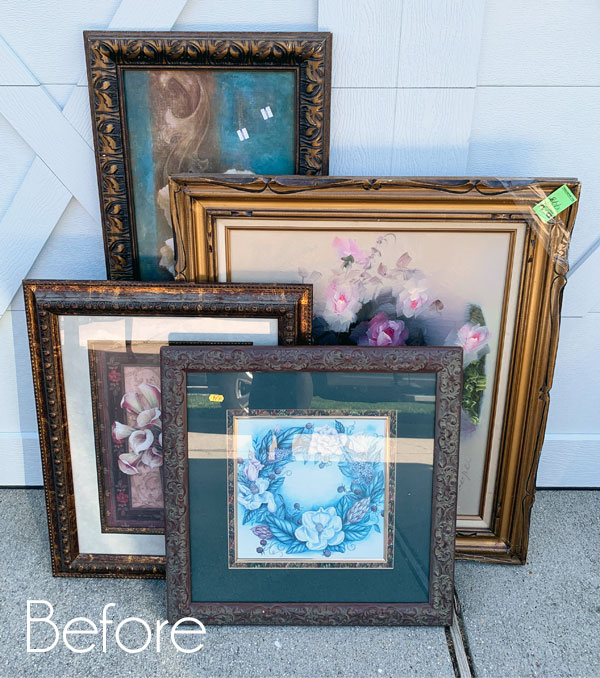
Frames are something I always check out at the thrift store. Usually the max I’ll spend is around $5 or $6 dollars unless it is really large or ornate, and when I already have an abundance of frames at home, I just look out for really good deals. I paid $18 total for all four of these frames that I’m sharing today.
I had planned to turn them all into chalkboards. When I went to Home Depot to pick up more hardboard, they didn’t have any. Hardboard is what I make my chalkboards out of and it is like pegboard but without the holes. I usually buy it in 4X8 sheets for around $8. They do sell smaller cuts, but you get more for your money buying the larger sheets.
What they did have though was whiteboard or dry-erase board like you would use with dry-erase markers for just a few dollars more. When you flip it over, it is hardboard on the other side! I’ve included a few affiliate links so you can find the products I love.
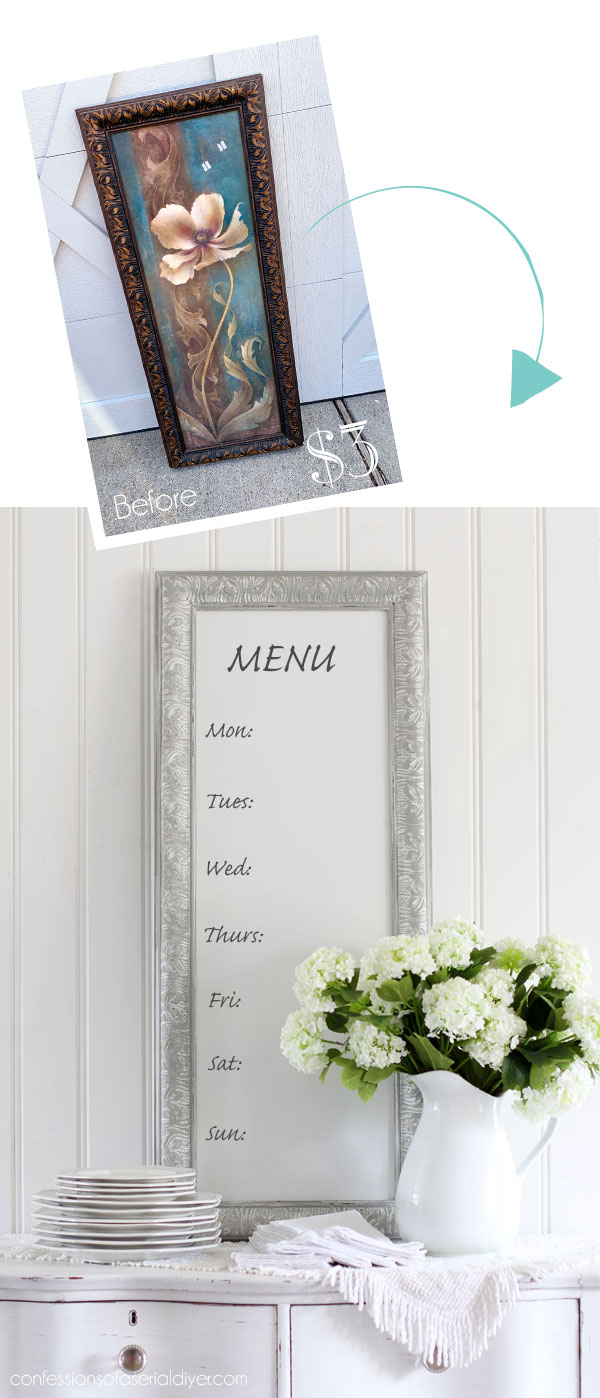
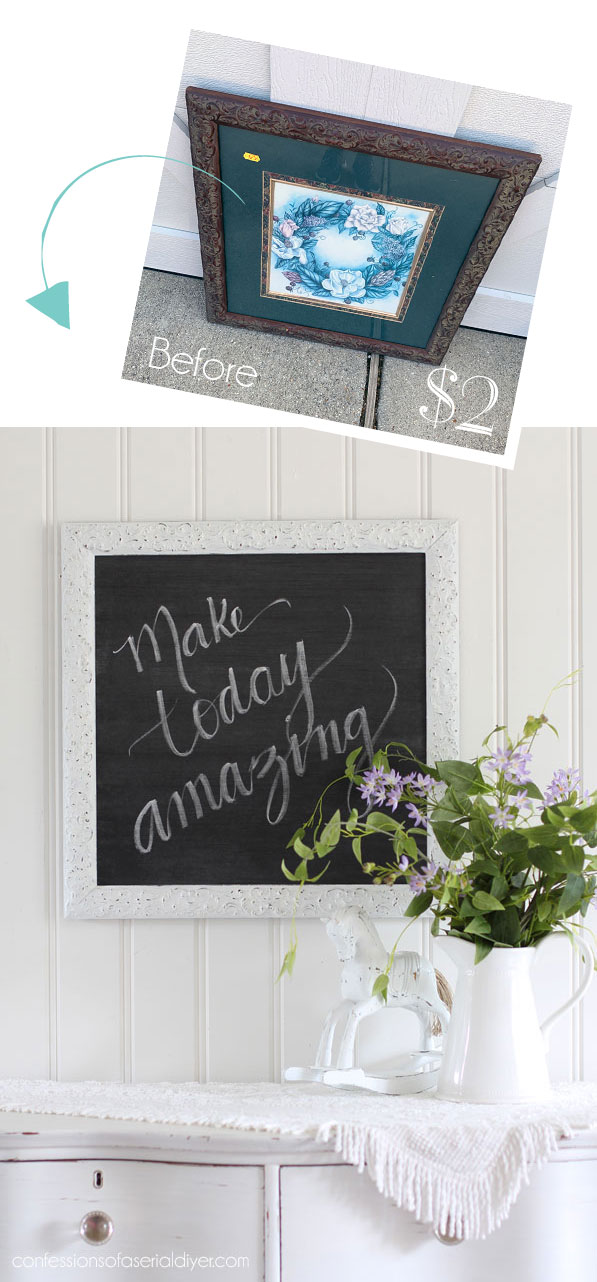
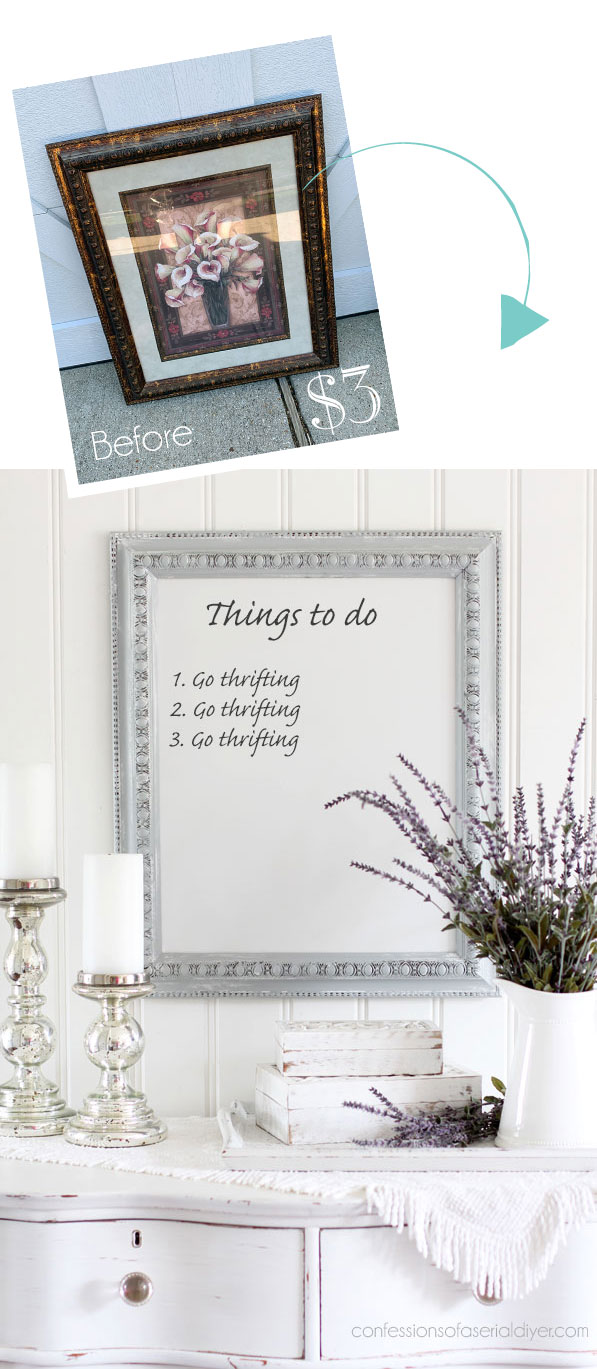
I decided to actually use the white board on a couple this time. I started with this taller frame that was marked $6.25 and was 50% off that.
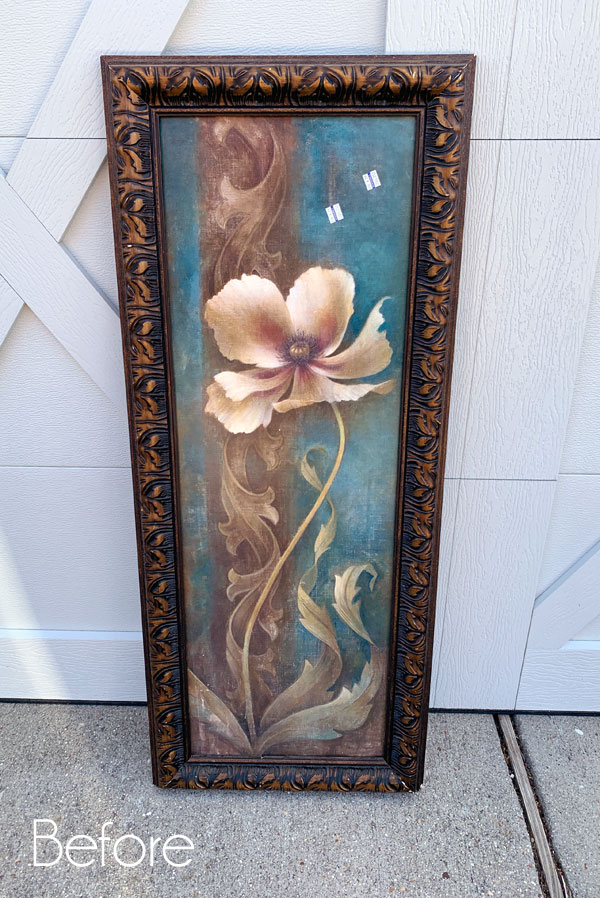
This artwork was way past its expiration date, so I didn’t feel bad about ditching it at all!
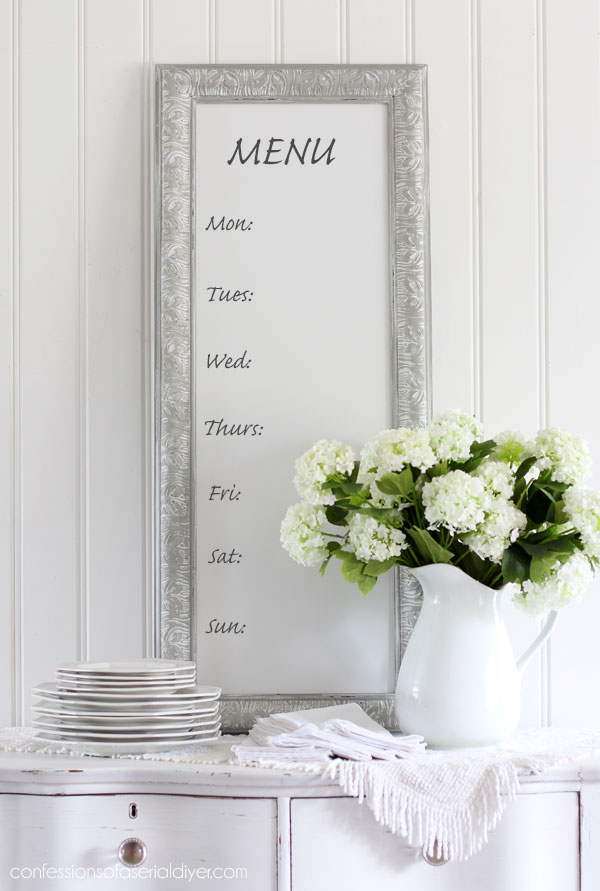
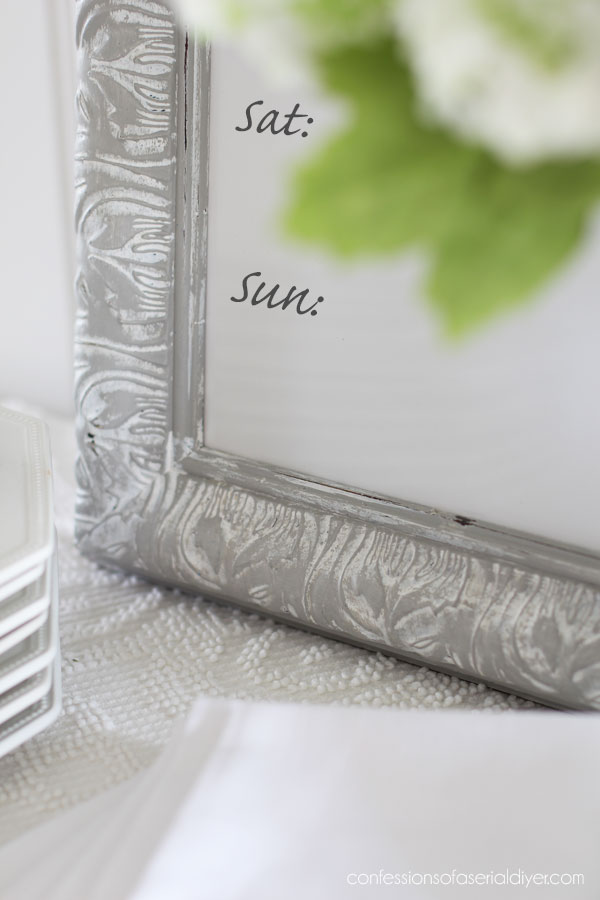
I combed the house in search of dry erase markers, but couldn’t find a one, so I edited in the words. Wouldn’t this be great to hang in the kitchen? As a mom who cooks at least five days a week, I appreciate having a plan ahead of time!
You can always cut the letters out in vinyl if you have a Silhouette or Cricut or you can buy a set on Amazon HERE!
This one got one coat of Dixie Belle’s Cotton, followed by a light coat of Driftwood, not completely covering the white:
I sanded all over a bit with 220 grit sandpaper and sealed with Dixie Belle’s Clear Coat in satin using their blue applicator sponge:
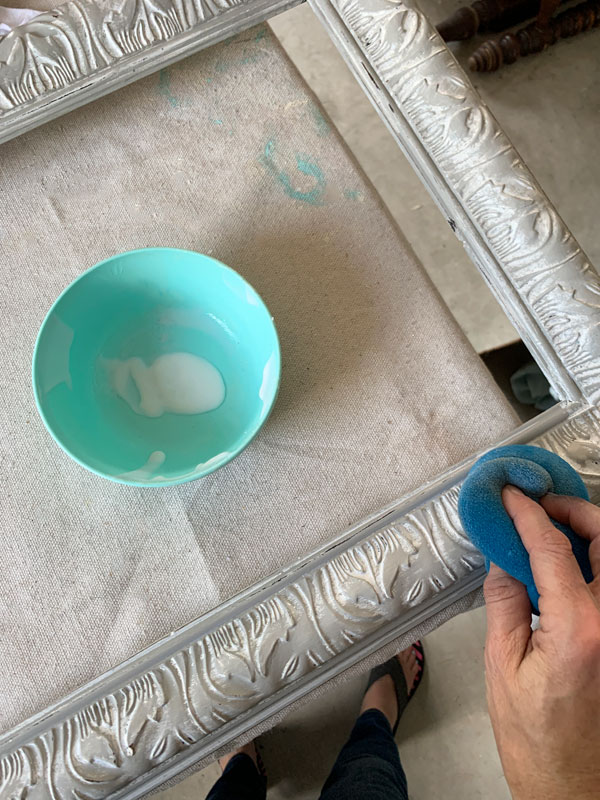
You want to be sure not to allow any sealer to pool in those crevices or those areas will appear yellow. (If that happens, just paint right over and seal again.) I keep my sponge pretty dry. You can even opt not to seal something like this at all, but I like the light sheen the clear coat adds.
I treat my sponge much like my brushes. I will just wrap it in saran wrap in between coats or projects and wait until I am completely done to rinse it out.
Not bad for a $3 thrift store frame!
Up next is the smallest of the three:
This one was on clearance for $1.99.
I used the backside of the dry-erase board this time and coated it in two coats of Rustoleum’s chalkboard spray to turn it into a chalkboard:
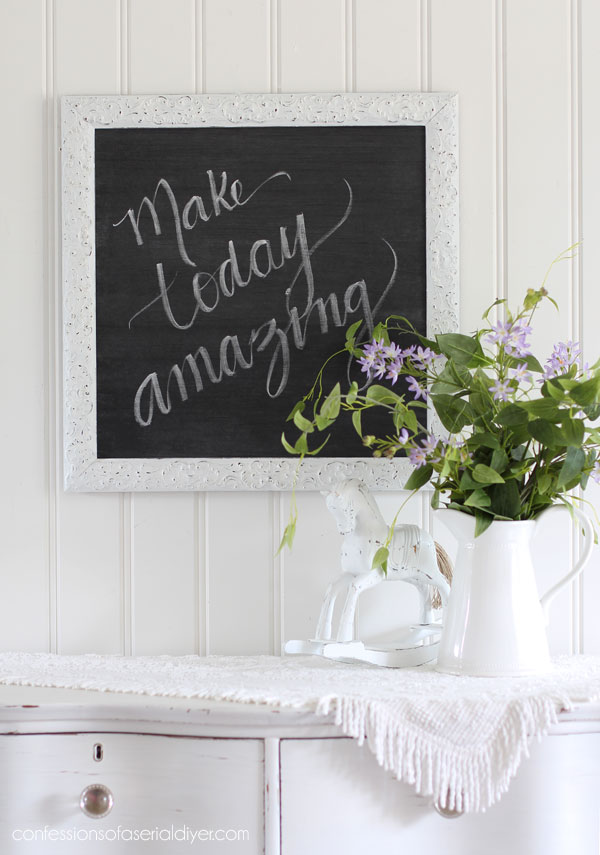
For this one, I removed what was inside, gave it two coats of Cotton, and then used my distressing block (See how I do that HERE.) to bring out the details. Again, I sealed with Dixie Belle’s Clear Coat in satin using their blue applicator sponge.

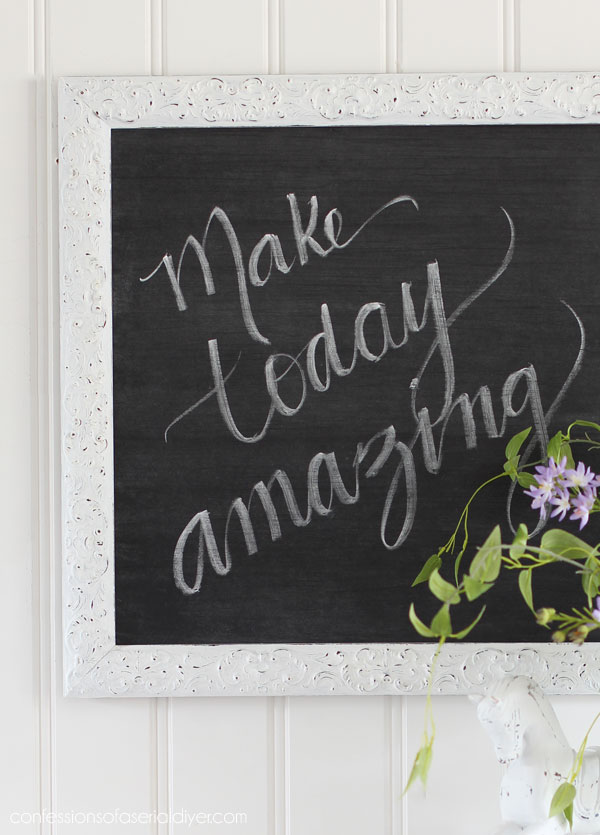
I didn’t cheat the lettering this time. I actually did the lettering myself.
To make your lettering a little more fancy, after writing your words, turn the chalk on its side and make each downstroke thicker…

I’m no pro, but it does make it look a little fancier!
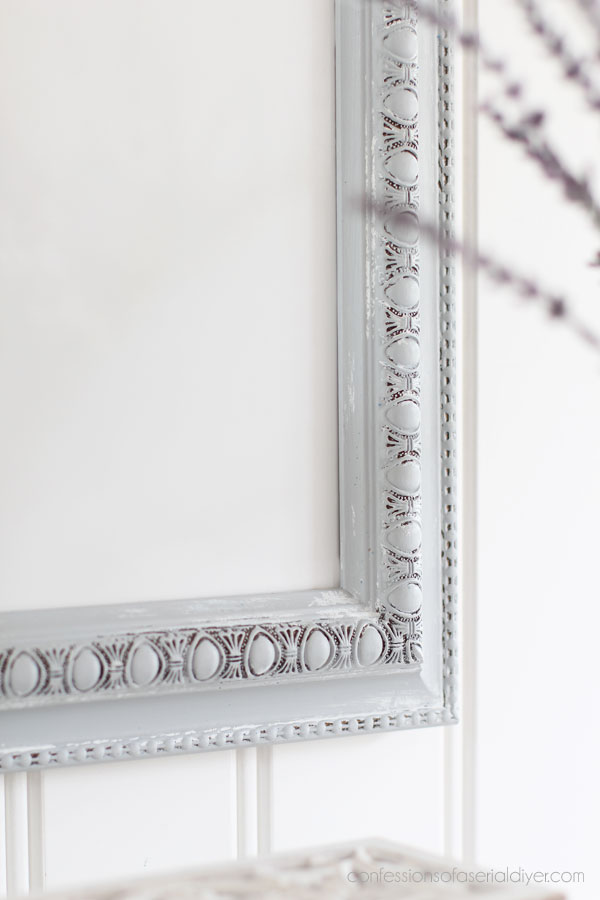
Up next is this medium sized frame that I found on the same day as the first one. It too was marked $6.25 but was 50% off:

I decided to make this one another dry-erase board:
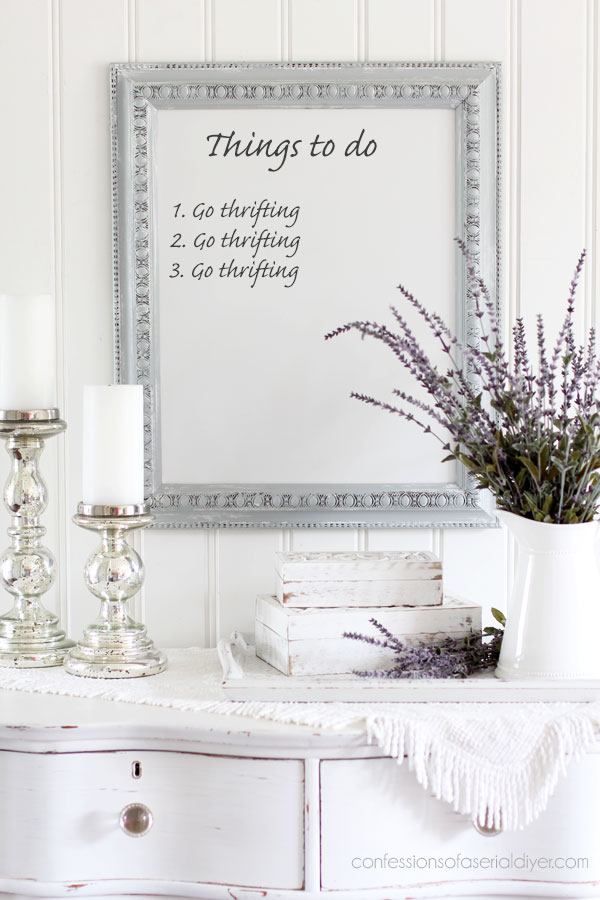
Again, I cheated the lettering on this one just like in the first one. You can see by my to-do list that I’ve got real priorities these days!
I painted this frame similarly to the lowboy I shared last week, by layering the paint to get a distressed look.
I started with cotton, and followed up with a 50/50 mix of Manatee and Cotton, not completely covering the frame with either of the coats of paint:
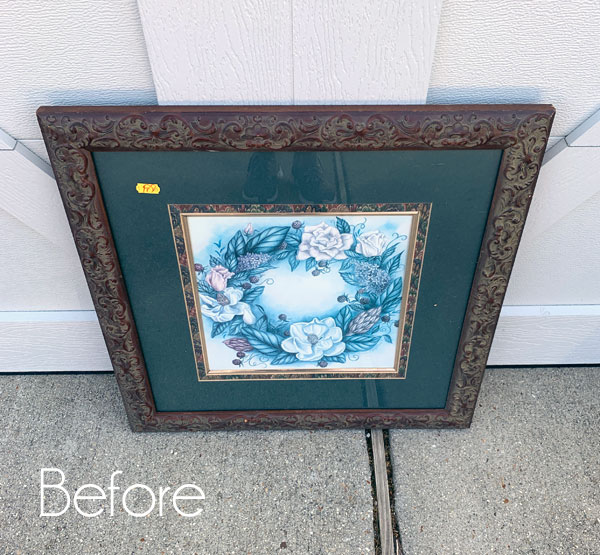
And finally, I paid a little more for this next one at $9.98:

I really liked the frame though and actually kind of like the painting too.
I removed the painting, and gave this one a coat of Cotton. Then I pulled out what was left of this gorgeous Chatellerault transfer I used on these $12 thrift store headboards:
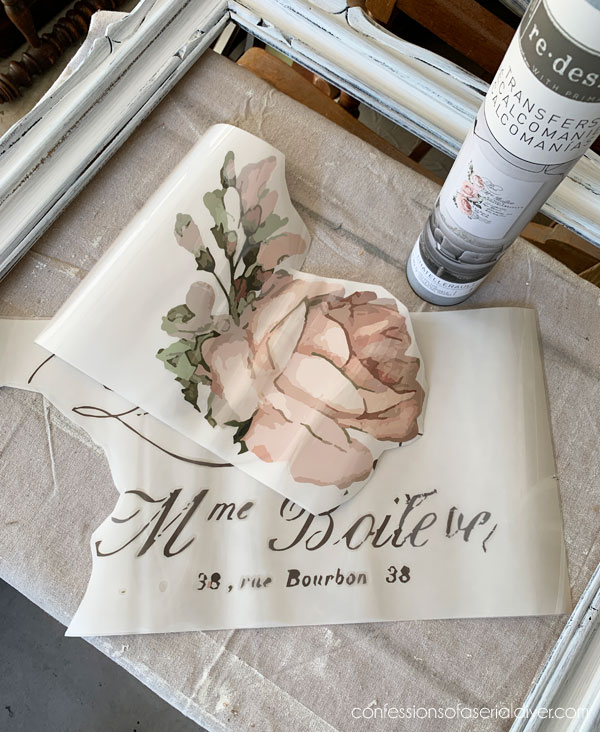
Ya’ll know I rarely throw anything away, including these transfer remnants with the messed up lettering!
There wasn’t much left, but they were perfect to dress up this frame!

This one is my favorite.
I was still able to use the good parts of the lettering for the bottom right corner…
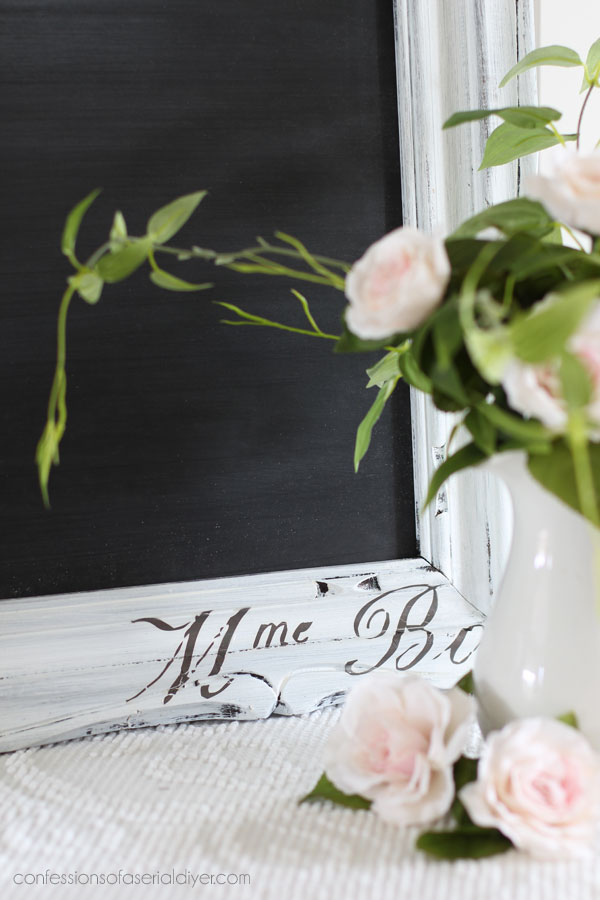
I’ll admit it was a bit of a challenge trying to get it to lay nicely with all of those crevices. I ended up cutting it and adding it in pieces in a couple of areas like the inside corners.
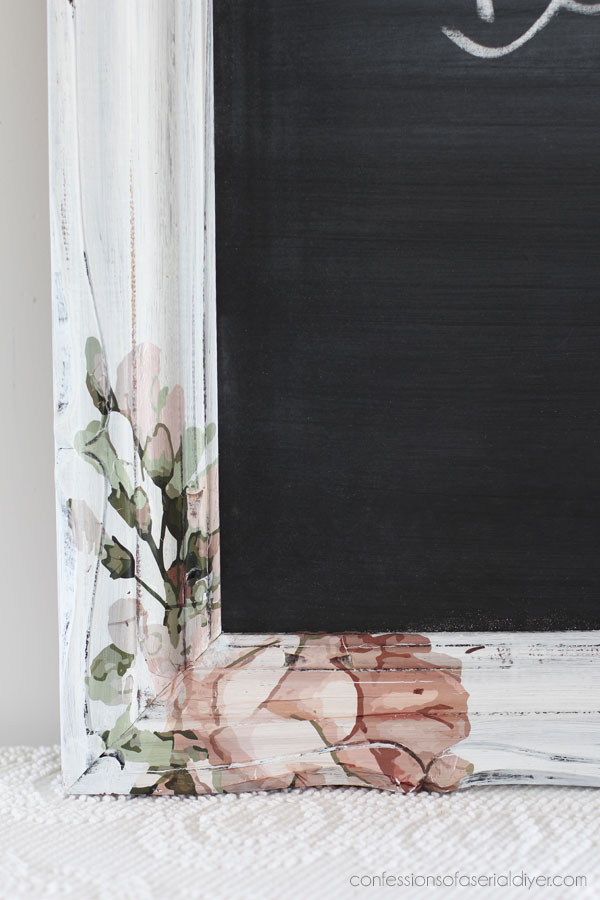
I sealed this one with Dixie Belle’s Clear Coat in satin also.
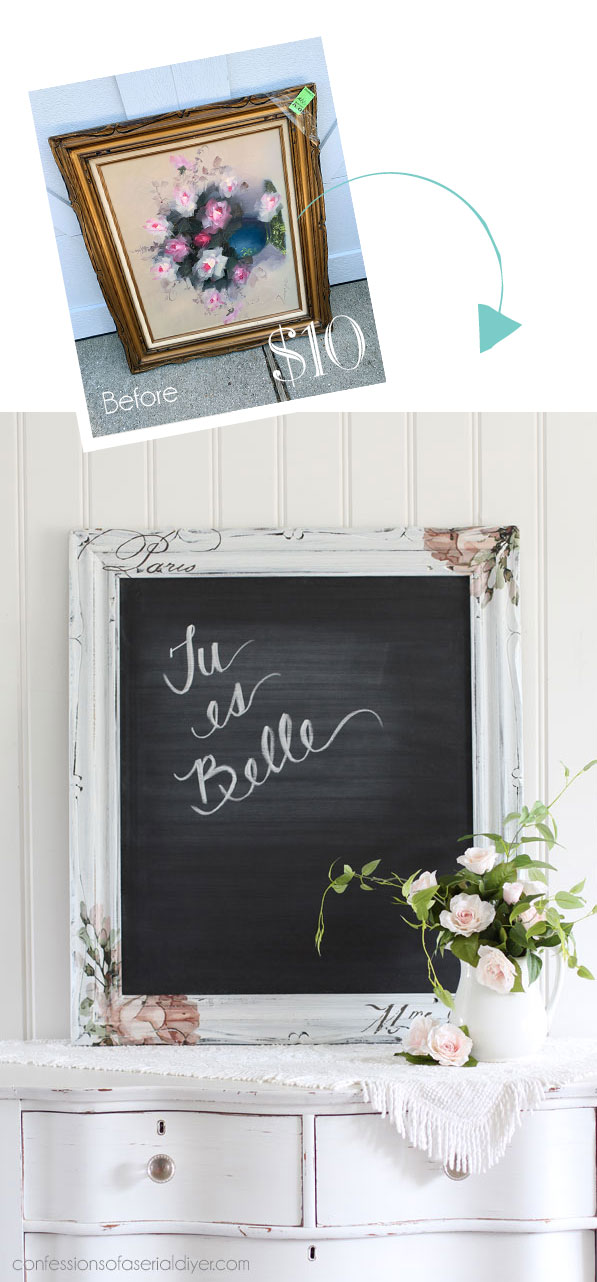
How to make a Chalkboard
I borrowed all of these photos from an older post, but this is step-by-step how I make my chalkboards:
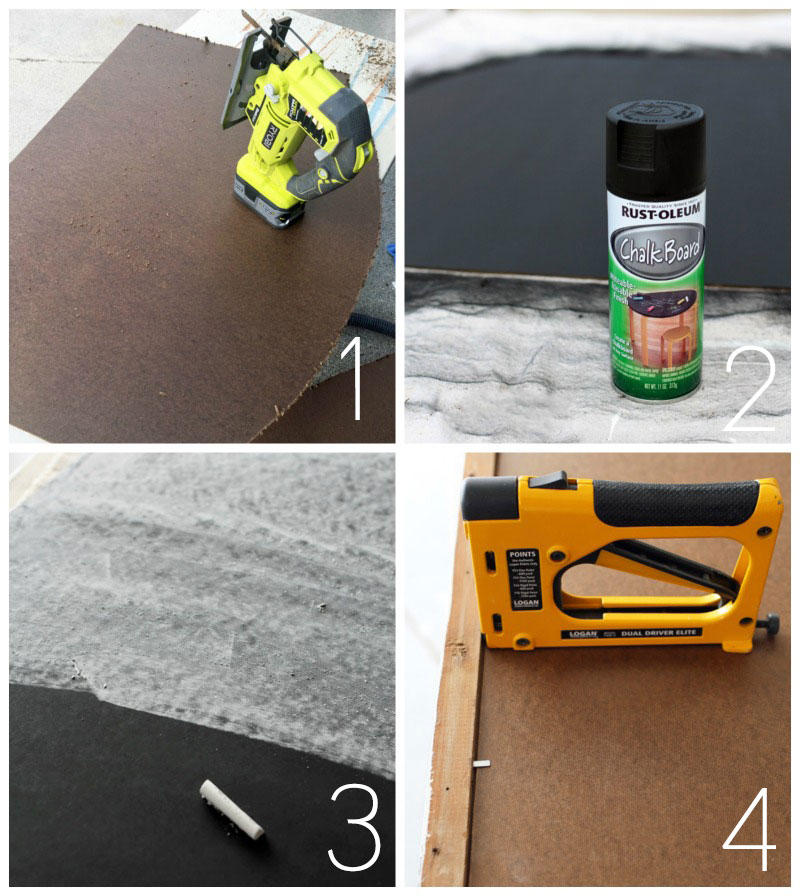
1. Cut the hardboard using a Jigsaw, small circular saw, or table saw.
2. Spray with two coats of Rustoleum Chalkboard spray.
3. Season the chalkboard by rubbing chalk across the entire surface.
4. Use a point driver or small nails to secure the chalk board to the frame.
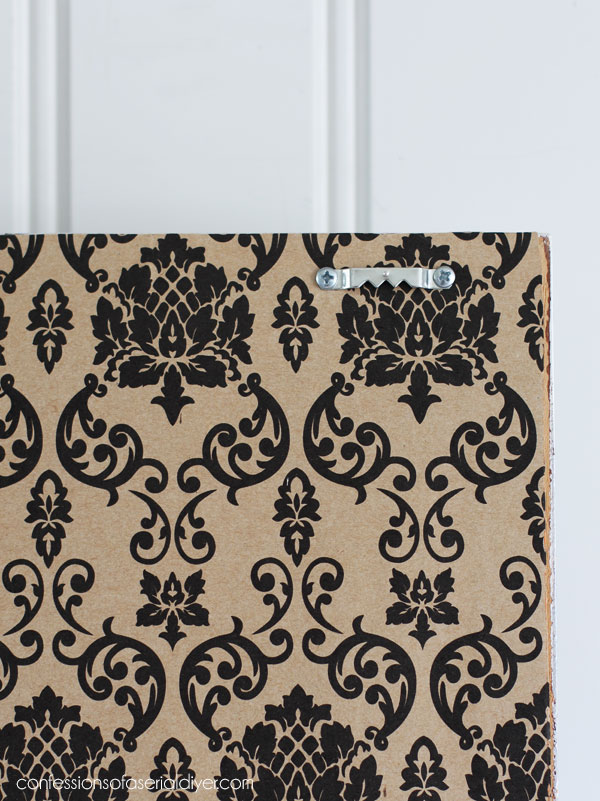
I cover the back with brown paper and I love when I can find it with a pretty print like this one from Hobby Lobby…

I like these sawtooth hangers that screw in place to hang them:
And that’s four more frames out of my stash and four more pieces I can cross off my list!
Only four pieces to go!! Visit any of the makeovers you might have missed at the links below:
Queen Anne Table Makeover & Mirror too!
$5 Dressing Table Bench Makeover
Thrifted Metal Wall Decor Makeover and a Brand New Thrift shop Shakedown Video!
I’ll be back on Thursday with my Furniture Fixer Upper crew sharing what I did with this ornate sofa table I picked up for $22!
See ya then!
UPDATE: No need to come back! See this beautiful table HERE now!!
XOXO,
![]()
Don’t Miss a Thing!
If you like what you see, there are several ways to follow along!
Email * Instagram * Facebook * Pinterest * Twitter


Mary Kaiser says
Oh they are so beautiful now. That is so cheap for 4 frames! They are so useful now. I like the last one the best also.
Christy says
Thank you, Mary!! I find decent frames quite often so I usually only pick them up if they’re a good deal! The last one is super sweet! Have a fantastic week! XOXO
Suzan Oxenreider says
Have you.tried using DBP Caviar for your chalkboard? If so, do you prefer the spray Rustoleum? Just curious as I use the Caviar and if Rustoleum is a better idea, I will give it a try!
Christy says
Hi Suzan! I have not tried the Caviar, only because I prefer the ease of spraying the chalkboards. 🙂 XOXO
Janice Holt says
Yes, yes, and yes; Go Thrifting. Great job on all the frames and the last one is my favorite but love them all. Glad you got a break in the weather.
Christy says
Ha ha yes!! I still have not been as my favorite thrift store by my house in not open yet…can’t wait! Thank you, Janice! XOXO
Christina says
Oh Christy, you rocked these frames! Love the white board idea. Way to take lemons and make lemonade! 🙂 I think the one with the transfers is my favorite as well.
Thanks for the reminder on how you use the distressing block.
Be well!!
xo
Christy says
Thanks, Christina! I haven’t made white boards before so we’ll see how they sell! Have a great week! XOXO
Sue Mellette says
Love all. Four frames, but I particularly liked the last one . The French transfer gives it vintage flair. So talented. Another great post! Thanks!
Christy says
Thank you so much, Sue! XOXO
Denise Cox says
Early good am! Well, hands down the last is my favorite!!! How lovely!!! This is the one I’m going to pin. And as I don’t have room for furniture projects, I certainly have room for this… 😉!!! Thanks so very much for sharing, Christy !!! 😊
Christy says
Good morning, Denise!! Thank you! I was so happy to be able to use the remnants of that transfer on that last frame! XOXO
Nancy Summers says
I think it would look great to cut out the word menu and days of the week with cricut and adhere them permanently to the whiteboard!
Love your blog!
Christy says
Oh absolutely!! Thank you, Nancy! XOXO
Rosie says
I enjoyed all your repurposed frames and my favourite was the same one that was your favourite… very pretty with the transfers in the corner, great idea always creative!
Christy says
Thank you, Rosie! I was happy to be able to use up the rest of that transfer! XOXO
Brenda says
You are so talented! I love seeing all of your projects.
Christy says
Aww thank you so much, Brenda! XOXO
Ann Hardy says
Love these! Do you select only wood frames? Would composit work?
Christy says
Thank you, Ann! I am drawn to wood frames, but I have used plastic, wood composite… you name it! XOXO
Stacey says
LOVE them all, especially the last one with the transfer flowers on it. Beautiful!!!! Thank you so much for alllllll the inspiration!! 🙂
Christy says
Thank you so much, Stacey! You are so welcome…it is always a pleasure to share!! XOXO
Angela says
Beautiful! Fantastic! Doable! For an amateur like me, maybe!
Christy says
Ha ha yes, absolutely!! XOXO
Deanna says
I love all of the frames! Especially the one with the “messed up” transfers. Can’t wait to see what you do with that sofa table! You thrift the best things! Have a great week!
Christy says
Thank you, Deanna! I was thrilled to be able to use even the messed up parts of that transfer! See ya Thursday! XOXO
susan says
LOVE the last one! Great idea!
Christy says
Thank you, Susan! XOXO
liz says
These are great. I’ve come across a large beautiful matted and framed picture frame. I love the frame and want to redo it and put another print inside. I know I’ve seen step by step where you’ve showed how to do that. Can you post again or send a link or at least instructions please. I want to work on the frame while I’m searching for a print to replace the one that’s there now. Thanks!!
Christy says
Thank you, Liz! Frames are put together several different ways. If there is a paper backing, you’ll want to remove that first. Then you can see how the picture is held in place. Usually, you will see some sort of staple which you can pull out with pliers. I can better help you if I can see what the inside of yours looks like, and possibly direct you to a post that shows what I did. Feel free to send a photo to my email christykjames@cox.net when you get started if you need more help! XOXO
Rhonda Storey says
Girl, you are SO talented and creative!!! I get excited when I see an email from you! I just love all of your ideas for repurposing. I absolutely love how you did the one with the transfers. So pretty!! Great job as usual.
Christy says
Aww thank you so much, Rhonda!! I’m thrilled that you look forward to seeing what I’m sharing! The frame with the transfers was my favorite too! XOXO
Robyn Wright says
I love them all, but Christy! That last one! What fun to do the transfer on the frame itself. Gorgeous!
Christy says
Thank you, Robyn!! You know I was so glad the remnants of that transfer didn’t go to waste lol! XOXO
jenifer says
The Paris frame is beautiful.
Christy says
I’m so glad you liked it, Jenifer! Thank you! XOXO
Addie says
Hello!!!!
Boy!!! You were NOT kidding about that artwork …..EXPIRED!!!!!
Can you even call that art????……barf!!!!
L@@k’in good now!!!! They will sell quick!!! I loved the first “menu” one the best!!! You have a good eye…keep up the good work!!!
Christy says
Hi Addie!! Ha ha yes, lots of those 80’s gems at the thrift stores! I just dropped them off at my booth this afternoon and I saw tonight that the smallest one sold already…woot woot! XOXO
Gail says
Christy,
You are an amazing talent! So worried you will turn me into a hoarder keeping all my “stuff” for a good update.
When you paint over the Cotton, do you a sort of dry brush or do you paint and wipe away. Wondering because you have such a perfect amount of the top color in the crevices.
Christy says
Thank you os much, Gail! Oh no ha ha! When I paint over the Cotton, I do more of a dry brush and just purposely try not to completely cover the Cotton. XOXO
Sue Duffy says
Love ’em!
Christy says
Thank you, Sue! XOXO
Daune says
Where did you get the menu and days of the week words for the long picture! I was about to throw out 3 pictures just like that and now my creative juices are at work!
Christy says
Hi Duane! I mentioned in the post that I tried to find a dry-erase marker in the house so I could write that to stage them, but I couldn’t find one, so I photoshopped the words on there lol. I did a quick search on Amazon though and you can find a set of vinyl “Menu” letters here: https://amzn.to/2M1HmpT. Hope this helps! Have fun saving yours! 🙂
Robin Stephens says
Jaw dropping….simply jaw dropping…. Love the days of the week menu….and the French motif one. But, they’re all stunning. Sending a round of applause! You deserve it! ❤️
Christy says
Oh I am so glad you enjoyed these, Robin!! Thank you SO much! XOXO
Willie says
I am in love with all the frames but most especially the last one with the transfer pieces on it. I have been thrifting frames for awhile now but not as yet gotten motivated enough to do anything with them. I think that after looking at this I think I’m ready to get started, maybe. Just not sure if I could possibly get the transfers on the edges like you have done with yours.
Do you have any posts where you put transfers on mirrors? I have managed to acquire a collection of those too. You have gotten me enthused with thrifting now I just need to do something with it. You make it look so easy,
Christy says
Thank you, Willie! Applying the transfer was a bit tricky, but I tried to roll the backing back as I was applying it so it would only stick where I wanted it to. I did cut it into a couple of pieces in the corners and applied them separately to make it easier. I have not put transfers on mirrors but am considering it for my next makeover! I love that you’ve got the thrifting bug! XOXO
Cecilia from Georgia says
Your frames always look great! Like you, I pick up some if they are a steal and enjoy painting them. That’s where I freeze! I have put chalkboard in some and they don’t sell good down here, so I’m not sure what to put in them. Whiteboard is a great alternative! Where is the best place to buy them? Thanks for such a good idea.
Christy says
Thank you, Cecilia! The whiteboard that I found came from The Home Depot! XOXO
Cheryl Atkinson says
Hi Christy! I love all of these. I would have never thought to put a transfer on a frame. These are all great! I am always excited to see what you have to share.
Christy says
Thanks so much, Cheryl! Enjoy your day! XOXO
Becky says
Lovely! I vote for all of them (it is an election year, right? 😁), but #4 is my favorite. Nice job!!
Christy says
Thank you, Becky!! XOXO
Marcie Lovett says
They look great, Christy, and I think there are people who will appreciate a dry erase board because it isn’t as messy as chalk. I was sure you printed the lettering on the menu board! The one with the transfer is my favorite – what a smart way to use up the transfer.
Christy says
Thank you, Marcie! We’ll see how the whiteboards do. They aren’t as charming as a chalkboard, but definitely cleaner! And yes, you know I was glad to not let the remnants of that transfer go to waste! XOXO
Christine Millership says
These frames are beautiful, and you have given me some great ideas of how to use about 10 large frames that we’ve got left over after moving house. I almost threw them all out at various points but always backed out, so I must have saved them for this! Love your ideas! Thanks xx
Christy says
Thank you so much, Christine! I’m glad I could offer a little inspiration for your frames!! XOXO