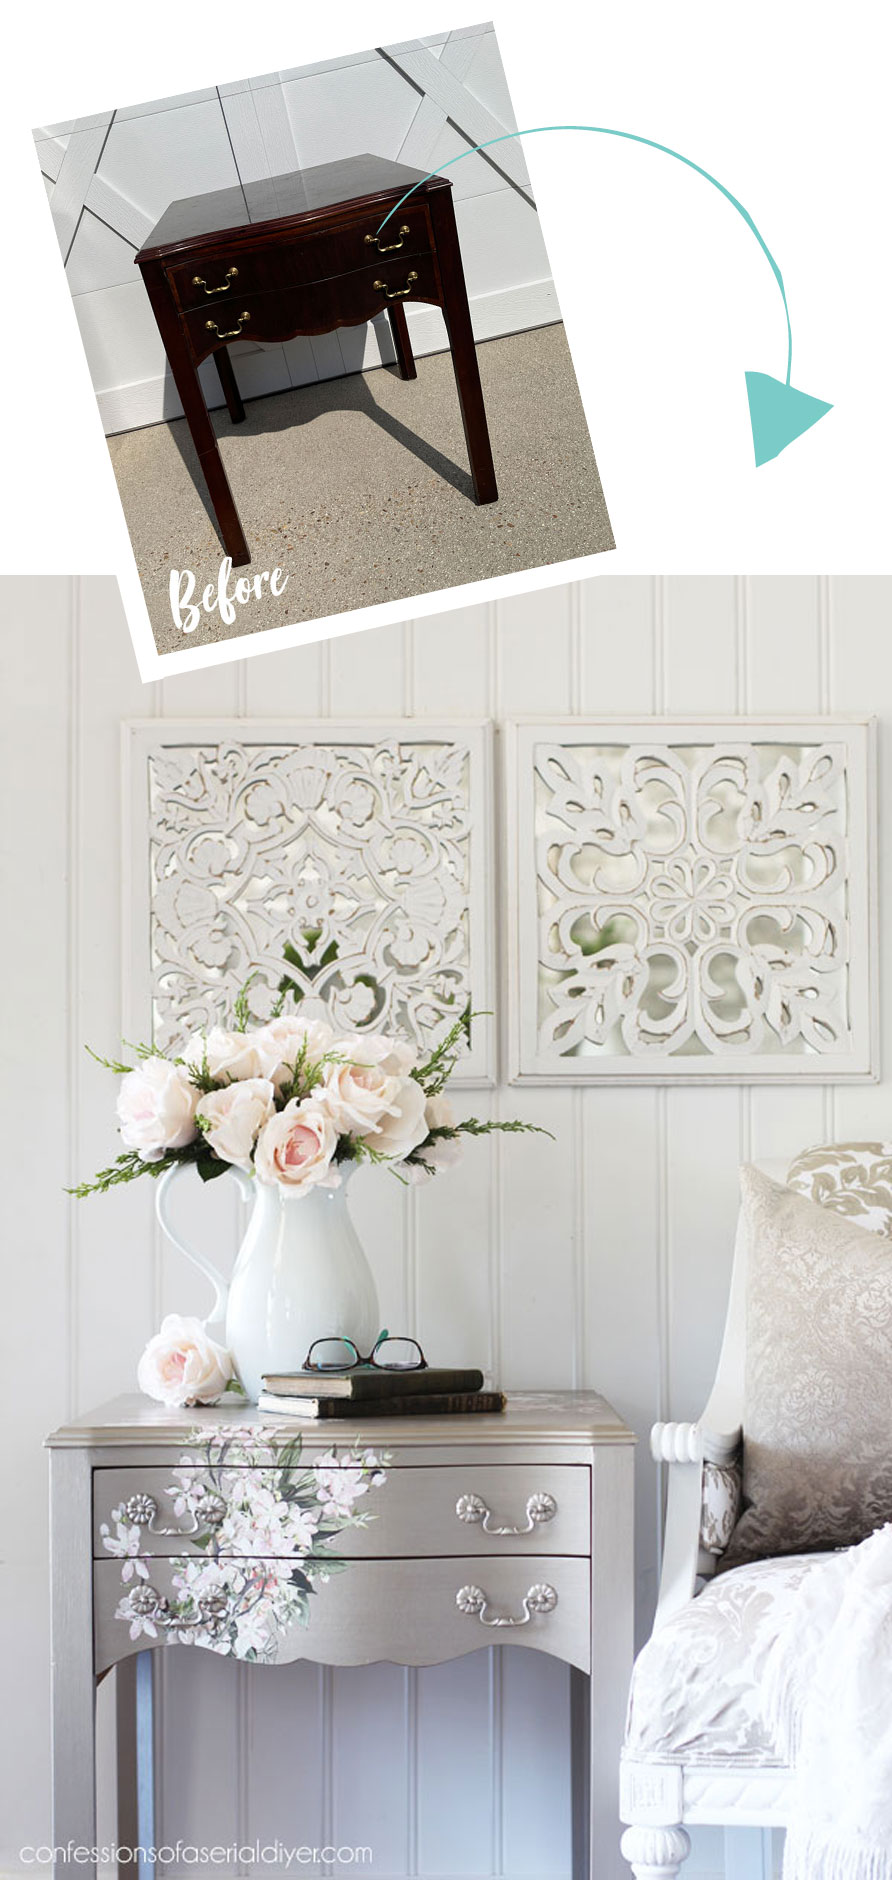
Hello fabulous friends! I am always so thrilled when you stop by! Today, I’m back to my Spring Haul sharing a side table with transfer makeover.
This side table was a lucky thrift store find for only $18.75:

I loved the more modern height on it for an older piece, and I also loved the scalloped edge across the bottom. It has a little damage on the top that you’ll seeing a minute.
Clean
I began this makeover the same way I start most makeovers, with a good cleaning with White Lightning.
One TBSP added to a half gallon of warm water is all it takes:
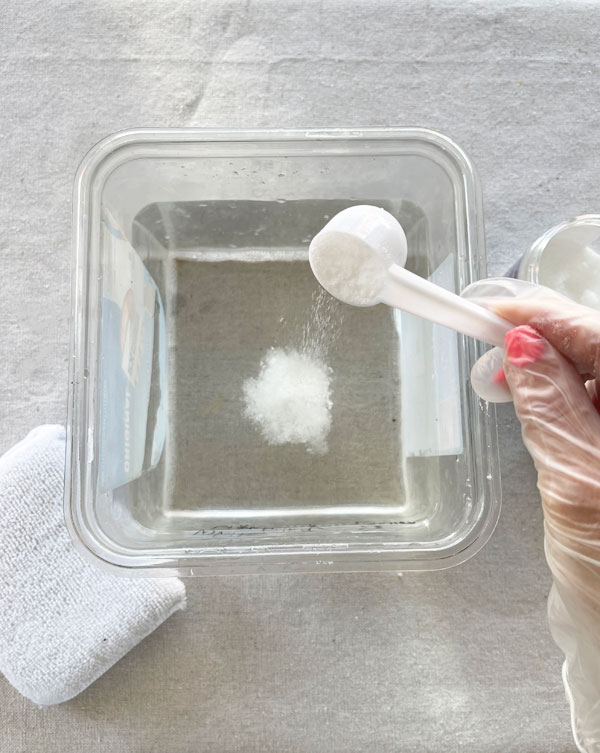
Dixie Belle’s applicator pads are covered in soft terrycloth and are perfect for this step…

You can throw them in the wash and use them over and over again! I swapped my water out for clean water and gave it another wipe down to remove any residue.
Paint
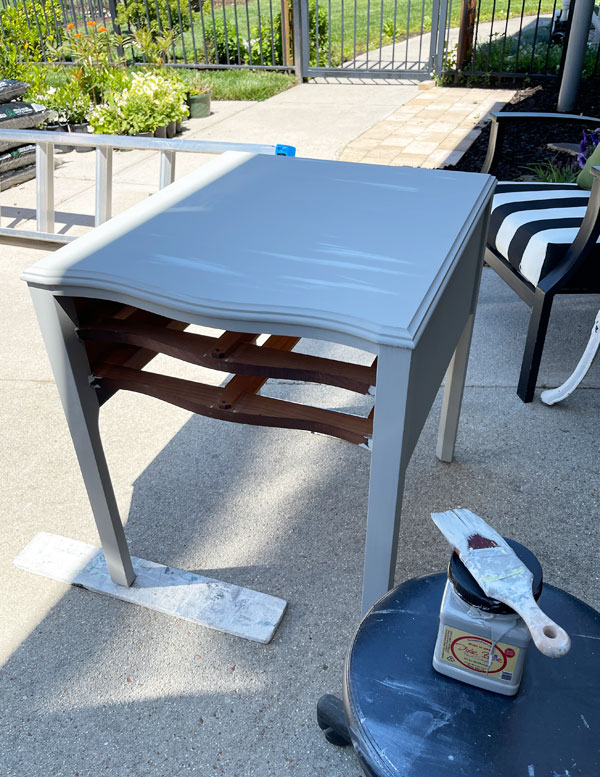
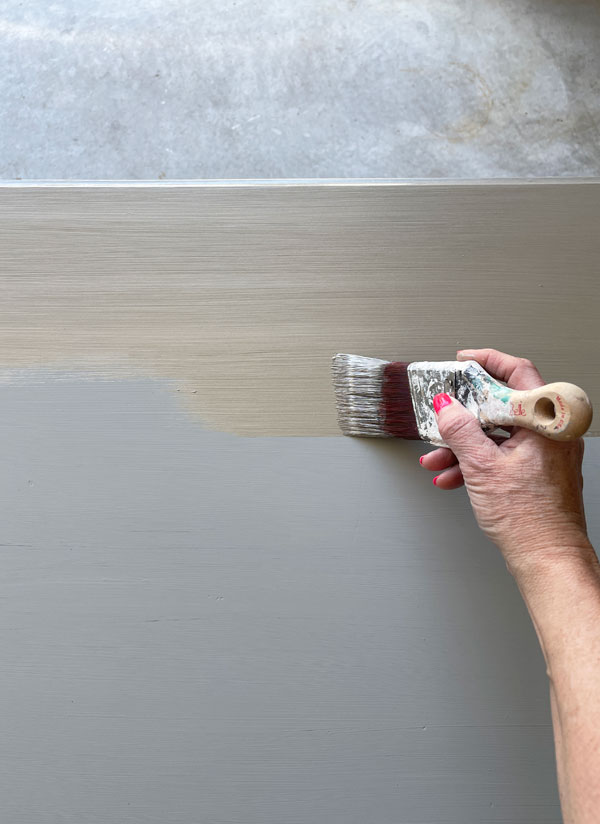
That is all the prep this piece needed, and I was able to get right to painting!
I had plans to use one of the Moonshine Metallics on this table, and they go on a bit sheer.
Adding a base coat of one of the regular chalk paint colors in a similar color helps to give better coverage, so I started with a base coat of Driftwood:
There are eight metallic colors in all:
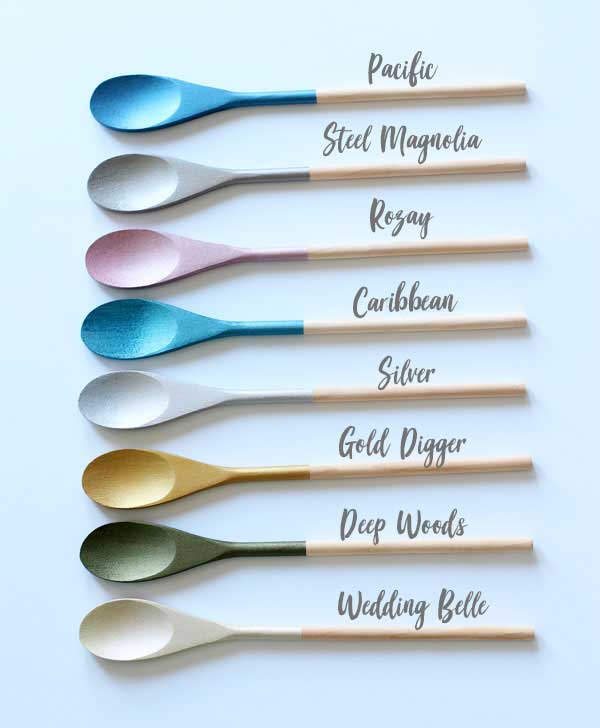
I layered my favorite metallic, Steel Magnolia, over the top of the Driftwood:
The metallics are self sealing so you can be done after painting, but I wasn’t finished yet!
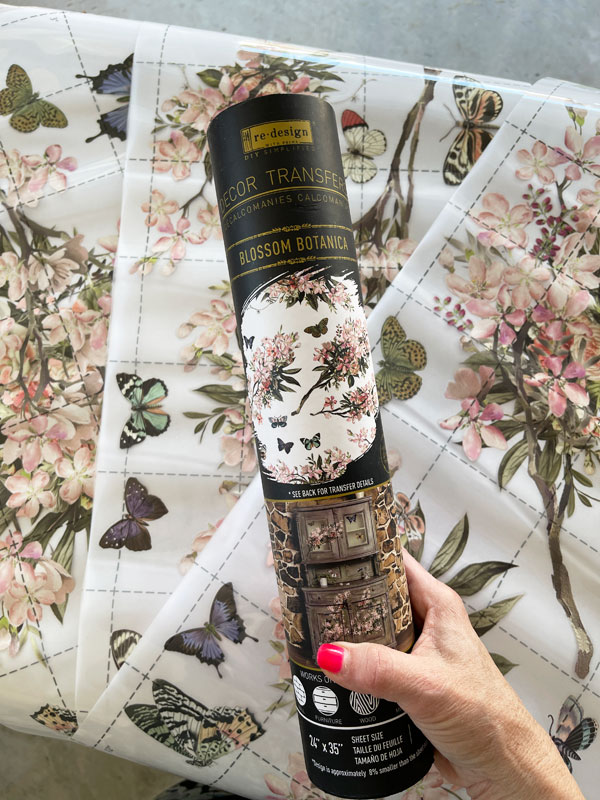
Adding a transfer
The top of this table had what appeared to be something that splattered along one edge of it that ate away at the topcoat:
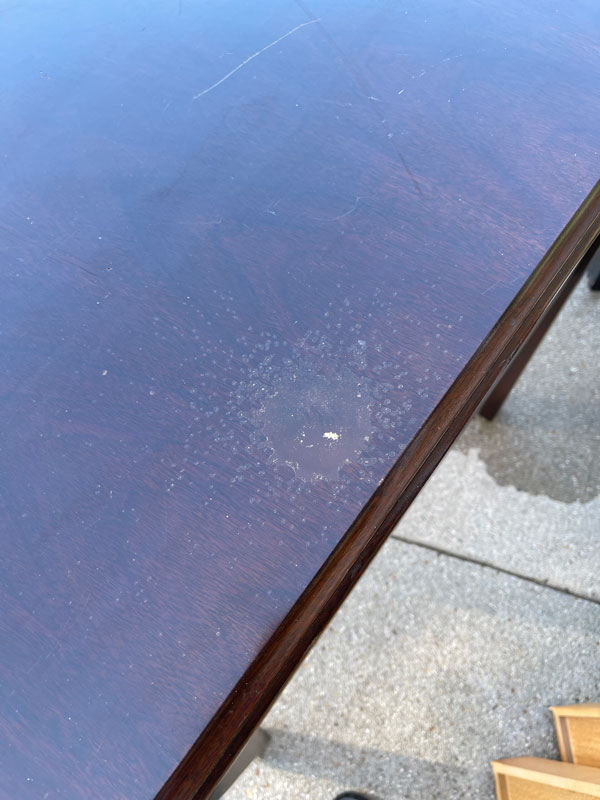
Instead of sanding the surface to smooth it out in preparation for paint, I decided to cover the damage instead…with a transfer!
I knew this Blossom Botanica one would be so pretty with it!
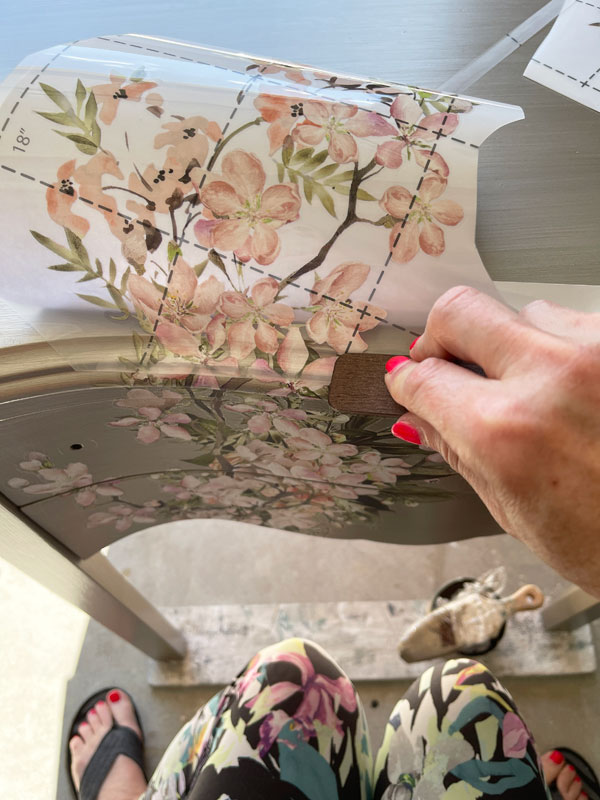
I cut it using my rotary cutter and straight edge and applied each section separately to make it easier:
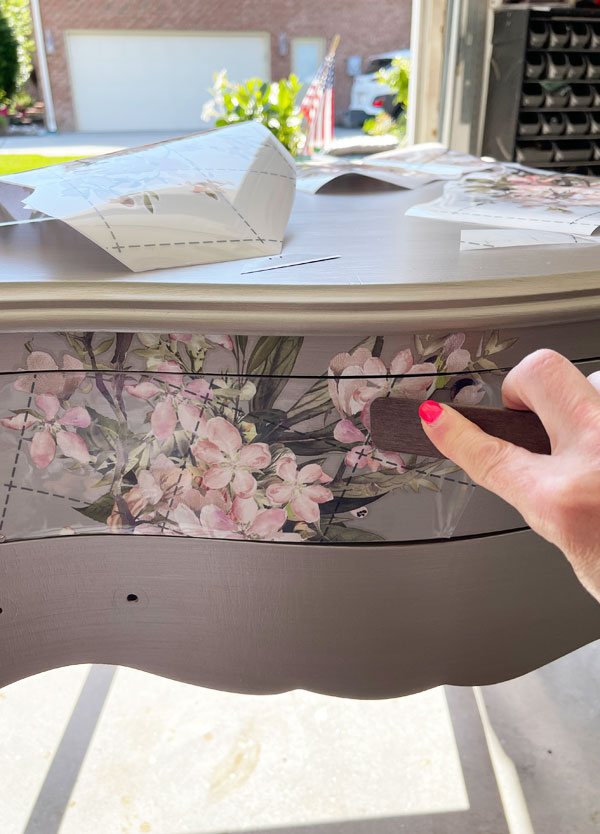
I brought it right up onto the top…
Seal
While the Moonshine Metallics are self-sealing, it’s a good idea to seal the transfer to protect it.
I sealed with my go-to sealer for furniture: Clear Coat in Satin, using the blue sponge applicator:
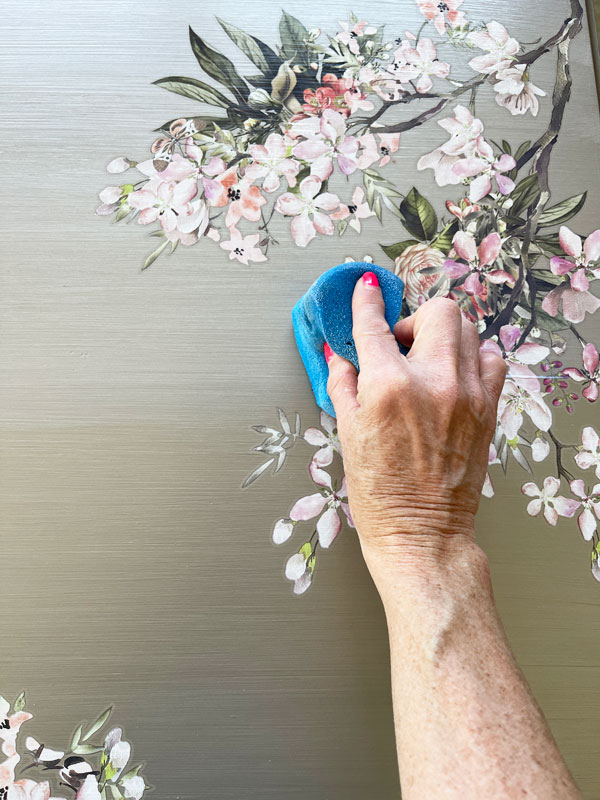
I only sealed the top and the front where the transfer was.
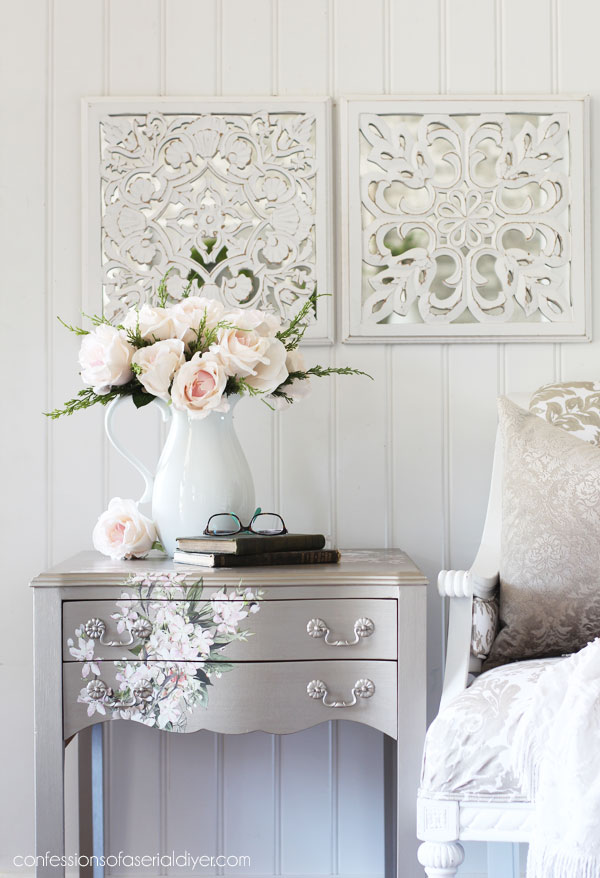
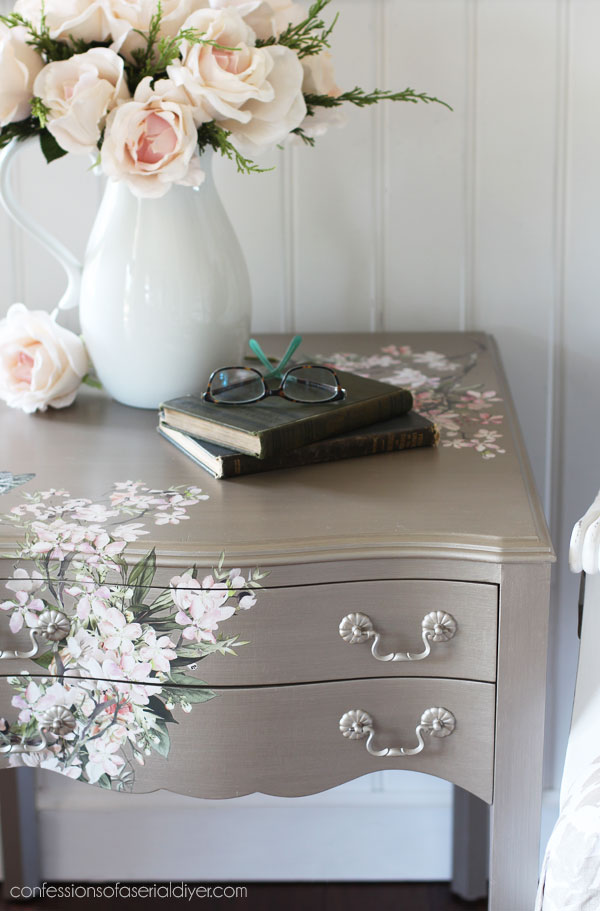
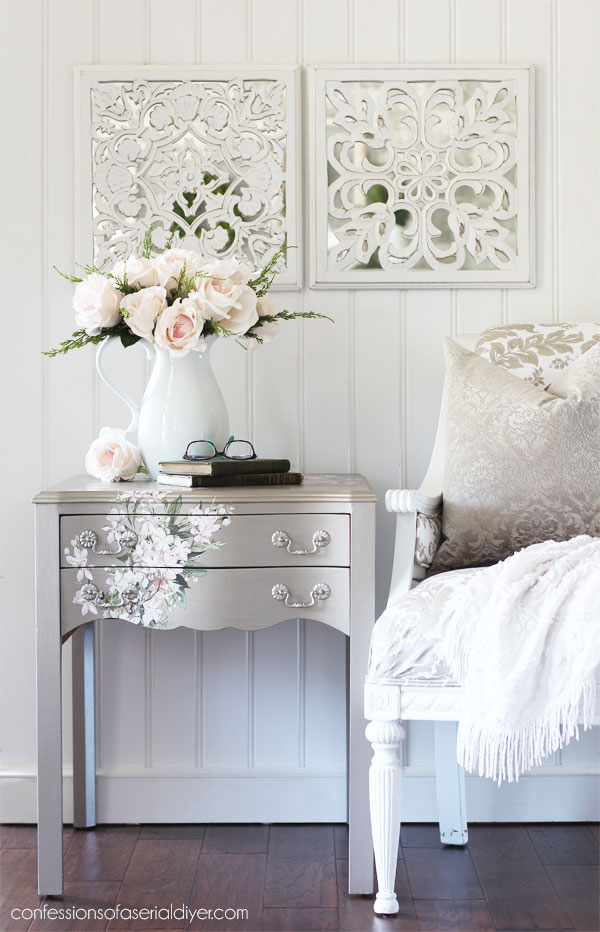
The After: Side Table with Transfer Makeover
Here is how this pretty lady looks now!
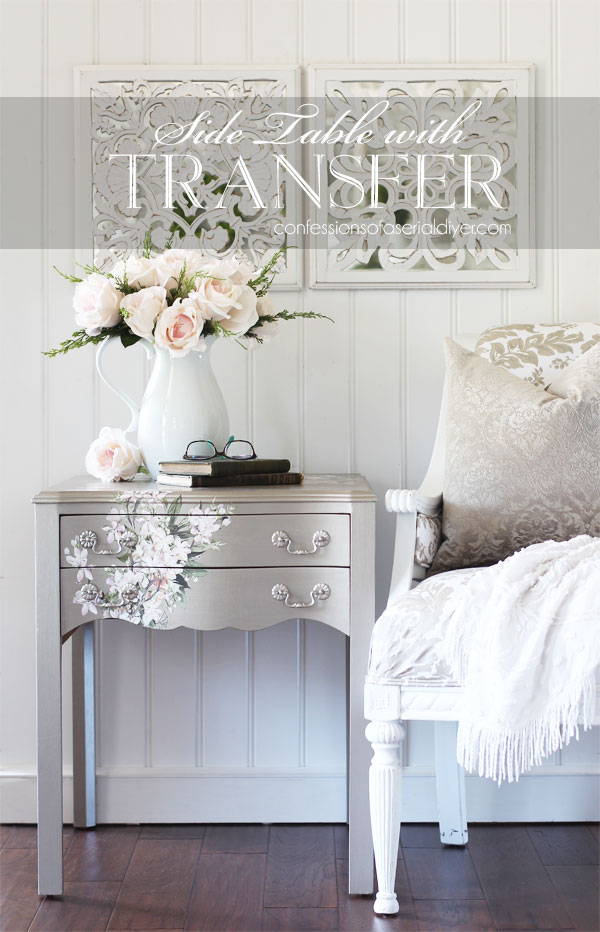
She shimmers and shines!
I had planned to use the same hardware. These are made up of three pieces…one center pull and the two round pieces that hold the handle on either side. However, I could not find one of the round pieces from the original pulls, so luckily I had eight replacements that I had saved from another piece!
These fleurette style ones are prettier anyway!
I painted them the same way…starting with Driftwood, followed by Steel Magnolia:
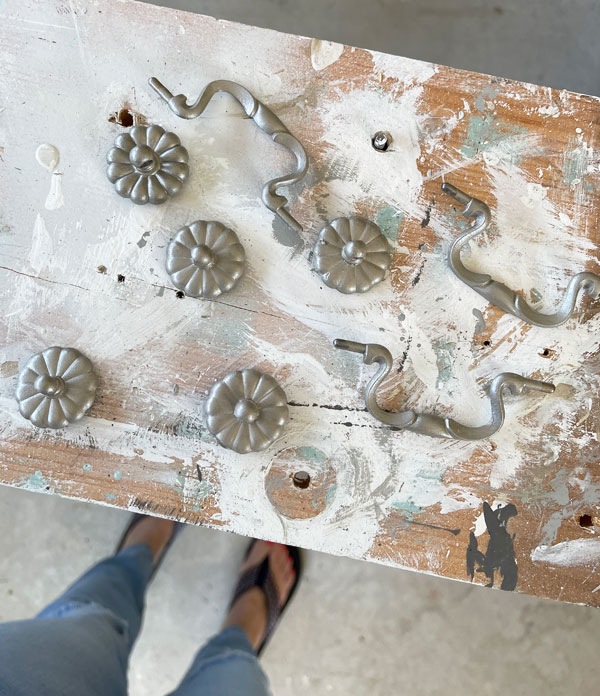
I chose to paint them the same color as the table as not to distract from the pretty transfer.
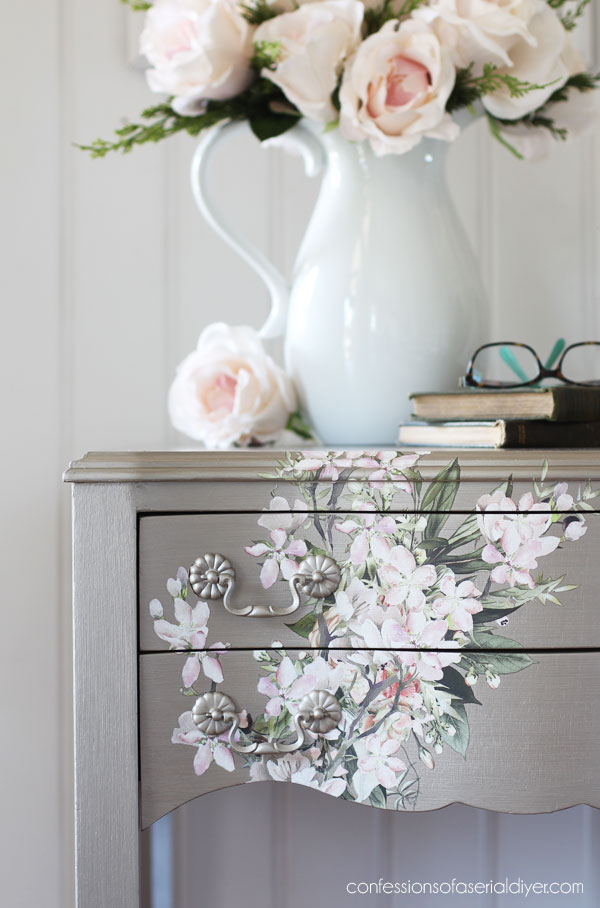
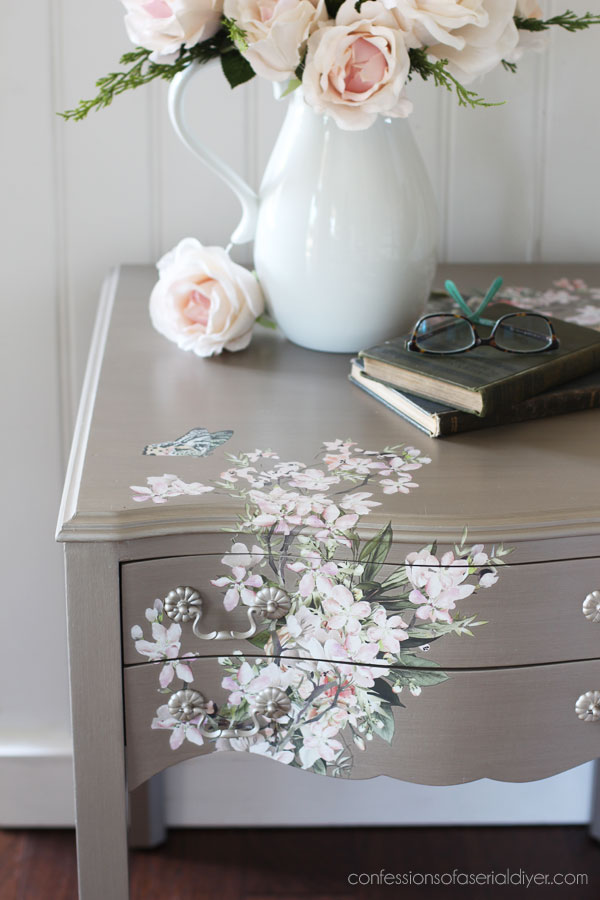
Of course, I had to pretty up the drawers too!
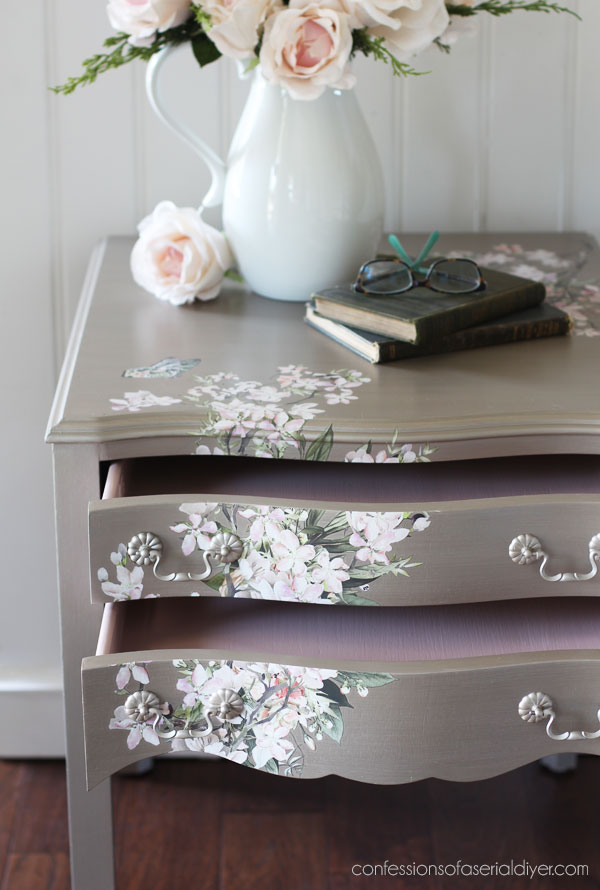
I chose Tea Rose to compliment the transfer and I just love it paired with the Steel Magnolia!
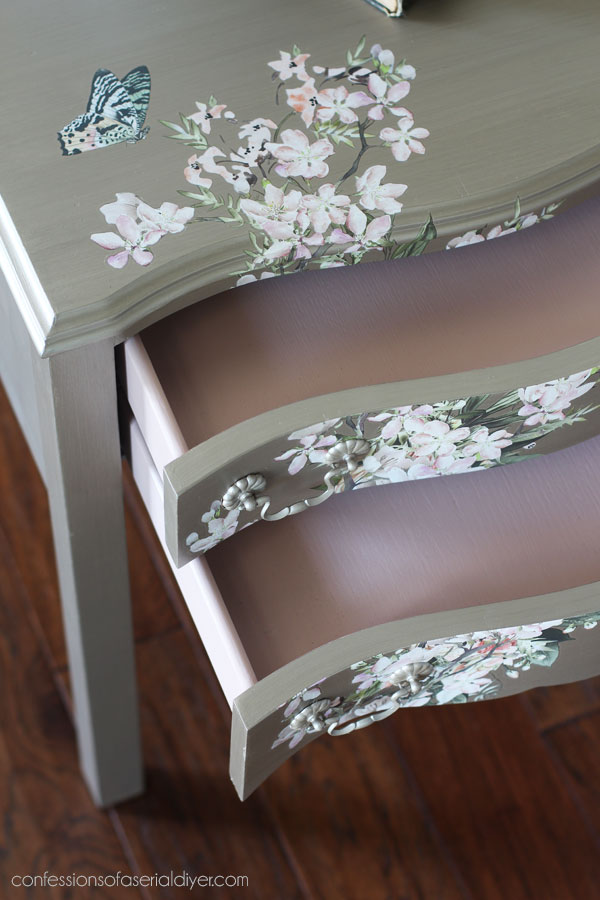
The insides were also sealed with Clear Coat in Satin using the blue sponge.
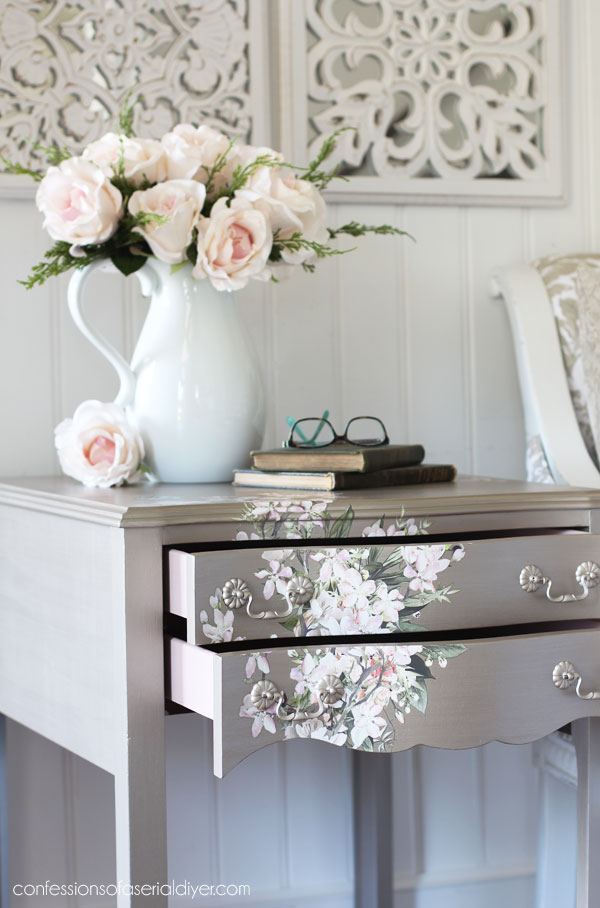
And here’s a better look at the top without the books:
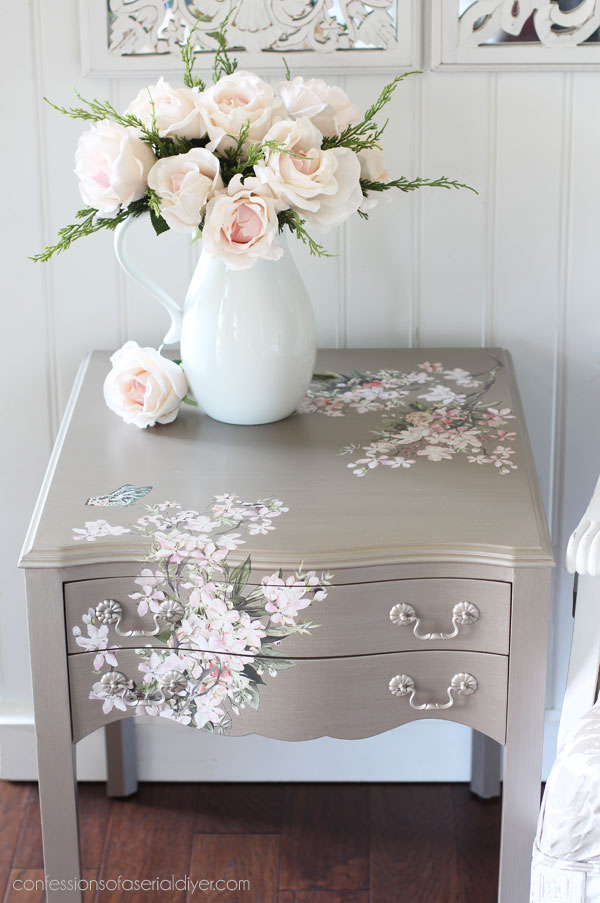
I have several pieces of this transfer left and already have plans for it!
That’s another one done!
See what I’ve completed so far at the links below:
Metal Bread Box Makeover
Ballerina Decoupage Paper Box
Petite Side Table Makeover
French Provincial Night Table
Repurposed Cigar Box
Antique Oak Chair Makeover
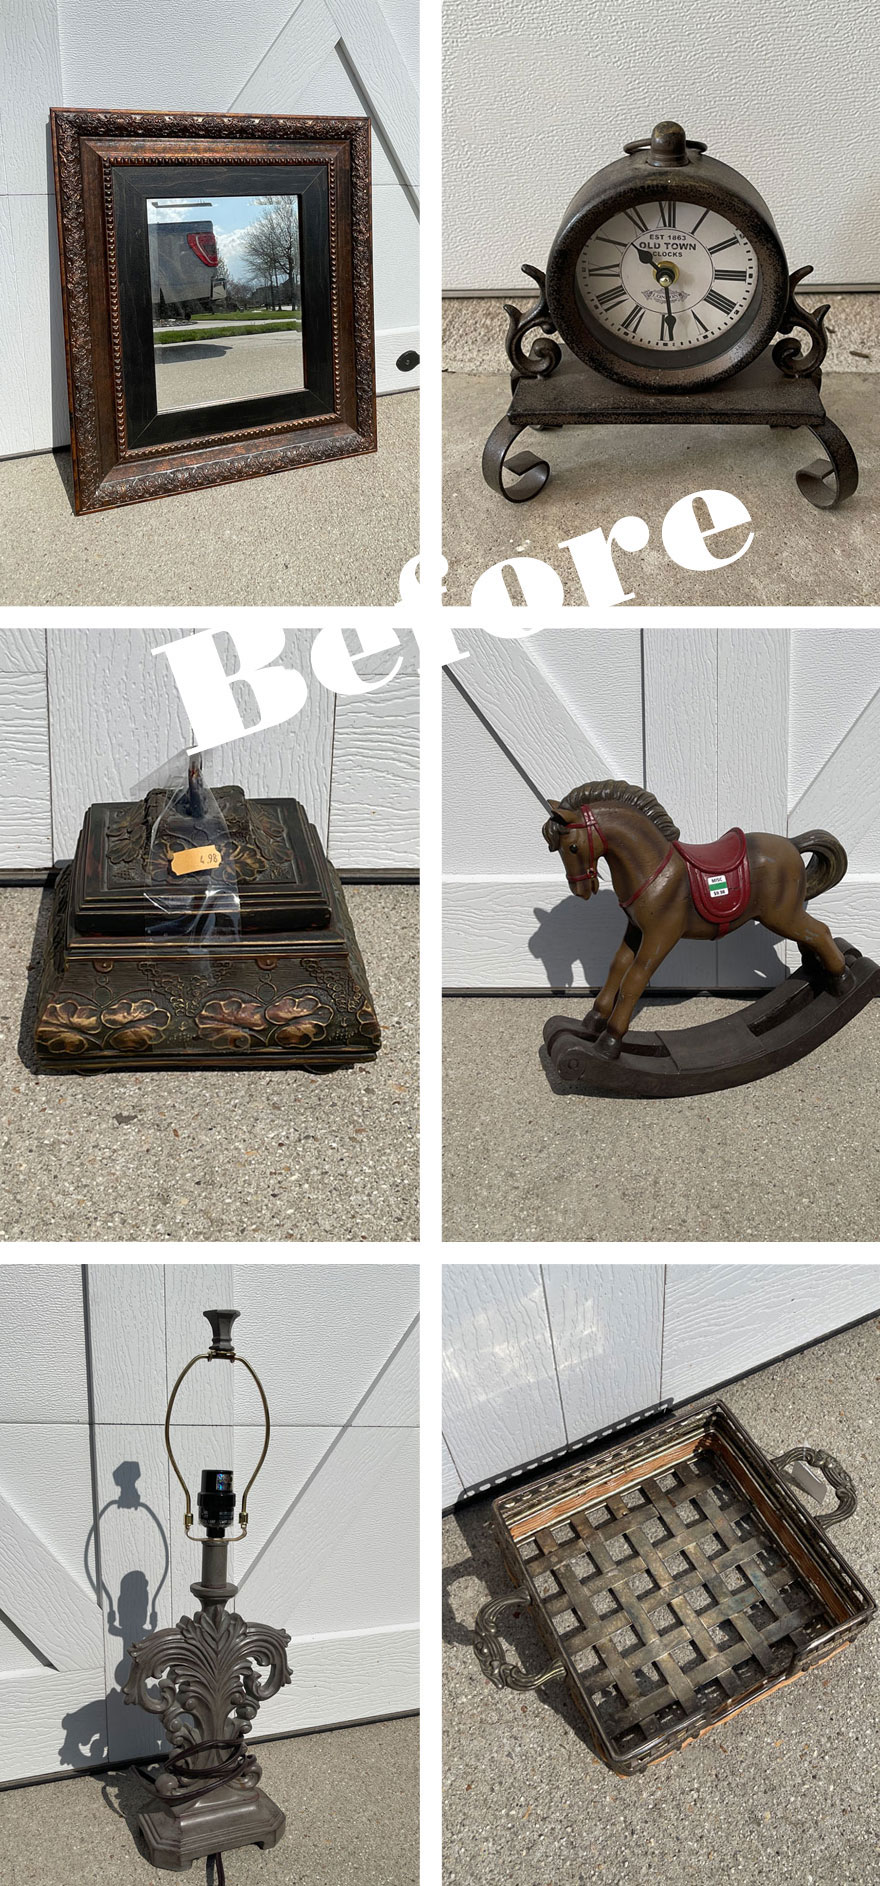
Painting the Smalls #16 (candlesticks, small box, tray)
Stenciled Mirror Makeover
Hutch Makeover
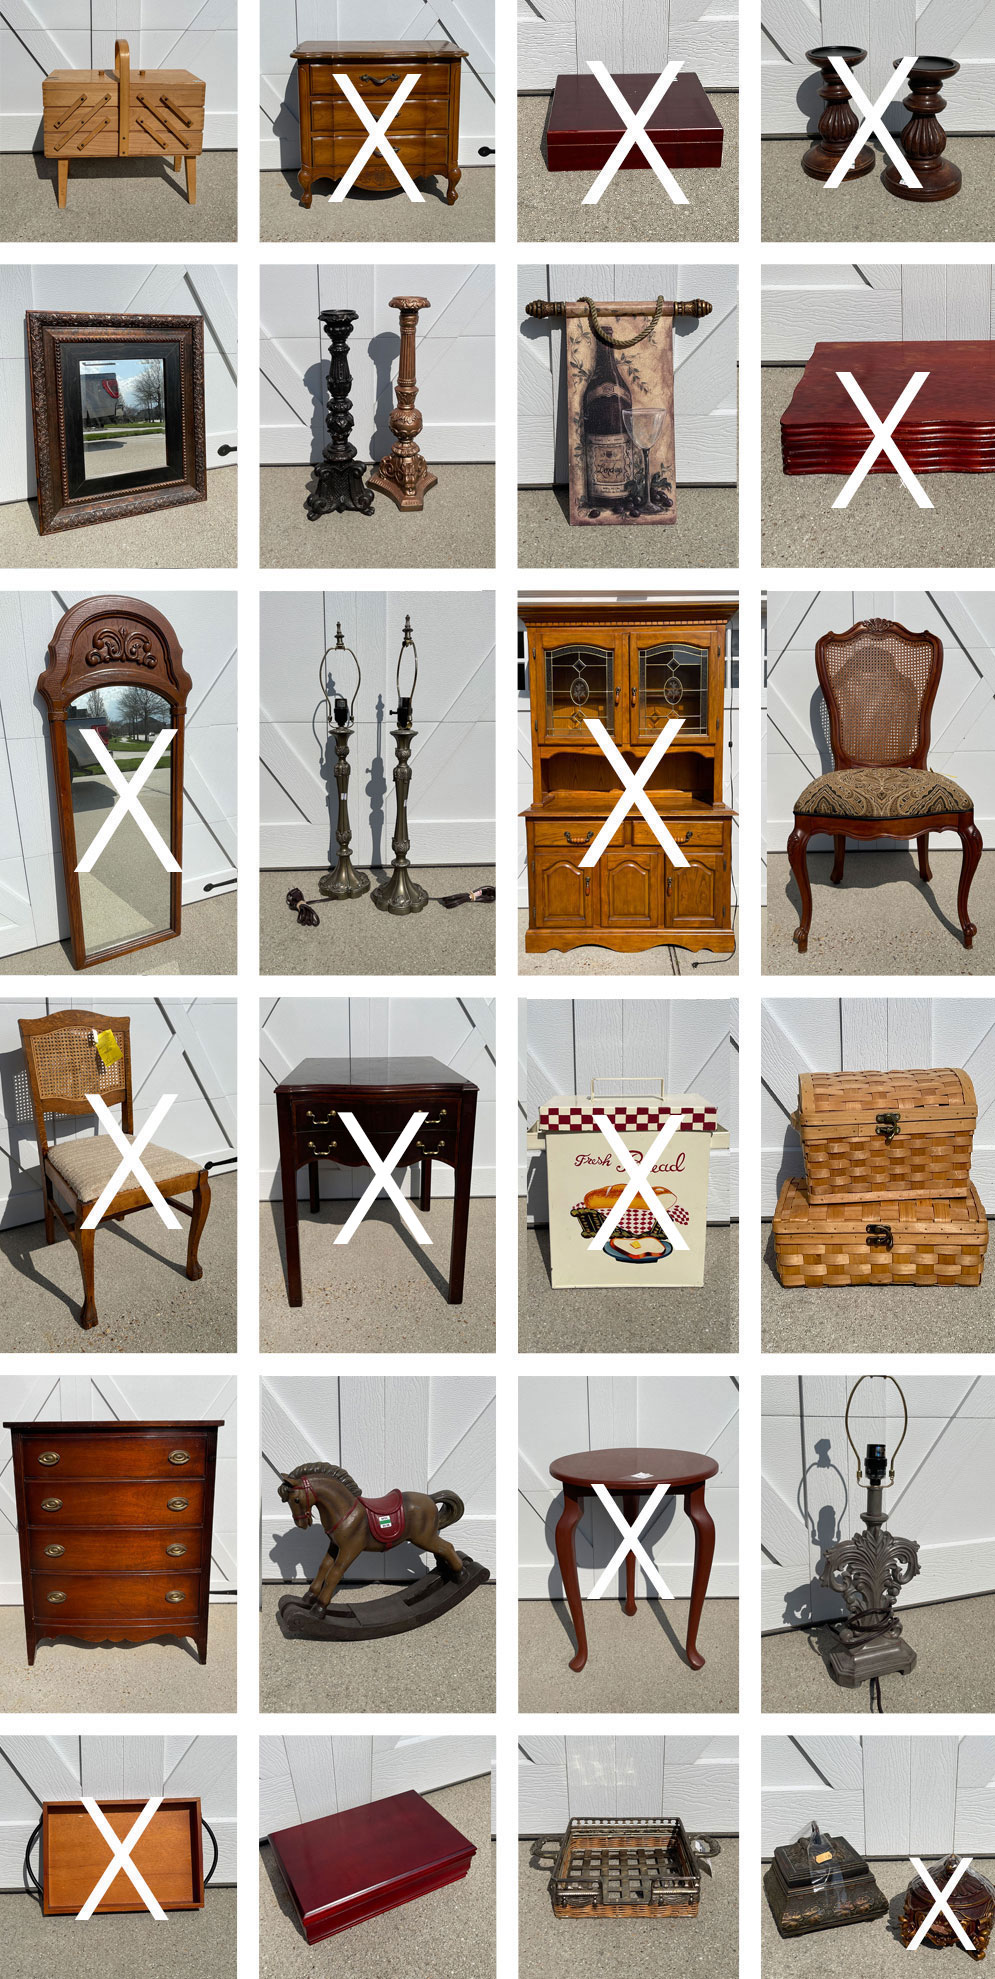
I’ve got several smaller items left, so I’m working on this round of smalls for Tuesday:
Have an amazing weekend, dear friends!
UPDATE: See the afters of these mini makeovers HERE now!
XOXO,

Don’t Miss a Thing!
If you like what you see, there are several ways to follow along!
EMAIL * INSTAGRAM * FACEBOOK * PINTEREST


Mary Kaiser says
WOW is that beautiful! That turned out so great! Love the floral transfers you used. That was a great price for a table with 2 drawers in it, and I LOVE the handles! You certainly know how to work magic on pieces like this!
Christy says
Thank you, Mary!! I was so excited to find this one, and that transfer is so pretty. I have enough left for another project I’ll share soon! Have a wonderful weekend! XOXO
Denise Cox says
WOW! It’s gorgeous!! I must admit, I wasn’t a fan of the paint color until you jazzed it up with the transfer. They compliment one another beautifully!! So, so lovely. Has a nice “oriental, cherry blossom ” vibe to it.
Christy says
Thank you, Denise! I’m so glad you enjoyed the outcome! XOXO
Sandi Allen says
So Beautiful & Elegant! Loving the colors!
Christy says
Thank you, Sandi! XOXO
Lori Oswald says
Christy, this is such a pretty transformation! Now I want to try the metallics!
Christy says
Thank you, Lori! They are so pretty…there are still a couple I want to try too! XOXO
Maryellen Webber says
What a beauty this table turned out to be! I wish I lived closer, I’d buy it myself!! Great job Christy!!
Christy says
Thank you so much, Maryellen!! XOXO
Leanne says
This is another stunner Christie. Wow. And you’re right – those floral type handles work so well. But I always worry about painting handles – especially metal ones (wooden ones are fine to paint). Do you not find that painted metal handles chip easily and start to look awful after a few uses? Or is there a special topcoat you use that prevents that from happening?
Christy says
Thank you, Leanne! I don’t worry at all when I’m using chalk paint which I did as a base here. If I were painting handles for something like kitchen cabinets that would get a ton of use and possibly get wet, I would go for spray paint instead. XOXO
Christine says
Love this makeover, Christy!! You must report back how quick this sells!! Well, unless you’re keeping it for yourself 😀
Christy says
Thank you, Christine! I sure will! XOXO
Judy says
I really enjoy your beautiful work!
Christy says
Aww thank you so much, Judy! XOXO
Janice Holt says
This table turned out absolutely beautiful. The color goes so well with the pretty transfer and knew you would do something to the inside and you chose the perfect color to match the transfer. Another great job.
Christy says
Thank you so much, Janice! You know I had to pretty up them drawers too lol! XOXO
Norma Jean says
I bought 8 chairs great condition, however they have a factory finish poly coat on them. Most everyone says I have to sand/rough up surface to get any type of paint to adhere. This table has the same finish and you did not do this. Please provide step by step using your mineral paint in black.
Christy says
Hi Norma Jean! With chalk paint, you just need a good cleaning first. If you plan to use the Silk Mineral paint, you will need to either sand first or apply a bonding primer like Slick Stick as it does not have the adhesive properties that the chalk mineral paint has. (It has a self sealer though.) Read all my best tips for chalk painting HERE. (The photos in this post are older as I wrote this many years ago, but I have kept all the information current. There are also two videos in that post…one on chalk painting and one on sealing with the sponge.)
And a how-to for the Silk Mineral paint can be found HERE.
I hope this helps!! XOXO
Gayle says
Loved it! Such a pretty, feminine piece. Thanks for sharing your talents!
Christy says
Thank you so much, Gayle! It is always a pleasure to share! XOXO
Laura says
Beautiful!
Christy says
Thank you, Laura! XOXO
Val says
Hallo Christy, I love the metallic look you gave to this side table, and this transfer was the perfect match! the tea rose inside the drawers is a lovely surprise and turns the whole piece so romantic! Congratulations!
Christy says
Thank you, Val! I’m so glad you enjoyed this one…I secretly wanted to paint the whole thing Tea Rose, so the drawers were a good compromise! XOXO
Cheryl Atkinson says
Hi Christy! That transfer is pretty. Are pieces with transfers and decopauge papers still selling for you? Mine used to sell very quickly but I find that isn’t the case anymore.
Christy says
Thank you, Cheryl! I haven’t done a ton of furniture with the transfers lately, but I’ve sold all but one that I have done. Business is always slower for me in the spring anyway! Hoping it picks up for summer for both of us! XOXO
Joyce says
Your table is just stunning! When you seal your transfer do you dab the sponge or drag it over the transfer? So impressed with all your painting ideas! Is
Christy says
Thank you so much Joyce! I drag the sponge from side to side. You can see a video of how I use it HERE if you like! XOXO
Celia says
Love this table it is really pretty and the transfer. I have only tried one transfer and it didn’t go well! Do you cut the transfers in blocks or follow along the edges? I noticed after applying there was a shadow around the transfer and it didn’t look blended, is that when you sand it? Thanks for all your time on these questions!
Christy says
Thank you, Celia! Oh no…I do try to cut the transfer in smaller pieces when I can, to make it easier to apply. Here, I cut to fit each drawer separately, etc. There will be a halo effect after applying your transfer, but sealing it greatly minimizes that. XOXO
Barbara says
Christy, that’s beautiful! I love a little glam. Too bad I live so far away, it would be perfect in my bedroom (sigh).
Christy says
Thank you, Barbara! That is a perfect description…glam it is! XOXO
Karen Davis says
Hi Chrissy, I just love this makeover. The colour and transfer are perfect. I’ve been looking for something for a small dresser I use for storage, and this will be it. Thanks for the inspiration!
Christy says
Thank you so much, Karen! I love that you are feeling inspired! XOXO
Peggy says
Sooooo pretty and fresh! Love the flowers AND the metallic!
Christy says
Thank you so much, Peggy! XOXO
Cheryl says
Your make-overs are always amazing! They give me inspiration every time I see one!
Christy says
Aww I appreciate that so much, Cheryl! Thank you! XOXO
Jeanne says
Love what you did with this table! Very pretty!
Christy says
Thank you so much, Jeanne! XOXO
Robin says
She’s the belle of the garden party! So lovely. I do have a question: did I spy brush strokes? On other items that you paint they aren’t noticeable unless it was the type or color of paint?
Christy says
Thank you, Robin! Brushstrokes are expected with any hand painted piece, but I usually sand my pieces after which does smooth everything out. Because the metallic has a sealer in it, I didn’t sand so the brushstrokes are a bit more noticeable. The key is to have them all uniform and neat though! 🙂 XOXO
Joanne D. says
OMG! That table is gorgeous now! Love, love, love the Metallic and the transfer. Wish I could buy it. You are awesome!
Christy says
Thank you, Joanne!! I’m so glad you like it!! XOXO
Cyndi says
OMG! It’s gorgeous. I gotta try that metallic paint! Another great job, Christy!
Christy says
Thank you, Cyndi! The metallics are fabulous! XOXO
Cyndi says
What some call “brush marks” I call “striae.” In my opinion, That texture is much more interesting than it would be without it. 😊
Christy says
Absolutely! 😀
patty cowan says
Oh my gosh that is the most beautiful thing you’ve done yet!!! HOW are you gonna top that one now? LOL
Thank you for sharing all your projects with us, I enjoy them immensely!
Christy says
Oh wow thank you so much, Patty! You are the sweetest, and I’m so glad you enjoy what I share! XOXO
Deborah Mealus says
Christy, I think you are a mind reader! I was loving the makeover and I thought,” I’d wish I could see the top without the books” and…there it was! You never disappoint with your talent and insight. Thanks for another stunning makeover!
Christy says
Oh ha ha…yes, I try to remember to do that as it is nice to be able to see the whole thing! Thank you so much!! XOXO
Linda says
You just cleaned it and painted?? I just got a small table that looks like melamine paint, it’s kind of thick where it has chipped. The products you use are that good that you don’t sand.? That’s crazy
Christy says
Hi Linda! When using chalk paint, most surfaces do not need to prepped in any other way other than a good cleaning. Any non-porous surfaces like laminate, plastic, glass, etc need to be sanded first or you can apply a bonding primer like Slick Stick first. I think melamine would need sanded or primed first. You can read more about Slick Stick in this recent post: https://www.confessionsofaserialdiyer.com/how-to-use-slick-stick-to-paint-metal/ I hope this helps! XOXO
Barbara Davis says
Gorgeous!!
Christy says
Thank you, Barbara! XOXO
Cecilia says
Oh my gosh! This might be my favorite of all your redos. It’s stunning! Wow.
😍
Cecilia
Christy says
Aww thank you so much, Cecilia!! XOXO
Denise - Salvaged Inspirations says
Ohhh this is stunning Christy! The color, the shimmer, the florals, and inside drawer detail WOW! Love it! Pinned!!! XOXO
Christy says
Thank you so much, Denise! It was a fun one to work on, my friend! Thanks for the pin! XOXOXO
Sue Mellette says
What a lovely makeover. I really like the metalic color and the transfer just makes the table pop! A nice touch with the drawer pulls – painting them the same color as the table was perfect! Thanks for sharing all the details. Enjoy your weekend.
Christy says
Thank you, Sue! The metallics are so ooh la la lol…fun to play with for sure! Have a great weekend too! XOXO
Teresa Farrell says
She is absolutely stunning,Christy❤
Christy says
Aww thank you so much, Teresa! XOXO
Beth Smith says
That table is gorgeous! Excellent job!
Christy says
Thank you so much, Beth! XOXO
Cyndel says
Gorgeous! I remember how I stared for at least a full minute when I saw your first makeover with Steel Magnolia, thinking how glowy and almost alive it looked. It looks beautiful with the floral transfer, too. Well done.
Two questions: (1) Does Steel Magnolia lean silver, gold or a mix of the two? And (2) Can transfers be painted? I want to make an old dresser into a tribute piece to my late Mom, who loved yellow roses. But I can’t find a transfer with yellow roses. I bought one that’s perfect for my plan, except the roses are pink and burgundy. Do you think priming and painting them might work, or would I more likely just ruin the transfer?
Christy says
Aww thank you, Cyndel! Steel Magnolia is so pretty in person too! It is more like a metallic taupe. I don’t see why you couldn’t paint over a transfer, especially if the place where you adhere the transfer won’t be handled much. Good luck! XOXO
Robyn Wright says
So romantic!
Christy says
I love that description, Robyn! XOXO
Vicki says
Wow, this is so gorgeous! I love the metallic with the transfer so much, great job!
Christy says
Aww thank you so much, Vicki! XOXO
Barbara J Orlemanski says
I have been following you for quite a few years now and I think this little table is absolutely the most beautiful piece you have ever done. Love the metallic look with the beautiful flowers. You just keep getting better year after year. Keep up the good work.
Christy says
Aww I appreciate that SO much, Barbara! Thank you!! I’m so glad you loved this one! XOXO
Caye Cooper says
Oh, that is SOOOO PRETTY!! Gosh, you do such lovely work. I really appreciate your efforts and workings. Thank you so much for all the inspiration you give!
Christy says
Aww thank you so much, Caye! Y’all make it such a pleasure to share each week! XOXO
Nette says
Gorgeous! A lovely expansion of your repertoire.
Christy says
Thank you so much, Nette!! XOXO
Addie says
Way better!!! NICE!!!
Christy says
Thank you, Addie!! XOXO
Constance Colvin says
Well, Christy, that is so dang pretty!
Christy says
Thanks so much, Connie! It was a fun piece to work on! XOXO
Josee says
You are very talented!
Christy says
I appreciate that, Josee! Thank you so much! XOXO
Angela Howarth says
Christy, this is so beautiful and wonderful that you have stepped away from white! I love your work.
Christy says
Thank you, Angela! I have another non-white furniture makeover coming next week…a miracle, I know ha ha! XOXO
Shirley says
What a beautiful makeover!! I honestly thought it would be white or green of some sort but I’m sooo glad you switched it up with this color and a transfer. It is absolutely stunning!
One day I’m coming to your shop! I will rent a room and do all the shopping I can…that day is coming so be prepared! LOL
Christy says
Thank you so much, Shirley! I love this color so much! And yay…can’t wait for you to visit! XOXO
Petra says
That is super pretty – and your styling/staging is en pointe 🙂
Christy says
Aww thank you so much, my friend! Have a fabulous weekend! XOXO
Sandra C says
The transfer glammed it up! Stunning piece!
Christy says
Thank you, Sandra! I love transfers…they make me feel like an artiste ha ha! XOXO
Melissa says
Beautiful! You have great vision!
Christy says
Aww thank you so much, Melissa! XOXO
Marcie Lovett says
What a beauty, Christy, and genius trick to cover up damage. I can’t believe the paint went on right over that shiny finish. And no bleed through, either. Woo hoo!
Christy says
Thank you, Marcie! I’m all for less work lol! Yep this wood had more brown to it. Had it been more red, I would have been skeered ha ha! XOXO
Sherri says
This makeover is just so lovely! I have soft pink and gold as colors in one of our bedrooms and I think the pink in this transfer is the perfect shade to coordinate on the nightstand. Three questions:
1. What color of chalk paint undercoat should I use with the gold digger metallic paint combined with this transfer?
2. Do you think that an entire nightstand painted in gold digger would look gaudy rather than glam?
3. Does the transfer combine well with gold digger? (It looks perfect with steel magnolia!)
Thanks so much for sharing your inspiring talent!
Christy says
Thank you, Sherri! I have emailed you separately with some images of the Gold Digger. 🙂
Michele M. says
Oh my gosh that is absolutely unbelievable!!!!! WOW!!!
That table is stunning, Christy. Very very well done. I love it.
Have a happy weekend.
Christy says
Aww thank you so much, Michele! Enjoy your weekend too! XOXO
Mary says
Its absolutely beautiful now Christy! What a difference your talent and effort made with this piece that had lovely “bones” to start with. Just gorgeous!
Christy says
Thank you so much, Mary!! Enjoy the rest of your weekend! XPXP
Karen Moore says
Stunning!
Christy says
Thanks so much, Karen! XOXO
Gina says
This is so beautiful!!
Christy says
Thank you so much, Gina! XOXO
Kerryanne says
Oh Christy, the colours in this project are simply gorgeous. You always make my heart swoon with your fabulous DIY’s.
Thank you for sharing your side table makeover at Create, Bake, Grow & Gather this week. I’m delighted to be featuring it at the party tonight and pinning too.
Hugs,
Kerryanne
Christy says
Aww thank you so much, Kerryanne!! I truly appreciate the feature, my friend!! XOXO
Chris says
So pretty!
Christy says
Thank you, Chris! XOXO
Carole says
This is so beautiful! I’d like to do a small vanity in a similar color combo. Will one jar of the metallic be enough to cover it? Also, have you ever painted over velvet? The vanity opens on the top to a little compartment, which is covered with lime green velvet…. it’s kind of bright and I’d like to cover it.
Thanks for always inspiring me!
Christy says
Thank you so much, Carole! One jar will be enough, if you do like I did here and base coat it with a similar chalk paint color like Driftwood as it goes on a bit sheer. You’ll get quicker coverage that way. I have not painted velvet, but if it is in a hidden compartment, I say go for it. The worst that can happen is you have to remove it. Rustoleum makes a fabric spray paint. I wonder how that would work on it? You would need to tape it off so there is no overspray but just thinking out loud. Or you can try the method I used here to paint fabric: https://www.confessionsofaserialdiyer.com/how-to-paint-fabric-with-chalk-paint/ and see how it goes. Good luck! XOXO