Hello, lovelies, and welcome back! Thank you for all the love on the armoire I shared on Tuesday! I had a hiccup with the transfer, but I was luckily able to get it back on track for a beautiful result! Today, I’m sharing a vintage cane chair that I picked up for $10 at the thrift store.
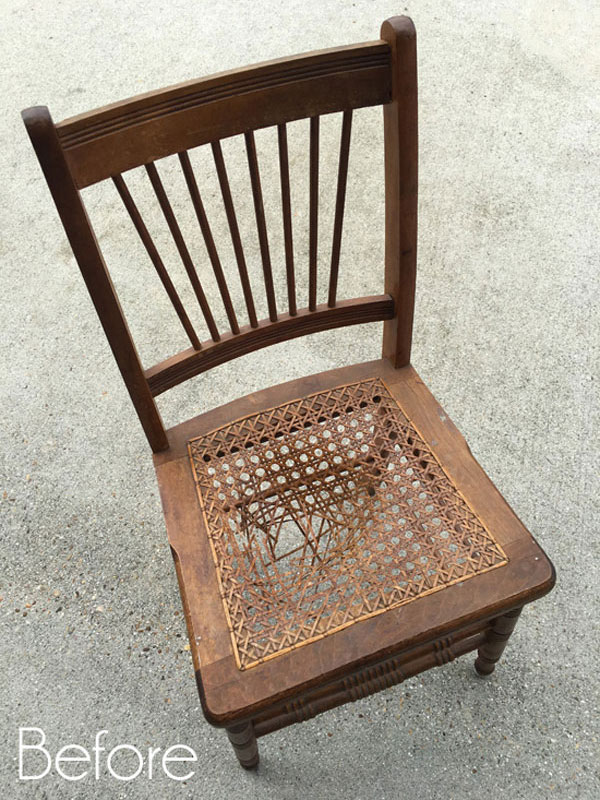
It started out like this:

I always check chairs to make sure they are sturdy before buying them. Wobbly chairs are not easy to fix, but this one was good to go!
I’ve included a few affiliate links so you can find the products I love.
Clean
The first step in this chair makeover was a good cleaning with White Lightning and boy did it need it!

Can you even believe it was that dirty?? This is why you clean your pieces ha ha!
I wiped it down well and then swapped my dirty water out for clean water and gave it another wipe down to remove any residue. White Lightning is a degreaser and deglosser, so it is not reccommended for pieces you do not plan to paint. Gloves are recommended.
Paint
I chose to get a quick first coat on this chair using Rustoleum flat white spray primer:

And that is my medium spray shelter which is the perfect size for small furniture like this chair.
Then I followed up with a custom mix of about 25% Hurricane Gray with about 75% Cotton:

I love this mix! It is a soft, subtle gray!
Sand
I sanded with 220 grit sandpaper wrapped around an old sanding sponge to smooth and distress a bit:

Adding some charm
I decided to add this little piece of transfer that I had left from the transfer I used on Tuesday to add a little something special to the back of the chair:

Seal
Finally, I sealed with Clear Coat in Satin using the blue sponge applicator to apply it:

Vintage Cane Chair Makeover Reveal
Here is how this cutie turned out:

Cute, right??

I love a simple painted chair!

The transfer on the back is such a small addition but it adds so much!


You don’t have to buy the large transfer this one came from, I also have this Vintage Script Mastery transfer set that would work.

And a peek at the cane…

Even if you plan to skip the spray priming step, be sure to at least spray prime the cane seat as that will keep your painted finish intact through all the movement of the cane as the seat is used.
I just love a little distressing, especially with some white peeking through…
 This chair already had several bumps and bruises, so distressing also helps to camouflage that.


If you have a cane chair that needs repaired, here’s is a fantastic alternative!
See how I remedied that HERE!
And that is another one done!!

See what’s been completed so far below:
Dated Coastal Lamps
Home Interiors Shelf Makeover
How to Change the Bottom of a Dresser
$3 Yard Sale Wall Shelf Makeover
Plant Stand Makeover
Freebie French Chair
Oak Pedestal Table
I’m hoping to blast through this huge haul this summer, so to help with that, I’ll be back with this round of six smalls on Tuesday:

UPDATE: They are done and ready for their big reveal HERE!
Have a great week, dear friends!
XOXO,

Don’t Miss a Thing!
If you like what you see, there are several ways to follow along!
EMAIL * INSTAGRAM * FACEBOOK * PINTEREST


Get FREE SHIPPING on all orders over $50. No code needed at checkout! Orders under $50 always enjoy $8 flat rate shipping! Most orders ship same or next business day!


Petra says
Super pretty and love the subtle colour combo 🙂
Christy says
Thank you, my friend! XOXO
Mary Kaiser says
Oh it turned out so beautiful! It is stunning! Nice for you to have a nice simple project after all the trouble you had with the last one! I am excited for the smalls on Tuesday, I think the smalls are my favorite!
Christy says
Thank you so much, my friend! I welcomed this simple redo for sure ha ha! I love the smalls too! Have a fantastic weekend! XOXO
Kathy W says
Hello and Good Morning, Christy – I love the chair. It turned out so cute!! For some reason, I am drawn to chairs. I could have dozens and it wouldn’t be enough. Lol. What amazes me about you is that you know just how to distress your makeovers!! I am not usually drawn to distressed items but I have loved every item you distress. I can’t say enough about your vision in knowing what to do with everything you have given a new life. The same goes for your transfers!!! I wish I had just a little bit of your amazing talent. You truly are an inspiration and you are so sweet to share it with us (your lucky followers). ????
Kathy W
oxox
Oh, BTW, my husband and I are in VA visiting our Son. Where is your booth in Virginia Beach in case we have some time to slip away to see your booth in person? It’s on my bucket list.
Christy says
Hello, Kathy! Thank you so much! I little distressing goes a long way and you have to take care to only distress where a piece would normally wear. I think that makes it work! You are the sweetest, always and I appreciate you! My booth is located in the Virginia Beach Antique Mall located at 3900 Bonney Road in Virginia Beach. It would be awesome if you got a chance to visit! XOXO
Cecilia says
Very cute. Sometimes a simple makeover is all a piece needs. This one is perfection now. Love it! And yay! A round of smalls – that’s always fun!
???? Cecilia
Christy says
Thank you, Cecilia! Absolutely! Woohoo…six mini makeovers on the way! Happy weekend, my friend! XOXO
Deborah Mealus says
As usual, your makeover is perfect! I love how the chair turned out. I have a very similar chair that I couldn’t decide what to do with it. Your makeover inspired me to go ahead and paint the cane! Thank you!
Christy says
Aww thank you, Deborah! The cane looks so good painted! Have fun with yours! XOXO
Marcie Lovett says
Very cute, Christy! You deserve a simple, straightforward project after the last one ???? I love cane and think about painting but I’m afraid it won’t wear well. Yours always look great, spray painting first seems like a good idea.
Christy says
Thank you, Marcie! Ha ha yes…this was a welcome break after the last makeover for sure! And I get it with the cane, but spray priming first will definitely help it to last! XOXO
Cyndi says
This turned out so pretty! Great tip about priming cane, too. I have a chair with cane and I’ll remember that when I finally paint it.
Christy says
Thank you, Cyndi! Yes, priming first will help it to wear well! XOXO
Ansje says
I love it!
Also the picture in the background! Is there a tutorial for that?
Christy says
Thank you, Ansje! That picture is one I created from a transfer long ago, but sadly, that transfer is no longer available. XOXO
Lizzy says
It’s super-cute and I love the custom color.
Christy says
Thank you, Lizzy! This is such a great neutral! XOXO
Mary Loveland says
That was a cute chair to begin with and you made it more useful and gorgeous. Well done!
Christy says
Thanks so much, Mary! I love a little painted chair! XOXO
Jewels says
Simple yet elegant. Such an inspiration of ” you too can do this ladies”!
Christy says
Thank you, Jewels!! And YES! You too can absolutely do this ha ha! XOXO
Caye says
Oh boy, Christy. So simple and sweet. I’m so glad you didn’t have to replace the caning. I did that once, and once was enough for me.
Isn’t it amazing how dirty pieces can be! I’ve found several that looked like they could use a wipe down, and when I got into it, wow it was filthy. One even had tiny dead bugs in it. Euuuu! So washing is so important!
I’m so glad that you made mention of the cleaner only meant for things that are to be painted! Thanks for that.
Have a great weekend! Hugs.
Christy says
Thank you, Caye! I don’t think I ever need to experience caning ha ha. Eww..tiny dead bugs? Yes, I clean everything because sometimes they don’t look bad at all and then you see the dirt when cleaning! Especially with older pieces that may have been stored in a barn, shed, etc. Enjoy your weekend too, my friend! XOXO
Michele M. says
It is awesome. Love the color you mixed too. Super cute and would just go with about any decor. It will sell so fast.
Christy says
Thanks, friend! These little wooden chairs don’t usually last long, but remember the white painted one that took like two years to sell? You just never know lol! XOXO
Mary says
Very cute redo, Christy! I love a painted chair too..so versatile, especially in that beautiful color you used. 🙂 I wanted to see how you fixed the one with the damaged cane seat, but I could not get the link to work to take me there. Am I doing something wrong? I have more than one chair with damaged cane seats and just haven’t known what to do with them. (But, as usual, you have a solution!) 🙂 Thank you for continuing to create beauty!
Christy says
Thank you so much, Mary! I’m so sorry about that. I must have forgotten to add the link. Here ya go: https://www.confessionsofaserialdiyer.com/simple-fix-for-a-broken-cane-seat/ It’s a great way to fix one without caning! I hope it helps, my friend! XOXO
Mary says
Thank you so very much, Christy! What a great save for these chairs that stumped me for so long ???? I have a set of 4 and just didn’t want to dissemble and repurpose. TY! You are a wizard!
Christy says
You’re welcome! I’m so glad that was helpful! And I’m sure it is a much easier solution than recaning lol. Here is another, but I redid it very similarly: https://www.confessionsofaserialdiyer.com/how-to-fix-a-broken-cane-chair/ Good luck with yours! XOXO
Mary says
Ooohhh love this one too! The gingham looks so awesome with the pattern in the caning. Thank you, thank you! Xoxo
Christy says
Thank you!! XOXO