Welcome back, amazing friends!! It’s furniture Fixer Upper Day, and instead of redoing something so close to the holidays, in December, we like to showcase our favorite Furniture Fixer Upper Makeovers from the year. Be sure to see what my friends chose at the bottom!
When I looked back through all the pieces I have made over this year, it was a no-brainer!
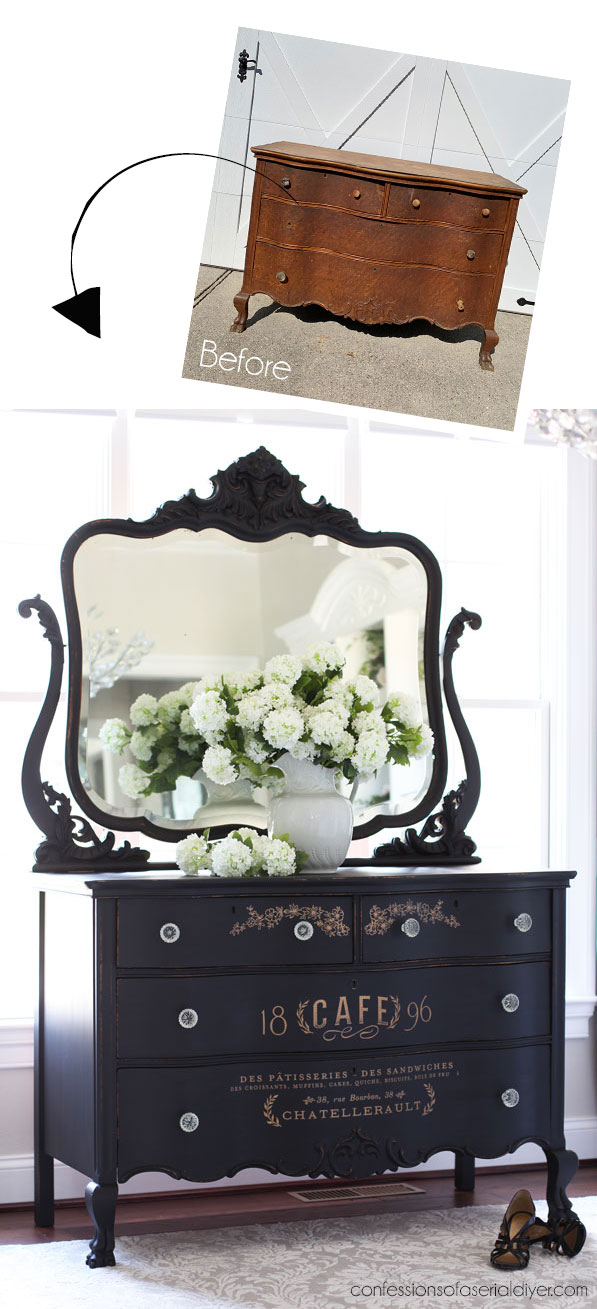
This antique dresser from my Mother’s Day Haul won, hands down:
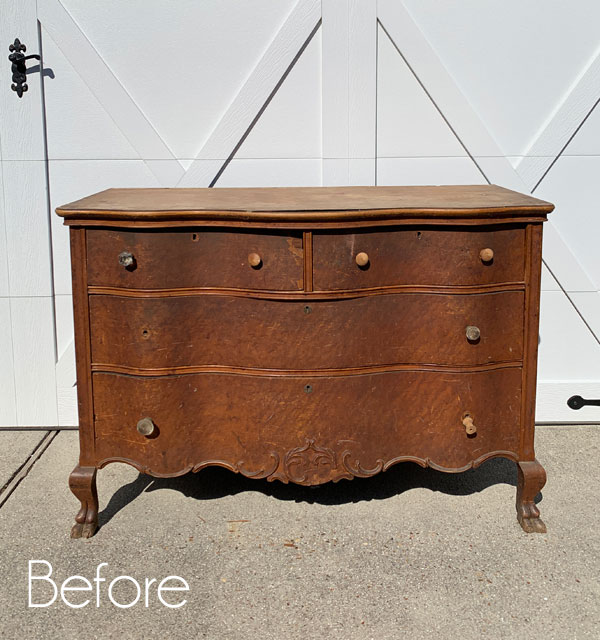
Isn’t she a beauty? Well, not yet, but just look at those curves! SO much potential!
But she was in need of a LOT of love. I’ve included a few affiliate links so you can find the products I love.
To start this project, I removed the drawers and gave it a good cleaning all over. White Lightning is perfect for this!
Getting rid of the musty smell
It was super musty on the inside, so to combat that, I brushed on one coat of BOSS in clear on the inside:
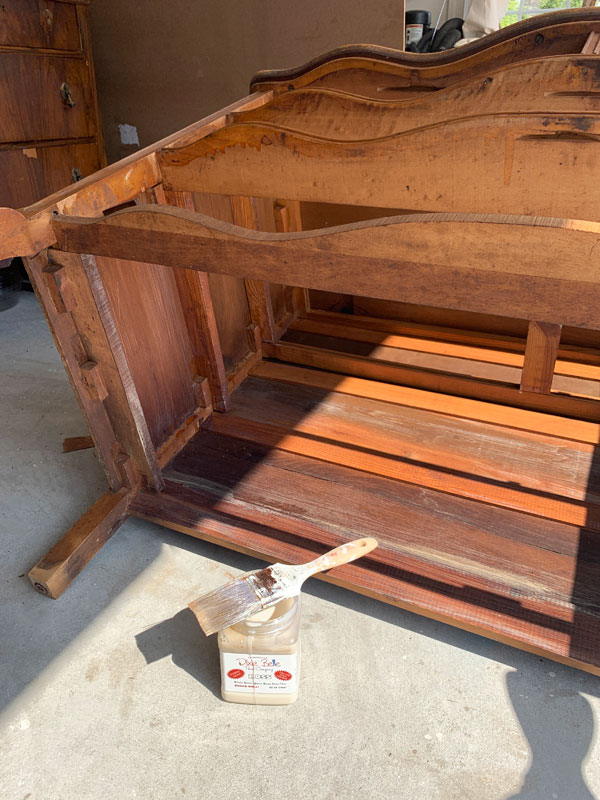
I covered every interior surface. It works amazingly well to seal in those musty odors!
Removing the veneer
Next, I tackled the veneer on the top.
Here is what I was working with:

Unfortunately, the veneer on this one was too far gone along the front and in some areas on top to salvage, so I decided to remove the veneer on this one. I learned the best way to do that from my friend, Larissa of Prodigal Pieces.
I laid soaking wet towels on the surface and left them overnight. The water softens the glue.
The next morning, I was able to scrape the veneer off in strips with a large putty knife:
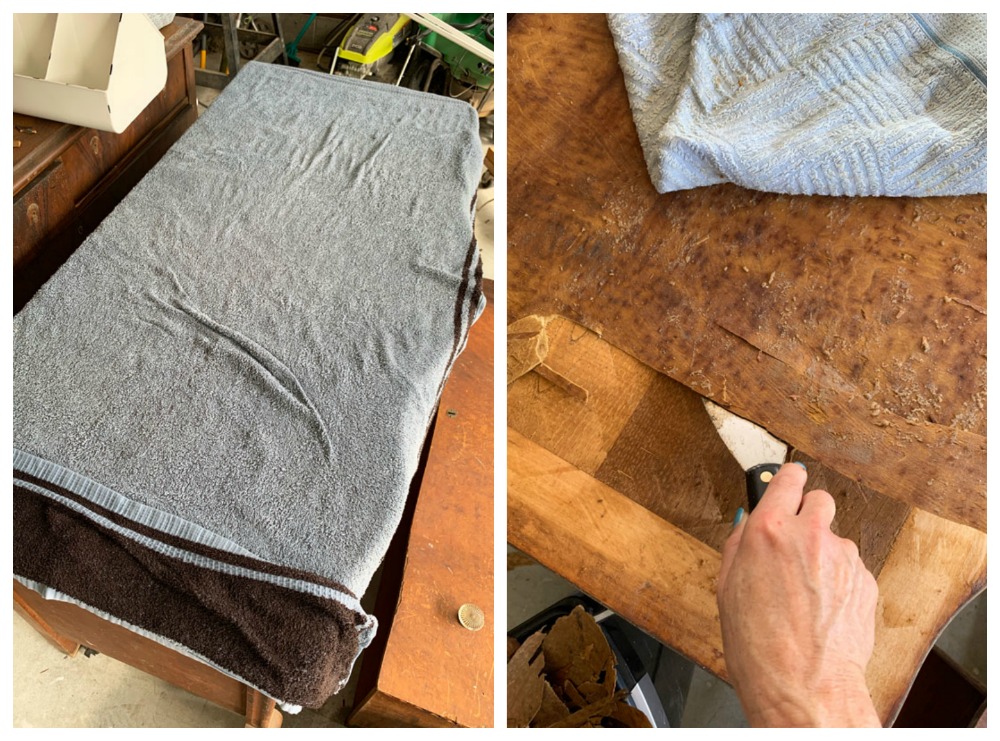
You can soak the towels and take them to your project, or you can lay the towels out (I used two here), and pour water on them from a pitcher, which is what I did.
I didn’t expect the top to be in pieces after removing the veneer:
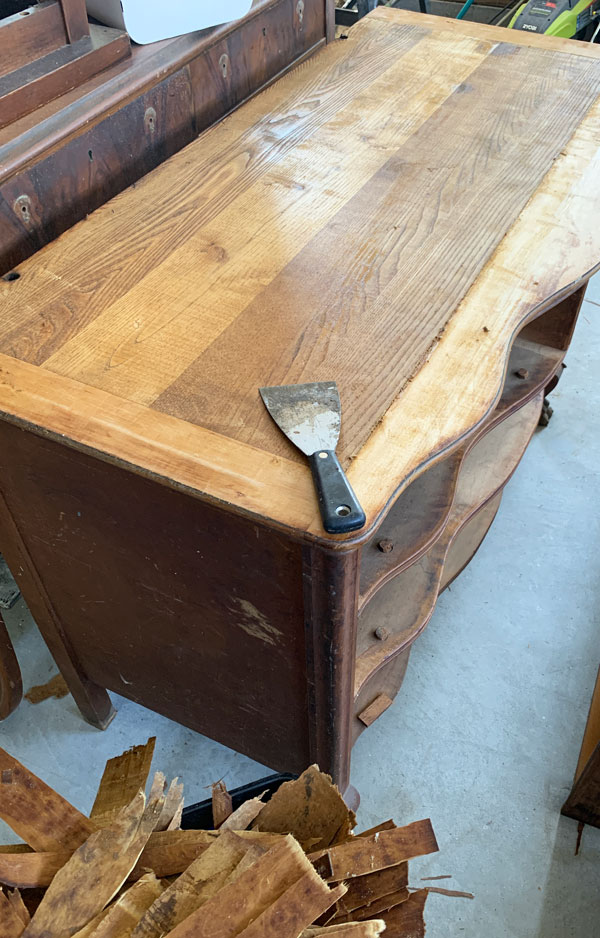
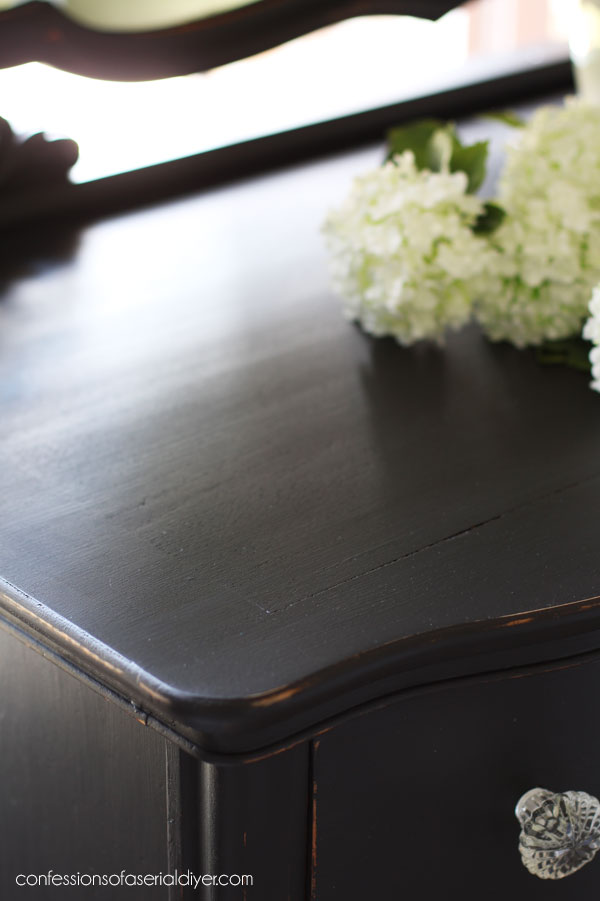
I cleaned it really well with Odorless Mineral Spirits and then gave it a good sanding to smooth everything out with 220 grit sandpaper using my orbital sander.
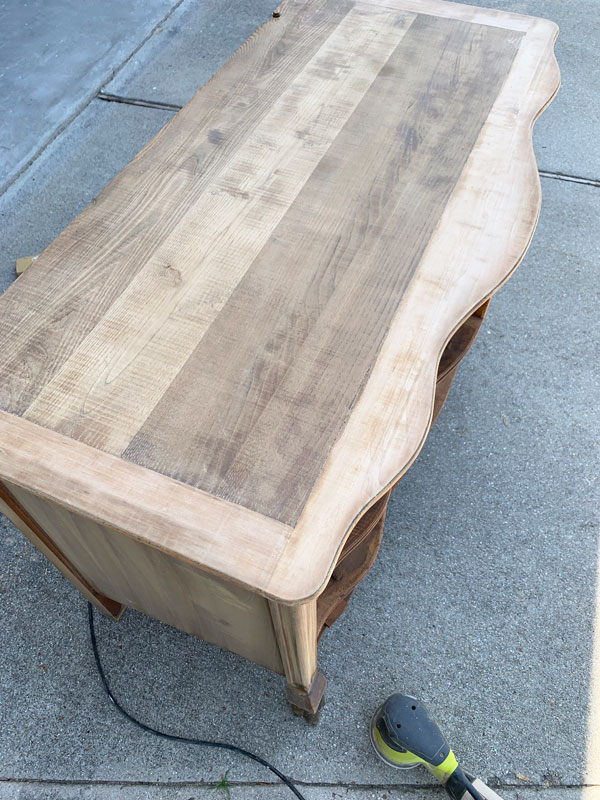
This would have been an awesome top had this been more of a farmhouse style dresser, and I may have even stained the top instead, but that was not the look I was going for.
Filling in the missing parts
The next challenge I had was the corner on this drawer:
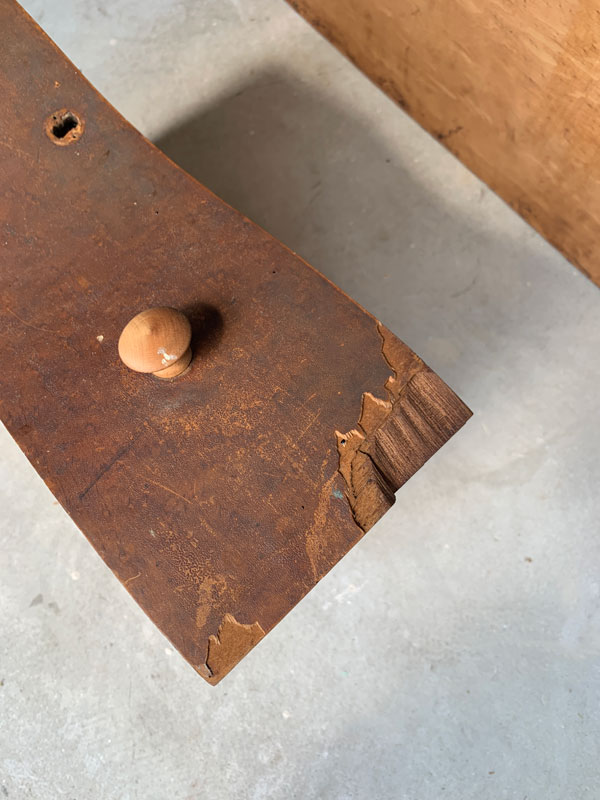
Part of it was completely missing. I turned to a tutorial by my fellow fixer upper friend, Denise from Salvaged Inspirations because I have seen her fill in some crazy missing parts using a product called Bondo. You can read all about it on her blog HERE. Let me tell you, this is the stinkiest product I ever have used in my life!
But dang, it sure does the job!
I did as her tutorial suggested and splinted the area to be filled, and after mixing the two products included, I slapped it over the area with a putty knife:
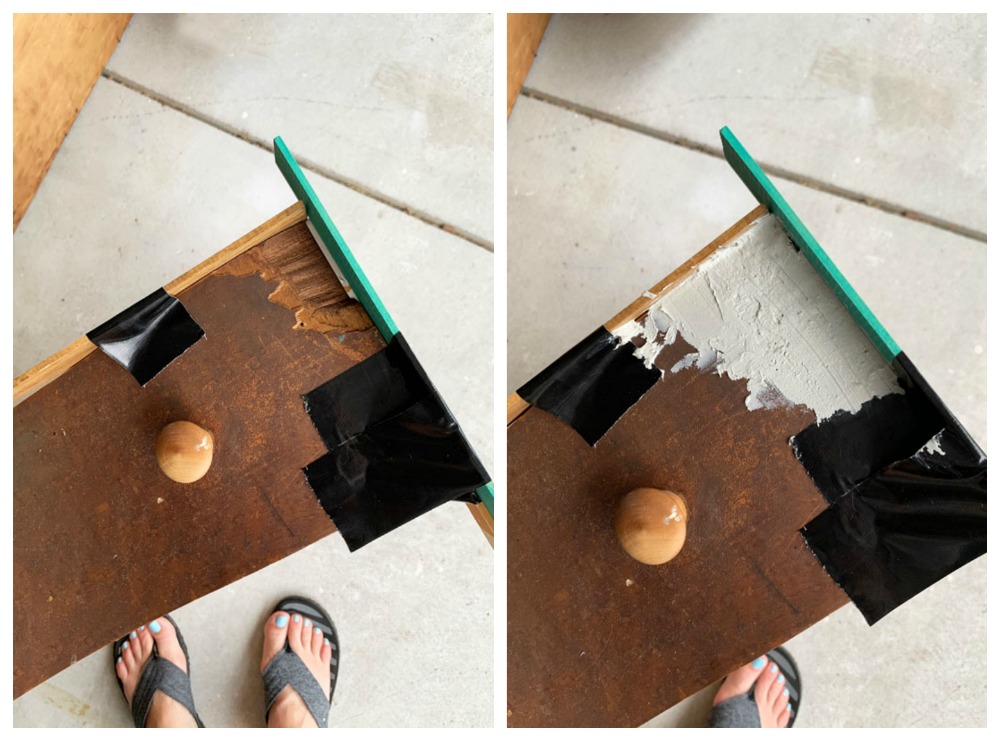
This stuff sets up in about two minutes, so use it quickly!
When it was completely dry, about 30 minutes later, I sanded the area with 220 grit sandpaper using my orbital sander.
I was done with the stink, so I filled the rest of the imperfections in with Dixie Belle’s Mud in brown:

I sanded those smooth also once they were dry.
I ended up hand sanding across all the drawer fronts just to smooth them out a bit.
Finally, time to paint!
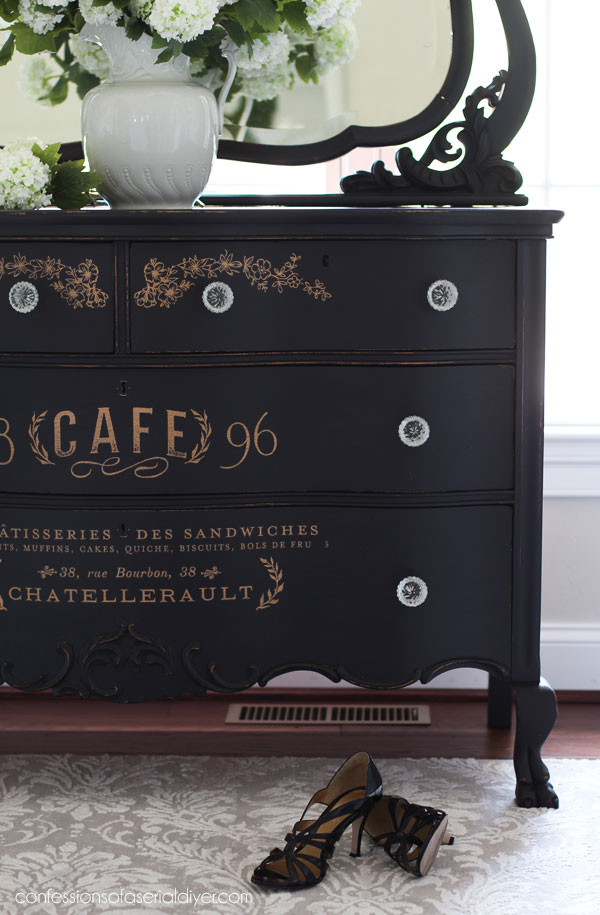
I chose Caviar for this project and gave the dresser two coats:
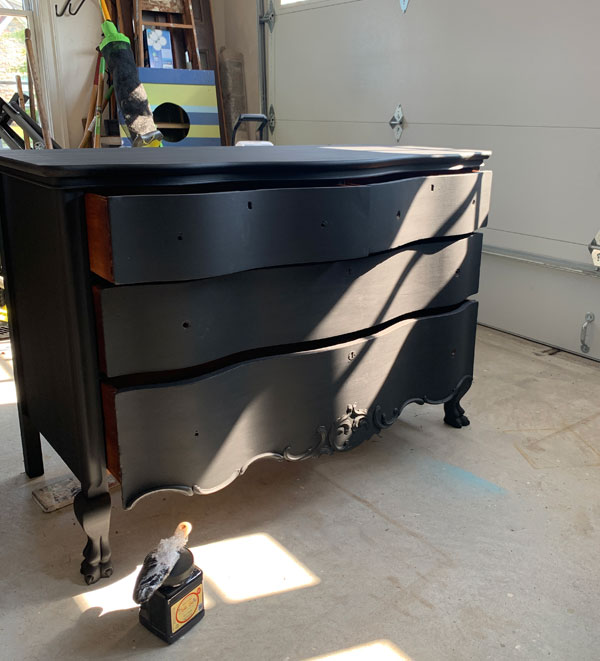
I did remove the drawers to paint them, but slid them in while they dried.
Applying the transfer
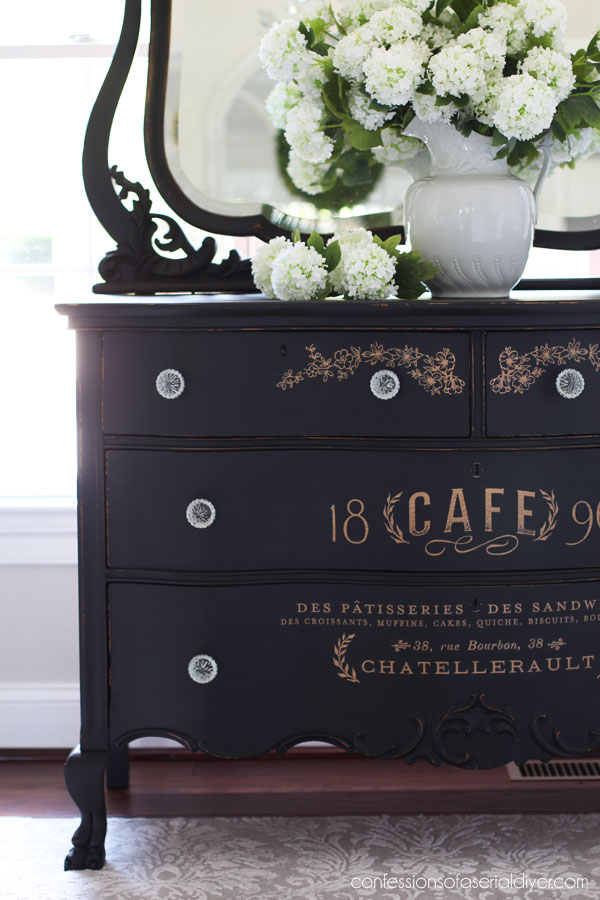
Now for the fun part, the embellishment! I chose to add a transfer to the drawers. Applying transfers is as easy as peeling off the backing, laying the top piece on your surface, and burnishing the transfer onto your surface using the included tool:
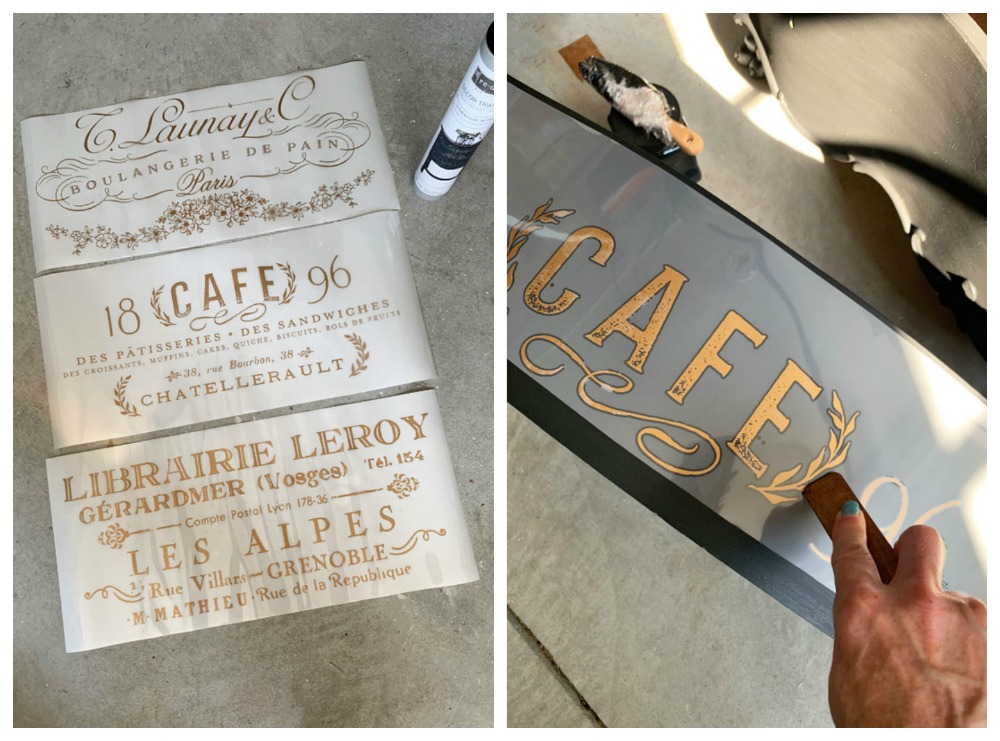
This one is called Somewhere in France. You can find it in my Etsy shop HERE. I cut this one up and used it in pieces. I only used the top two sheets for this entire dresser!
Once the image was transferred, I peeled the top layer off slowly. (If any of the transfer remains on the top, lay it back down and burnish some more. You do have to be careful where you place it, because once it touches down, it is pretty much stuck!)
Of course, deciding where you want to put the pieces is the hard part!
Fixing the Mirror
This dresser also came with an amazing mirror!
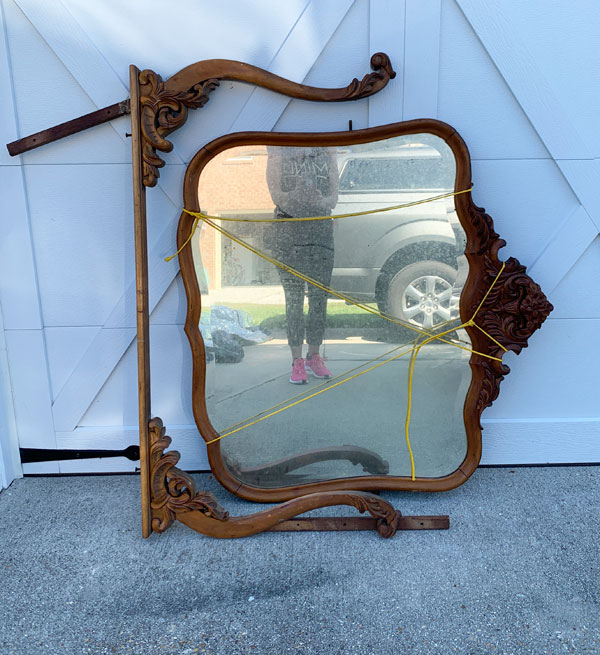
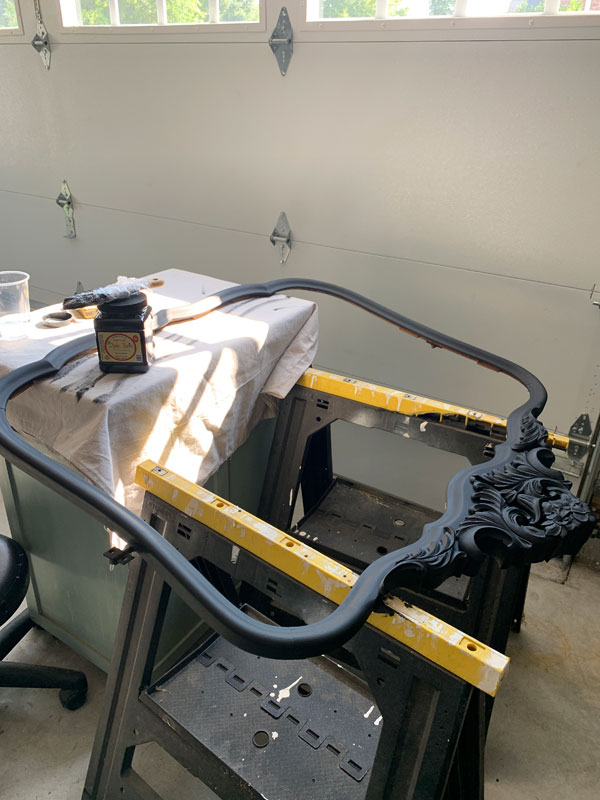
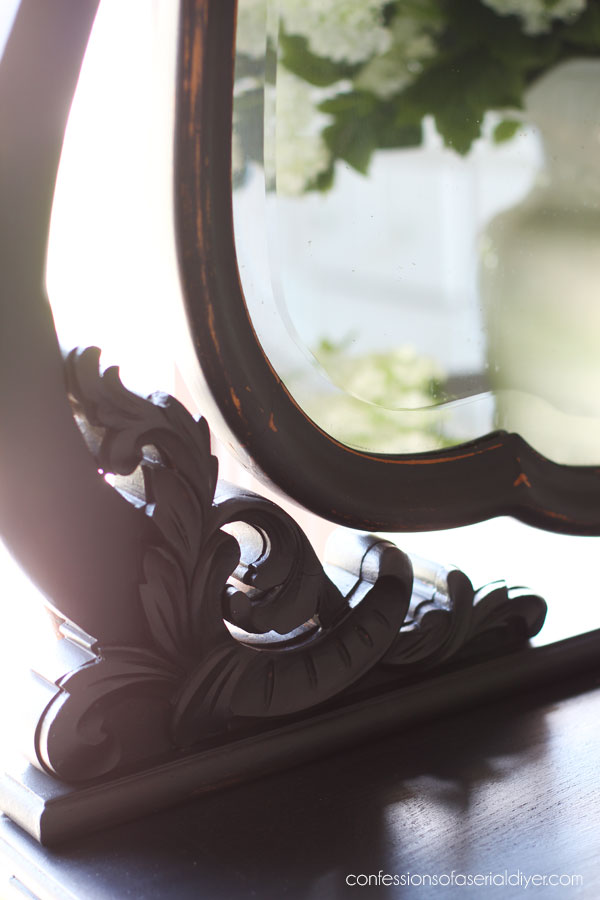
It was coming apart in three of the joints though, so I removed the mirror and took it apart. Then I used Titebond wood glue to put the pieces back together:

It and the harp that holds it also got two coats of Caviar:
Sanding
Then I sanded everything lightly with 220 grit sandpaper wrapped around an old foam sanding block. I also sanded over the drawers with the transfers. I vacuumed up all the sanding dust with my shop vac.
Sealing
Finally, I was ready to seal everything! I sealed all the pieces with Dixie Belle’s Satin Clear Coat, using their blue sponge applicator:

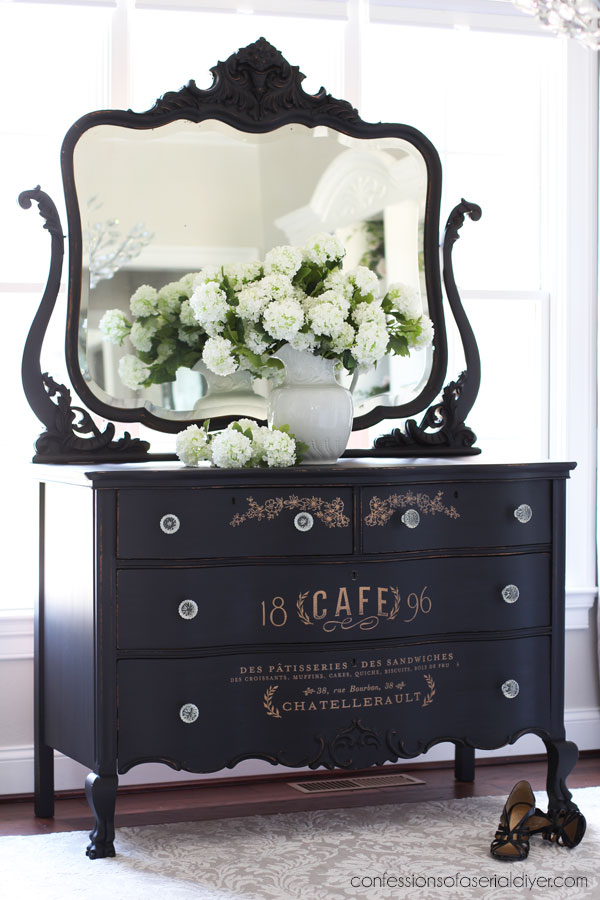
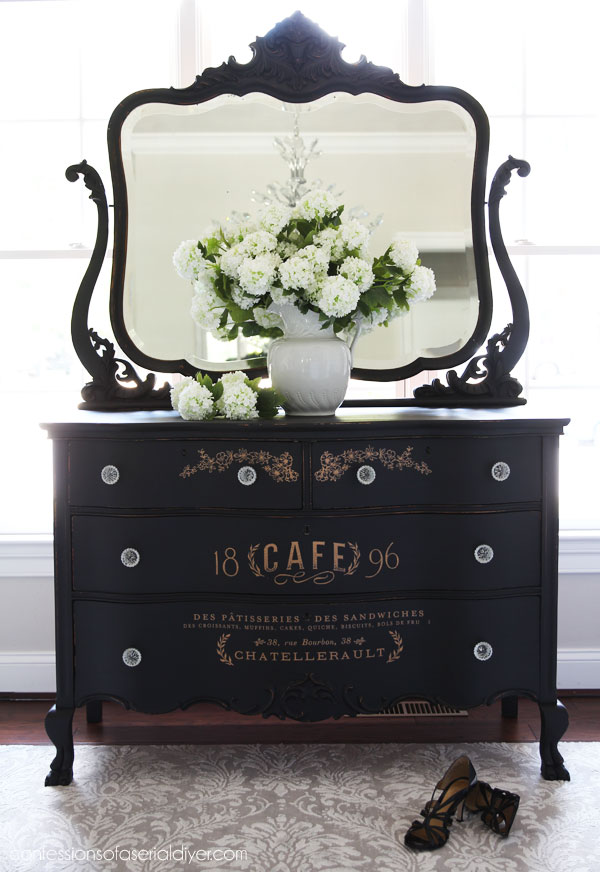
Ready to see the result of five days of work in 100+ degree temperatures??
(It’s hard to imagine weather that hot right now lol!)
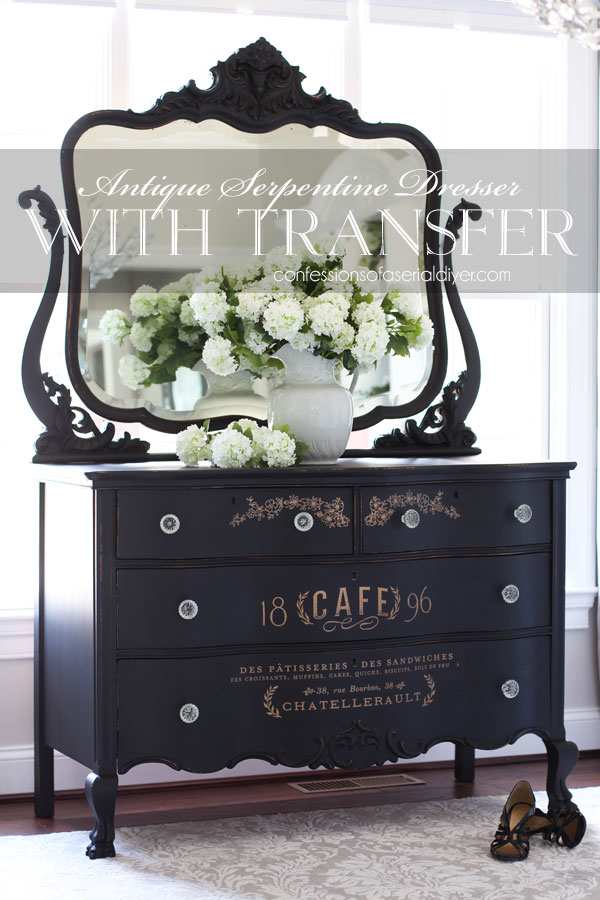
Ooh la la. Am I right?
She’s a sexy little number now!
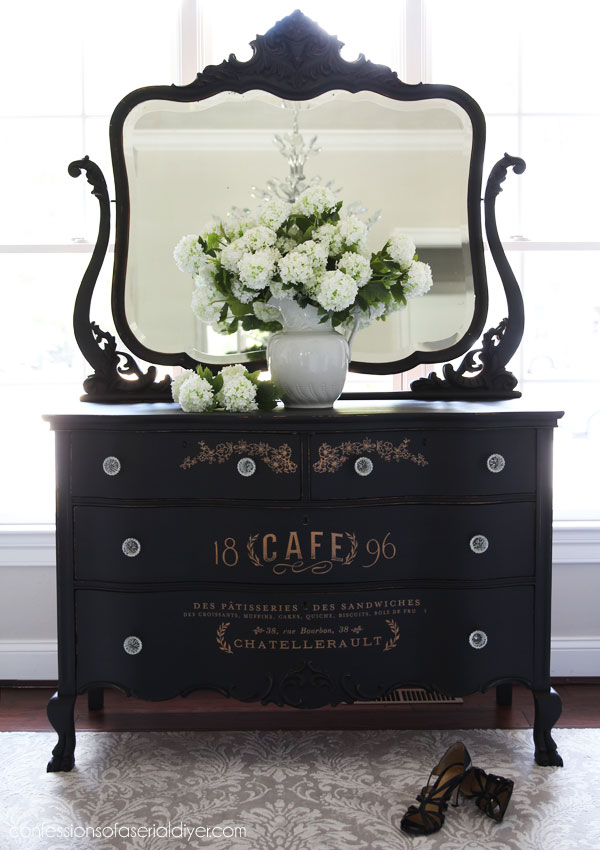
You can see now why a rustic top just wouldn’t work with the beautiful details in this dresser. It needed to be sleek, and I am so pleased with how the top turned out!
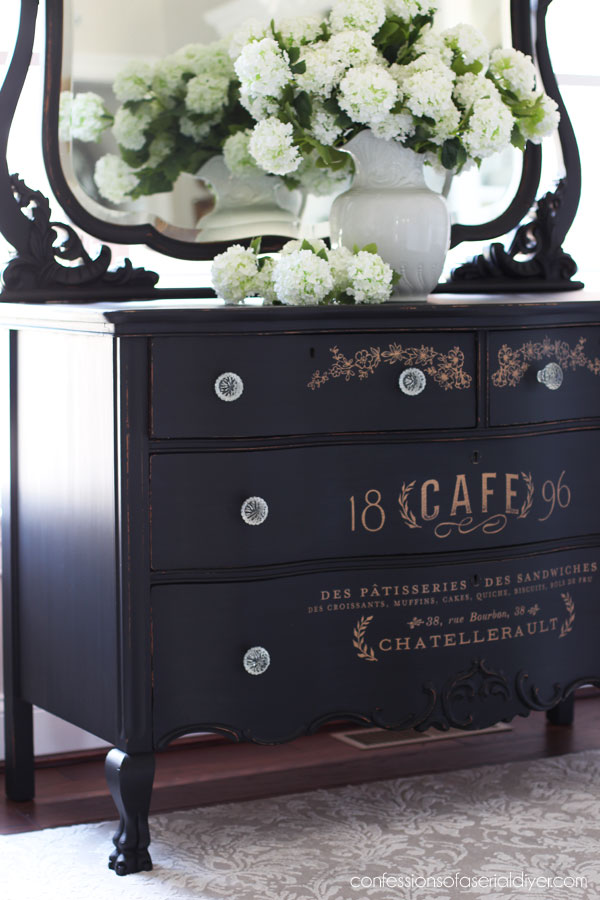
How about those gorgeous details on the bottom?
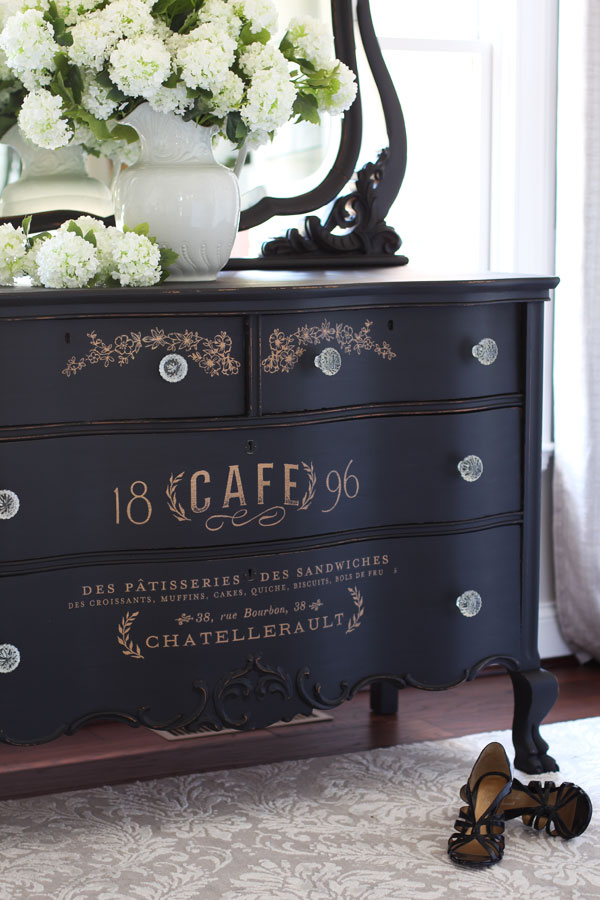
You probably didn’t even notice that some of them are missing…

I don’t think it even matters though. It’s part of the story of this piece.
And the mirror with that harp…
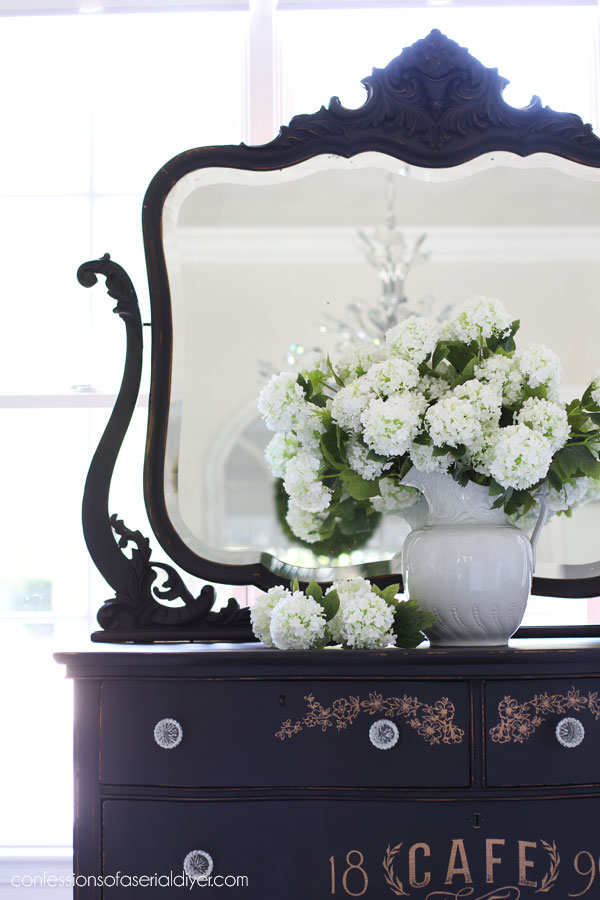
It’s hard to see the details up close, but they are exquisite…
The original dresser did not have one salvageable knob unfortunately, but these glass ones from Hobby Lobby did the job…
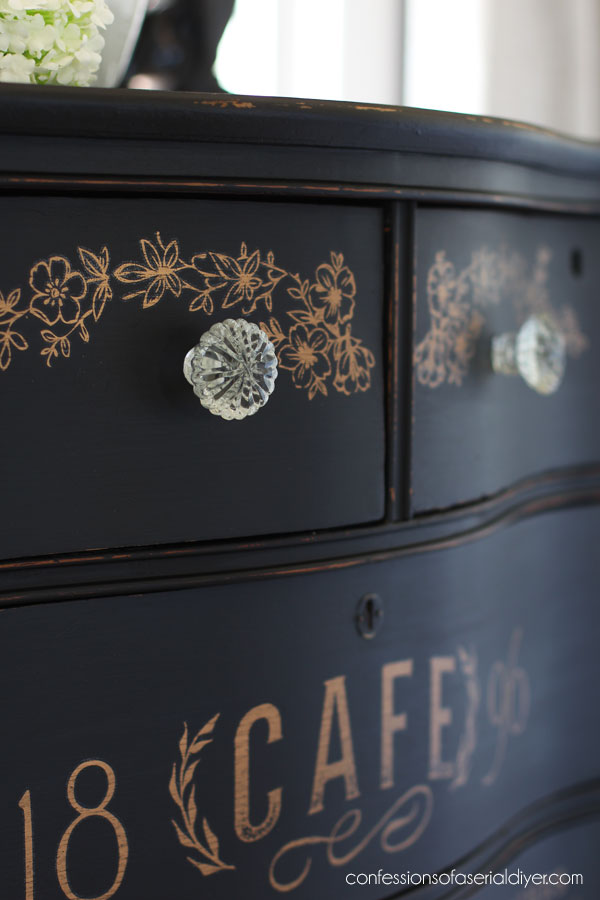
That photo also shows how well that Bondo worked on the upper right corner of that drawer on the left!
The Drawers
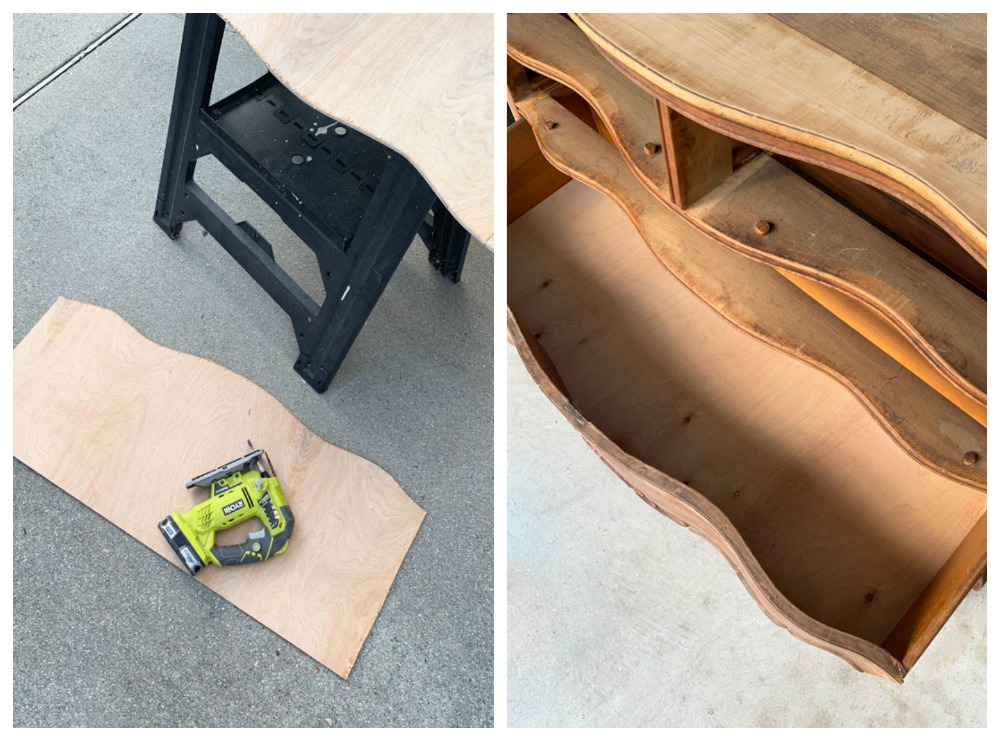
Now, let’s talk about those drawers. The top three worked really well, but I had the hardest time getting the bottom drawer out. When I finally did, I realized the bottom of the drawer was coming apart in layers. I had to disassemble the drawer to get the bottom out, cut a new bottom with my jig saw, and then reassemble the drawer.
I cleaned them really well and then I applied Big Mama’s Butta to the sides and back.
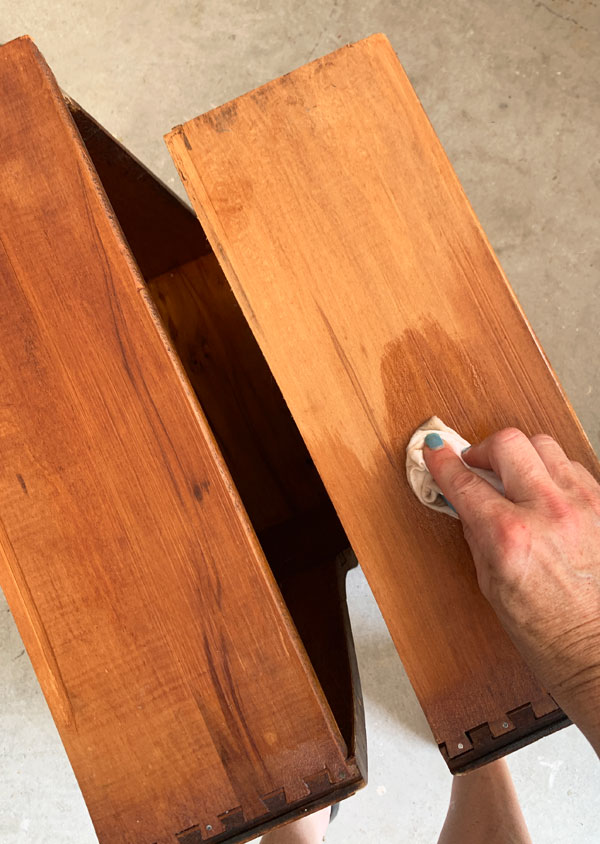
It hydrates and protects the wood and comes in three scents: Orange Grove, Suzanne’s Garden, and unscented. I tried out Suzanne’s Garden this time and it smells so beautiful! It smells like roses, which I normally am not too fond of, but this is lovely!
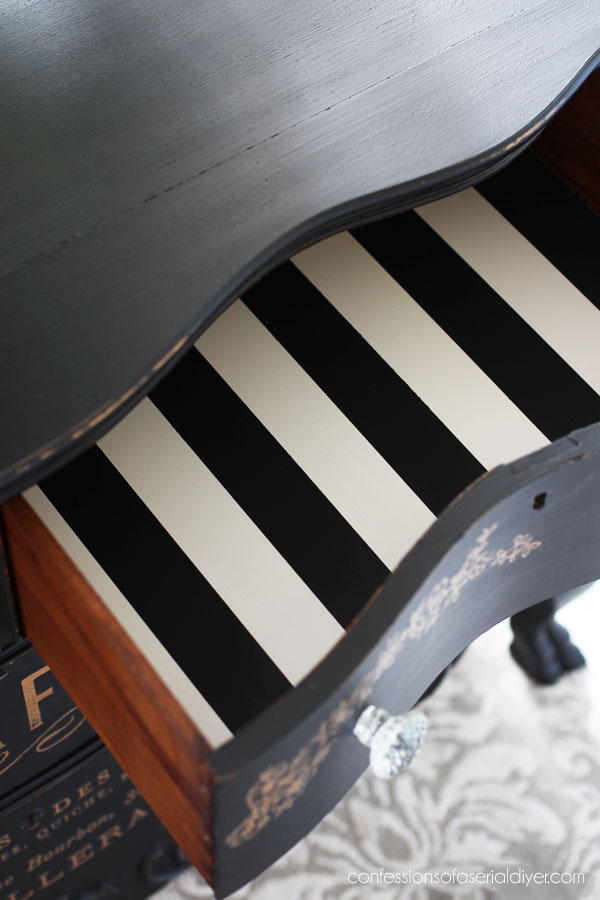
Then for the bottoms of the insides of the drawers, which I always save for last, I had purchased a fabric with some french wording on it, but I was not looking forward to cutting it to fit all those curves.
Instead, I taped off the perimeter of the drawer bottom with FrogTape and then painted the bottoms of the two top drawers in one coat of BOSS in white, followed by one coat of Fluff. Then I added FrogTape to create my stripes. (See how I do that the easy way HERE!)
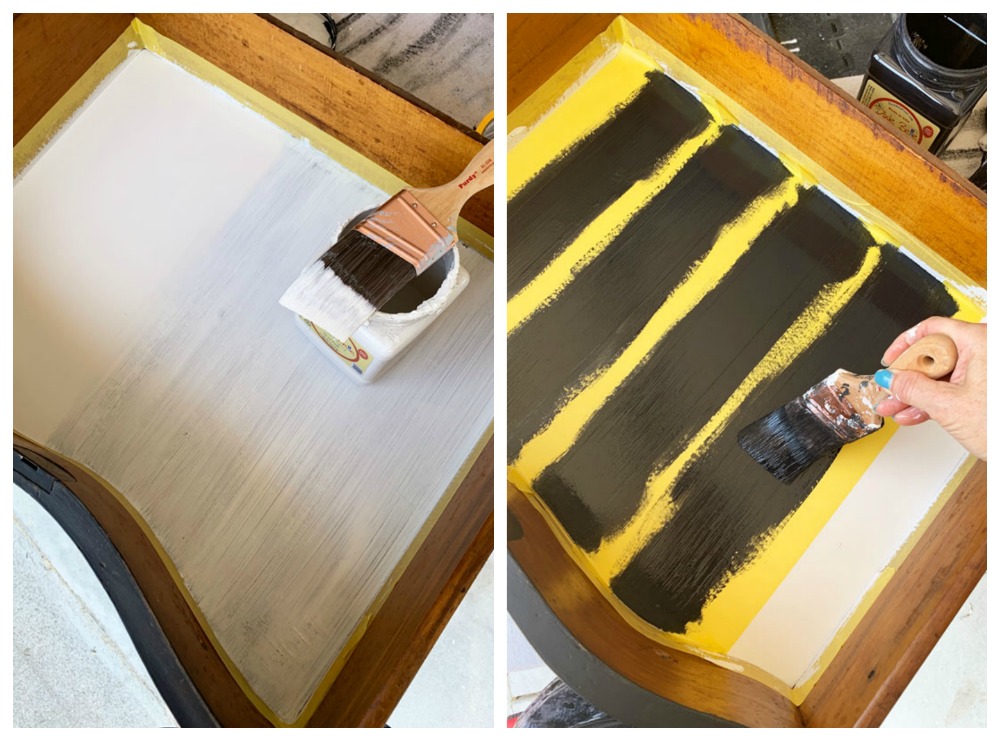
I removed the tape as soon as I applied the second coat of Caviar to the stripes. I used Clear Coat in Satin to seal, but this time, I used a brush specially designed for polyurethanes by Wooster. The sponge is a game changer for applying the sealer to the outside, but it can be tricky to use a sponge on those inside corners.
I love how they turned out!
For the middle drawer, I painted the bottom black instead and used another part of the transfer!

I repeated the stripes on the bottom drawer:
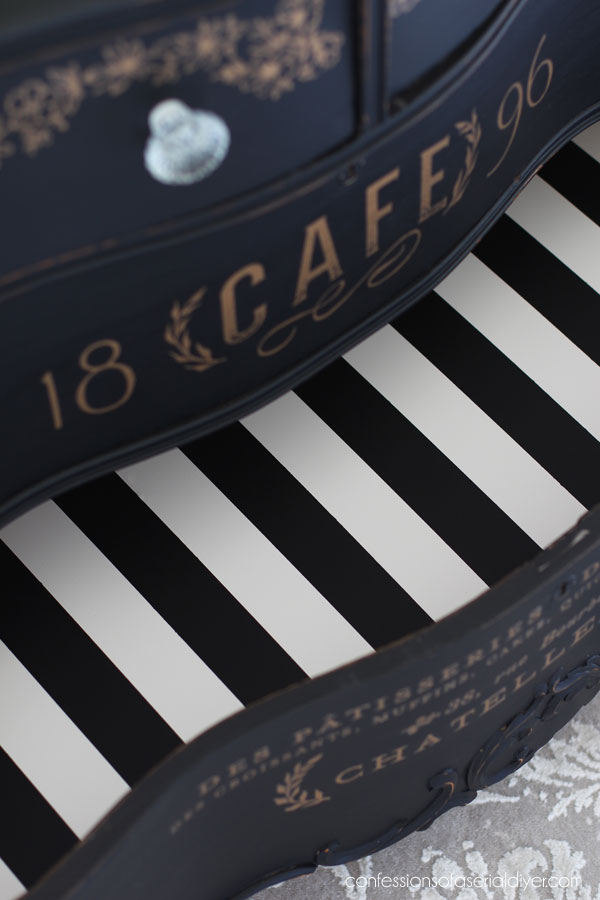
Adding a little something to drawers is such a great way to add an unexpected touch.
Whew! Wasn’t that a lot of work?
It was so worth it to see this pretty lady come back to life though!
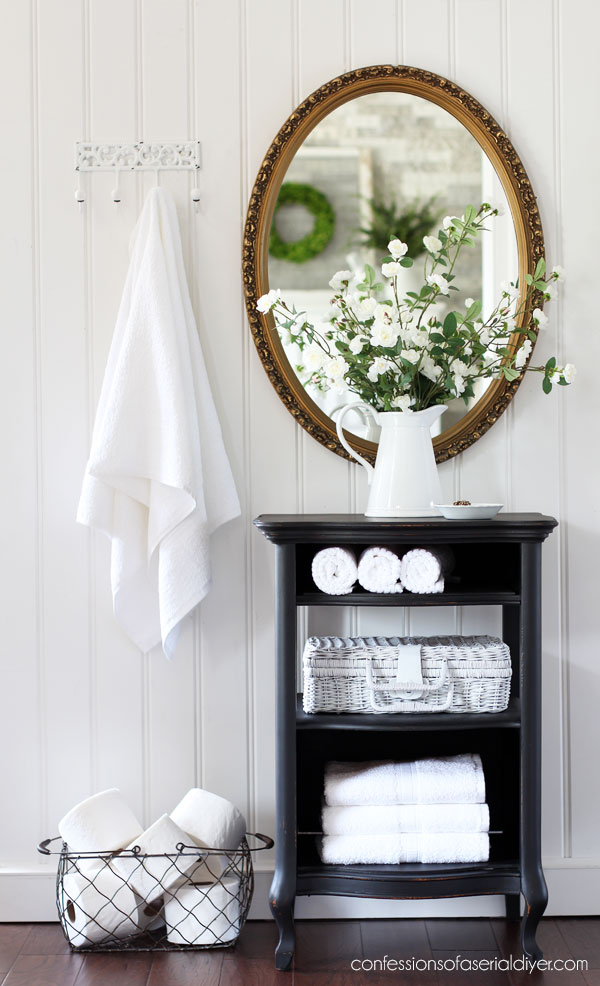
And here is the night table that went to this dresser that I also painted in Caviar:
Can you see why this was my favorite Furniture Fixer Upper post this year?
Now you have three more fabulous makeovers to visit!
1. Petticoat JUNKtion
2. Salvaged Inspirations
3. Girl in the Garage
And here are all my Furniture Fixer Upper makeovers from this year! I’ve included the links to them below if you missed any or just want to revisit some fun makeovers!
1. January: Secretary Desk Makeover
2. February: $25 Thrift Store China Cabinet Makeover
3. March: Thrift Store Desk Makeover
4. April: Farmhouse Hutch Makeover
5. May: Ornate Sofa Table Makeover
6. June: Mary’s Dressing Table Makeover
7. July: Today’s Makeover 🙂
8. August: Antique Twin Headboard Makeover
9. September: $60 Thrift Store Dresser with Transfer
10. October: Sheet Music Cabinet Makeover
11. November: Vintage Secretary Desk Makeover
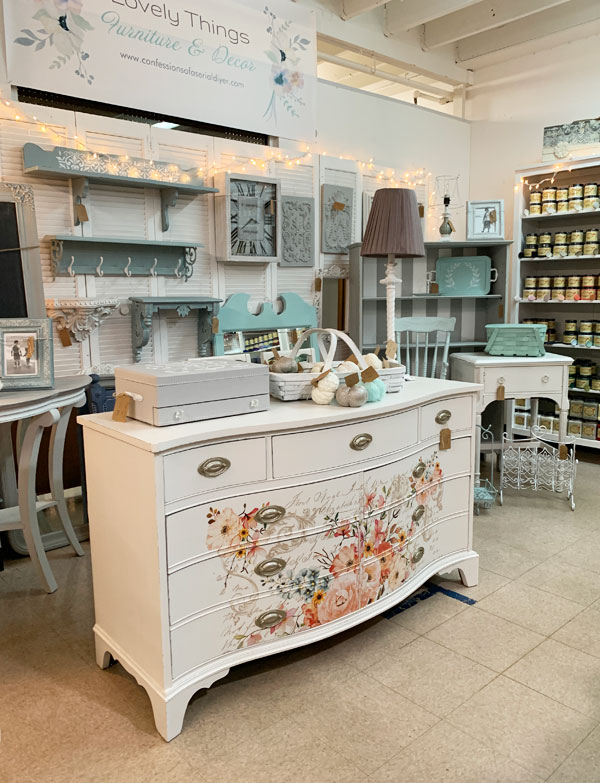
I am so thrilled that I got to share this one again! Some of you have been asking for a booth update, so I’ll be back with that on Tuesday. Here’s a peek:
Have a fantastic and safe weekend!
Update: See what my booth has been up to HERE now!
XOXO,
![]()
Don’t Miss a Thing!
If you like what you see, there are several ways to follow along!
Email * Instagram * Facebook * Pinterest * Twitter


ColleenB.~Tx. says
Beautiful make-over
Christy says
Thank you, Colleen! XOXO
Norma says
OMG! This make-over turned out amazing! I love it! gorgeous piece!
Christy says
Thank you, Norma! XOXO
Mary Kaiser says
I see why this one was your number 1! She turned out so beautiful! Did you sell it in your booth? Some one is so lucky to have this piece! I would be proud to own anything you have done because everything you do is beautiful!
Christy says
Thank you so much, my sweet friend! It did sell this summer… I was kind of sad to see it go! Have a fantastic weekend! XOXO
Michele M. says
Oh, my word. Whoa! I can TOTALLY see why this is your favorite! I’d say it’s mine as well – this is a stunning piece. Well done, Christy. It’s so gorgeous.
Christy says
Aww thank you so much, Michele! XOXO
Christine Prowak says
Wow, that was a LOT of work!! Beautiful! Did it sell fast?
Christy says
Thank you, Christine! It sold after a couple of months in my booth! XOXO
Sandra r mills says
I love all that you do…. there is so much detail work…did you sell that beautiful piece for enough to reward you for it? I don’t think I could in my booth.
Christy says
Thanks so much, Sandra! I sold it for $400…taking into consideration that I got it for free, I was happy with that! XOXO
Janice Holt says
Think this is one of my favorites also, although it’s hard to say with all the beautiful things you do. Now I saw something from Kirklands that I want to try and think you would do them and do such a great job. It is a little Christmas village house that is done in Christmasy plaid on the outside. I will send you the link if you would like. When I saw it you were the first person I thought about. I just know you would do a fabulous job.
Christy says
Thank you, Janice! Those little plaid houses sound cute!! XOXO
Laura Lane says
Oh my goodness!!! This was a winner for me too! This one and the desk that you did. This piece is just stunning! Great job! I would have had to keep this one for myself.
Christy says
Thank you, Laura! I did think really hard about replacing my son’s dresser with this one…he spends most of the year at college anyway, but in the end, I decided to let it go. It was a bit sad to see it sell lol! XOXO
Christina says
This is an absolutely stunning makeover! I love every bit about it. What a ton of work you did!! It is completely elegant. You always amaze me with your talent!
Be well and Happiest Holiday Season!!
Christy says
Thank you so much, Christina! Stay safe out there! XOXO
Vicky says
Christy, Such a lovely piece. I saw a lady replace decorative pieces on a blog. She made new pieces out of a putty product of some type. Hopefully I saved it and will send it to you for future projects.
Christy says
Thank you, Vicky! Yes, I have seen that done as well. Had this been white, the missing detail would have been more obvious and I might have tried to fix it. I do kind of love that it tells the story of this piece too though! 🙂 XOXO
Dolores Kelly says
Christy,
This dresser is a wow!! You really put your heart and soul into this piece. I loved how this dresser came out. I enjoy following your blog every week! You are truly inspirational and so talented.
Christy says
Aww I appreciate that so much, Dolores! Thank you! XOXO
Connie Bebout says
WOW!!!!! This is just BEAUTIFUL !!!!!
Christy says
Thank you, Connie! XOXO
Rosie says
Ohh la la is right!! This piece came out gorgeous. Loved reading all about it again. Have a great weekend!🤗
Christy says
Thank you, Rosie! I’m so glad you enjoyed it the second time around! XOXO
Michele says
All of your pieces are so beautiful! Thank you for sharing the process with us!
Christy says
It is always my pleasure, Michele!! XOXO
Lyn Edington says
I absolutely love this piece. It is so classy.
I saw this recently and thought of you. Next time I find a piece with missing trim, I am going to give it a try. Have you had any luck with this repair technique? https://www.hometalk.com/37624897/repair-that-missing-trim
Christy says
Thank you, Lyn! I have seen it done with clay, but not hot glue…how clever is that? Thanks for sharing! XOXO
Joni Gonzales says
Omg this is gorgeous! How did I miss this the first time around? I read every one of your emails but didn’t see this one! Chalk it up to 2020 lol. So glad I clicked today even knowing it was a rerun 🙂
Christy says
Thank you, Joni! I’m so glad you didn’t miss it this time! XOXO
Lorri says
Oh la la is right!!! Lovely lines and u enhanced it with those lovely transfers.😍 I love the one white dresser that you used that beautiful flower transfer that covers almost the whole front of dresser. Like you I do seem to always go with white backgrounds. Be safe and enjoy your family this Christmas. What a strange world it has been. I really enjoy reading your blog. ❤
Christy says
Thank you so much, Lorri! Yes, I often opt for white, but every once in a while, Caviar calls ha ha! It has been a strange year, indeed! Stay safe and have a merry Christmas! XOXO
Candy says
Wow, gorgeous, gorgeous, gorgeous! I would have loved to have this in my home. I am lost for words another fabulous job.
Blessings, Candy
Christy says
Aww thank you so much, Candy!! I wish I had a space for it myself…it was hard to say good bye! XOXO
Mary King says
So happy to hear that this was your favorite transformation of the year. The piece had much history in my family. As I told you my sister and I created Barbie homes on top! Sorry that I couldn’t have kept, but thankful for your beautiful talent. Hope the new owner loves it and takes care of it for years to come. Thank you again for being so important in my life this year! May God continue to bless you and your family.
Christy says
It truly was my favorite, Mary, with your beautiful dressers not far behind! I feel so blessed and grateful that you gave me the opportunity to breathe new life into these beauties! Thank YOU so much! I hope you are enjoying your dressers. Have a blessed Christmas! XOXO
Angel says
Gorgeous in every way. Beautiful!!
Christy says
Thank you so much, Angel! XOXO
Sue H Mellette says
All of the comments folks made on this beauty are spot on! You are truly an artist and a very creative one at that! I always look forward to see what you do to the drawers when you makeover a dresser or chest of drawers. To me, that is your signature. Not many people would have the patience or time to create the details that you do! I love the transfer and the transfer on the inside was a stroke of genius! How clever you are!!! Can’t wait for Tuesday!! Have a fabulous weekend.
Christy says
Aww thank you so much, Sue! I appreciate your thoughtful comment so much! I do love to add a little surprise to the drawers! See you on Tuesday, my friend! XOXO
Debra Rarrick says
OMG!! Just an absolute gorgeous job! I have never posted a comment, but just had to when I saw what you did with this piece. Beautiful work!
Christy says
Thank you so much, Debra! I don’t find beauties like this in my area very often, so it is really a treat when I get to love one back to life! XOXO
Debra Hubbs says
Wow that came out so beautiful!
Christy says
Thank you, Debra! XOXO
Denise - Salvaged Inspirations says
It took some doing but you turned her into a sexy little number indeed! 😉 Thanks for including my Bondo (stinkiest stuff ever…lol) tutorial. Love, love, love this dresser. Elegant and gorgeous!
Christy says
Thank you, my dear friend! Oh yes, girl…I will leave the Bondo to you lol…super stinky! Have a wonderful weekend!! XOXO
Addie says
This has the “WOW” factor….good to see it again. It is truly one of my favorites!!! I have the same style of furniture in my bedroom……just don’t know if I have enough guts to do it. (it is natural wood now)
Have a good weekend!!! xoxo…the Adster
Christy says
Thank you, Addie! Ooh if I could get my hands on your bedroom set…ha ha ha!! XOXO
Addie says
I wish you could get your hands on it!!!! I am too chicken to do it. I could never put the lettering on. xoxo
Christy says
Aww I bet it would be a fun se to redo. The lettering might be the easiest part…those transfers really make it easy to add those amazing details. The hardest part is lining it up correctly. XOXO
Becky Fischer says
Great job. I am so very impressed. You have outdone yourself. The drawers were a nice surprise; I love them!
Christy says
Thank you so much, Becky! I think the drawers might be my favorite! XOXO
ROSE LEFEBVRE says
Gorgeous! I sure wish you lived here in Oregon!
Christy says
Thank you so much, Rose! My grandparents used to live in Brookings…just lovely! XOXO
Petra says
Well you’ve done it again! Another fabulous piece in black! Well done and have a great weekend 😀 xo
Christy says
Thanks so much, my friend! You too!! XOXO
dodie says
gorgeous! gorgeous! gorgeous!!!!!!!!!
Christy says
Thank you, Dodie!! XOXO
Heidy says
This one is so beautiful! My personal favorite was September trash to treasure dresser white and dark do over. I have so many favorites and the last one, little green table!!! I can never wait to see what you’ve done.
Have a wonderful Christmas and happy new year!
Heidy ❤️
Christy says
Thank you, Heidy! Oh yes, I loved that one too! It is always a treat when I find pieces with those gorgeous lines! Merry Christmas to you too! XOXO
Laurel says
Beautiful you do an amazing job.
Christy says
Thanks so much, Laurel! XOXO
Paula says
Every gal should have a little, black dresser! And this one is stunning! (ps did you paint your toenails “Sunken Pool”, by Behr? LOL 🙂
Christy says
Ha ha, right? thank you so much, Paula! And you know I want all the things in that color…even my toes! 😀 XOXO
Jen @ Girl in the Garage says
Wow, I remember this gorgeous piece but I had forgotten how much work went into it! Wishing you a Merry Christmas, my friend! xo
Christy says
It had ALL the problems ha ha, and I too had forgotten how much work it was, but so worth it to save her! Merry Christmas!! XOXO
Linda Edwards says
Your dresser turned out amazing. Thanks for sharing how you removed the veneer. I’ve never seen it done that way. It sure looks easier.
One question…when you applied wood glue to the mirror frame, what did you use to hold it together as it dried? I can’t picture how regular clamps would work.
Thanks again for sharing all your lovely projects.
Christy says
Thank you, Linda! Yes, that method for removing veneer works amazingly well! As for the mirror, the corners fit together so nicely, that I just left it lying on a flat surface while the glue dried. There was no need to clamp it. Then the new luan backing that I added over the mirror when it was complete further protected those joints. XOXO
vicki says
What a gorgeous transformation!!! I just LOVE this piece! Wish I was closer, I would buy it in a flash!
Christy says
Thank you so much, Vicki! It sure was a treat to have the opportunity to love this one back to life! XOXO