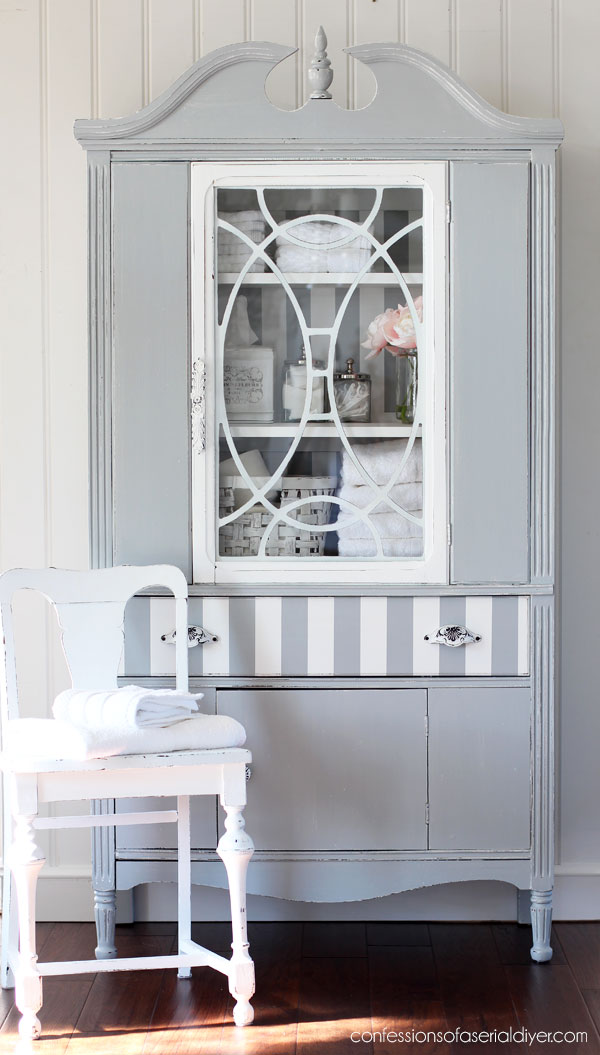
Hello awesome friends and welcome back! Today I’m sharing a pretty painted china cabinet that I got for a steal at the thrift store!
I’m still finishing up my Halloween decorating, so I thought this cutie was worth another share!
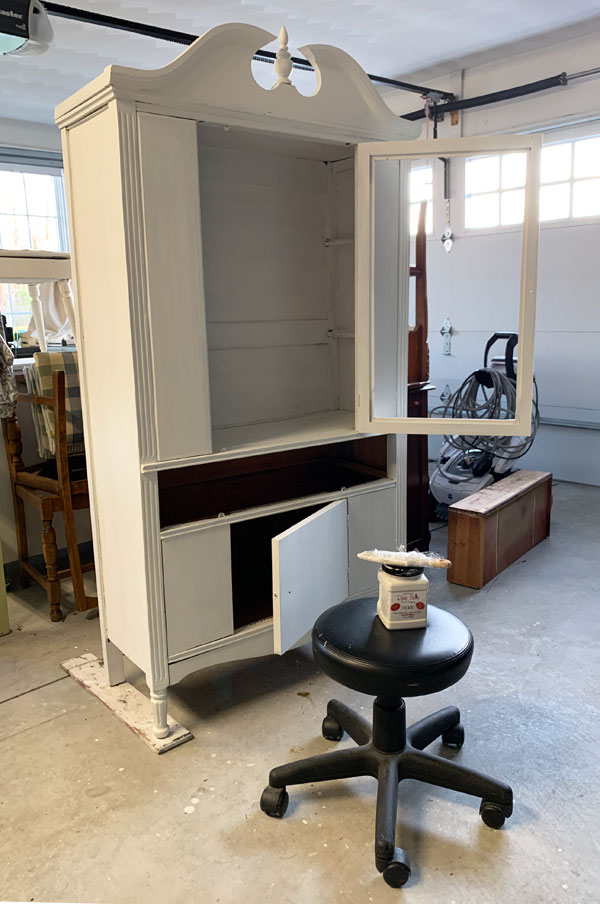
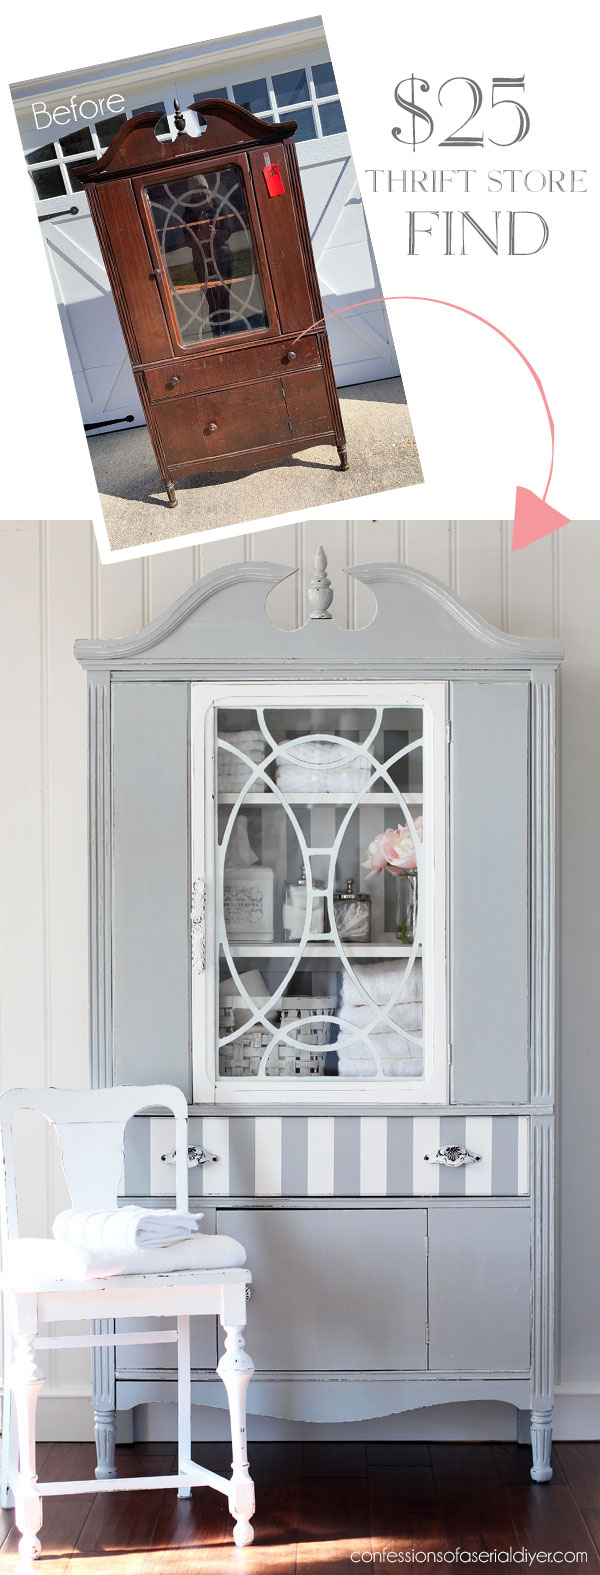
Would you believe this cabinet was only $25??
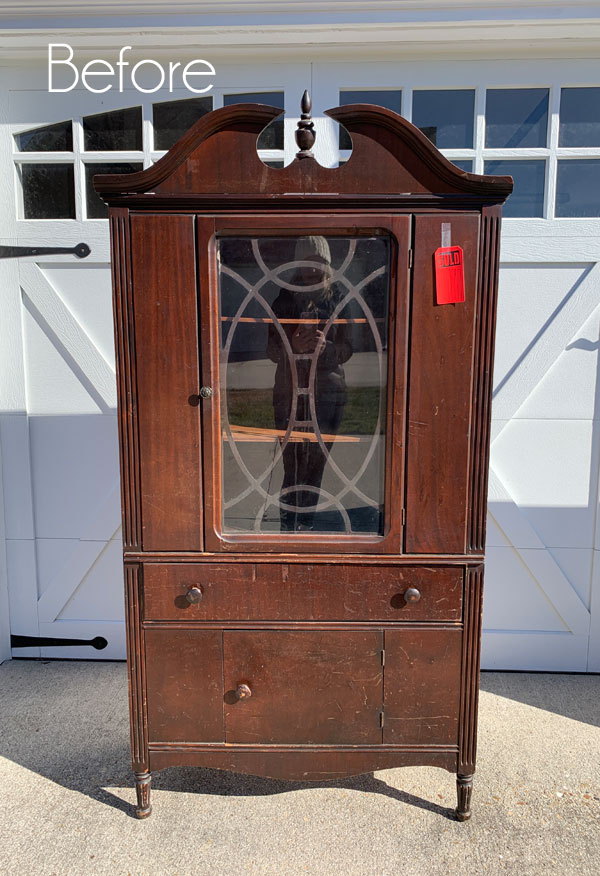
I know!! I couldn’t grab the tag fast enough! It had definitely seen better days, and luckily, only the drawer had missing veneer.
If just a small amount is missing, but the rest is intact, I will usually just fill those areas with wood filler. However in this case, much of the veneer was starting to come loose, so it needed to be removed.
I’ve included a few affiliate links so you can find the products I love.
Remove the veneer
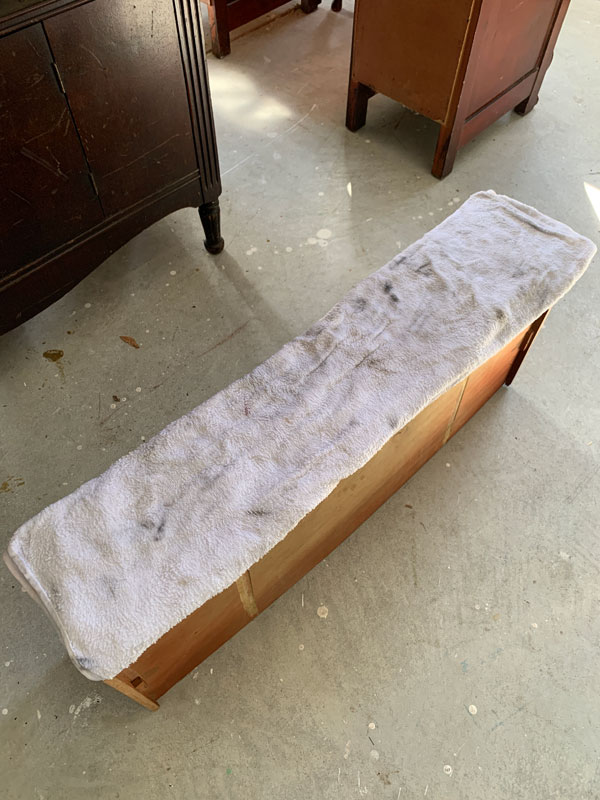
My friend, Larissa from Prodigal Pieces, has a great veneer removal method, and it totally works!
You basically soak a towel in water and let it sit on your surface overnight. Or you can do what I did and apply the towel to the drawer and then pour water onto it:
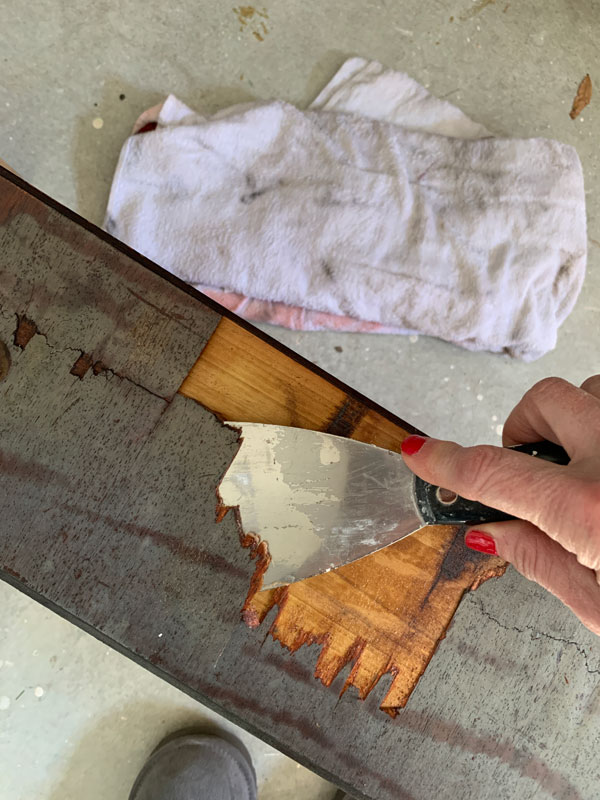
This worked so well. I was able to easily remove the rest of the veneer using a metal putty knife:
Once I had it all removed, I used my rotary sander to smooth out the surface…
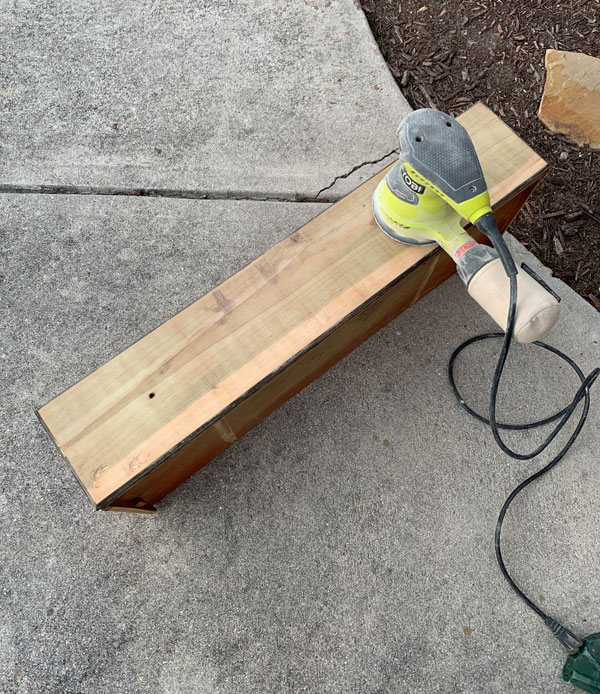
Then it was good to go!
The prep
After giving the cabinet a really good cleaning, I decided to give it and the drawer a coat of Dixie Belle’s BOSS in white since it has some age to it and likely would be a bleeder. I let it sit overnight, but when I started to paint the inside the next day, I was still getting a little bleeding here and there, so I decided to give it another coat both inside and out and let it sit again overnight.
That did the trick! (99% of the time, one coat does it, but you get those stubborn pieces every so often.)
Ready for Paint
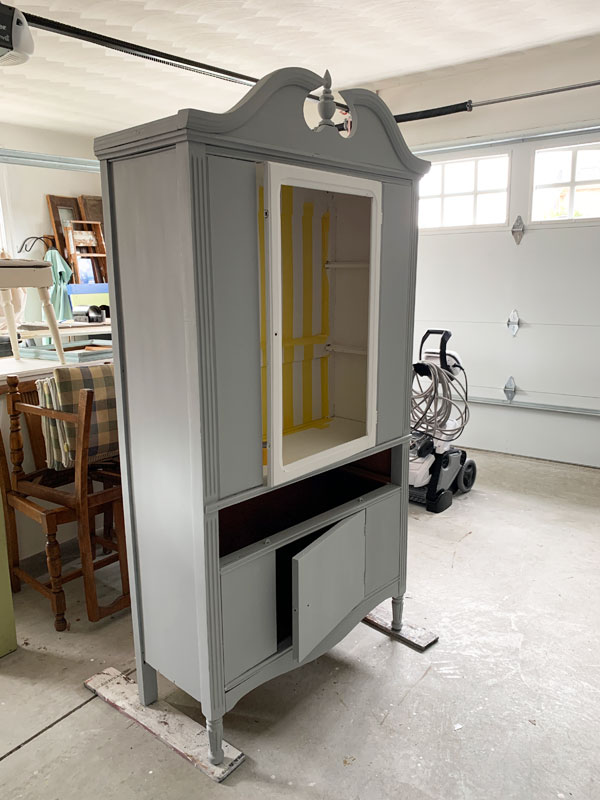
Then I gave the inside, the drawer, and the door one coat of Dixie Belle’s Cotton and painted the outside in one coat of a 50/50 mix of Cotton and Manatee Gray…
You can find my tutorial for How to Paint Furniture using Chalk Paint HERE!
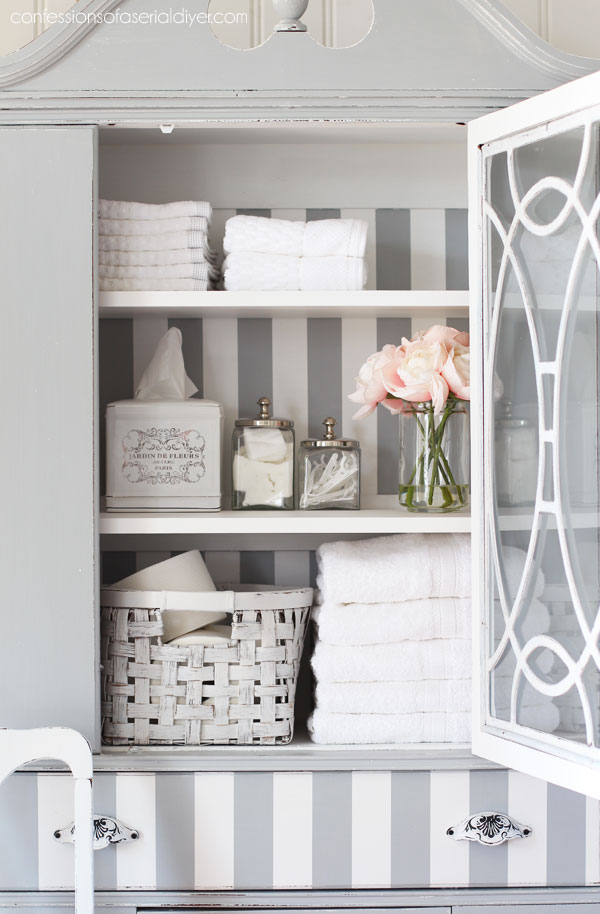
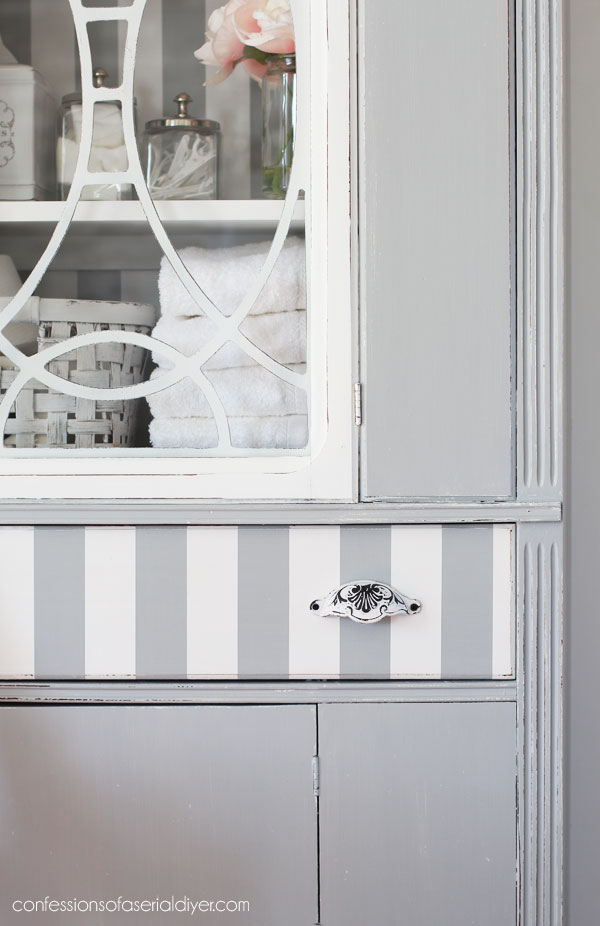
I like to paint the insides of these pieces in white or something else light, especially if there is no light. Otherwise they are just too dark inside. You’ll also notice I decided to add a little character to the inside with my favorite…stripes!! I taped them off with Frogtape for Delicate Surfaces and painted just one coat of the white and gray mix:
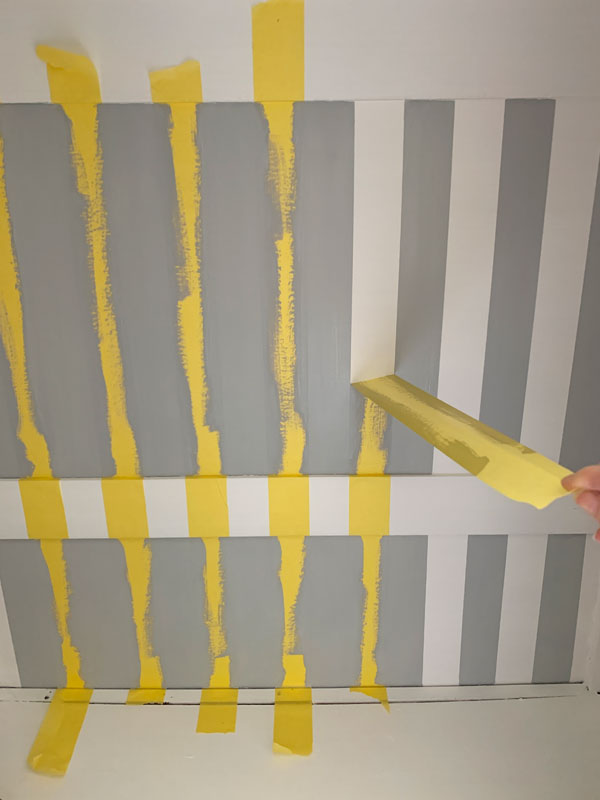
Then I removed the tape right away while the paint was still wet. I hit the drawers while I was at it.
See how I space out my stripes the easy way HERE!
Seal
I sanded all over using 220 grit sandpaper and then sealed with Dixie Belle’s Clear Coat in Satin using their blue applicator sponge.
The big reveal
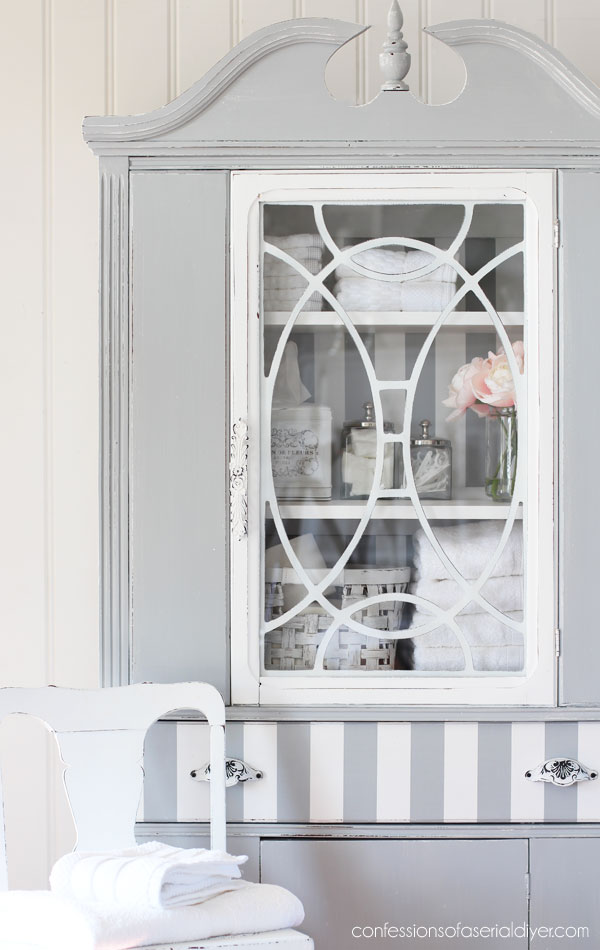
I love how this sweet piece turned out!

I thought it would be fun to stage it for a bathroom.
I really wish I had enough space in our bathroom for it!
It could hold all kinds of toiletries!
I removed the fretwork and the glass from the door frame so I could paint everything. The fretwork got primed with Rustoleum spray primer, followed by a coat of Cotton on both sides. I sanded it with 220 grit sandpaper but didn’t bother to seal it.
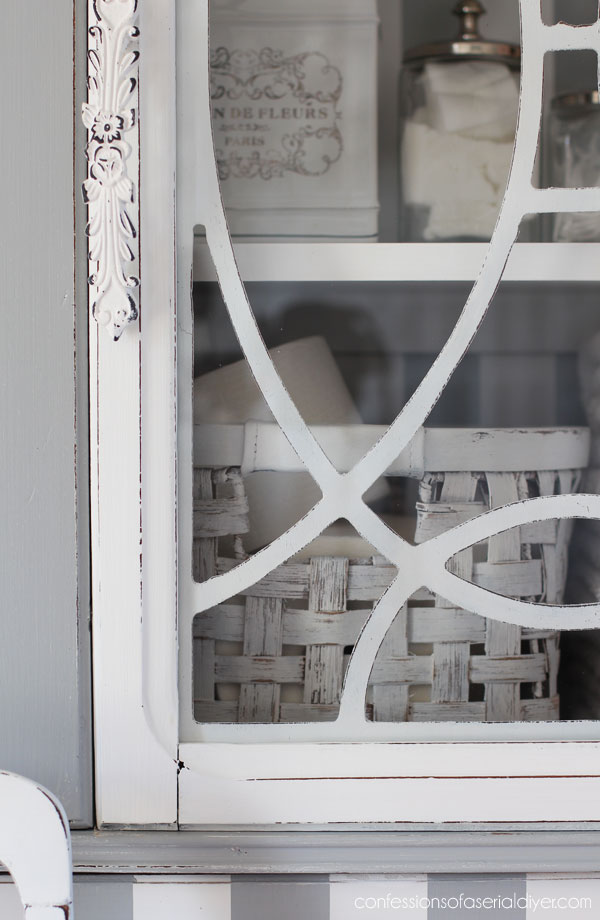
I liked the cabinet without it, but it adds such a pretty detail to the door. The fretwork and glass were being held in place with narrow pieces of trim and small nails. I painted the trim and reused the nails to put it all back together just how it was.
The original shelves were thinner and were sagging quite a bit in the center, so I had the guy at Home Depot cut two new shelves to fit for me. Then I primed with the BOSS and painted with a coat of Cotton. They were sealed with the Clear Coat in Satin as well.
These look much better and are much more sturdy than the originals, and I love the striped detail at the back peeking out from behind them when the door is open…
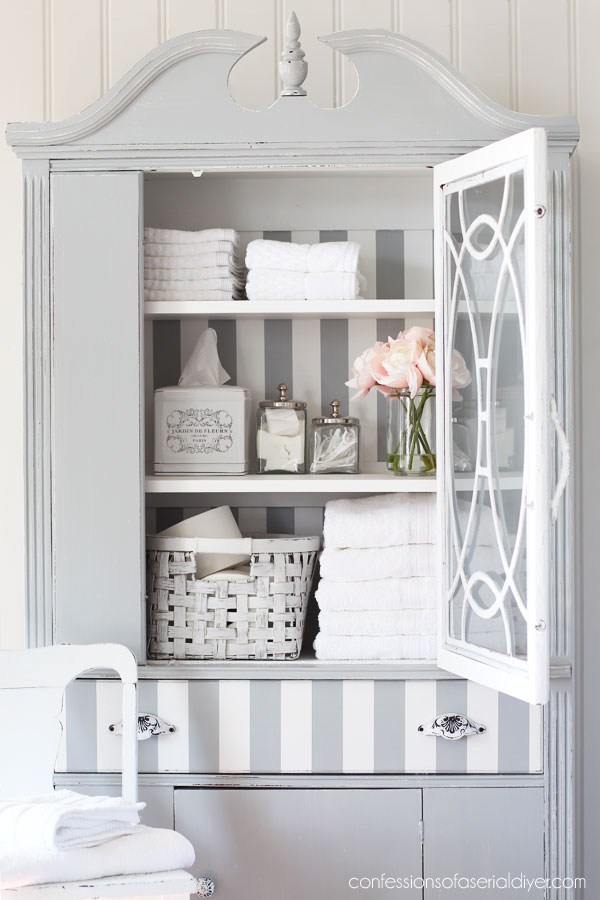
The basket is one of my favorite things in there…
I picked it up at the antique mall where I have my booth, for $6:
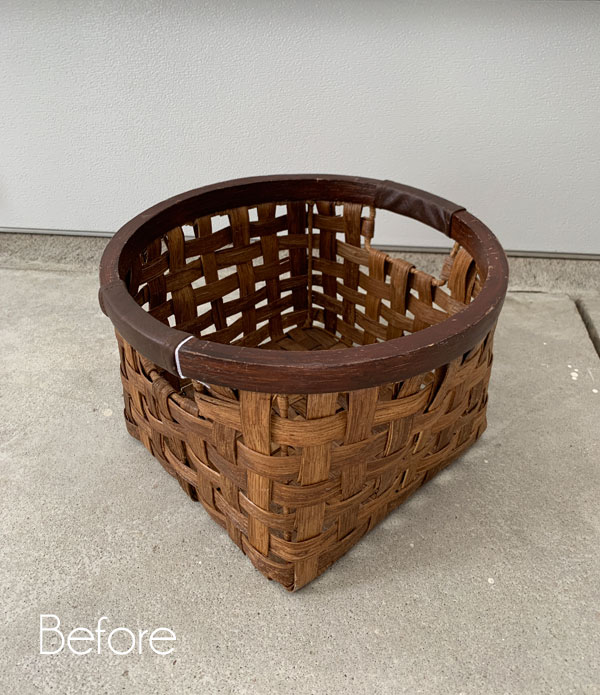
It was another quick redo done in two coats of Cotton:
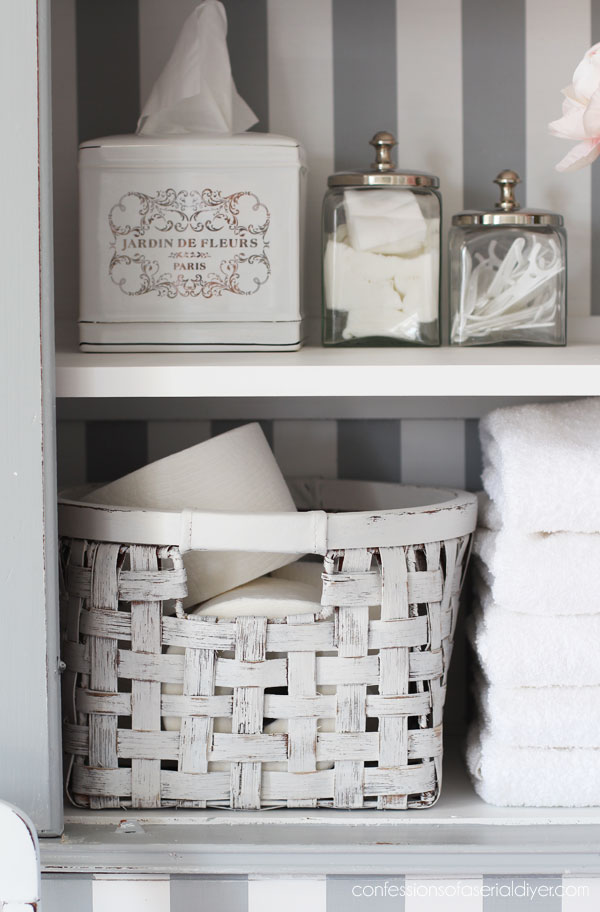
Ya’ll know I love a painted basket!!
The drawer got a pretty new liner in fabric I picked up at JoAnns:
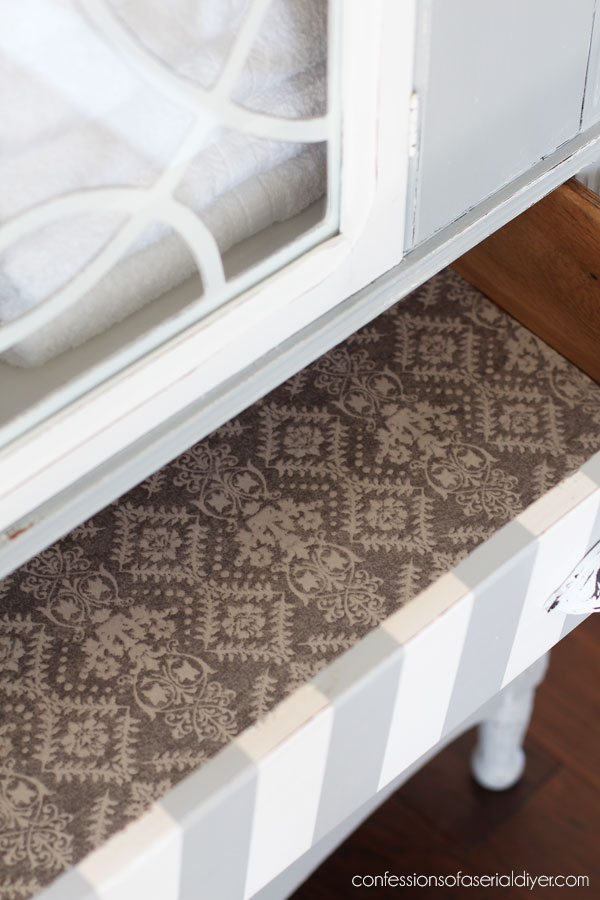
You can see how I line drawers with fabric in this video:
If you have trouble viewing, find it on YouTube HERE.
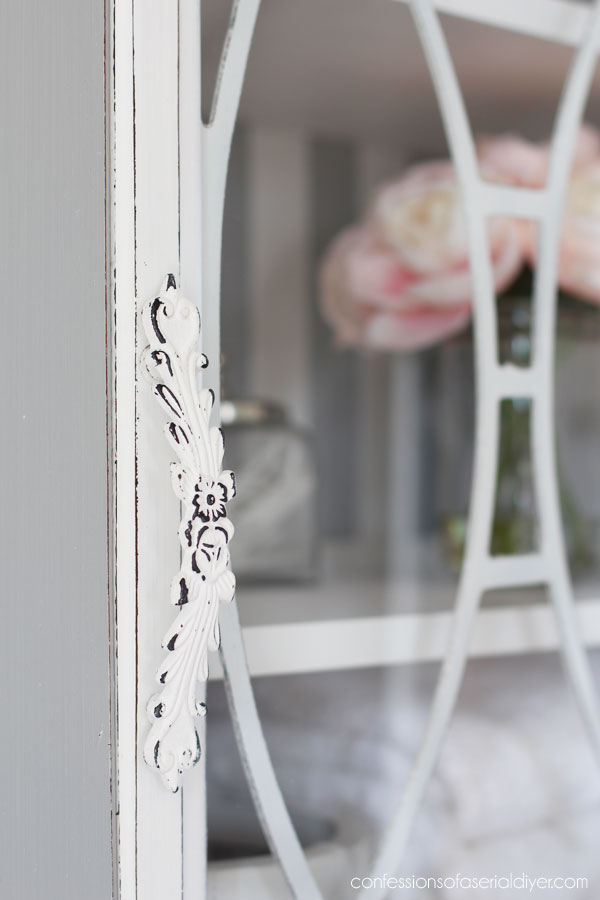
I changed out the hardware as well…
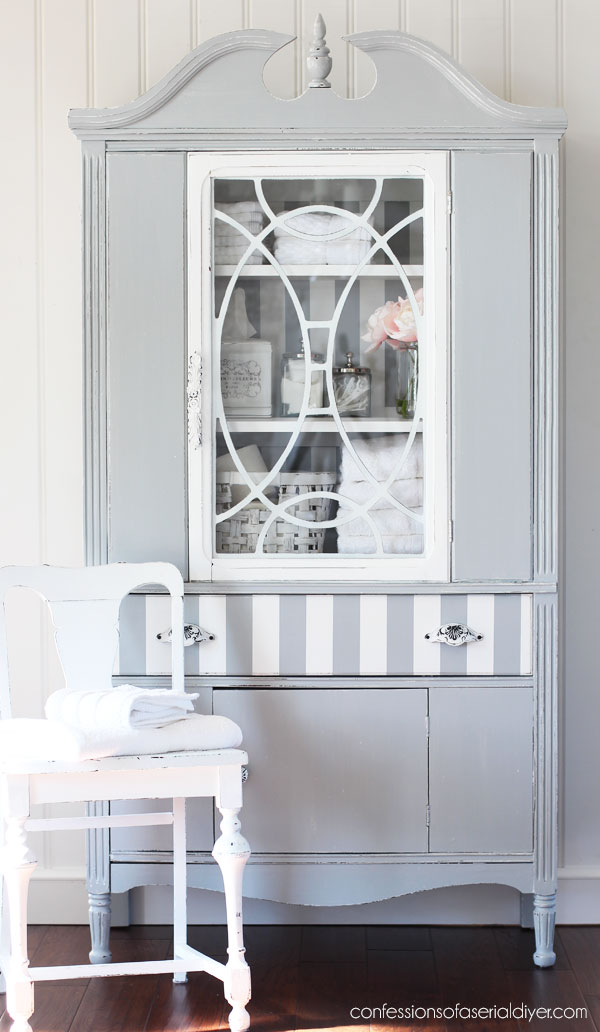
This pretty handle is one of my favorites from Hobby Lobby:
The knob on the bottom door, which is hard to see, also came from Hobby Lobby, and the drawer pulls came from a set of about 12 that I found at HomeGoods:
They were perfect for the drawer, and I just covered right over the existing holes instead of filling them.
Priming with the white BOSS and only painting one coat of the gray mix allowed for pretty distressing:

This china cabinet would be so pretty paired with a white dining set!
This was a project I completed from last year’s Winter Haul:

You can check out what I had already completed so far at the links below if you like:
$3 Lamp Makeover (& How to Rewire a Lamp)
Windsor Chair Makeover (& Drop Leaf Table Take Two)
How to Wet Distress (& a $5 Lamp Makeover)
$5 Thrift Store Chest Makeover
I’ll be back on Tuesday sharing what I did with this chest:
 Have a fabulous weekend! 😀
UPdate: See how sweet this chest turned out HERE now!
XOXO,
![]()
Don’t Miss a Thing!
If you like what you see, there are several ways to follow along!
Email * Instagram * Facebook * Pinterest * Twitter


Mary Kaiser says
This was a beauty and it was worth showing again. It had so many of the beautiful details that you do so well. It has the beautiful detailing and the stripes and the fabric in the drawer. Plus the bonus of getting the veneer off that was loose. You are awesome!
Christy says
Thank you, Mary! I really enjoyed working on this one! Have a fantastic weekend! XOXO
Janice Holt says
You know we love your pieces old or new. I know you have been so busy with your Halloween decorations and can’t wait to see them again. Don’t work too hard and will be watching Tues. Have a great week-end.
Christy says
Thank you so much, Janice! I am about done decorating woohoo!! Enjoy your weekend too, my friend! XOXO
Christina says
Wow, Christy, this turned out so beautifully! Love the color, stripes and detail on the fretwork. Wonderful! I can see some toddler playing hide and go seek in that bottom door covered area. lol Of course, I love the basket as well. 🙂
Have a great rest of your week!!
Christy says
Thank you, Christina! It’s a great hiding spot ha ha! XOXO
Rose Lefebvre says
Oh wow! I LOVE this cabinet and the fretwork is perfect. So beautiful! Bravo!
Christy says
Thank you so much, Rose! XOXO
liz says
I absolutely love how this cabinet turned out! You have such amazing vision & creativity when redoing your treasures.
Christy says
Aww thank you so much, Liz!! XOXO
Debra Hubbs says
So pretty! I also love the color mix you made.
Christy says
Thank you, Debra! XOXO
DONNA says
FANTABULOUS job! You’ve got it going on!!
Christy says
Aww thank you, Donna!! XOXO
Julie A. Henry says
BEAUTIFUL AS ALWAYS…..QUICK COUPLE QUESTIONS. CAN I PAINT OVER A PIECE THATS BEEN PAINTED WITH CHALK PAINT (DIXIE) AND SEALED WITH WAX? WHAT TYPE OF WOOD DID YOU USE FOR THE SHELVES IN THIS PIECE? THANK YOU! HAVE A WONDERFUL DAY……HAPPY PAINTING!!
Christy says
Thank you, Julie! If you sealed with Dixie Belle’s wax, yes! It is water based, so you can paint right over it. If you used an oil-based wax like Annies Sloan’s wax (you’ll know if it is stinky), then you will want to wipe it down with odorless mineral spirits to remove the wax first. I believe the wood was pine…the least expensive that still looked decent. 🙂 XOXO
Denise - Salvaged Inspirations says
You fixed her up pretty my friend. Love the stripes and drawer liner! XOXO
Christy says
Thank you, my friend!! Have a fantastic weekend! XOXO
Cheryl Atkinson says
Hi Christy! It is so pretty I love the stripes. I bought a real pretty on at an estate sales for 75%off but it was more than 25. It is in such perfect shape that I can’t decide if I want to pain it or not
Christy says
Thank you, Cheryl! I know exactly the dilemma you are having. It is hard to take a brush to a perfectly preserved piece. Although, if you don’t love it as is, I say paint it to make it something you really love. XOXO
Annette Santana says
Absolutely gorgeous, that color is just stunning. Also the basket, love it. Great job👏🏻👏🏻👏🏻🌹. I have a question, what is the difference between the slick stick and the boss, and when is wise to use one or the other?
Christy says
Thank you so much, Annette! Slick Stick is a gripping primer for non-porous surfaces that might have a hard time grabbing onto the paint like metal, glass, or laminate, and even some really high gloss wood. BOSS is a blocking primer and is used to seal in stains and odors, so if I suspect bleed-though, or if a piece is stinky, I will use BOSS first. Hope this helps! XOXO
Val says
Hallo Christy,
How lovely it turned out! With the stripes in the inside and on the drawer. You just took this cabinet to another level!
Christy says
Aww thank you so much, Val!! XOXO
Tracy says
I love how thus turned out 😍
Christy says
Thank you, Tracy!! XOXO
ROBIN GREEN says
I AM SO EXCITED TO SEE THE HALLOWEEN DECORATIONS. I’VE HAVE USED SOME OF YOUR DECORATING IDEAS AT CHRISTMAS. YOU HAVE SUCH A TALENT. CAN’T WAIT FOR HALLOWEEN DECORATIONS.
Christy says
Yay!! I’ll be sharing them next week!! XOXO
Sue Mellette says
What a lovely makeover. I love the colors, details, stripes and of course the inside of the drawer! You brought this one from the 20th century to the 21st century with your creative genius! You always amaze me with your close attention to every little detail! That is what makes your creative work so appealing!! Thanks for sharing. I hope you have a marvelous weekend.
Christy says
Thank you, Sue!! I appreciate that so much, my friend! Enjoy your weekend too!! XOXO
Addie says
Hey Awesome friend!!!! $25!!!!!!! What a find!!!! It had seen better days but is looking good now. So cute for a large bathroom….not mine.
Have a good weekend!!!!
Christy says
Hi Addie!! I wish I had a bathroom big enough for it too…nope! Ha ha! Have a great weekend too!! XOXO
Nette says
It came out beautiful. One question I have is, how do you mix paints 50/50? By volume, weight or what? Do you save some of the mix for touch-ups? Thanks.
Christy says
Thank you, Nette! I mix them 50/50 by volume, so half of each in one jar. I would probably save some if the mix were more complicated, but this is easy enough to mix up again. XOXO
Lizzy says
It’s beautiful! I love everything about it.
Christy says
Thank you so much, Lizzy! XOXO
Constance Colvin says
All I can ever say is: Awesome.
Christy says
Thanks so much, Connie! XOXO
Petra says
What a lovely piece of furniture. Would suit any room. I like how you painted the door white to go with the stripes. Just a lovely piece 🙂
Christy says
Thank you, Petra! I love that these pretty pieces can be used for more than just china! 🙂 XOXO
Michele M. says
WOW!!! That is beautiful, Christy!!!!!
Christy says
Thank you, Michelle! XOXO
Brenda says
As usual you have done it again! So beautiful.
Christy says
Thank you so much, Brenda! XOXO
Maggie says
I don’t have any luck with Dixie Boss. I always end up applying clear Shellac to stop bleed through.
Christy says
Maggie, you must allow plenty of dry time. It says on the jar four hours, I believe, but that is not enough time! It needs to sit at least overnight, and you will get great results! I’ve painted literally hundreds of pieces and have not had to go back to that stinky shellac since finding BOSS. XOXO
Maggie says
Thanks Christy. Perhaps I’m not waiting long enough. I’ll try again.
Christy says
You’re welcome! Dry time is key for sure. Good luck! XO
Marci says
Hi Christy…. I always enjoy seeing your painted furniture projects. I have a question though and I can’t remember ever seeing pictures, but do you paint the underside and the back of the furniture that you redo?
Thanks. Looking forward to seeing your Halloween decorations!
Christy says
Hi Marci! Thank you! I paint the underside edge of the fronts, sides and backs of my pieces, but not the rest of the undersides. I do usually paint the backs also. I hope that makes sense! I’ll be back on Wednesday this week with those decorations! XOXO
anna says
parece que tenga una varita mágica, una calabaza la convertiria en carroza.
Fantástico trabajo y elegante como siempre.
Christy says
¡Muchas gracias! XOXO