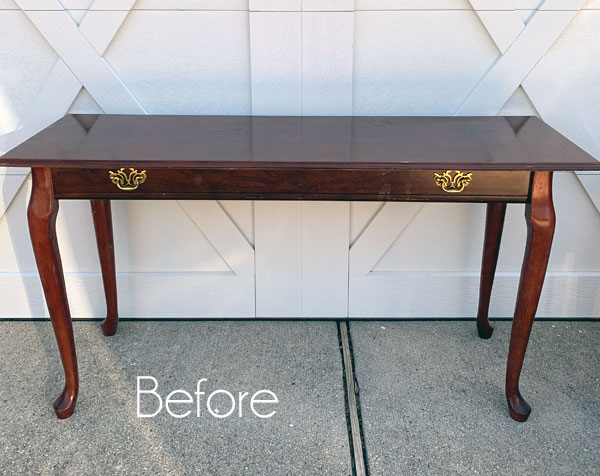
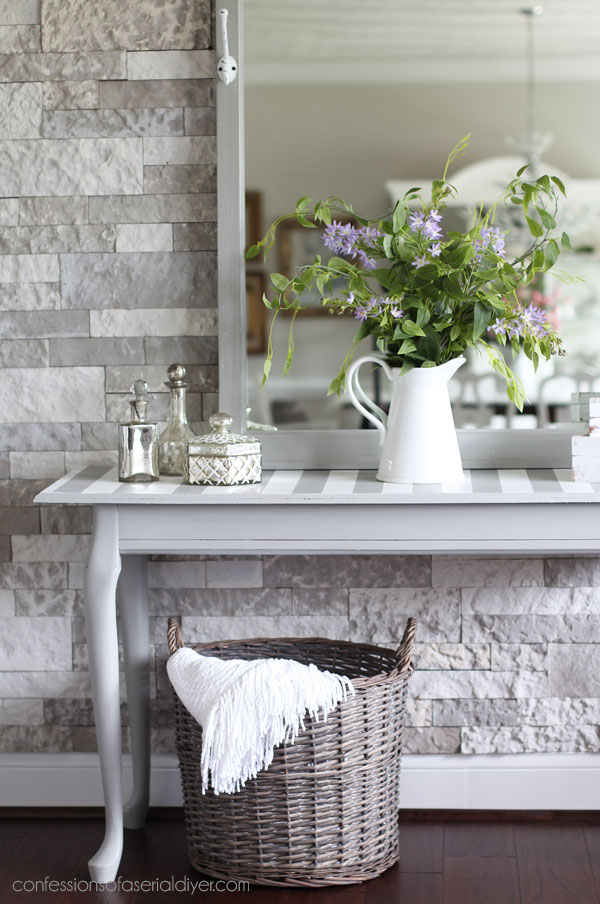
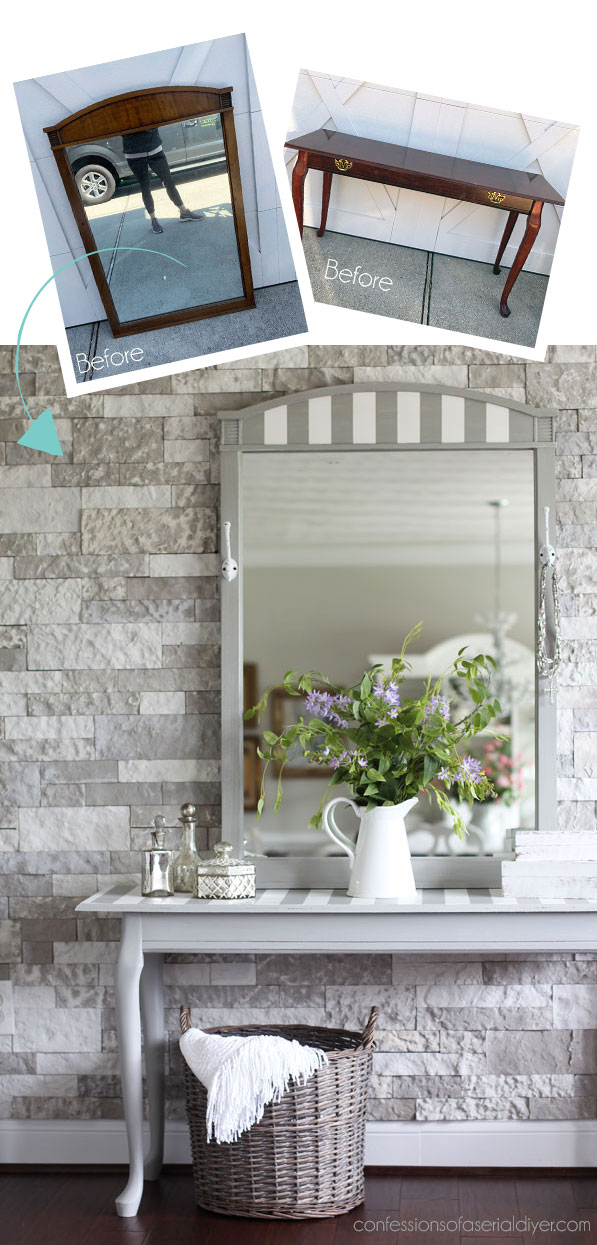
Awesome friends, today I’m back with this petite queen Anne table that my super sweet local reader friend, Dianne, gave me:
She had a mirror she was looking to get rid of and ended up sending me out the door with three pieces! Thanks, Dianne! All are of them are in my current haul.
A few of you mentioned you’d like to see this table done next, so here you go!
Removing the pulls on the front and a little paint therapy went a long way!
And that bonus makeover I mentioned?
It started out as this mirror:
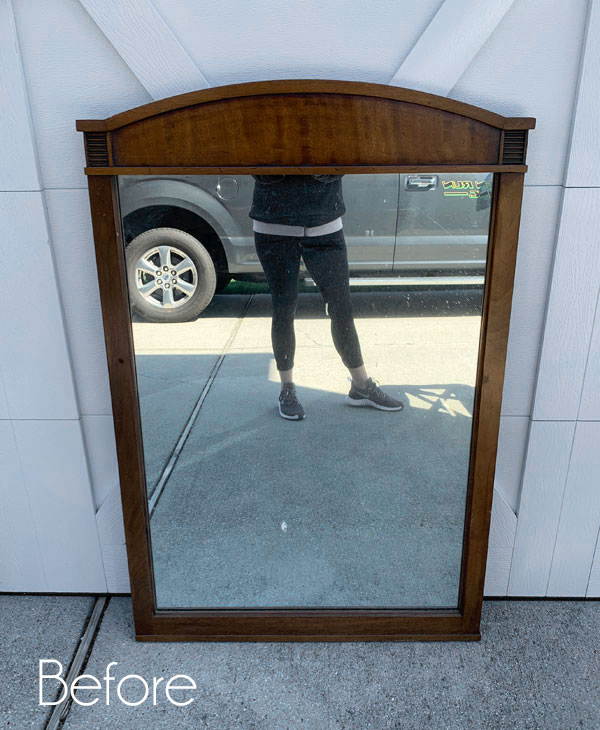
This mirror came with this dresser I shared back in the Fall, but I didn’t think it did much for the dresser. I almost had my Hubby take it away just to get it out of the garage because I thought it had so little potential. Of course at the last minute, I just could not let him take it.
I’ve included a few affiliate links so you can find the products I love.
I think it turned out cute after all!

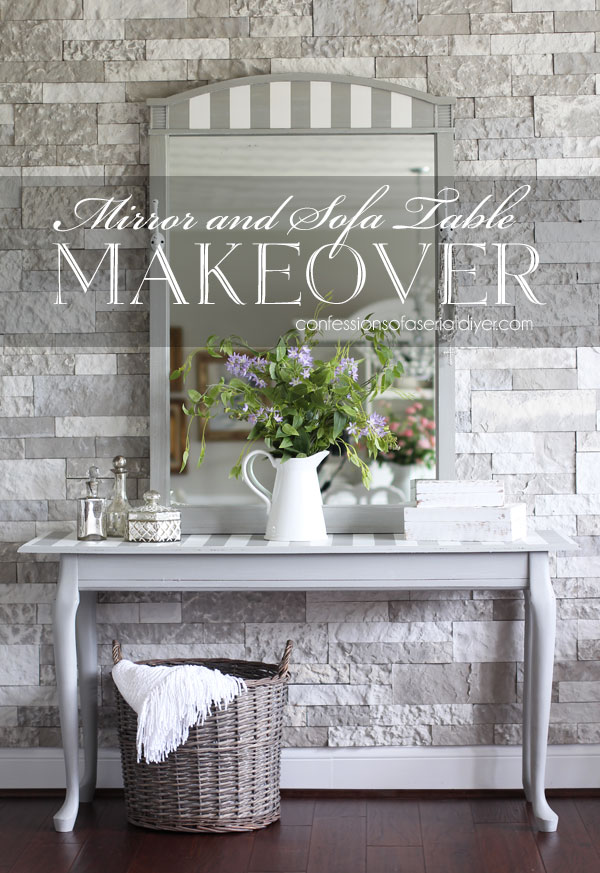
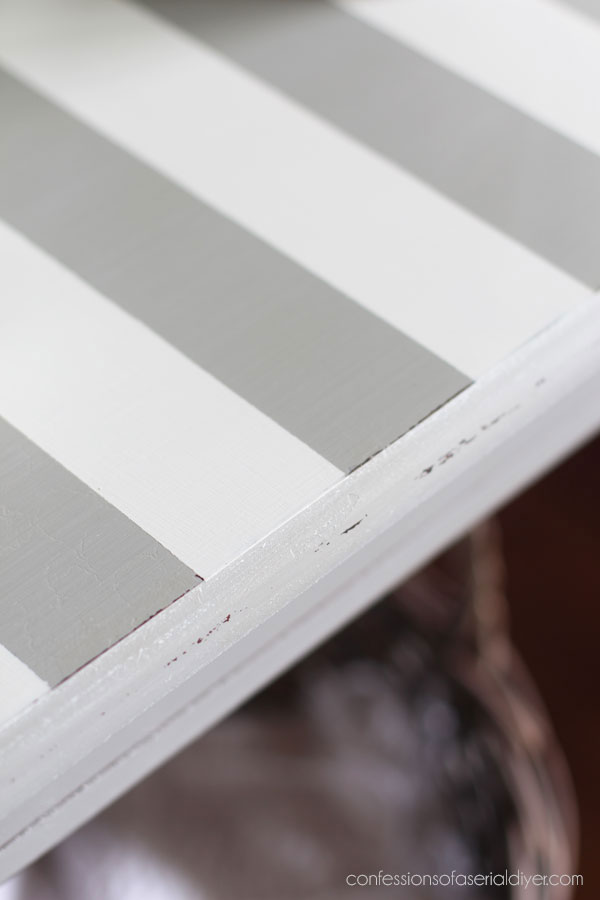
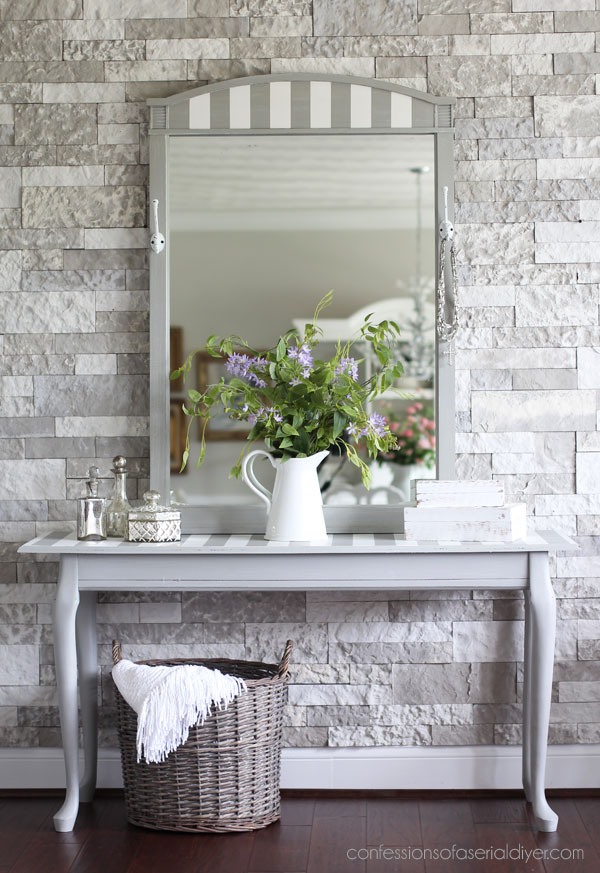
The color I used on these pieces is Driftwood by Dixie Belle. It is a lovely gray with a touch of brown in it making it more like a taupe color.
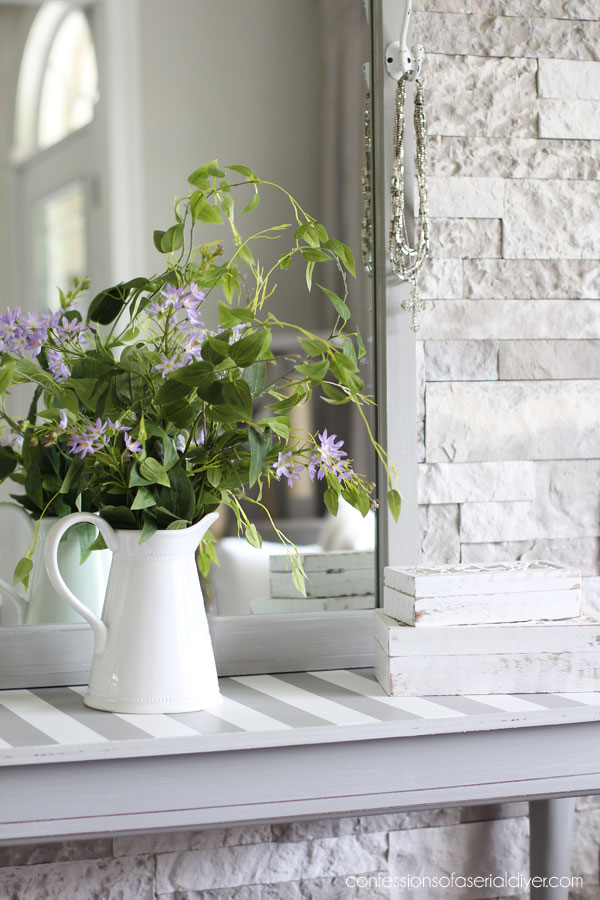
And as you can see, I added my favorite stripes to the top!
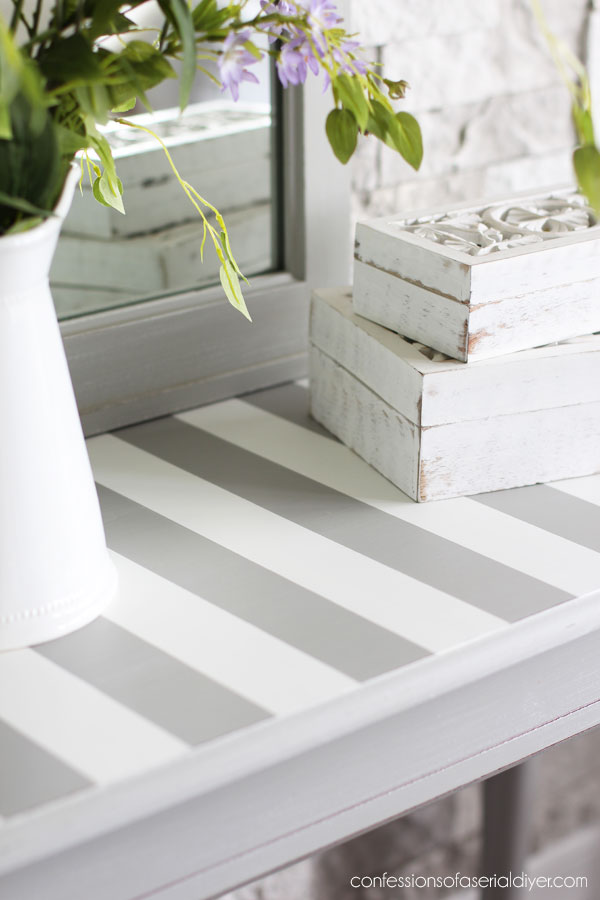
The top of this table had a couple of marks that likely would have been visible if I just left it painted a solid color, but the stripes are great for disguising blemishes.
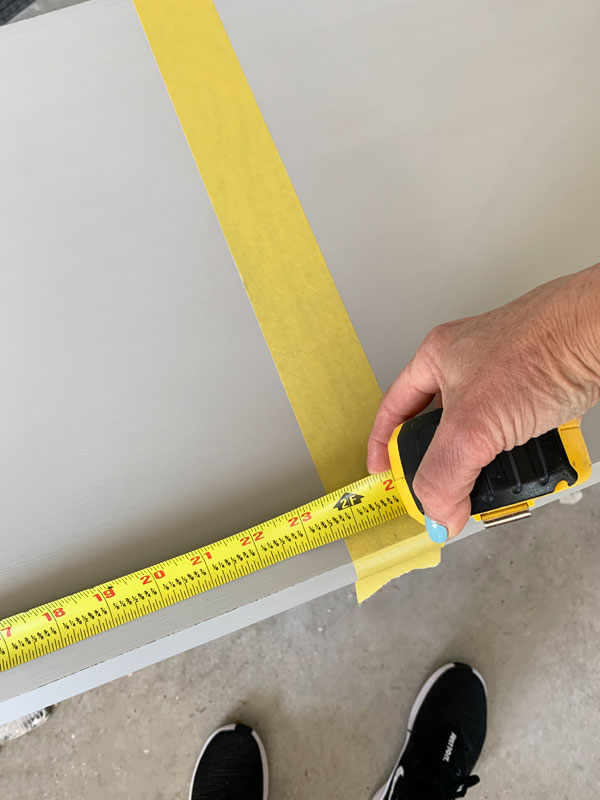
How to get perfect stripes every time!
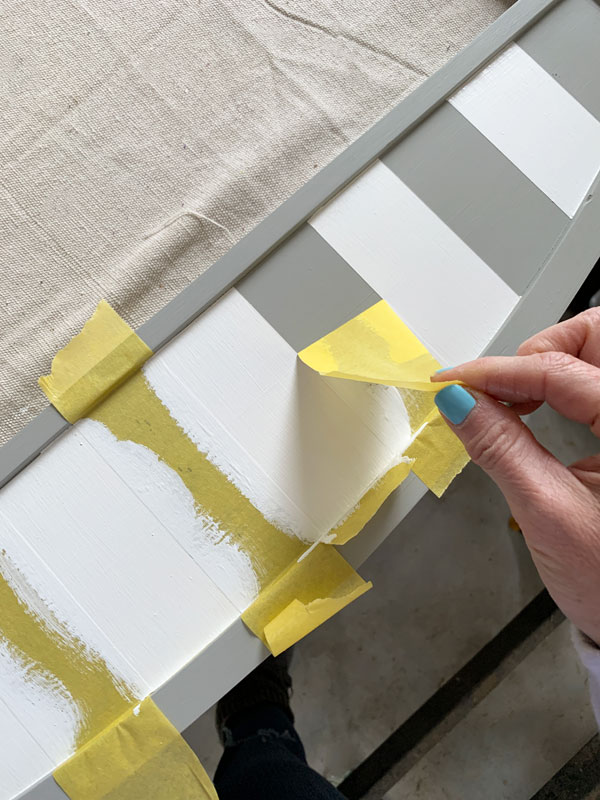
There is a super easy way to get perfect stripes on your furniture piece every time!
Start with a good painter’s tape. I like FrogTape for delicate surfaces, but their green version is great also.
- First, I measured and marked the center point on my surface and centered the tape on those marks. Then I measured to be sure it was centered.
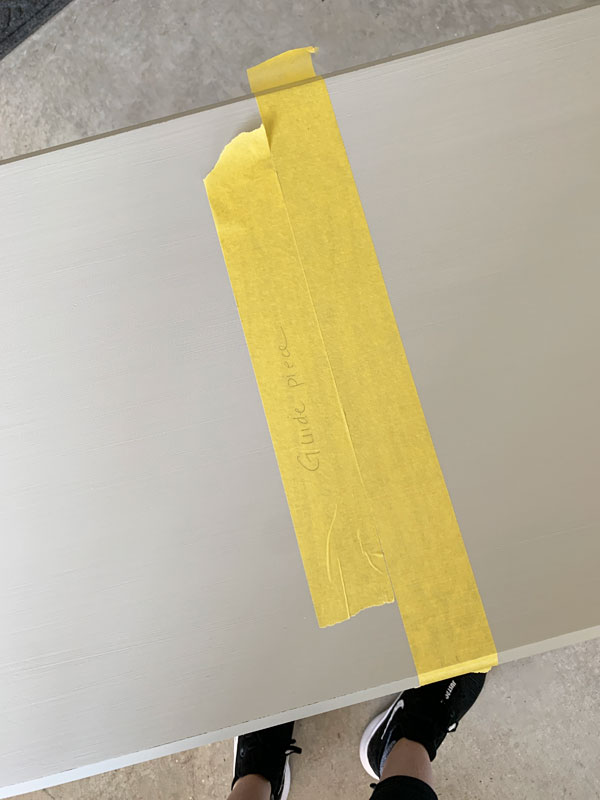
- Next, I ripped a piece of tape to use as my Guide Piece and lined it up right next to the original piece:
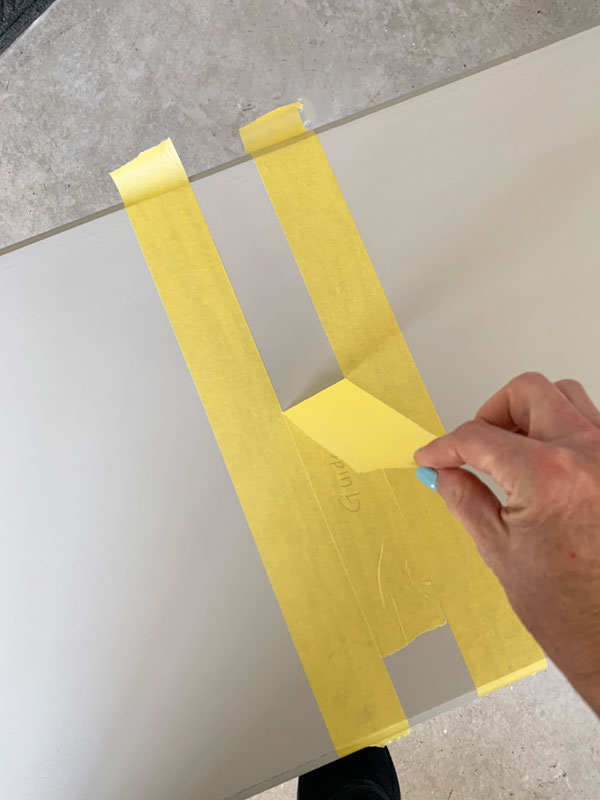
- Then I added another piece next to that and removed the Guide Piece.
- I continued on the same way…
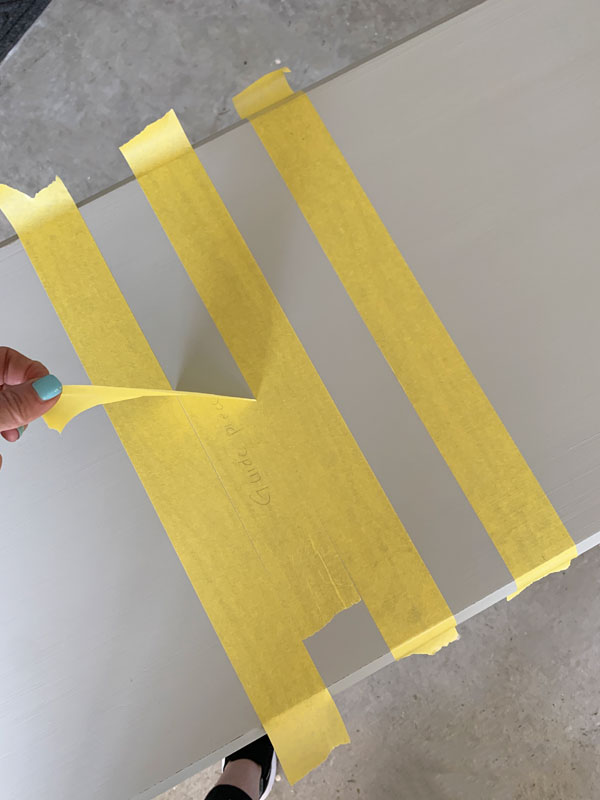
Until I had the whole piece done…
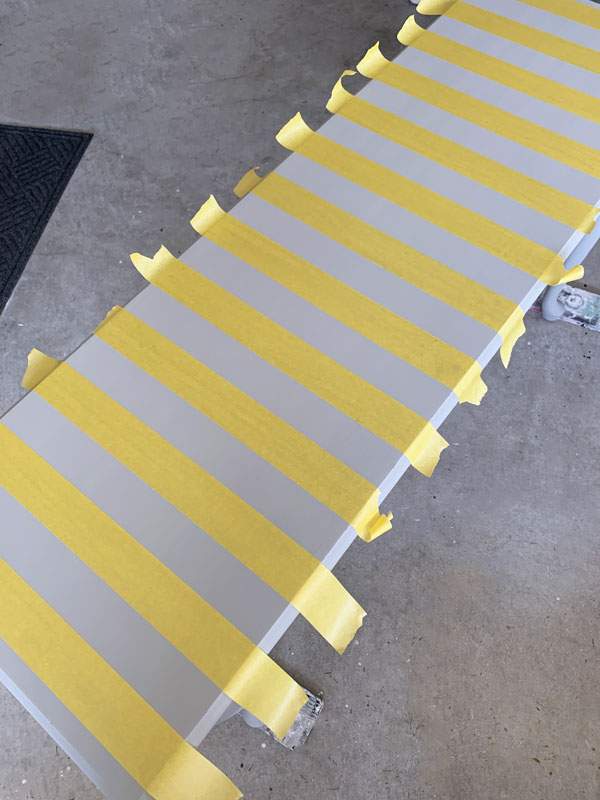
Perfect stripes!! If you want a wider stripe, just double up the tape, and if you want a more narrow stripe, this tape also comes in a more narrow width.
- For this table, I also added a strip of tape all around the edges since I wanted the stripes just on the top. Then I just painted in the stripes! I used two coats of Cotton for the stripes on this table:
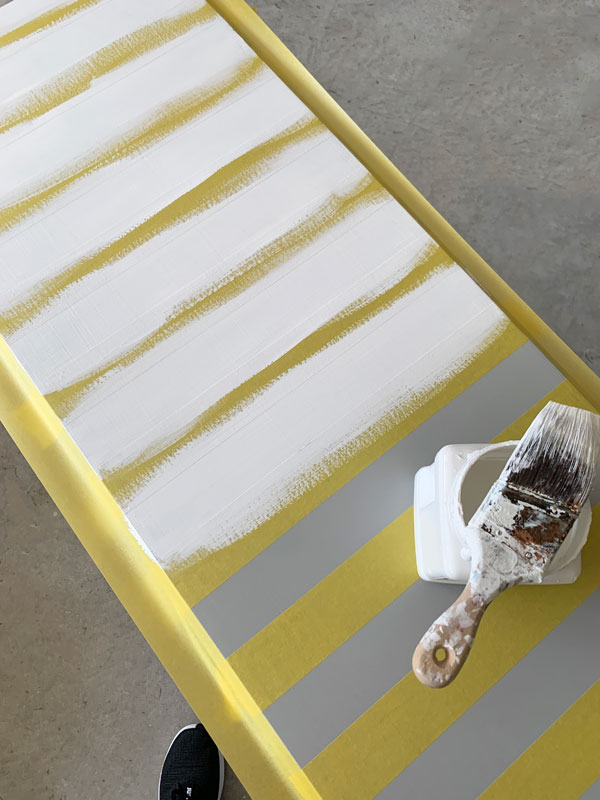
- I removed the tape as soon as the second coat went on.
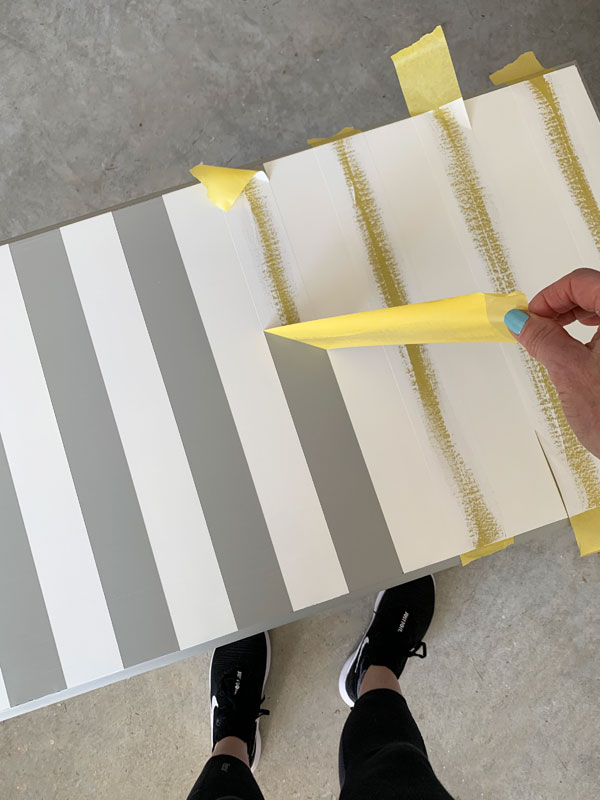
That’s my favorite part! Look at those crisp lines!
After adding the stripes, I added a very light dry brushing of Cotton all over to soften it a bit. I hadn’t originally planned to sand as well, but I did end up sanding with 220 grit sandpaper. The sanding took away some of the dry brushing. I would have sanded first if I had planned to do both originally.
It’s hard to see from a distance, but you can see it up close:
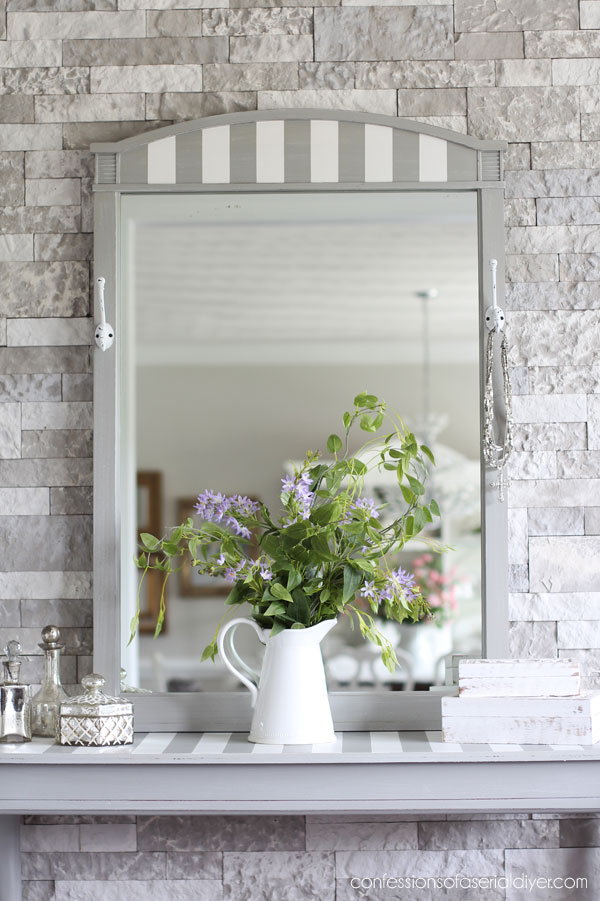
I did the mirror the same way:
As you can see too, I removed the mirror so I could paint the frame more easily, and I like to paint the underside of the frame where the mirror will reflect the finish. To add the mirror back, I secured it with my Logan Point Driver and then replaced the original wood backing…

See more of my stone feature wall HERE.
It’s hard to hide behind those flowers! Peek-a-boo!

I have the camera on a two second delay timer, so I had to click and duck ha ha!
I sealed both pieces with Dixie Belle’s Satin Clear Coat using the blue sponge applicator to apply it. You can see a video on how I apply sealer with a sponge below:
If you have trouble viewing, find it on YouTube HERE.
I added hooks to the mirror to add a little more function:
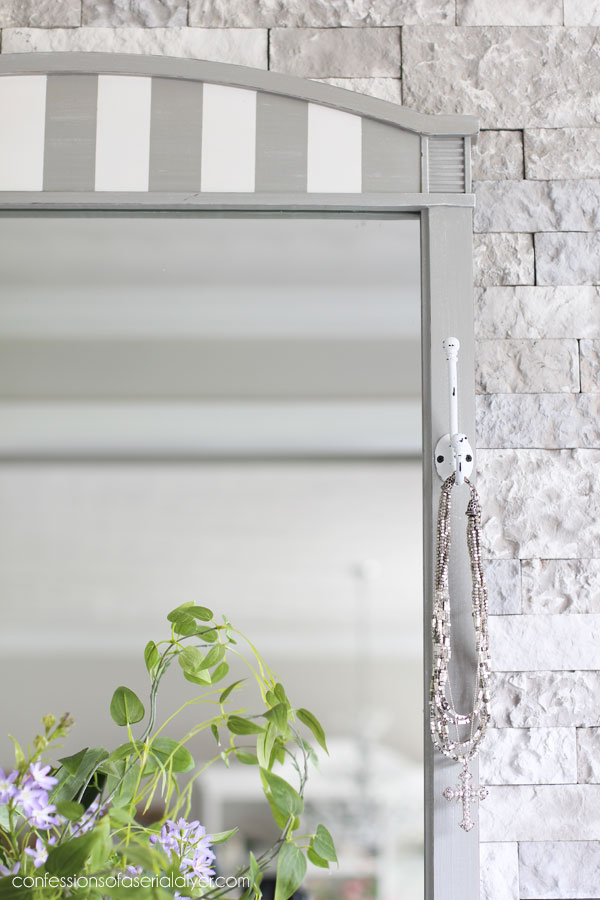
These came from Lowes and started out dark brown. I painted them with three coats of Cotton and used my nail to scratch off the paint here and there…
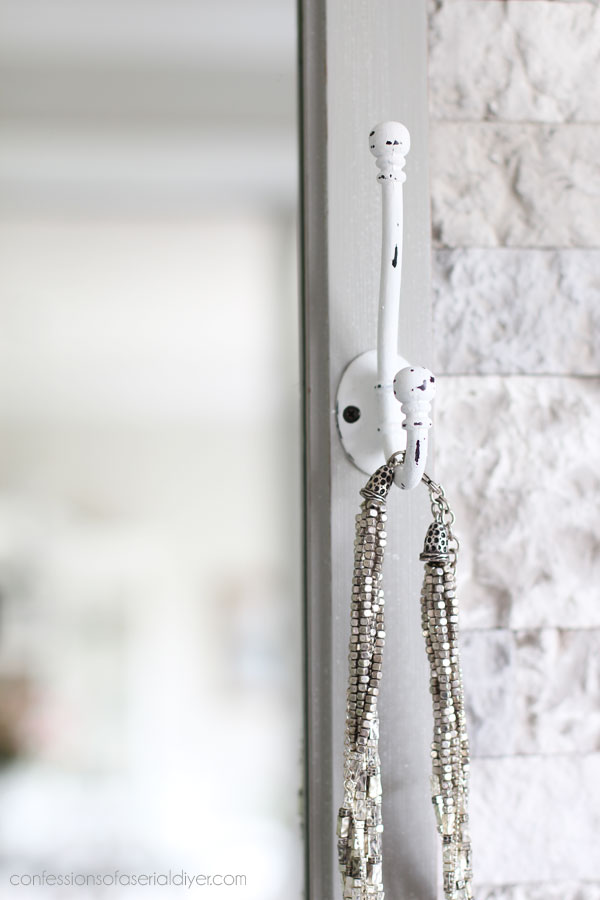
This would be great hanging in an entryway to hold keys, leashes, etc.
I hope y’all enjoyed this two-for-one today!
That’s two more projects I can cross off the list!!

If you missed the first couple, you can revisit them at the links below:
$5 Dressing Table Bench Makeover
Thrifted Metal Wall Decor Makeover and a Brand New Thrift shop Shakedown Video!
Tuesday is Trash-to-Treasure day and I had planned to share this mirror since it was heading to the trash, but since I decided last minute to paint it to match the table, I’ll have to come up with something else for Tuesday!
UPDATE: I ended up redoing this table:

See how redo #2 looks HERE now!
I hope you all have a wonderful weekend!
Take care and stay safe!
XOXO,
![]()
Don’t Miss a Thing!
If you like what you see, there are several ways to follow along!
Email * Instagram * Facebook * Pinterest * Twitter


")


Mary Kaiser says
WOW they both are so beautiful now! They look like they have always been together. I bet some one will come and purchase them together because they look like they belong together. I would purchase them both and use in the entry way together, You could have a cute basket to catch all the sunglasses and keys and stuff, it would be adorable!
Christy says
Thanks, Mary! Ooh yes, this would be perfect in an entryway! have a great day! XOXO
Christina says
Beautiful Christy, just beautiful! They look like they were made for each other…. now they are!! 🙂 Love the stripes.
Be well!
Christy says
Thank you, Christina! Yep, now they are! Stay safe! XOXO
Robin Stephens says
Classy! I do so love the gray and white….and the stripes set it apart from the rest of the gang, I’m sure. You stage your pieces so beautifully. Good job….as always! ❤️
Christy says
Thank you so much, Robin! XOXO
Maryellen Webber says
Today’s project is fantastic! I love the color choices and the stripes, It turned out beautiful!! Thanks for inspiring me!
Christy says
Thank so much, Maryellen! It was fun to see this unlikely pair come together! XOXO
Cheryl Atkinson says
Hi Christy! I love Driftwood. Good choice and it looks so much better without that useless hardware on front. I learned how to do my stripes from you. Thank you. Well, Goodwill will be opening soon. Just be sure to wear your gloves and trash right after. I still have a house haul I am still working on so keep bringing those ideas. 😃
Christy says
Thank you, Cheryl! I love Driftwood too! I cannot wait to go thrifting again…will definitely be careful when I go. Although, I too still have several things I can work on! Have a great day! XOXO
Petra says
I’m loving that soft grey you use 😀 And the stripes are perfect 😀 xo
Christy says
Thank you, Petra! It is a great neutral and you know I love stripes! XOXO
Cecilia from Georgia says
Great marriage! The mirror by itself is blah and the table is just a table. Put them together and it is a match made in furniture heaven! The stripes are so perfect! I just finished a grain stripe on a table and had to touch up…I gotta practice more to get mine as crisp as yours. Have a wonderful weekend. Stay safe and be strong!
Christy says
Thanks, Cecilia! This unlikely pair ended up helping each other out for sure! And I love stripes on just about anything! You stay safe as well!! XOXO
Olivia says
The stripes on the mirror take it from common to unique. It gives the mirror some depth. Looks great with the striped table. Like the colors you chose.
Christy says
Thank you, Olivia! I’m so glad I didn’t let my Hubby trash the mirror! XOOX
Janice Holt says
I always love your stripes and thanks for sharing how you get them so straight. The added hooks to the mirror is such a good idea but leave it up to you to always make something plain become something beautiful. Stay safe and healthy.
Christy says
Aww thank you so much, Janice! You stay safe and well too! XOXO
Shirley says
Love 💕 love 💕 those stripes and the colors you chose. You made this project look so easy and fun. I appreciate the details on how to get those perfect stripes because they can be difficult to get accurate if it’s not done right. Your stone wall is lovely and the perfect backdrop for these two pieces. Keep inspiring us, Christy.
Christy says
Thank you, Shirley! Stripes are such an easy way to add a little something extra, but yes, only if they’re straight lol! Doing them this way really helps. And did you know that when I was asked if I wanted to try the stone product, I chose the lightest color because I planned on painting it white? I ended up loving the color as is! Have a great day! XOXO
Becky Fischer says
I absolutely love what you did to the table and mirror. I also love your written detail of what you did. I am going to have to try my hand at stripes. I really enjoy your blog. Thank you for all that you do.
Christy says
Thank you, Becky!! I’m so glad you found this helpful and I appreciate you following along with me! XOXO
Larissa ~ Prodigal Pieces says
Love this transformation and combo!
Christy says
Thank you, Larissa!! XOXO
Kandie says
I am totally awed by these two transformations of furniture I see every weekend at garage and estate sales. Now I will keep my eyes open for these individual pieces since I see how lovely you have made them by grey and white. Wonderful!
Christy says
Thank you, Kandie! I love that you loved the results…pairing these two together definitely helped them both! XOXO
Cecilia says
Oh wow, I love it. It never fails to amaze me how paint can transform a dated piece. The mirror turned out great too! They both have personality now!
Christy says
Thank you, Cecilia! Yes…paint can really work wonders!! XOXO
freidia Martindale says
Morning Christy,
They both turned out beautiful!
Question for you..
Can I use the Dixie satin clear coat on your original chalk paint?
Hugs : )
freidia
Christy says
Good morning, Freidia! Yes, you sure can! XOXO
Jo Ann says
What??? You almost had hubby take that mirror away??? it turned out beautiful. You have such a talent. I hope your family is doing well. Stay safe!
Christy says
I know!! I am so glad I stopped him lol! Thank you, Jo Ann! We are well here…you stay safe also!! XOXO
Jessica Nash says
Beautiful as usual, Christy! Thanks for the little tutorial for doing stripes, I’m going to try that one day when I find the perfect piece!
Christy says
Thank you so much, Jessica!! Yes…using this method to add stripes makes it so much easier! XOXO
Mary Falks says
I love how you chose your colors and the stripes! What about the brass drawer pulls? Were those fake drawers or did you do something else with them?
Christy says
Thank you, Mary! The brass pulls were just there to look like drawers were there I guess, but I just removed them and filled the holes. 🙂 XOXO
Michele Hillberg says
Hi Christy, I love how this turned out, along with all your other items too! I was wondering what you use to fill holes with? Also, on your Mom’s hutch redo, which I adore, how did you paint the spirals? Thank you
Michele
Christy says
Thank you, Michele! I use Dixie Belle’s Mud to fill in holes or Wood Filler if that is easier to get to…most brands work very similarly. I painted the spirals with the same brush I used for the rest…I just went in the direction of the spirals. Hope that makes sense! XOXO
Nancy @ Artsy Chicks Rule says
Love the stripes and it looks just perfect against your stone wall!! Gorgeous! xo
Christy says
Thank you, Nancy! XOXO
Marcie Lovett says
They would be perfect for a foyer, Christy. I can’t believe you almost let that mirror go! 😁
Christy says
It really would be great in a foyer! And I don’t know what I was thinking…good thing I came to my senses lol! Have a great weekend, Marcie! XOXO
Becky says
Bingo! You nailed it again!!!
Christy says
Aww thank you, Becky!! XOXO
Lizzy says
So pretty! Love the color pallet.
Question. Why is everyone using Dixie Bell everything all-of-a-sudden?
Christy says
Thanks, Lizzy! Good question! I love it personally because they have everything I could possibly need in their brand. And while the paint is probably very comparable to other big name chalk paints, they have the best sealer and bleed-through blocker…a one-stop shop! XOXO
Lizzy says
Good to know. Thanks!
Christy says
Sure thing! 🙂
Sue H Mellette says
Love what you did with both pieces. I agree with others who mentioned how well they work together. I particularly like the hook! Love stripes too and gray and white is always a classic combination! Thanks for sharing.
Christy says
Thanks so much, Sue! These were an unlikely match before, but they so work so well together now! Have a great weekend! XOXO
LYNN SCHAUCHULIS says
Hi Christy, I have a table just like that one.. It is cherry wood and I think it has some can of finish on it. Did you have to put on a primer first ? how many coats of cotton did you use ? Is the stripe a gray or a toupe color, hard to tell in the photo…Sorry for so many questions.. Just love your work. wish I could take a painting class with you :}
Christy says
Hi Lynn! I try to give as much detail in my posts, so if I use a primer, I will definitely share that detail with y’all. All I did to prep this piece before painting was give it a good wipe down with clorox-type wipes. Then I gave it two coats of Driftwood which is more taupe than gray. For the stripes, I did two coats of Cotton and immediately removed the tape after applying the second coat. Thanks so much and I hope I answered your questions! XOXO
Rosie says
Another haul beautifully done! Seeing you incorporate stripes in your projects inspires me to give it a try so thank you for that!
Have a great weekend!
Christy says
Thank you, Rosie! I love that you are inspired to try stripes…this method definitely makes them easier to apply! I hope you have a great weekend too! XOXO
Joanne says
Oh my goodness – how perfect are THEY!! You are the truly so gifted. Just Love, Love, Love all you do.
Christy says
Aww thank you, Joanne! I appreciate that so much! XOXO
susan says
As usual, BEAUTIFUL! You didn’t have to use slick stick or anything for the shiny finish? I have one of those and I was afraid it would scratch right off if I didn’t.
Christy says
Thank you, Susan!! I did not use anything as a primer and I usually don’t and do not have any issues. You just need to be careful with it for the first three weeks while it fully cures. XOXO
Carole Larsen says
I love them both and especially together. You are so creative.
Christy says
Thank you so much, Carole!! XOXO
Dianne says
Christy, I am so late reading my emails. We have a lot going on here. I love the treatment you gave the sofa table! It looks so good and the mirror to match is the creme de la creme. So glad you were able to make it beautiful.
Christy says
Thank you, Dianne! I’m glad you liked what I did with this one…two more to go! Take care! XOXO
ROSE LEFEBVRE says
Really cute re-do!
Christy says
Thank you, Rose! XOXO
jan says
what did you do to prep this table, as it has a very shinny coat, sorry new to all this.
Christy says
Hi Jan! The only prep I did was give it a good cleaning first. If chalk paint is new to you, you can see more on how I chalk paint furniture which also includes a video at the end in this post: https://www.confessionsofaserialdiyer.com/how-to-paint-furniture-using-chalk-paint/ I hope this helps! XOXO