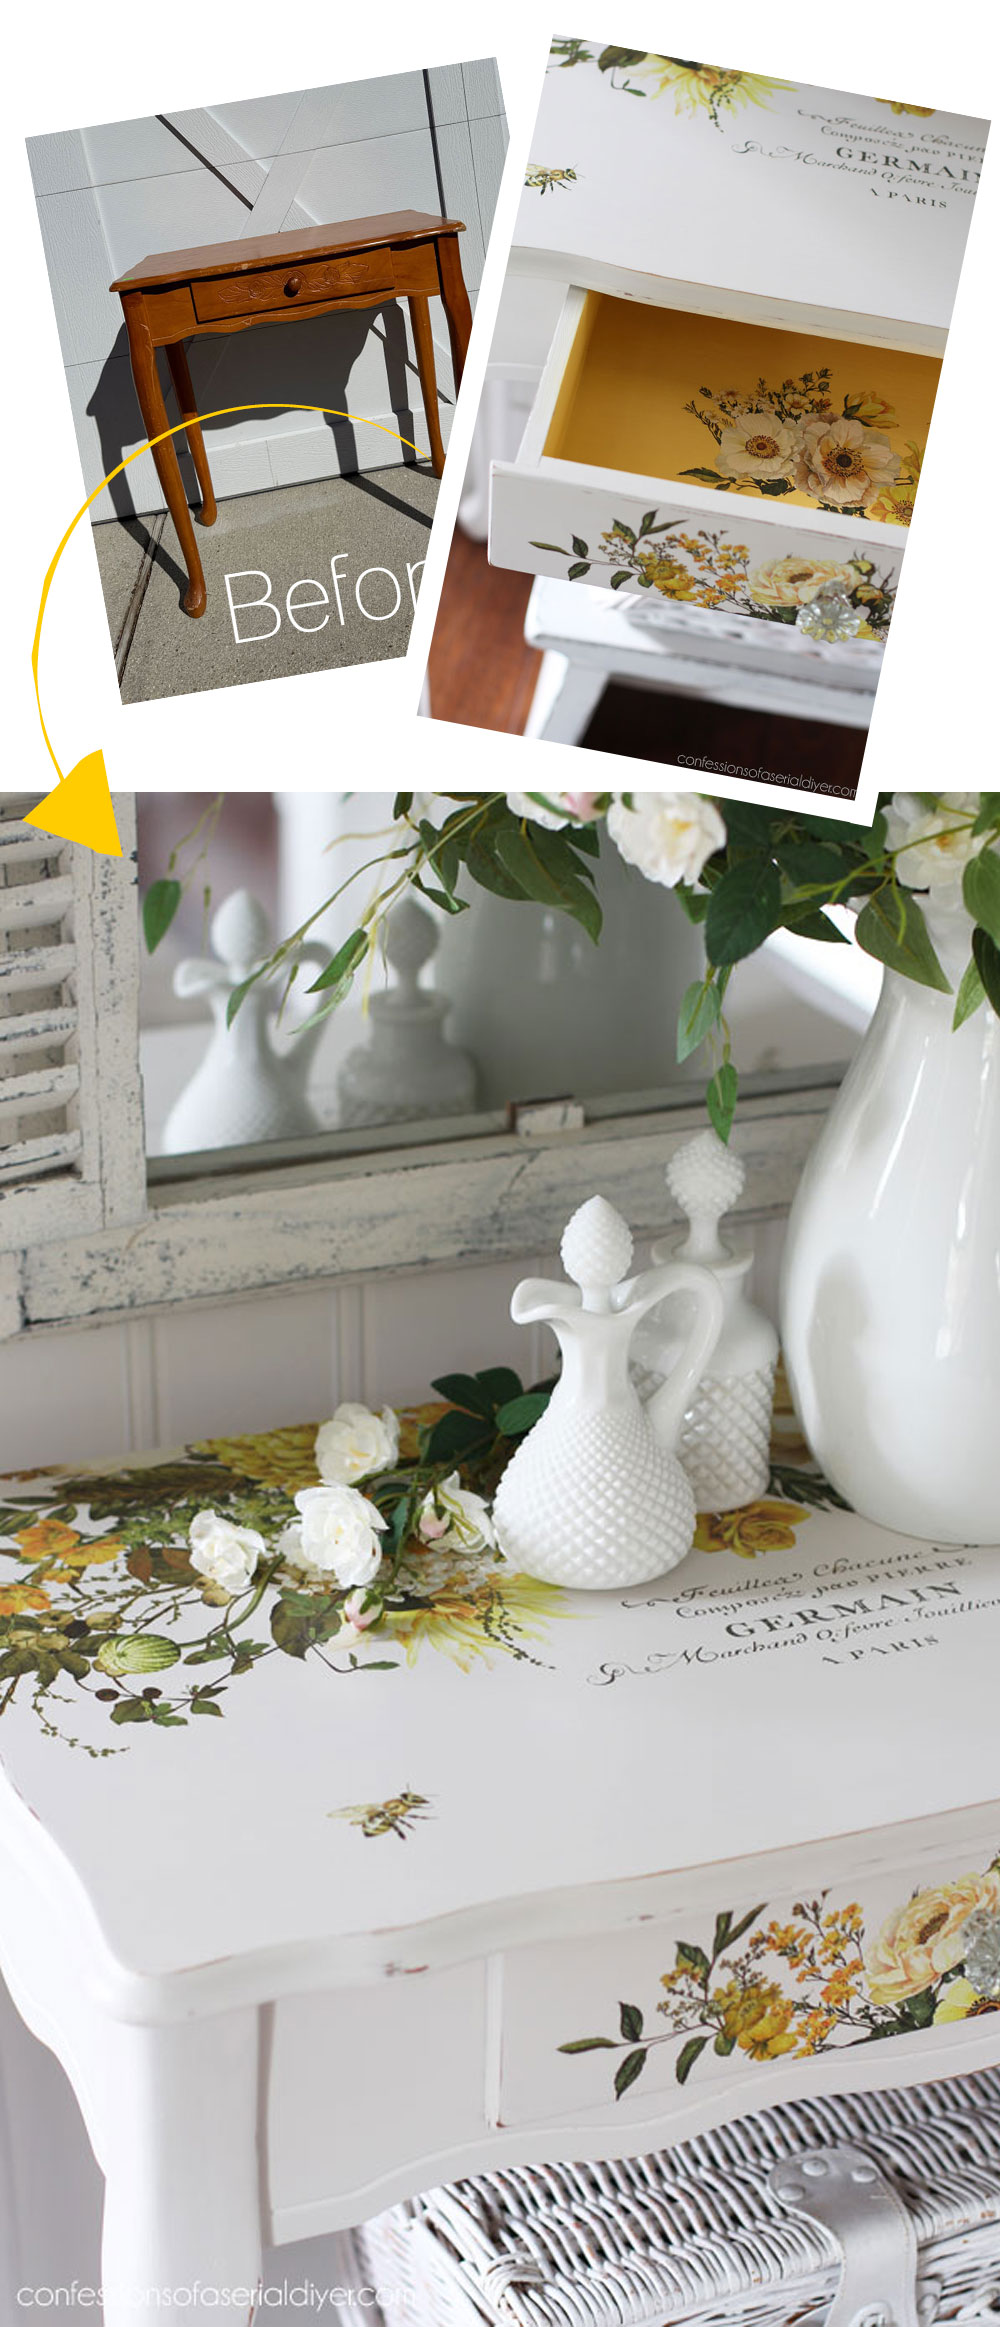
Hello, sweet friends, and welcome to another Trashy Treasures Tuesday!! I have the perfect piece for today, a trashed $10 thrift store table makeover! My friends have two more trashy redos for you at the bottom, so be on the lookout for those.

Before we get to it, I want to say THANK YOU to our veterans, past, present, and future for protecting our freedoms! I come from a very large military family, and I know the sacrifices you and your families have made and continue to make for our country! ❤️🤍💙
Ok, let’s get to it!
Here is today’s trashy piece:
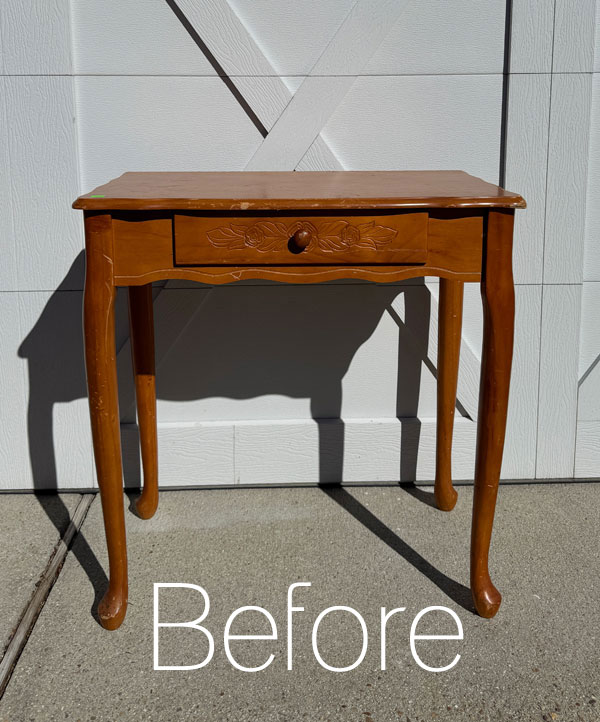
Not too bad, right? Oh how those before photos doth deceive!
I found this piece at the thrift store when I was just starting to search for my new haul. Pickins were slim, so even though this one was pretty banged up, I brought her home anyway!
I’ve included a few affiliate links so you can find the products I love.
The Damage
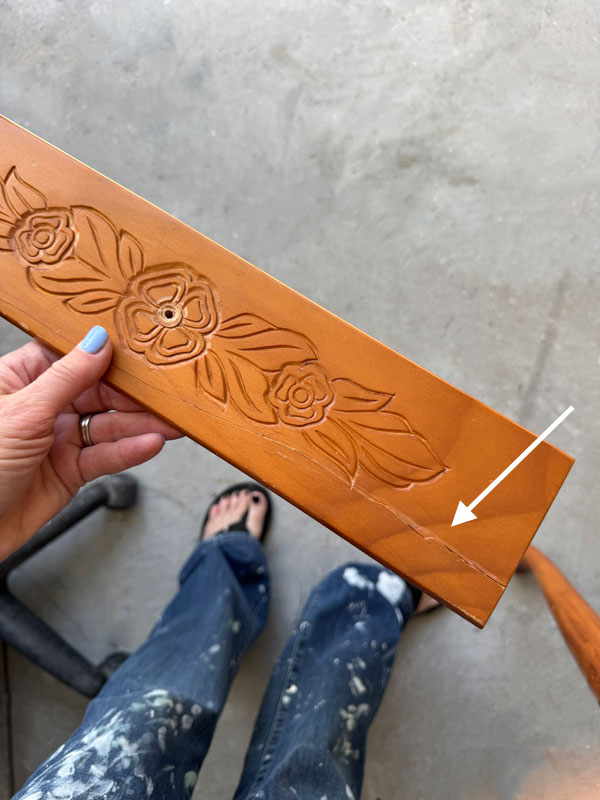
I didn’t notice this dinged corner until I got it home:
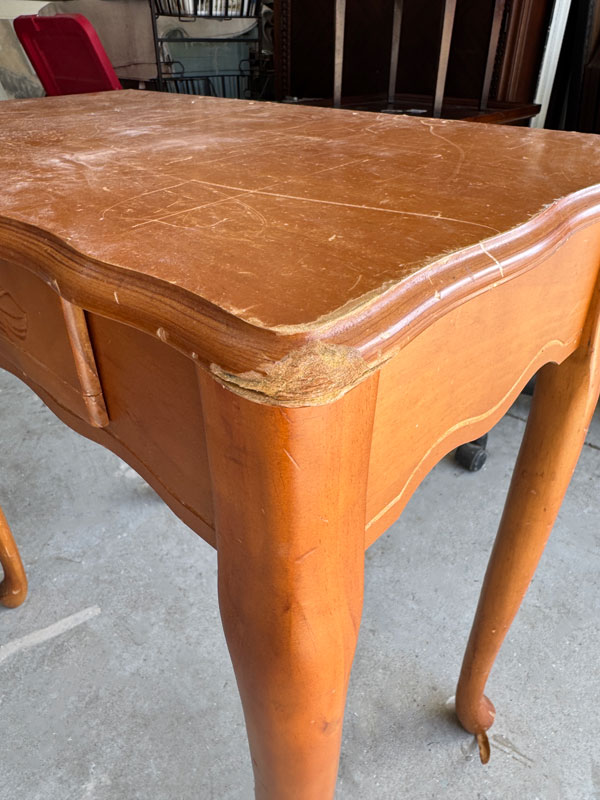
The way it crumbled apart and started to separate told me this top was not solid wood.
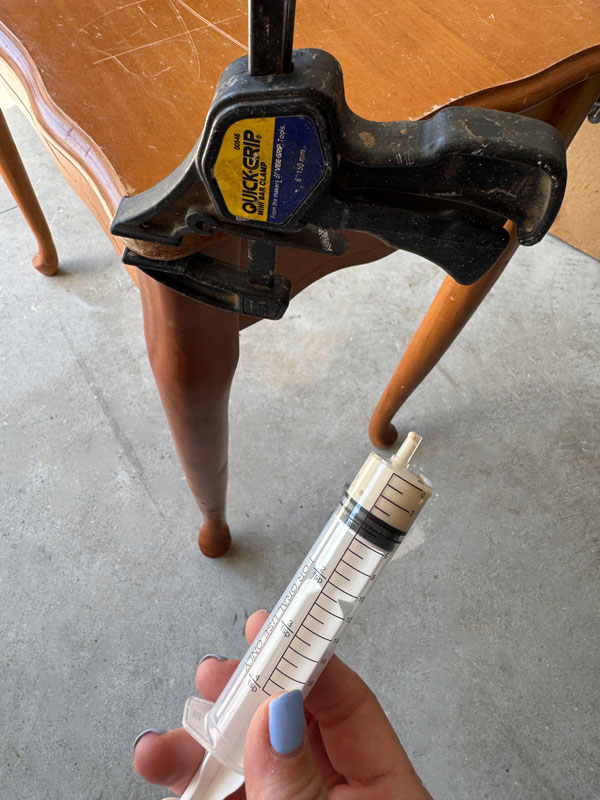
I was able to fix that by gluing the layers back together using wood glue:
Here is the top:
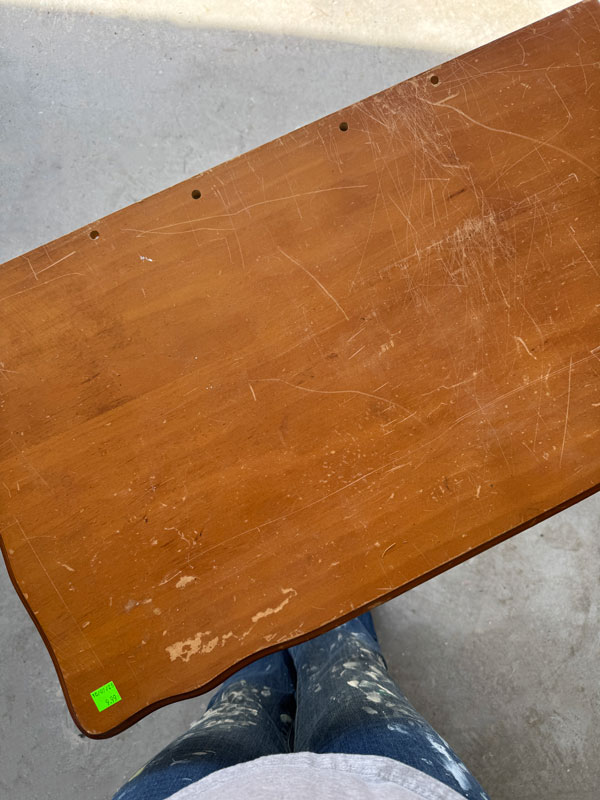
It looked like it may have had a piece across the back or maybe even a mirror that went in those holes.
And here is another thing I missed…the drawer front had broken in two at one time and had been poorly glued back together:
How could that possibly have happened??
Clean
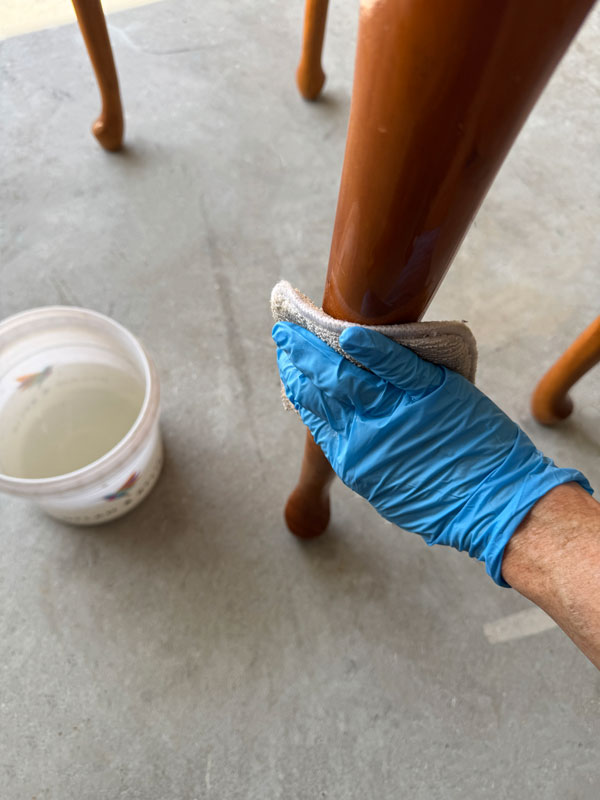
Once the glue on that corner was dry, I gave everything a good cleaning. I used my go-to furniture prep, White Lightning, mixing a TBSP into a half gallon of warm water.
It is a degreaser and a deglosser and gloves are recommended:
Be sure to swap your water out for clean water and wipe it down once more to remove any residue.
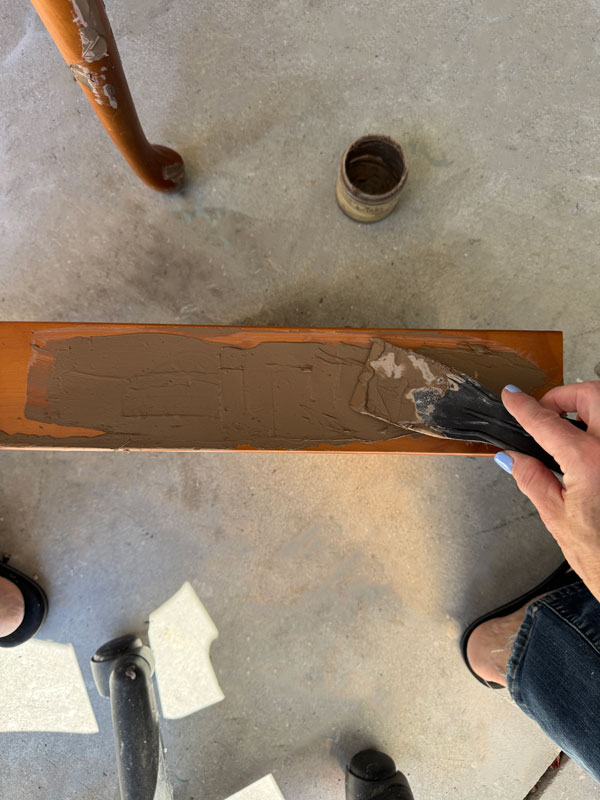
Fill dings, holes, and all those scratches
Next, I used Dixie Mud from Dixie Belle to fill all the things. The top was not solid wood, so I didn’t know how far I could sand, so filling was the best option. It looks crazy here:
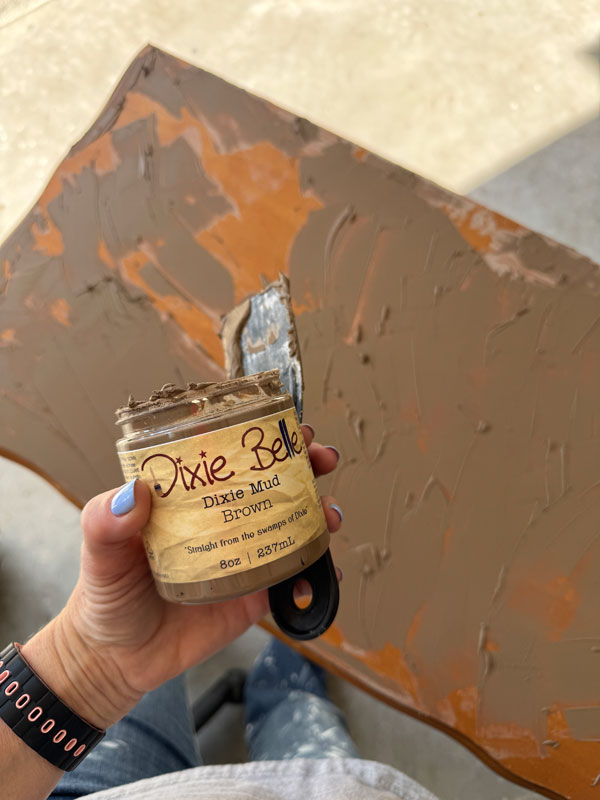
The top was SO scratched up! Once that was dry, I did have to fill the holes across the back a bit more and let those dry. A better way to fill those would have been to fill them with pieces of dowel cut to fit, but I didn’t have a dowel that would fit on hand, so this worked fine.
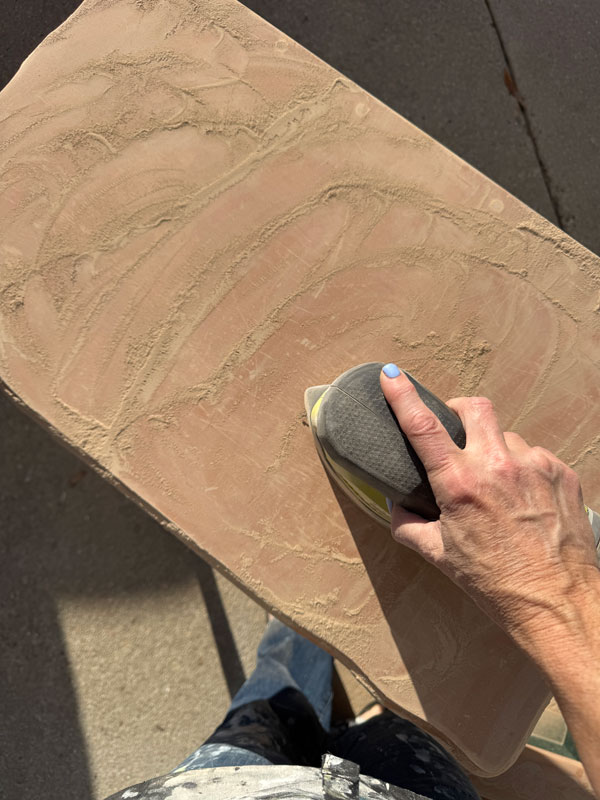
Then, I sanded all over with 220 grit sandpaper using my Corner Cat sander ( I call it my light duty sander, perfect for light duty jobs!) :
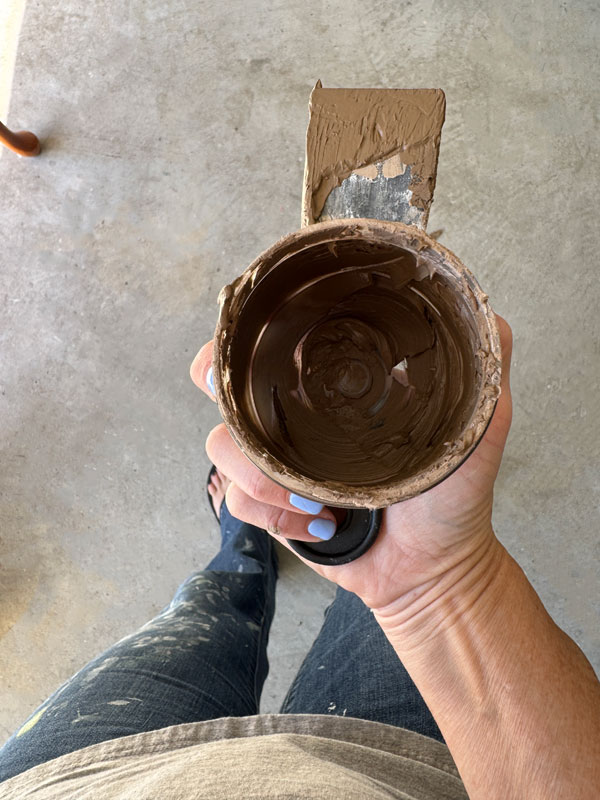
I also decided I wanted to fill that design on the drawer in, so I hit the drawer front with Mud too:
I’ve shown this before, but I have never used an entire tub of traditional wood filler before it hardened up on me, but Dixie Mud stays soft all the way till the end:
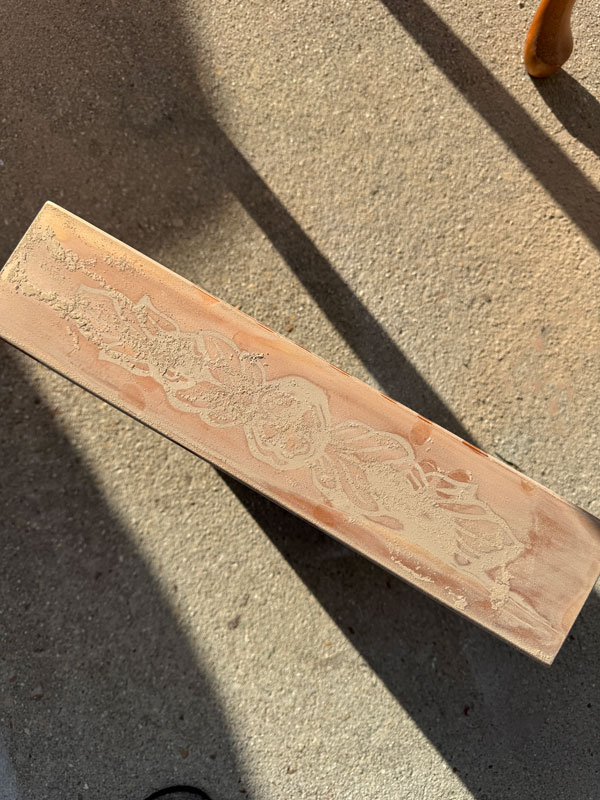
Here is the drawer after sanding:
I vacuumed up all the dust and gave everything a good wipe down with a clean, soft cloth, and we were ready for paint!
Paint
For this set I chose Fluff by Dixie Belle, giving it two coats for solid coverage. I was happily moving right along and did not get one photo of painting this piece lol.
Sand
Chalk mineral paint has a bit of a texture to it but just the lightest sanding will make it buttery smooth, and I did that with 220 grit sandpaper wrapped around an old sanding sponge. Once again, I wiped everything down.
Adding a transfer
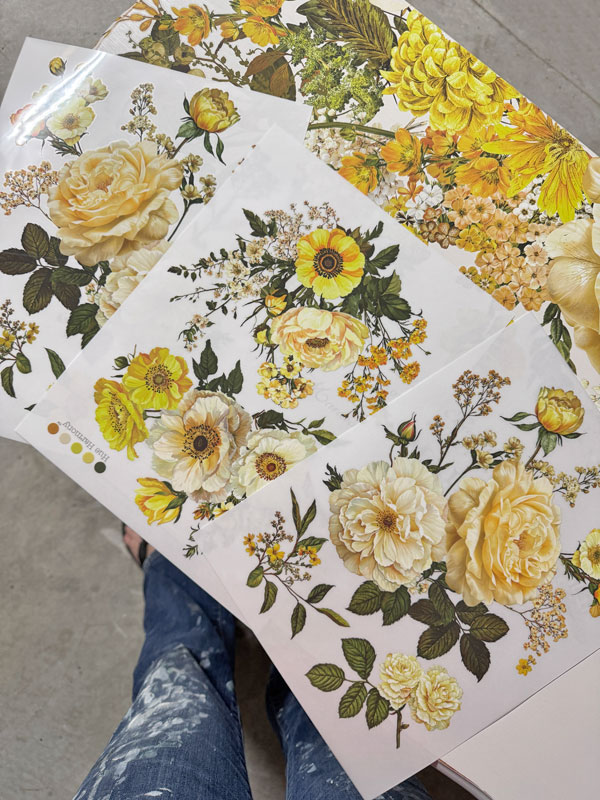
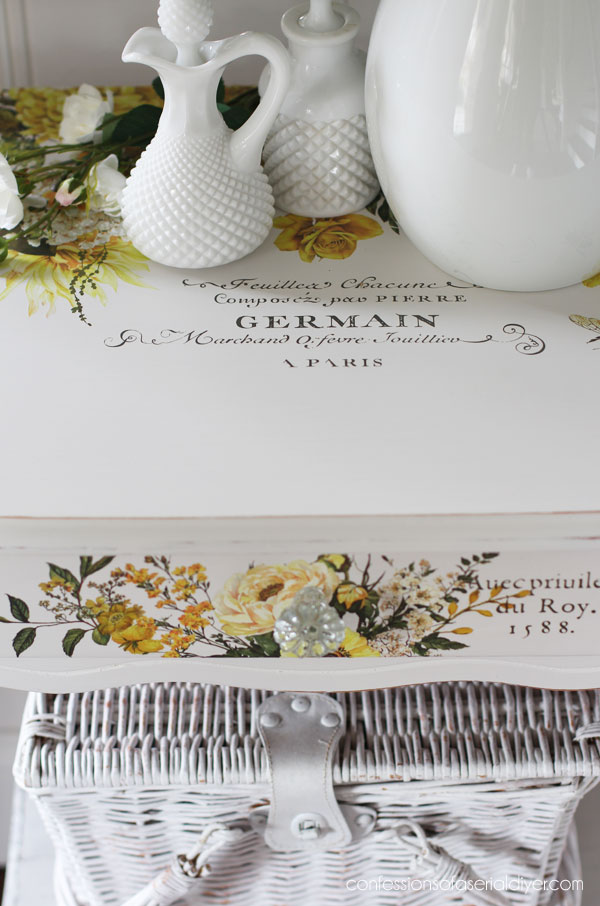
Here you can see the color I used. I chose it as a backdrop for this gorgeous Sunlit Serenade transfer:
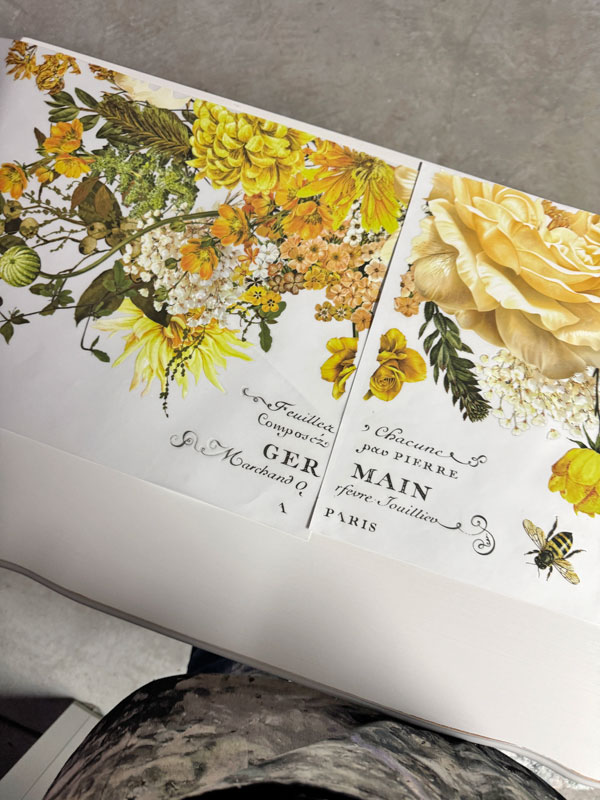
I had these two pieces left over from this armoire I shared over the summer. (That was over Savannah Mist rather than white.)
Transfers by Redesign with Prima are often limited run only, so they may no longer be avaialble if you are viewing long after the posting date. See all the transfers I have in my shop HERE.
The larger transfers now have these wavy edges, so it isn’t so obvious where the pieces join together. I cut that edge straight since it was going along the back:
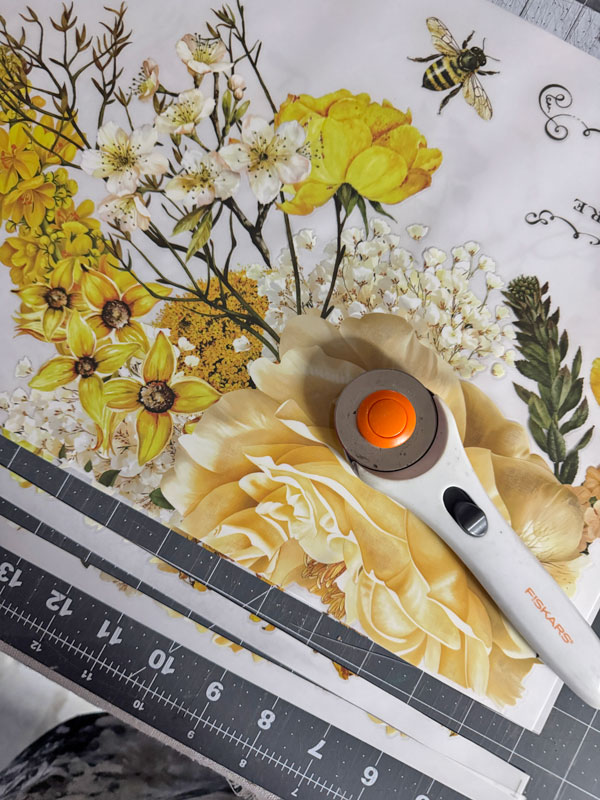
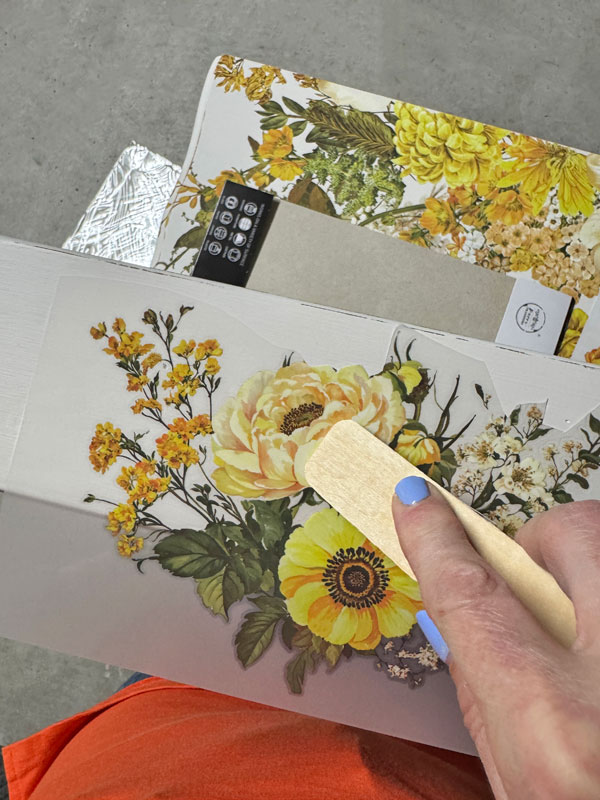
Then, I started adding my transfer. If you haven’t tried transfers before, they are pretty easy if you have a nice, flat surface like I have here.
HOW TO APPLY A TRANSFER:
- Remove the white backing
- Position the transfer where you want it
- Use the burnishing tool included to burnish (rub with pressure) the transfer to your surface
- It is best to start in one corner and pull the clear plastic layer on top away from the transfer as you go.
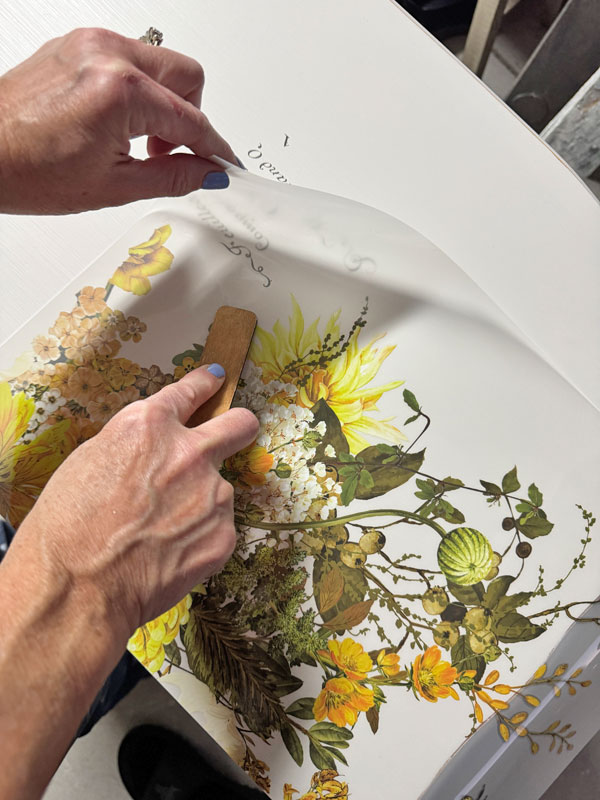
- If you get any pieces that stick to the clear plastic layer on top, lay it back down and burnish some more
It gets a little harder if you have moldings or trim you need to work around. In that case, you may need to cut your transfer into smaller pieces and match it up as you go to make it easier to apply.
Once I had the top done, I moved on to adding some to the drawer front.
Here is what the drawer that I filled the design in looked like after painting:
You can barely still make out the design. I could have filled that once more with mud, but I wanted to apply transfers there and I knew that would cover that right up!
However, I didn’t have enough of the Sunlit Serenade transfer, so I pulled out this smaller middy one called Yellow Bliss:
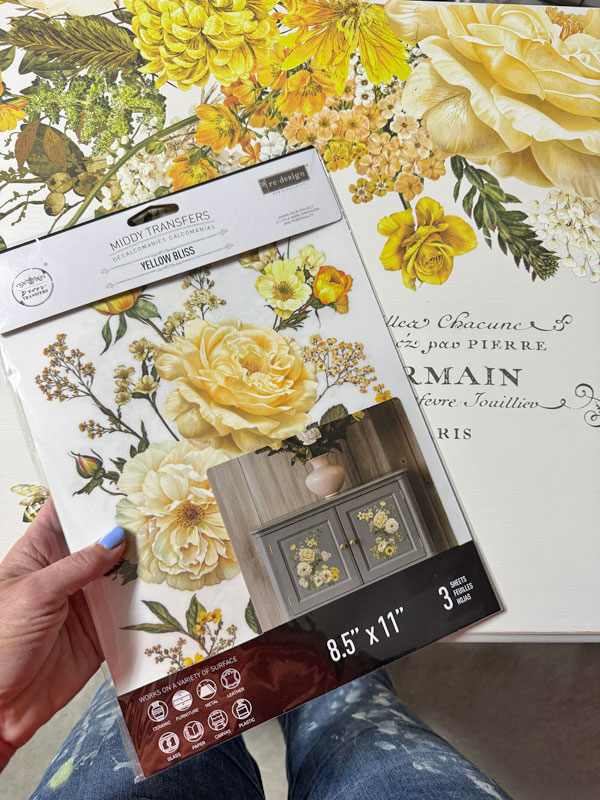
It coordinated perfectly!
Seal
The final step was to seal this table, and I did that with my favorite sealer, Clear Coat in satin, using the blue sponge applicator which makes it SO easy:
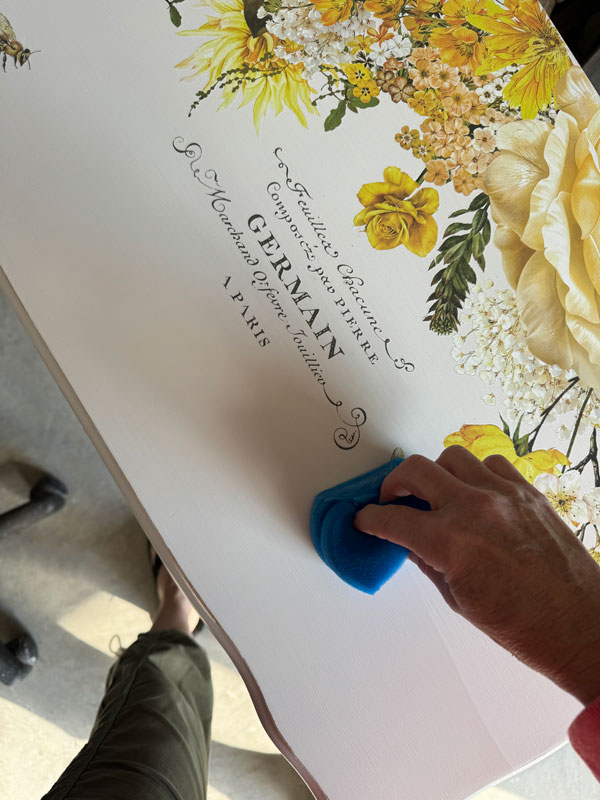
It comes round, but I cut the sides straight for easier handling and application. (You can do that easily with a good steak knife.)
I will get a ton of uses out of one sponge. Just rinse with water, squeeze out the excess and leave it to dry on a paper towel until next time.
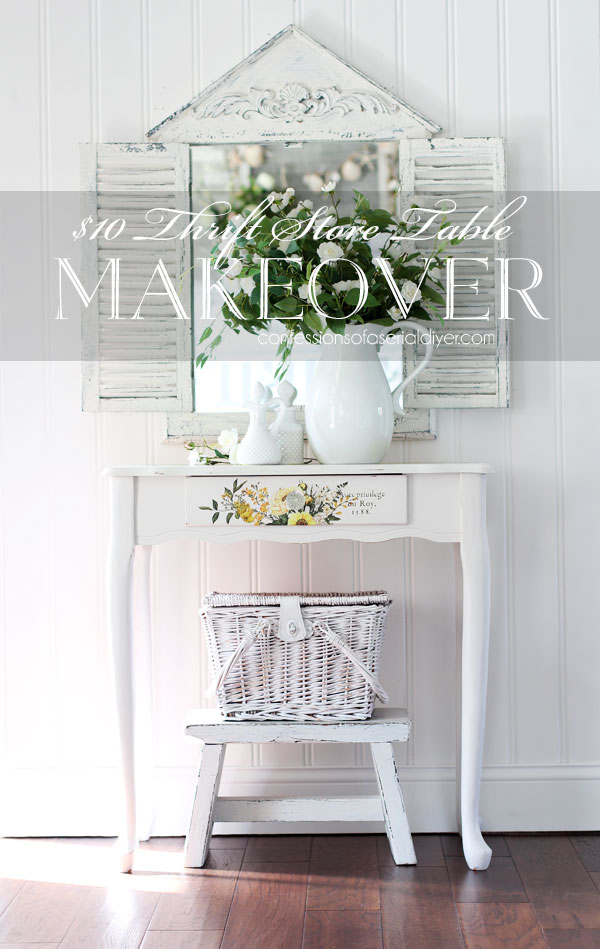
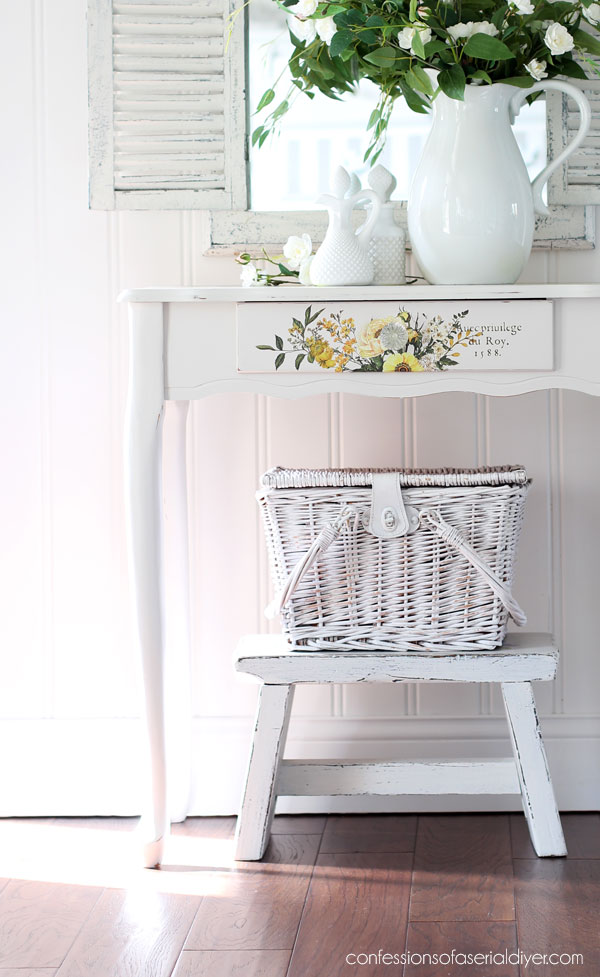
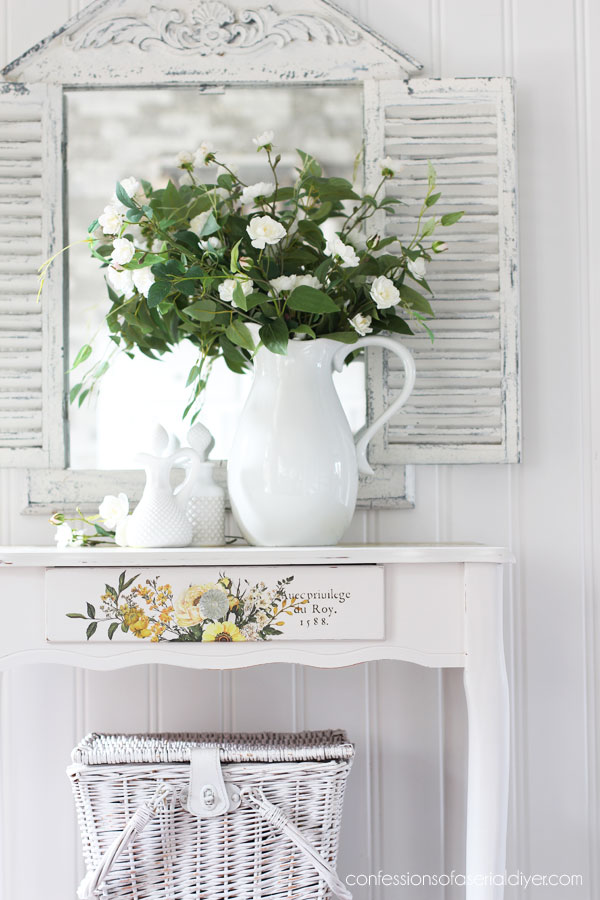
Trashed $10 Thrift Store Table Makeover Reveal
Here is how this little lady looks now!
Ok, let’s see the good part!
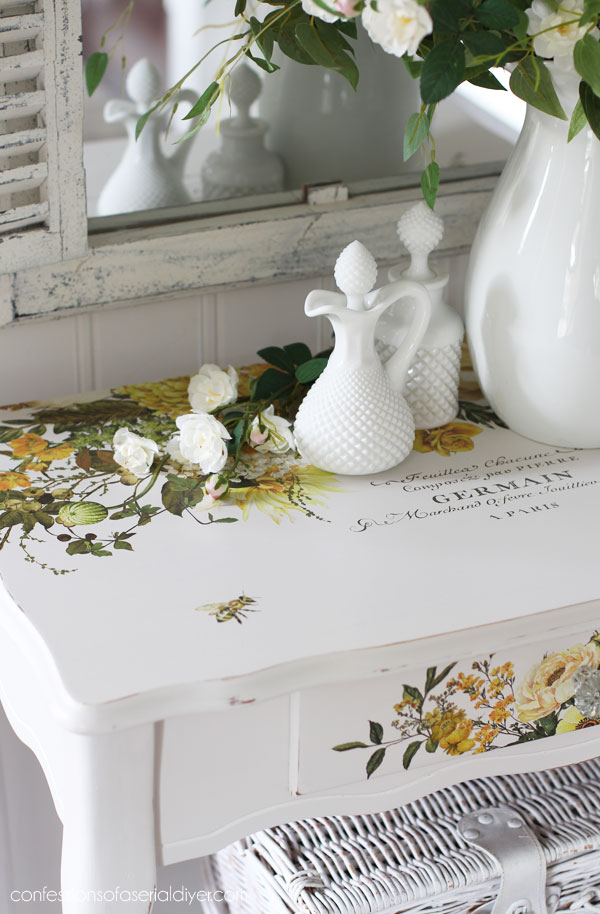
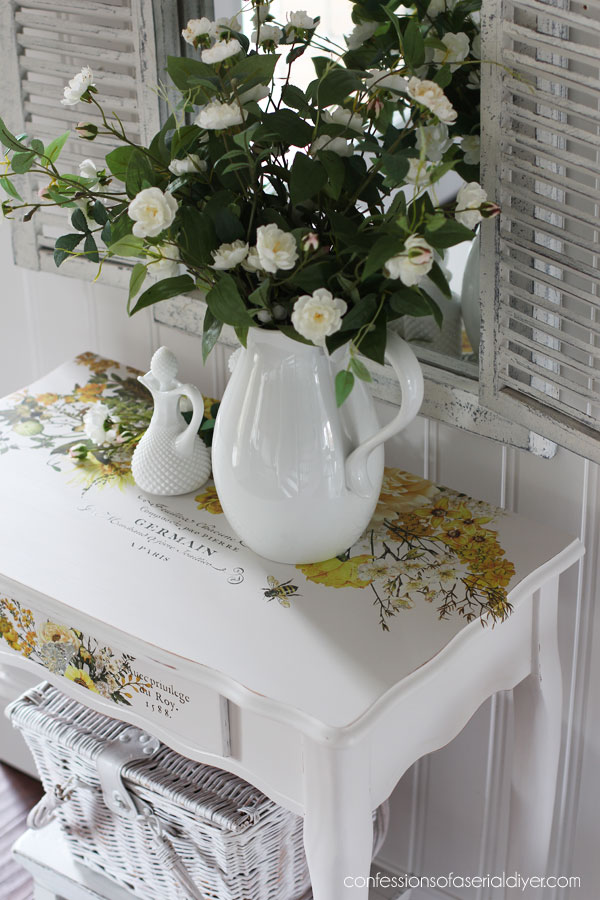
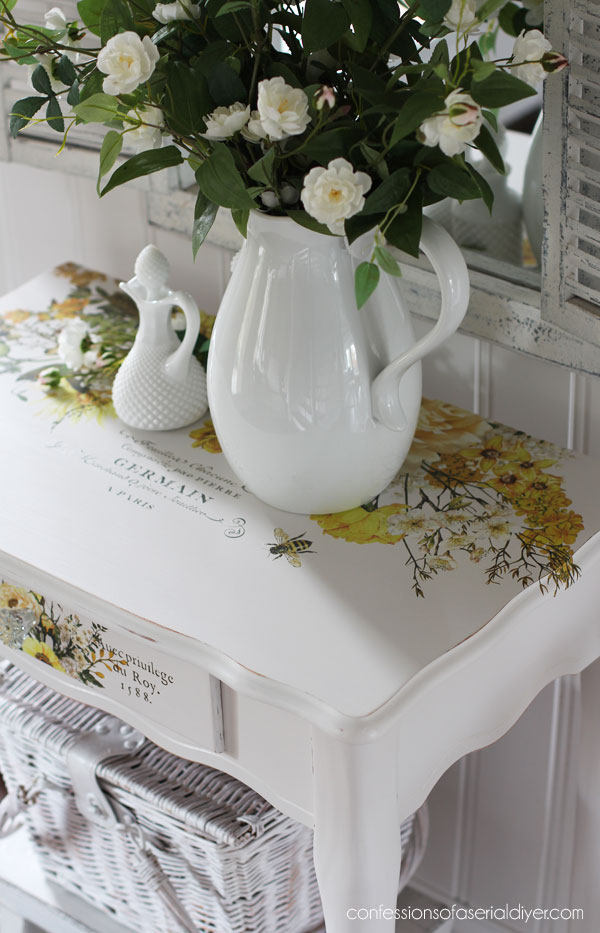
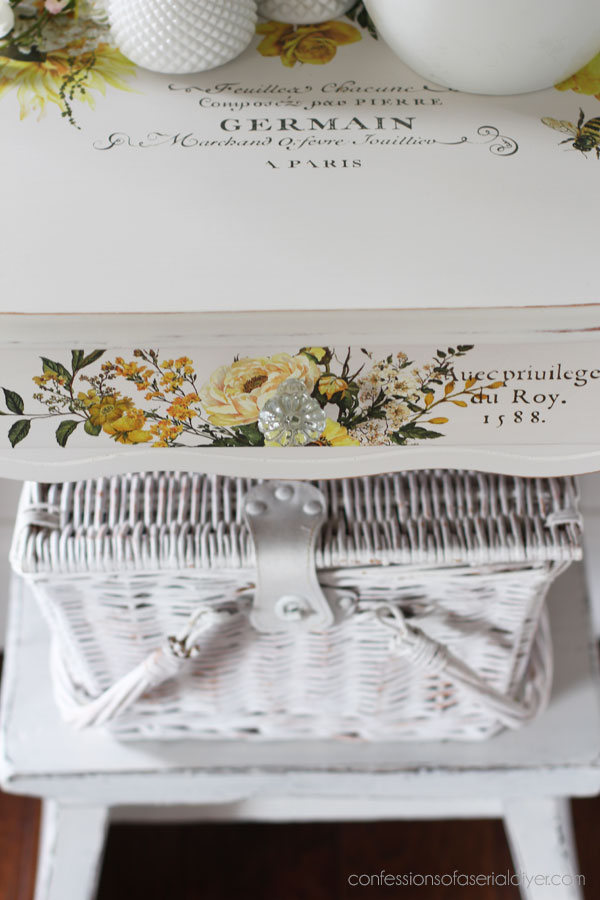
The top is where all the action is:
(And notice in that photo how that corner came back so nicely after gluing, adding a little filler, and sanding.)
And the top is so smooth.
And here it is without anything on the top:
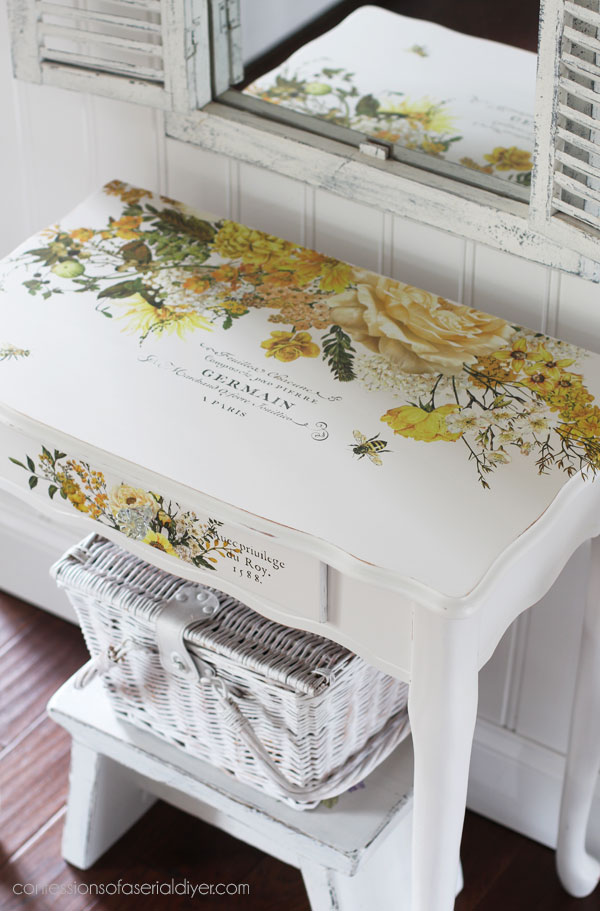
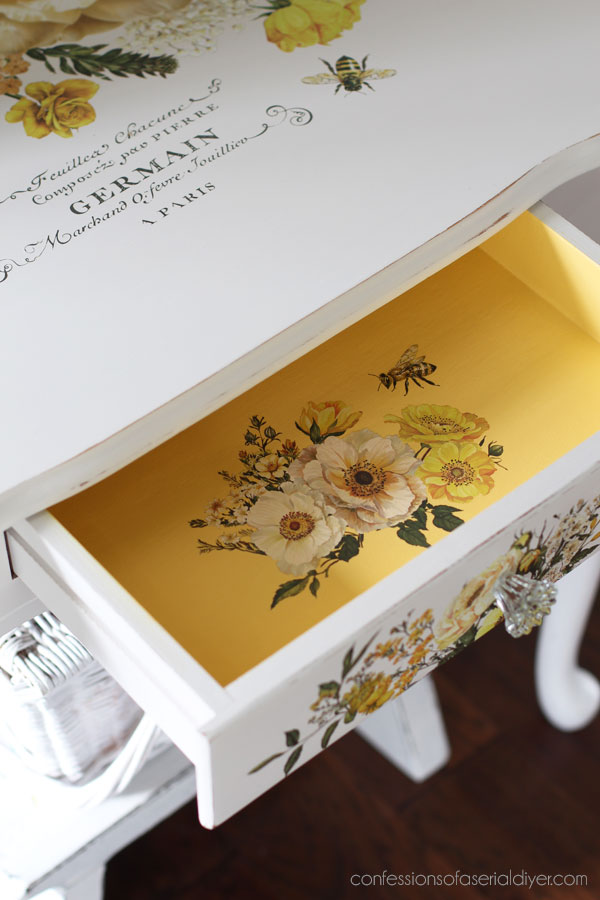
This transfer is so sunny and happy, and I just love the bees!

The drawer
The drawer looks great too considering I filled in that floral detail…
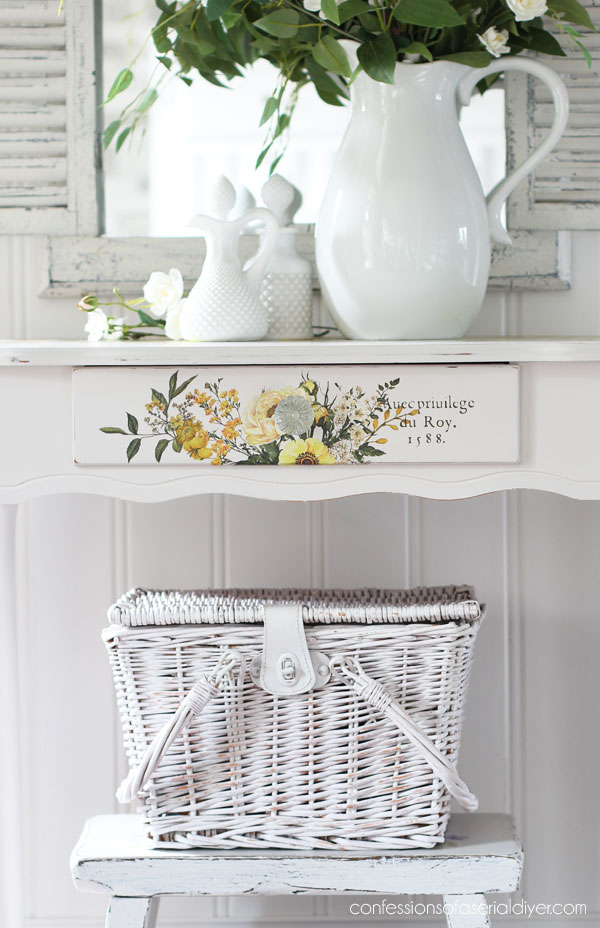

The glass knob is from Hobby Lobby.
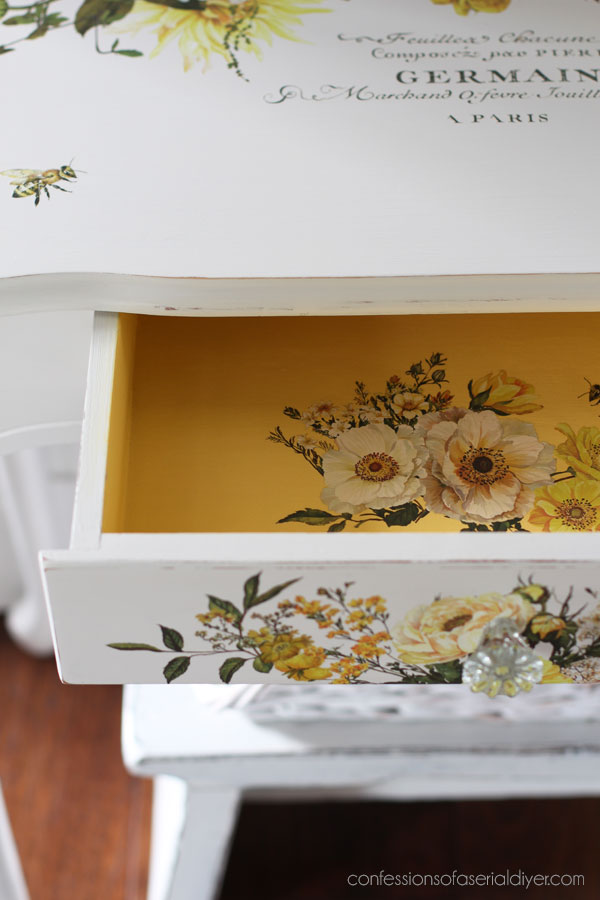
And here is the inside!
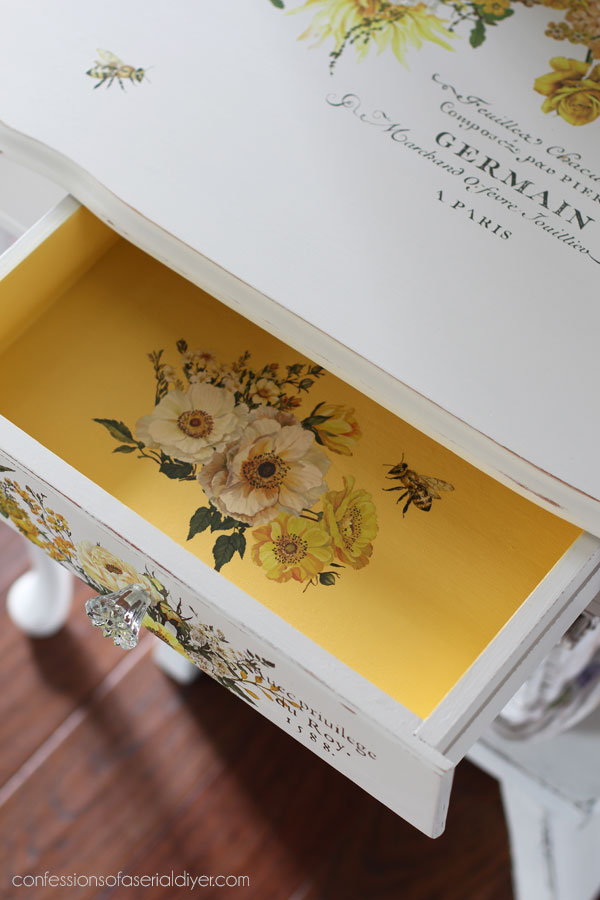
Y’all know I like to add a little something special to the drawers!
This one started with one of these fabric linings that I painted Fluff to begin with:
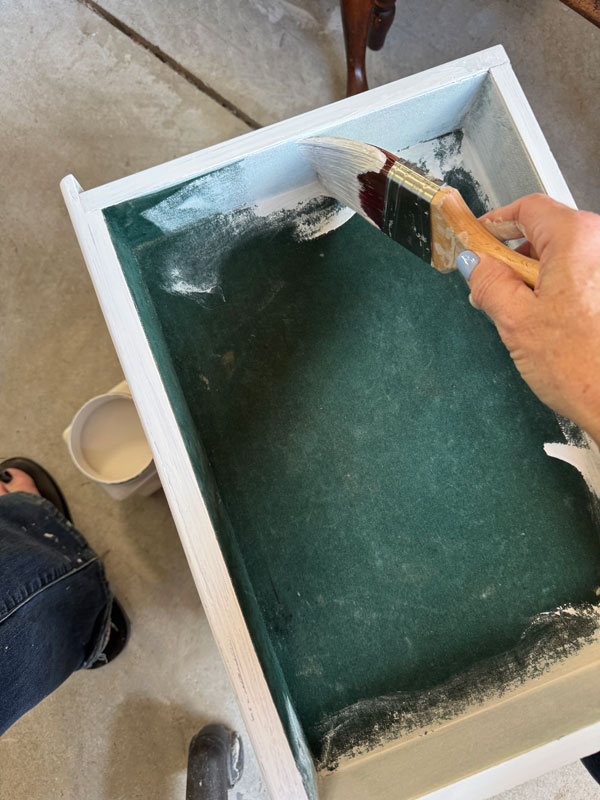
It actually took the paint quite well, but it really soaked it up!
I decided I wanted a splash of color and mixed up this sunshine yellow shade to coordinate with the flowers:
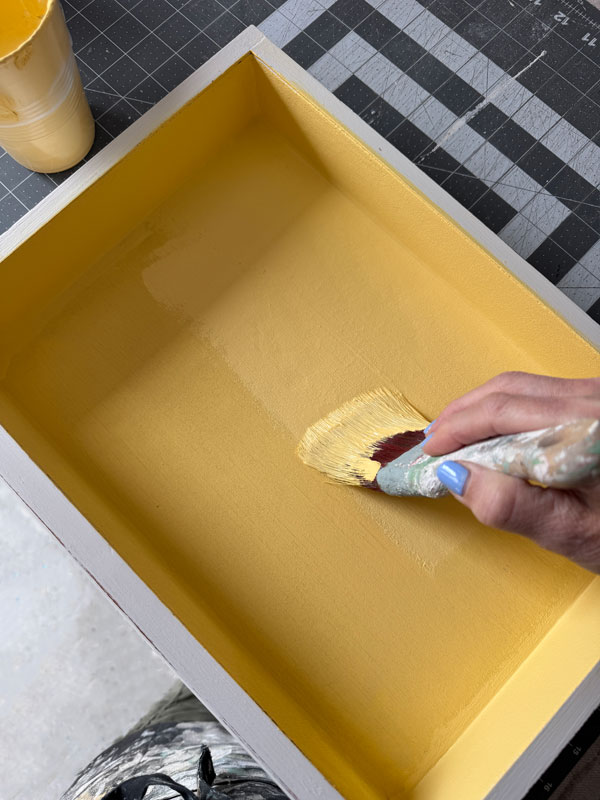
This is half Dixie Belle’s Daisy and half Cotton. You can see there that I gave it two coats.
Once it was dry, I added some flowers in there too and then sealed that with Clear Coat in satin as well.
This little table never knew it could be so cute!
Paired with a white chair and a mirror, and it’s a great place to pretty yourself up in the morning. Or, it could be used as a night table or even in an entry!
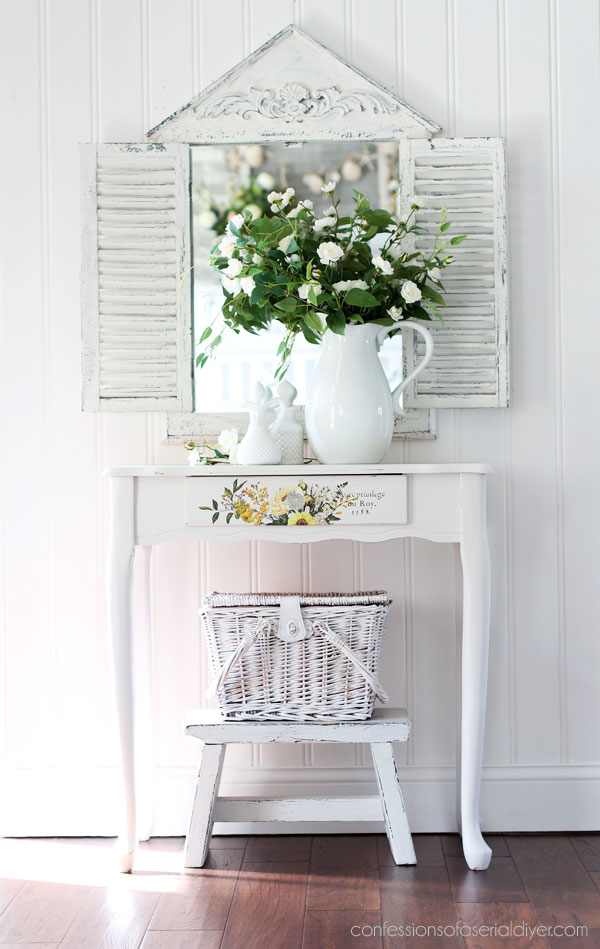
It’s sure to add some cheer no matter where it ends up!
Don’t forget to see what my friends have for you today!
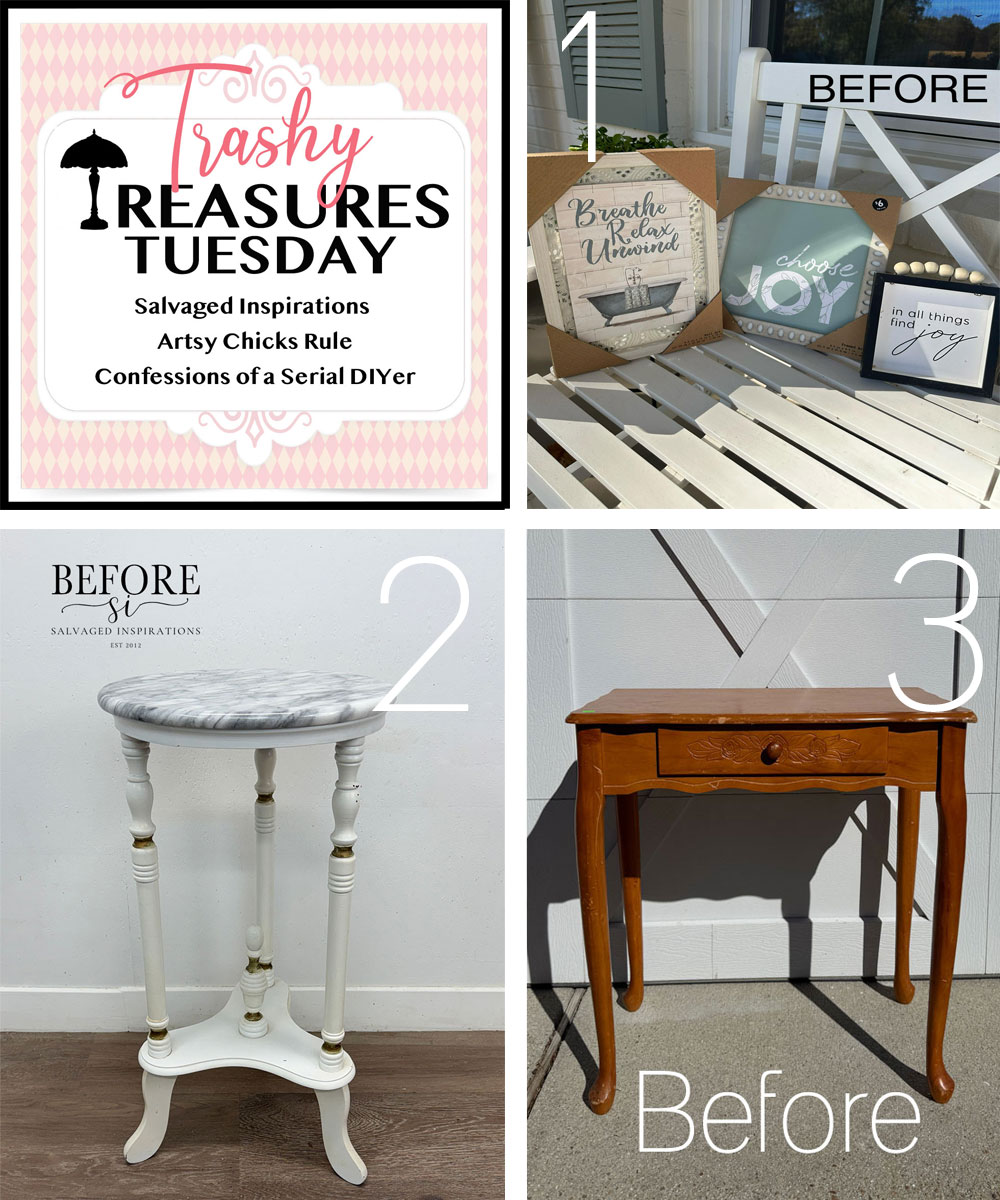
2. Denise’s Marble Top Plant Stand Makeover
3. Me! So glad you’re here! 😀
And that is another one done!!
See what I’ve completed so far below:
Round Wooden Storage Case
Washstand Cabinet Makeover
Vintage Mahogany Dresser Makeover
I’ll be back on Thursday sharing what I did with this simple chair:
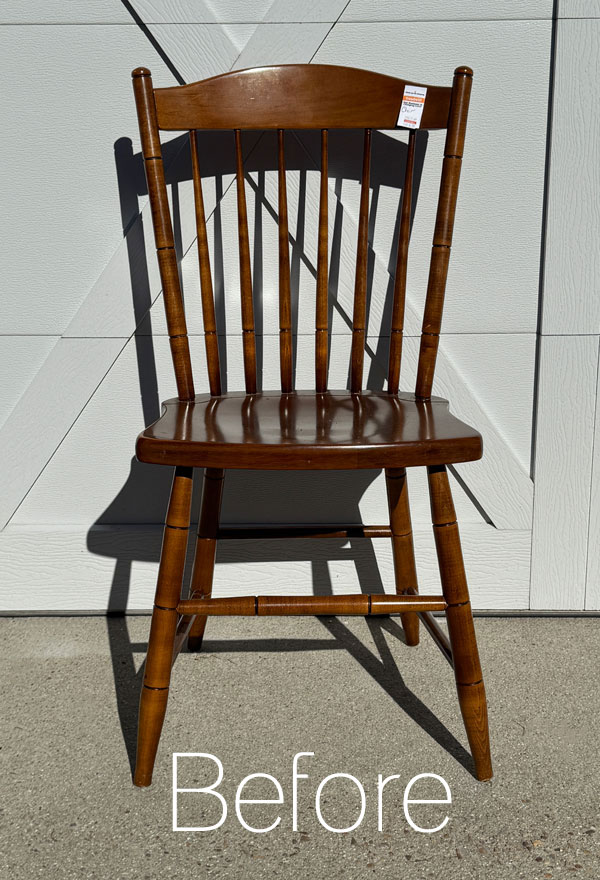
UPDATE: Guess what color I painted this chair and then go see if you’re right HERE!
Have a lovely weekend!
XOXO,

Don’t Miss a Thing!
If you like what you see, there are several ways to follow along!
EMAIL * INSTAGRAM * FACEBOOK * PINTEREST


Get FREE SHIPPING on all orders over $50. No code needed at checkout! Orders under $50 always enjoy $8 flat rate shipping! Most orders ship same or next business day!


Mary Kaiser says
Oh it is adorable now! I love how it turned out! So sunny an bright! The yellow and flowers in the drawer are so fun, and the bees are so cute! She is a beauty now and someone will be so luck to have this piece in their home!
Christy says
Thank you, my friend! I don’t play with yellows too often, but I love how happy it is! XOXO
Janice Redden says
Christy, this one is definitely a cutie. The perfect little hall table that says “Welcome Home!” at the end of a busy day. You always find the perfect finish. A happy ending for the once sad little table.
Christy says
Aww thank you, Janice! Yes, such a welcoming little piece that now has several more years in it! XOXO
Cecilia says
What a great makeover! I’m not sure I’ve seen that much Dixie Mud added to a piece, lol, but it took care of all the dings! Love the yellow flowers and the bees! And of course, the drawer needed a special touch! Sunny yellow and more flowers ( plus a bee 🥰), just gorgeous. Love this one!
😊Cecilia
Christy says
Thank you, Cecilia! I’m so glad you enjoyed it! Yes, the top had so many scratches that it needed all the Mud ha ha! XOXO
Abbe Kemack says
🎼You can do magic, you can do anything…🎶🎤
Happy Fall that feels like Winter even here in Florida.
😁Abbe K❤️
Christy says
Thank you, Abbe! We woke up to snow here this morning…what a crazy drop in temps! I was working in flip flops this past weekend lol! XOXO
Jewels L says
Normally I don’t care for yellow however, this was a game changer! So fresh and pretty. Love it.
Christy says
Same! I rarely use yellow in my makeovers, but this is just so happy! Thanks, Jewels! XOXO
Charleen says
What a wonderful surprise. Love the inside of the drawer. It’s cuter than a bugs ears….,! You never cease to amaze me. Thank you for all the forgotten pieces that you bring back to a useful life(to be useful again). Take care.
Christy says
I’m so glad you like it, Charleen, thank you! It is sitting here in my office and it is such a happy piece! XOXO
Cyndi says
Soooo pretty!!
Christy says
Thanks so much, Cyndi! XOXO
Mari says
I love your placement of the transfers….especially the top!
By the way, Your links to the sites dont work.
Christy says
Thank you, Mari! The links are working for me…weird! XOXO
Mari says
No, still not working here. In fat nine of your previous ones are either. I’ll have to check my settings.
Christy says
Oh no…I hope you figure it out!
Liz Shivel says
Beautiful, as usual,, Christy! I have a “butter yellow” painted bedroom, so this piece would definitely be at home there! 🌻
Christy says
Thank you, my friend! Oh yes, it sure would. I bet it is such a happy room! XOXO
Denise - Salvaged Inspirations says
This makeover puts a smile on my face. The yellow floral transfers and the surprise yellow drawer – so cheerful – like a dose of sunshine. Beautiful Christy! Pinned XOXO
Christy says
Oh yay! It is such a happy piece for sure! Thank you, my friend! XOXO
Kathy Owen says
Your attention to detail is amazing. Beautiful work. I love the yellow!
Christy says
Aww thank you, Kathy! I don’t use yellow very often, but I really enjoyed it here! XOXO
Tia Trevallion says
Beautifully done! As always, I love, love, love the inside of the drawer/s. They always look so nice it makes you not want to put anything in them and just leave them pulled out and open. LOL
Christy says
Thank you so much, Tia! I love a surprise drawer ha ha! And so true…I wouldn’t want to put anything in there either! XOXO
Gladys says
That table with it’s scratched condition turned into a lovely piece of furniture. The yellow transfer is just right. Thank you for sharing your talents with us.
Christy says
I’m so glad you enjoyed it, Gladys, thank you! It sure did need some love! XOXO
Mary says
Oh my, she is breathtaking now! I wished I lived closer to you..I would love this piece in my home! You do miracles with your transformations…Beautiful job, Christie!
Christy says
Aww thank you, Mary! I appreciate that so much!! XOXO
Rebecca Payne says
I love this post. Awesome job.
Christy says
I love that you enjoyed it, Rebecca! Thank you so much! XOXO
Jackie C says
this piece makes me happy. So pretty and that drawer set the whole thing off. Love it.
Christy says
Right? Yellow is such a happy color! This is in my office right now and it makes me happy just having it near ha ha! Thank you, my friend! XOXO
p says
You had snow… ?? Crazy. I live just north of Denver, and no snow yet here. I previously lived south of Chicago – they had a serious lake effect snow storm recently. But gone right after.
I don’t do a lot of yellow either – but some yellow touches are always so sunny and happy 🙂 This is such a happy piece now.
I Love how you did the drawer inside ! Now that is a happy surprise. Gotta love the bee !
You had to use Sooo much mud ! Could never tell that now.
Yes – that broken corner looks perfect !!
Christy says
Yes! Can you believe that? We hardly ever get snow here, and never in November. I was wearing flip flops and a tank top while working on this table outside this past weekend ha ha! I don’t usually do yellow, but this really is just so happy! And yes…it needed all the Mud lol, and I was amazed that corner came back together so nicely too! Thank you, P! XOXO
Michele M. says
Oh my gosh it is DARLING!!!!!! You did such a great job transforming that ugly ducking into a beautiful swan, Christy! Absolutely adore it now.
Christy says
Aww thank you, Michele! I loved seeing this little table come to life! I hope your week is off to a great start! XOXO
Robin says
That is the happiest makeover I’ve seen, Christy!!! The inside of the drawer takes the cake. It will be sold in a NY minute.
Christy says
Aww thank you so much, Robin! I’m so glad you enjoyed this happy makeover! XOXO
Lizzy says
What a sweet little table. I love it!
Christy says
Thank you, Lizzy! It’s such a happy piece! XOXO
Rose Lefebvre says
SUCH A LOVELY LITTLE TABLE THAT COULD BE USED IN SO MANY WAYS!
Christy says
Thank you, Rose! Absolutely! XOXO
Nancy @ Artsy Chicks Rule says
That turned out so pretty, Christy!! The yellow is SOO happy!! xoxo
Christy says
Thank you, my friend! Yes, this piece is sitting here in my office and it is so cheery! XOXO
Mariele says
The wood glue in a syringe is genius!
I liked the motif in the wood, but I can completely understanding filling it in – this guy was is very roughly shape, and I’m sure trying to preserve it would have been difficult. You did a beautiful job on this one. So sunny and happy. 🙂 Thank you for sharing another beautiful makeover!
Christy says
I’m so glad you enjoyed this one, Mariele, thank you! The wood glue in the syringe works so well, and I just saran wrap the top and keep it store in there for next time! XOXO
Trish says
Beautiful job! Such a great little table now.
Question, did you remove the drawer lining after you painted it white or did you paint the yellow on top of the white painted lining? The transfers seem to adhere to different textures well. Thank you for sharing your beautiful work with us.
Christy says
Thank you so much, Trish! I painted yellow over the white. It is still lined under there. The lining was adhered so well that painting it was just easier, and yep, the transfer still transferred nicely! XOXO
Rhonda Childress says
Absolutely gorgeous!
Christy says
Thanks so much, Rhonda! XOXO
Sherri Sharp says
Love this, I am so nervous about trying to do a transfer. Don’t want to waist it!!
Christy says
Thank you, Sherri! You can totally do this, especially on a flat surface like this table. Practice on something small first. I hope you give it a try! XOXO
Debra Hubbs says
Love this!! Perfect.
Christy says
Thank you, Debra! XOXO