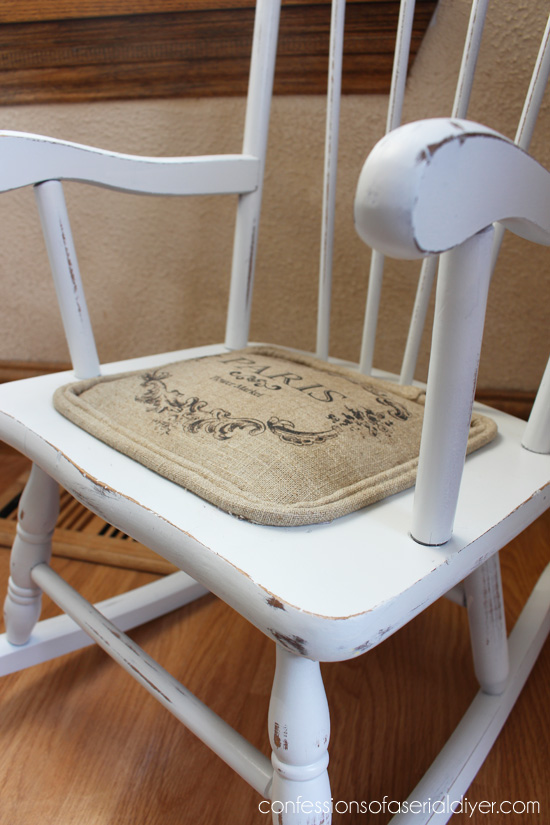
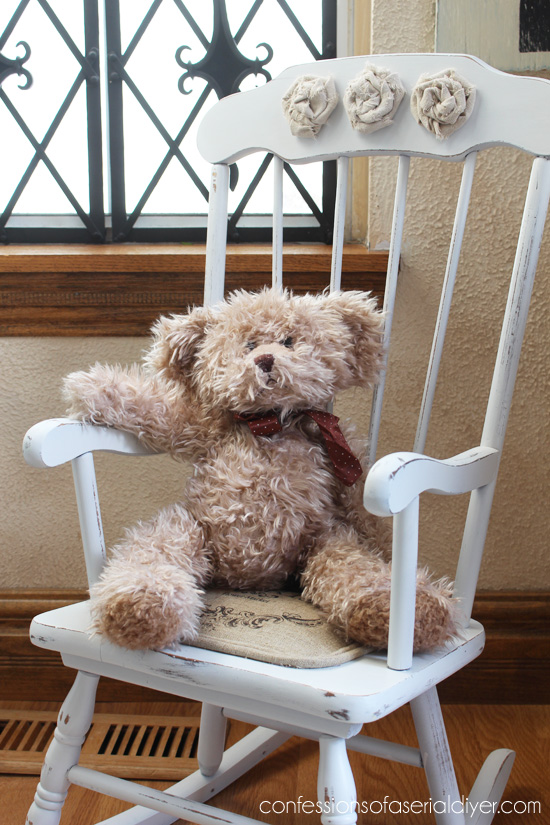
Guess what day it is? It’s Themed Furniture Thursday! My painting pals and I share a furniture makeover around the third Thursday of every month and this month’s theme is chairs. Pretty simple, right? I chose to redo this little rocking chair I picked up at the thrift store for $4:
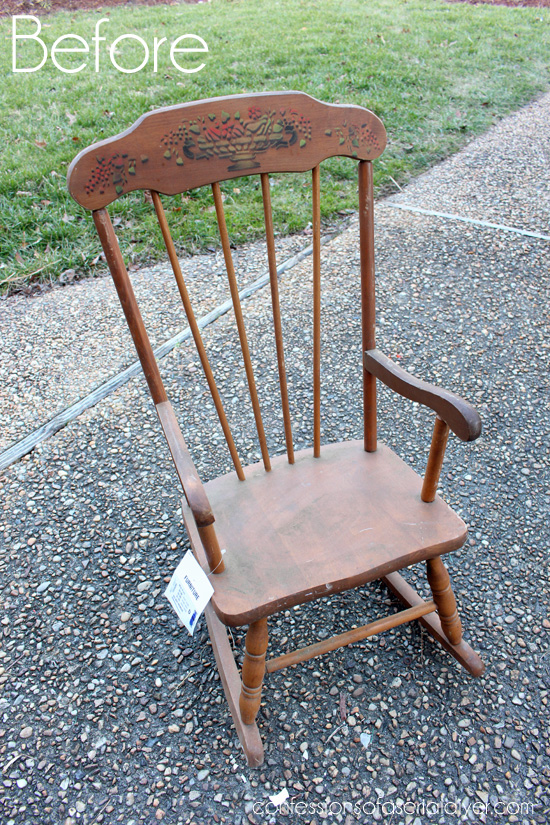
A little country charmer at one point, I’m sure.
I decided to give it a shabby little makeover:
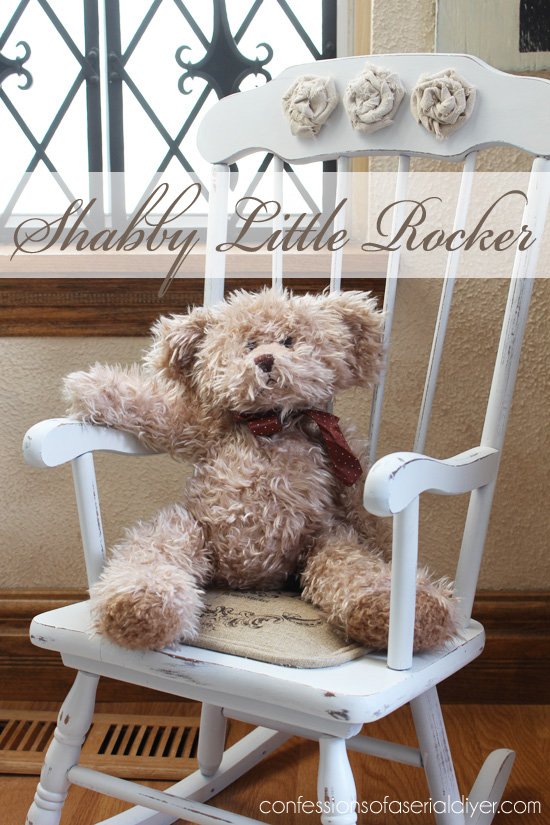
I used spray paint for this one. I wasn’t looking forward to painting all the spindly parts and this really had no finish on it. I spray primed first, followed by two coats of Rustoleum’s Blossom White in Satin. Then I gave it a little sanding here and there.
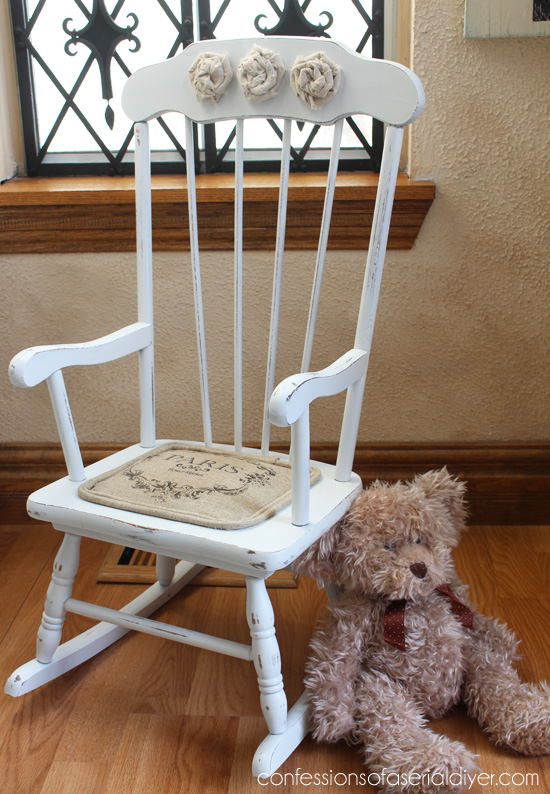
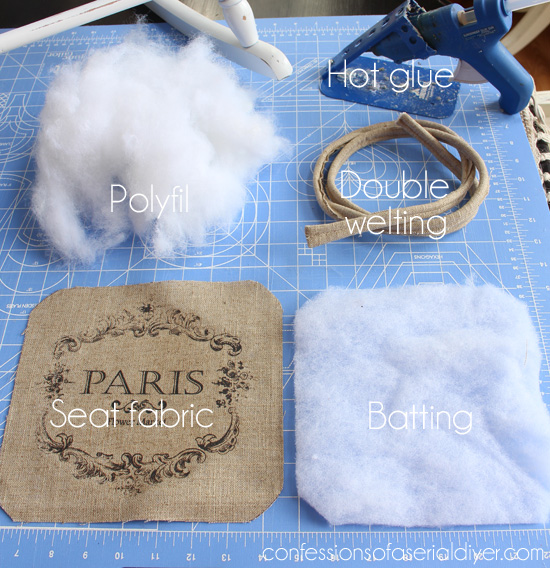
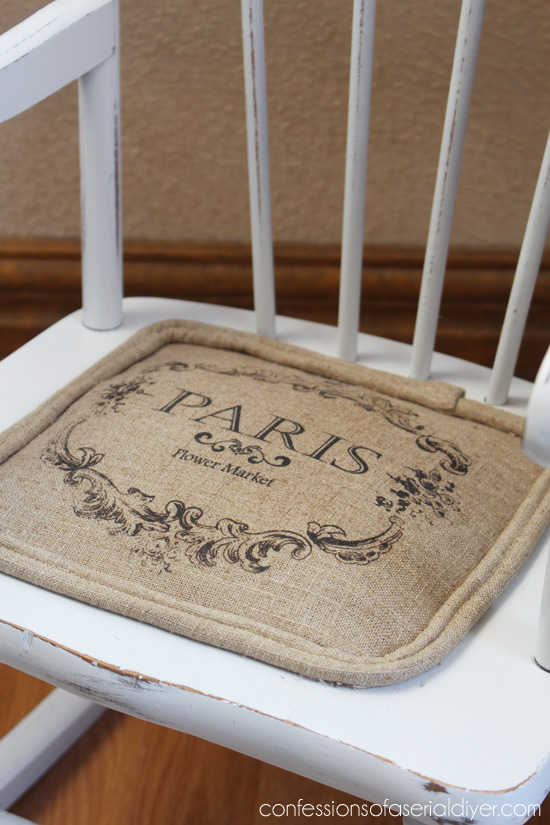
I was originally going to make a chair cushion with a pleated skirt, but I would have had to work around the arms for that, so I decided to add some padding to the seat instead.
This was a piece of scrap linen I had leftover from another project. I used Lesley Riley’s TAP (Transfer Artist Paper) (affiliate link) to transfer these graphics to it.
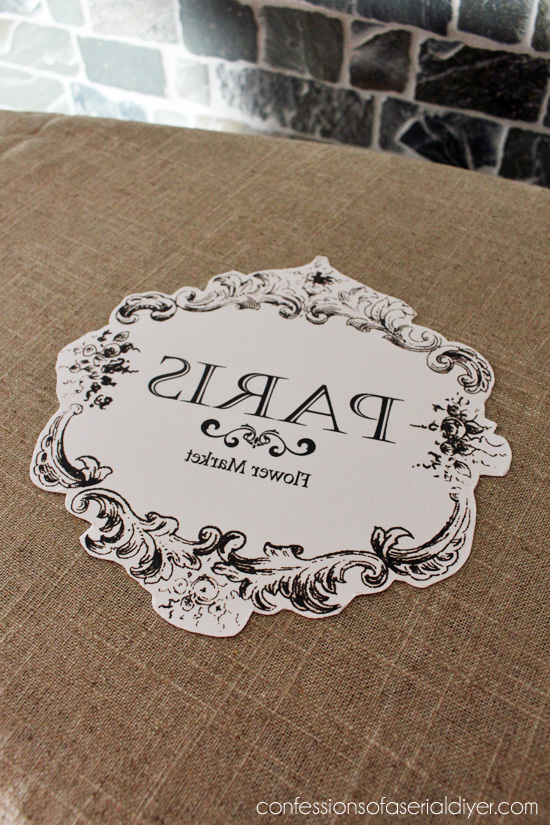
Just print in the reverse, cut around the edges, and iron to transfer the image. You can see more here where I used this graphic before. I found it online, but it was not linked to anyone. It may have originally come from The Graphics Fairy.
It transferred beautifully to this piece of linen:
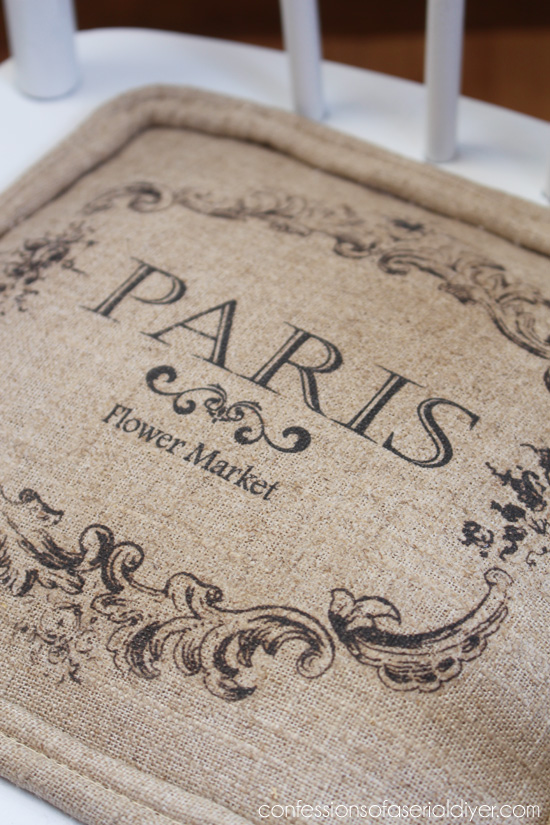
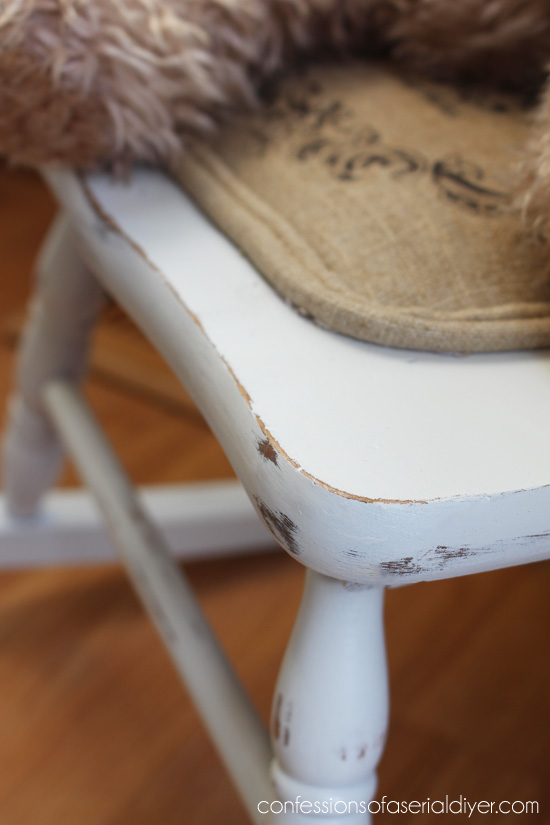
Adding the padded seat was simple. I’m not sure how this method would do for an adult-sized piece, but it is perfect for little chairs intended for little behinds!
Here’s what you’ll need:
And so easy it is to do: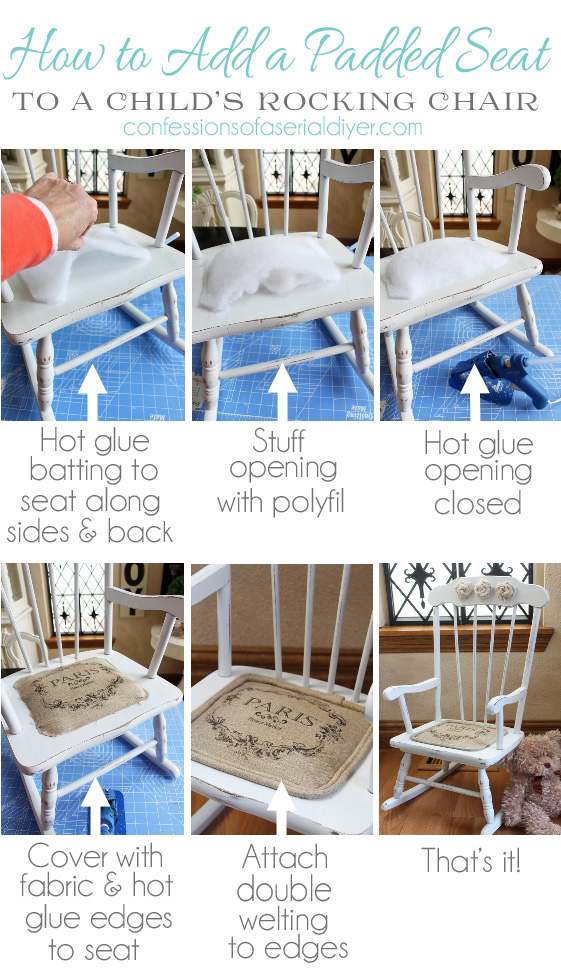
Here is also my tutorial for making double welting:
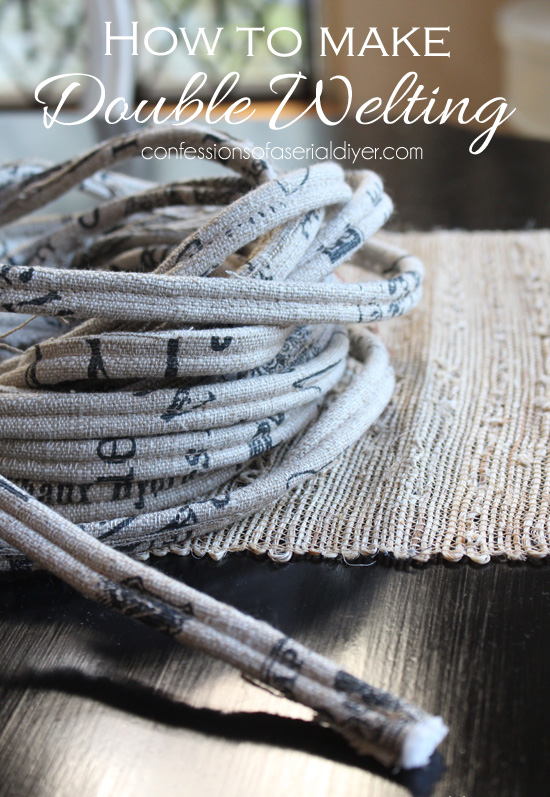
I used hot glue to add the welting.
I think this little chair is so sweet now.
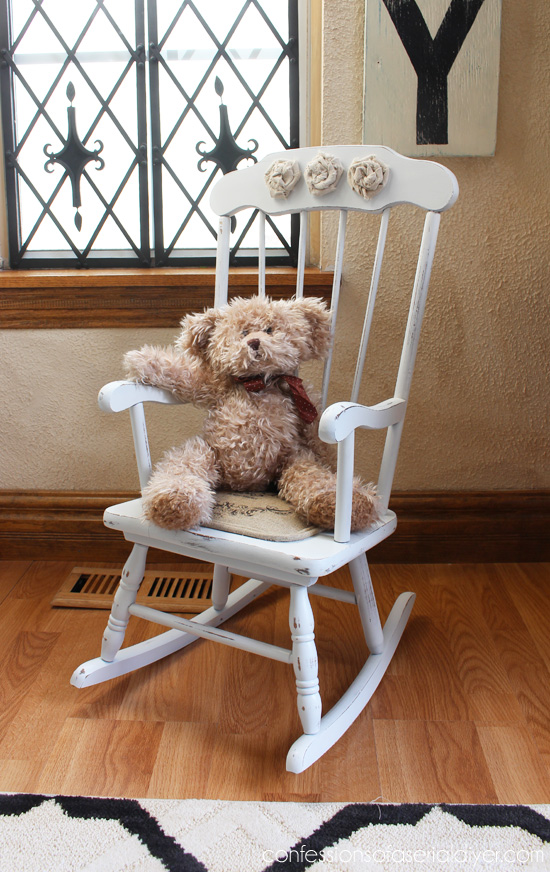
I had a few rosettes left over from my Rosette Framed Mirror, so I added them to the back:
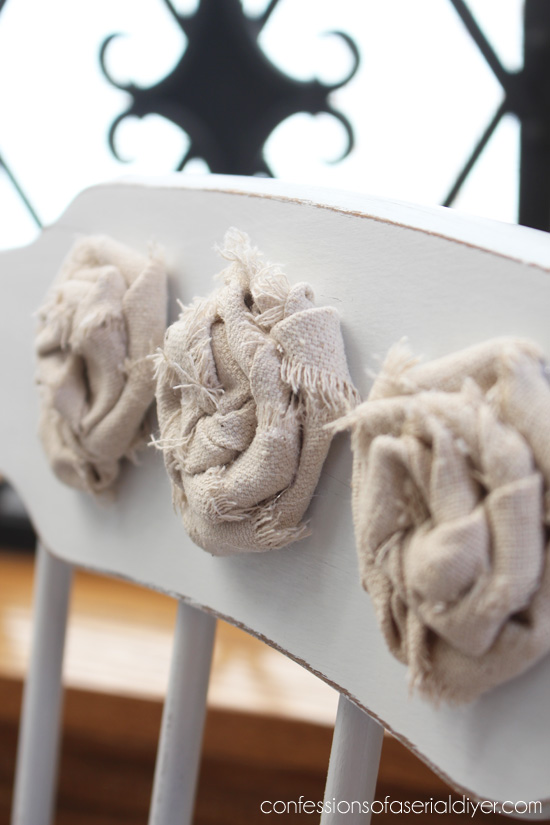
This would go perfectly in a room with that mirror!
In case you missed any, here are my previous themed furniture makeovers:
1. $5 Yard Sale Chair Makeover (Bold)
2. Mini Drop Cloth Rosette Stool (Travel)
3. Flower Stenciled Side Table (Flowers)
4. Thrift Store Side Table Goes Glam (Metallic)
5. Duck Egg Blue and White China Cabinet (Two-toned)
6. Sewing Chair with a Secret Drawer (Numbers)
7. Decoupaged Paper Mosaic Rolling Cart (Decoupage)
8. Desk with French Graphics (Letters)
9. French Secretary Desk (Inspired By)
There’s so much more inspiration from my talented friends below!
Looking to update a chair anytime soon?
XO,
![]()
Don’t Miss a Thing!
If you like what you see, there are several ways to follow along!
Email * Facebook * Instagram * Pinterest * Twitter


heather j says
This is so adorable….I LOVE the seat padding and rosettes. They are the perfect finishing touches! I love when I get a notification that you added some thing because I know it’s going to be amazing whatever it is. You have been creatively blessed:) thanks for sharing!
Larissa ~ Prodigal Pieces says
Ooh, I’m drooling over than linen transfer! Great job giving new life to that worn out rocker, Christy. 😉
Heather @ Viral Upcycle says
The chair is adorable and the rosettes and seat cover are very fitting. I did a chair exactly like that this past summer for a client. I recognize the fruit pattern inlay on the back. Can’t wait to see your 31 days projects! Oh, did I ever tell you what a hard worker you are!?!
Christy K. James says
I’m sure that fruit pattern was a hit at one time, but not anymore lol! I haven’t been working at all lately with all this snow! I’m starting to have withdrawals ha ha! I’m sure you guys are tired of it too. March will be fun for sure. 🙂
Christina says
Christy, this is adorable! I love the rosettes and the details. I laughed when I read your reason for using spray paint. Oh yeah! This would be great as a full-size rocker as well. Yay Christy!!!
Christy K. James says
Thanks, Christina! Yes, those spindles can get the better of you ha ha! XO
JP says
What a beautiful job and tutorial….I pinned it to my inspirations board!
JP
Christy K. James says
I’m so glad you like it, JP! 🙂
Melody @ My Passion For Decor says
What a great idea! I’ve seen so many kid’s rockers, but never one as lovely as this!
Christy K. James says
Thanks so much, Melody! XO
Therese @ Fresh Idea Studio says
Christy, you cute little rocker ROCKS! I love, love, love the little rosettes.
Christy K. James says
Thanks, Therese! XO
Mary says
This chair is so sweet and adding that little cuchion just finished it off Love…
Christy K. James says
Thanks, Mary! Hopefully it will be loved for years to come. 🙂
Paula@SweetPea says
This rocker is now perfect for a little girl’s room. I love the padded seat you added with the transfer and the sweet rosettes you added to the top. Perfection!
Christy K. James says
Thanks so much, Paula! It would be so fun to decorate a little girl’s room. 🙂
Marie@The Interior Frugalista says
That is one sweet rocking chair makeover! Love the chair pad and appreciate the tutorial (which I have pinned). Christy where do you buy the Lesley Riley’s TAP paper? I just refinished the adult version of that exact chair last week for my daughter who is due with her first baby in early April. Now I’m thinking I need to cushion it with a sweet pad!
Christy K. James says
Thanks, Marie! I buy online from Amazon. It’s a bit pricey, but it is awesome on fabric!
Linda @ Mixed Kreations says
It turned out beautiful! I love the shabby look, and your seat cushion looks great. And love how you added the Rosetts. Nice job!
Christy K. James says
Thanks so much, Linda! Hopefully it will be enjoyed for years to come now. 🙂
MaryJean says
Christy, I just looked at your sectional makeover, yikes! I don’t know if I would try something like that. Especially if it was brand new to begin with. I could just hear my husband now. “You want to what?” It did turn out beautiful! Kudos to you on a job well done!
I have this wall that I . . . hmmm (pondering) 😉
Christy K. James says
Thanks, MaryJean! Ha ha I think I was at the point of ditching the entire sectional because it was so not functional! In the end, this saved spending a bunch more money. Also, the store where I purchased this sofa still sold this particular one and if it didn’t turn out, I could just buy the piece I needed. I’m happy to report it’s holding up great! 🙂
Breanna says
This is seriously so cool! I love the addition of the little seat and the rosettes! Definitely going to remember those tutorials 🙂
andi says
Awww…so cute! And I’m in love with that teddy bear. 🙂
-andi
Julie (Being Home) says
This is too darn cute! I am actually on the look out for a rocking chair. I use to nurse my little guy in one all the time and read stories. He stopped sitting in it for a while and I gave it away a few years ago. Since December, he has been wanting one. He is very kinesthetic, so a rocking chair is perfect for him. I am trying to find one that will go with his room decor, but not pay a lot of money.
Thank you for the chair pad break down. It makes sense and easy to follow. 🙂
Say, can you recommend a vinyl patch kit? I have two chairs I picked up at a Restore and they need some very minor vinyl repair.
Christy K. James says
Thanks, Julie! I gave my son’s rocker away too to make more space in his room, but I miss it! I haven’t had to repair vinyl before, so I’m sorry I’m no help. XO
Nancy @ Artsy Chicks Rule says
So cute Christy! I am with you, say no to hand painting spindly parts! 😉
Love the Paris seat you added too.
xo
Nancy
Christy K. James says
Yes exactly! This project was so fast using spray paint…I wish they were all like that! 🙂
Debbie says
Is there anything you can’t do! This is beautiful! What a cute makeover and I love the tap transfer paper too!
Debbie
Christy K. James says
Aww thanks, Debbie! That TAP paper is amazing! XO
Michelle Lepak @ Dandelion Patina says
So cute! I love the rosettes on the back! Nice transformation.
Christy K. James says
Thanks, Michelle! I thought this would be so sweet in a little girl’s room. 🙂
Wendi @ H2OBungalow says
This was so creative! Loving the added seat bottom, that was such a creative detail! You have me thinking of a project I want to do with those cute little rosette flowers. I’ve made them once and will probably burn the daytlights out of my fingers when I make them again:) Love them on your sweet little chair!
Christy K. James says
Thanks, Wendi! This was a fun makeover to do. I burned the begeez out of my fingertips the first time I did these rosettes on a stool, but it went much better the second time around. 🙂
Jeanette says
Christy, I’ve always loved your rosettes and that pad for the chair is stunning. I’m going to try the transfer paper on a project around here. I love the crispness of the transfer. Jeanette
Christy K. James says
Thanks, Jeanette! That transfer paper is fantastic!! XO
Christy @ Our Southern Home says
This chair is just precious. I’ve got to make some of those rosettes!!! LOVE!!
Christy K. James says
Thanks, Christy! The rosettes are so easy…I have to hold back from wanting to put them on everything lol!
Jen @ Girl in the Garage says
This is adorable, Christy! I am a little jealous that you can spray paint in February though… 😉 I would never have known how to make a seat pad like that – thanks for sharing your tutorial!
Christy K. James says
Thanks, Jen! I had a tiny window of opportunity to spray paint one day and did it as fast as I could lol! 🙂
Angie @ Postcards from the Ridge says
This turned out so pretty! The seat and the rosettes make it, for sure. You are one talented lady!
Christy K. James says
You’re so sweet! Thanks, Angie! XOXO